

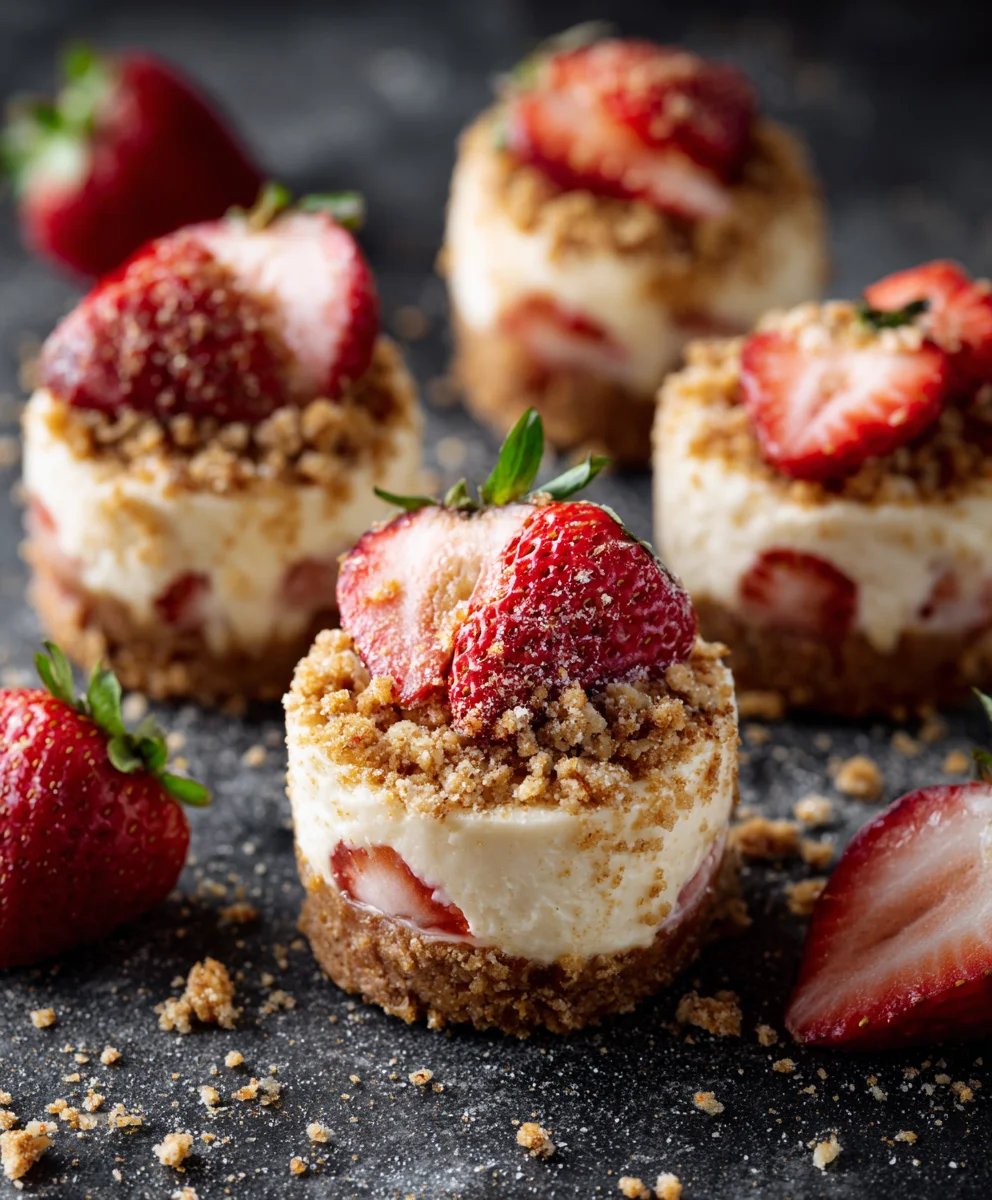
Mini Strawberry Crunch Cheesecake Bites are not just a dessert; they are a delightful revelation, offering a symphony of textures and flavors in every perfect, bite-sized package. Have you ever wished for a dessert that combines the nostalgic joy of a classic ice cream truck treat with the sophisticated allure of a perfectly crafted cheesecake? I certainly have, and that’s precisely what these irresistible bites deliver. While cheesecake boasts a rich history dating back to ancient Greece, evolving through Roman times to become the globally adored dessert we know, the “strawberry crunch” element brings a playful, modern twist that evokes cherished childhood memories.
I find that people absolutely adore these treats because they embody the best of both worlds. The luscious, creamy cheesecake base, often a symbol of indulgent comfort, pairs exquisitely with the vibrant tang of fresh strawberry, all crowned with an unforgettable, crunchy topping. This unique combination ensures each mouthful is an exciting journey for the palate – smooth, sweet, tart, and satisfyingly crisp. Perfect for gatherings, elegant enough for special occasions, yet simple enough for a weeknight indulgence, these Mini Strawberry Crunch Cheesecake Bites are designed for sheer enjoyment and effortless sharing. I am confident they will quickly become a cherished favorite in your recipe repertoire.

Ingredients:
-
For the Graham Cracker Crust:
- Graham cracker crumbs: 1 ½ cups (approximately 10-12 full graham cracker sheets, finely crushed)
- Granulated sugar: 2 tablespoons
- Unsalted butter: ½ cup (1 stick), completely melted
-
For the Creamy Cheesecake Filling:
- Full-fat cream cheese: 24 ounces (three 8-ounce blocks), brought to proper room temperature
- Granulated sugar: 1 cup
- Large eggs: 3, also at room temperature
- Full-fat sour cream: ½ cup, at room temperature
- Pure vanilla extract: 1 tablespoon
- All-purpose flour: 1 tablespoon (an optional secret ingredient that really helps prevent cracking!)
- Salt: A tiny pinch (about ¼ teaspoon)
-
For the Irresistible Strawberry Crunch Topping:
- All-purpose flour: ½ cup
- Granulated sugar: ½ cup
- Unsalted butter: ½ cup (1 stick), melted
- Strawberry gelatin mix: 3 tablespoons (from a standard 3 oz box, dry mix)
- Freeze-dried strawberries: ½ cup (about 0.5 oz package), crushed into small, irregular pieces
- Pink or red food coloring: 1-2 drops (optional, for a more vibrant color)
-
For the Optional Whipped Cream Topping (for serving):
- Heavy cream: 1 cup, very cold
- Powdered sugar: 2 tablespoons (or to taste)
- Vanilla extract: ½ teaspoon
Preparing Your Workspace and Oven:
- Preheat the oven and prepare your pan: Before we dive into the deliciousness, let’s get our oven ready. Preheat your oven to 325°F (160°C). Then, line a standard 12-cup muffin tin with paper liners. I prefer using sturdy liners for cheesecake bites, as they hold their shape better and make removal a breeze. If you don’t have paper liners, you can lightly grease each cup, but liners truly make the process much smoother for these Mini Strawberry Crunch Cheesecake Bites.
Crafting the Perfect Graham Cracker Crust:
- Crush the graham crackers: My preferred method is to place the graham cracker sheets in a large zip-top bag and crush them with a rolling pin until they resemble fine crumbs. Alternatively, a food processor works wonders for achieving a uniform texture quickly. You’re aiming for 1 ½ cups of fine crumbs, similar to sand. This fine texture is key for a cohesive crust.
- Combine dry crust ingredients: In a medium-sized bowl, combine the graham cracker crumbs with the 2 tablespoons of granulated sugar. Give them a good whisk to ensure everything is evenly distributed. This little bit of sugar adds just the right amount of sweetness to the otherwise plain graham crackers.
- Add melted butter: Pour the ½ cup of melted unsalted butter over the crumb mixture. Using a fork or your clean fingertips, mix everything thoroughly until the crumbs are moistened and resemble wet sand. Every single crumb needs to be coated; this is what binds our crust together and prevents it from falling apart when you bite into these delightful Mini Strawberry Crunch Cheesecake Bites.
- Press the crust into the muffin tin: Distribute the crumb mixture evenly among the 12 lined muffin cups. I usually use about 1 ½ to 2 tablespoons per cup, depending on how thick I want my crust. Using the back of a spoon or a small, flat-bottomed glass, firmly press the crust down into the bottom of each liner. The firmer you press, the less likely your crust is to crumble during serving.
- Pre-bake the crust (optional but recommended): While some recipes skip this, I find that a quick pre-bake sets the crust beautifully and prevents it from becoming soggy. Bake the pressed crusts in your preheated oven for 5-7 minutes, just until they’re lightly golden and fragrant. Remove them from the oven and set them aside to cool slightly while you prepare the cheesecake filling.
Whipping Up the Silky Smooth Cheesecake Filling:
- Ensure ingredients are at room temperature: This step is non-negotiable for a truly smooth, lump-free cheesecake. Your cream cheese, eggs, and sour cream absolutely must be at room temperature. Cold ingredients will lead to a lumpy batter because they won’t emulsify properly. Take them out of the fridge at least an hour before you start, or gently warm the cream cheese in its wrapper in a bowl of warm water for a few minutes.
- Beat the cream cheese: In the bowl of a stand mixer fitted with the paddle attachment (or using a large bowl with an electric hand mixer), beat the softened cream cheese on medium-low speed for about 2-3 minutes. You want it to be incredibly smooth, fluffy, and completely free of lumps. Scrape down the sides and bottom of the bowl frequently to ensure even beating. This initial step is critical for a smooth cheesecake texture.
- Add sugar: Gradually add the 1 cup of granulated sugar to the cream cheese, beating on low speed until just combined. Increase the speed to medium-low and continue beating for another 2-3 minutes, scraping the bowl often. You want the sugar to dissolve into the cream cheese, making the mixture even smoother and lighter. Avoid overmixing, as we don’t want to incorporate too much air.
- Incorporate sour cream, flour, vanilla, and salt: Add the ½ cup of room temperature sour cream, 1 tablespoon of all-purpose flour, 1 tablespoon of vanilla extract, and the pinch of salt to the cream cheese mixture. Beat on low speed until just combined. The sour cream adds a wonderful tangy depth and extra creaminess, while the flour is my little secret weapon for preventing cracks in cheesecake by stabilizing the batter.
- Add eggs one at a time: This is a delicate step. Add the eggs one at a time, beating on the lowest speed possible just until each egg is incorporated before adding the next. Overmixing at this stage can incorporate too much air, which can cause the cheesecake to puff up in the oven and then fall and crack during cooling. After the last egg is just barely mixed in, give the bowl one final scrape to ensure everything is perfectly combined. The batter should be incredibly smooth and luscious.
Creating the Signature Strawberry Crunch Topping:
- Prepare the freeze-dried strawberries: If your freeze-dried strawberries are whole, gently crush them into small, irregular pieces. You can do this by hand or by pulsing them briefly in a food processor. We want some texture here, not a powder. Set aside.
- Combine dry crunch ingredients: In a medium bowl, whisk together the ½ cup of all-purpose flour, ½ cup of granulated sugar, and 3 tablespoons of dry strawberry gelatin mix. The gelatin mix not only gives these Mini Strawberry Crunch Cheesecake Bites their signature strawberry flavor but also a beautiful pink hue.
- Add melted butter: Pour the ½ cup of melted unsalted butter over the dry ingredients. Using a fork, mix until the mixture is crumbly and moistened. It should resemble wet sand, much like the graham cracker crust. If you’re using optional food coloring, add 1-2 drops now and mix until the color is evenly distributed and vibrant.
- Incorporate freeze-dried strawberries: Gently fold in the crushed freeze-dried strawberries. These add an intense strawberry flavor and a lovely textural contrast to the crunch. Spread the mixture evenly on a small baking sheet lined with parchment paper.
- Bake the strawberry crunch: Bake in your preheated 325°F (160°C) oven for 8-10 minutes, or until the mixture is lightly golden and fragrant. It should feel dry and crumbly when you touch it. You might need to gently stir it halfway through baking to ensure even toasting. Remove from the oven and let it cool completely on the baking sheet. It will crisp up further as it cools. Once cooled, break it apart into small crumbles if it has clumped together. This is the star of our Mini Strawberry Crunch Cheesecake Bites!
Assembling and Baking Your Mini Strawberry Crunch Cheesecake Bites:
- Fill the muffin cups: Pour or spoon the cheesecake batter over the pre-baked graham cracker crusts in the muffin tin. Fill each cup about ¾ full. I find using a small cookie scoop or a measuring cup with a spout helps to keep things neat and ensure even portions.
- Prepare for baking: Place the muffin tin on a larger baking sheet. This isn’t strictly necessary for mini cheesecakes like it is for a full-sized one with a water bath, but it adds an extra layer of protection against potential drips and makes handling easier.
- Bake the cheesecakes: Bake for 18-22 minutes, or until the edges are set and appear slightly puffed, but the centers still have a slight jiggle when you gently shake the pan. This slight jiggle is perfect; they will continue to set as they cool. Avoid overbaking, as this is a common cause of cracks in cheesecakes.
- Cooling process: This is a crucial step for preventing cracks. Once baked, turn off the oven, prop the oven door open slightly with a wooden spoon, and let the cheesecakes cool inside the oven for at least 30 minutes, or even an hour. This gradual cooling prevents a sudden temperature shock that can lead to cracking.
- Transfer to a wire rack: After the initial oven cooling, carefully remove the muffin tin from the oven and transfer it to a wire rack. Let the cheesecake bites cool completely at room temperature, which can take another 1-2 hours. They will continue to firm up as they cool.
- Chill thoroughly: Once completely cooled to room temperature, transfer the muffin tin to the refrigerator. Chill the Mini Strawberry Crunch Cheesecake Bites for at least 4 hours, but preferably overnight. Chilling is essential for the cheesecake to fully set, develop its creamy texture, and be easy to handle without falling apart. Patience is a virtue here!
Finishing Touches and Serving:
- Prepare optional whipped cream: Just before serving, if you’re making the optional whipped cream, pour the very cold heavy cream into a chilled bowl (I often chill my bowl and whisk attachment for 15 minutes beforehand). Add the powdered sugar and vanilla extract. Beat on medium-high speed until stiff peaks form. Be careful not to overbeat, or you’ll end up with butter!
- Remove from muffin tin: Once thoroughly chilled, gently lift each cheesecake bite out of the muffin tin by its paper liner. Peel back the liner if you wish to serve them without it, or leave it on for easy handling.
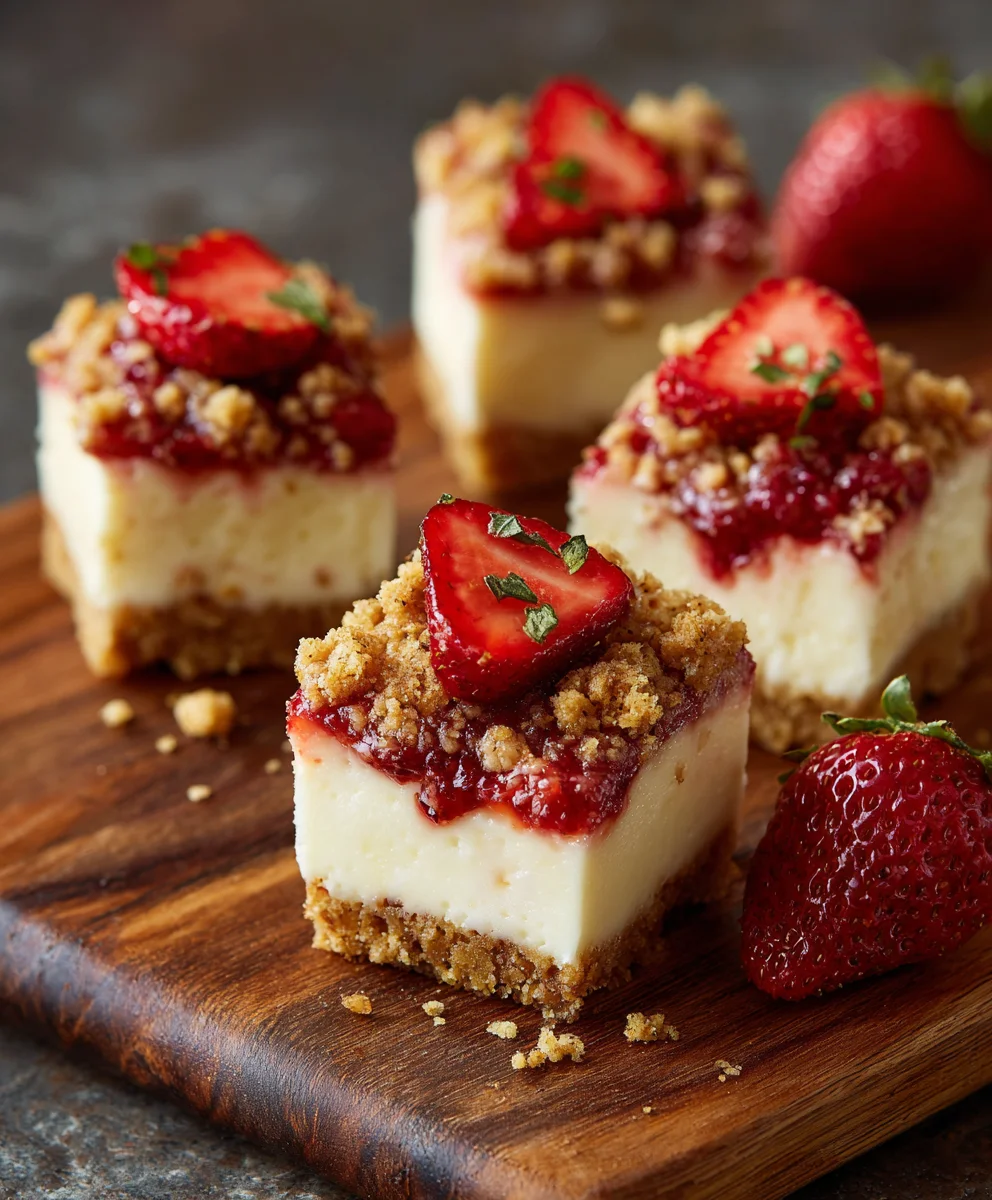
- Top with strawberry crunch: Generously sprinkle or gently press the cooled, crunchy strawberry topping over the top of each cheesecake bite. You can cover the entire top or create a beautiful little mound in the center. The amount is completely up to your preference, but I always lean towards more crunch!
- Serve and enjoy: If using, add a dollop of fresh whipped cream on top of the strawberry crunch just before serving. These Mini Strawberry Crunch Cheesecake Bites are truly a delightful treat, offering a perfect balance of creamy, tangy, and crunchy textures with vibrant strawberry flavor. They are best enjoyed immediately after adding the crunch and whipped cream, but the cheesecakes themselves (without toppings) can be stored in an airtight container in the refrigerator for up to 3-4 days. For optimal crunch, add the topping just before serving.
Conclusion:
And there you have it, my friends! We’ve reached the sweet finale of our journey, and I genuinely hope you’re feeling inspired to roll up your sleeves and bring these incredible desserts to life in your own kitchen. After all we’ve discussed, it’s clear that these aren’t just any ordinary sweet treat; they are a delightful symphony of textures and flavors, perfectly balanced to create an unforgettable experience. The velvety smooth, tangy creaminess of the cheesecake base, kissed with the fresh sweetness of strawberries, all crowned with that irresistible, buttery, crunchy topping – it’s a combination that truly sings on the palate. This recipe for Mini Strawberry Crunch Cheesecake Bites is more than just a dessert; it’s an invitation to create joy, to share smiles, and to impress everyone lucky enough to try them.
What makes these Mini Strawberry Crunch Cheesecake Bites an absolute must-try? It’s the ingenious fusion of classic cheesecake comfort with a playful, vibrant crunch that sets them apart. They’re perfectly portioned, making them ideal for any occasion – from an elegant dinner party where they’ll shine as a sophisticated individual dessert, to a casual backyard BBQ where their grab-and-go appeal is a huge hit. Imagine a platter of these beautiful, bite-sized wonders gracing your dessert table; they’re visually stunning and promise a burst of fresh, summery flavor in every mouthful. Plus, despite their impressive appearance, they’re surprisingly straightforward to prepare, making them accessible to bakers of all skill levels. You don’t need to be a pastry chef to create something truly spectacular with this recipe.
Creative Serving Suggestions and Delicious Variations:
Once you’ve mastered the basic recipe, the fun doesn’t have to stop there! These delightful bites are incredibly versatile, offering endless possibilities for customization and presentation. For serving, I highly recommend arranging them artfully on a chilled platter, perhaps garnished with a few fresh mint leaves or a light dusting of powdered sugar just before serving. For a more formal presentation, placing each bite in a small paper liner or on a petite dessert plate can elevate their elegance. They are best served chilled, allowing the flavors to meld beautifully and the cheesecake to maintain its perfect texture.
Now, let’s talk variations because this is where you can truly make the recipe your own! If strawberries aren’t your only love, consider swapping them out. You could create glorious Mini Blueberry Crunch Cheesecake Bites by using fresh blueberries and a blueberry-flavored cookie crumble. Or perhaps a mixed berry version, incorporating raspberries and blackberries for a more complex fruity tang. The “crunch” topping itself is ripe for experimentation! Instead of vanilla cookies, imagine a chocolate cookie crunch for a decadent twist, or even a pretzel crunch for a salty-sweet sensation that is absolutely addictive. You could also infuse the cheesecake batter with different flavors – a hint of lemon zest brightens the tanginess, while a touch of almond extract adds a sophisticated warmth.
Feeling adventurous? Try drizzling a thin stream of melted white chocolate or dark chocolate over the finished bites for an extra layer of decadence. For holiday-themed treats, you could adapt the crunch to a gingerbread cookie crumble for a festive touch, or pumpkin spice cookies for an autumn celebration. The possibilities are truly boundless, limited only by your imagination! You can prepare these bites a day in advance, storing them covered in the refrigerator, which makes them a fantastic make-ahead option for entertaining. Just add your fresh fruit and crunch topping right before serving to maintain optimal texture and freshness.
Your Baking Adventure Awaits!
I genuinely hope this article has armed you with the confidence and excitement to embark on your own dessert-making adventure. There’s nothing quite as satisfying as creating something truly delicious from scratch, especially when the result is as universally loved as these cheesecake bites. So, please, don’t hesitate! Gather your ingredients, put on your favorite apron, and dive into making these incredible treats. You’ll be amazed at how simple it is to achieve such a professional-looking and tasting dessert.
Once you’ve whipped up your batch of these delightful Mini Strawberry Crunch Cheesecake Bites, I would absolutely love to hear about your experience! Did you try a fun variation? What was your favorite part of making them? How quickly did they disappear from your table? Share your stories, your photos, and your triumphs! Your feedback and creativity inspire not just me, but other bakers in our community. Happy baking, my friends, and get ready to enjoy a dessert that’s sure to become a cherished favorite in your recipe collection!
Mini Strawberry Crunch Cheesecake Bites
Mini Strawberry Crunch Cheesecake Bites are a delightful revelation, offering a symphony of textures and flavors. These irresistible bites combine a luscious, creamy cheesecake base with the vibrant tang of fresh strawberry, crowned with an unforgettable, crunchy topping. Perfect for any occasion, they are smooth, sweet, tart, and satisfyingly crisp.
Ingredients
-
Graham cracker crumbs: 1 ½ cups
-
Granulated sugar: 2 tbsp
-
Unsalted butter: ½ cup (1 stick), melted
-
Full-fat cream cheese: 24 oz (three 8-oz blocks), room temp
-
Granulated sugar: 1 cup
-
Large eggs: 3, room temp
-
Full-fat sour cream: ½ cup, room temp
-
Pure vanilla extract: 1 tbsp
-
All-purpose flour: 1 tbsp
-
Salt: ¼ tsp
-
All-purpose flour: ½ cup
-
Granulated sugar: ½ cup
-
Unsalted butter: ½ cup (1 stick), melted
-
Strawberry gelatin mix: 3 tbsp (dry mix)
-
Freeze-dried strawberries: ½ cup (approx 0.5 oz), crushed
-
Pink or red food coloring: 1-2 drops (optional)
-
Heavy cream: 1 cup, very cold (optional whipped cream)
-
Powdered sugar: 2 tbsp (or to taste) (optional whipped cream)
-
Vanilla extract: ½ tsp (optional whipped cream)
Instructions
-
Step 1
Preheat oven to 325°F (160°C). Line a 12-cup muffin tin with paper liners. -
Step 2
Crush graham crackers to 1 ½ cups fine crumbs. In a medium bowl, combine crumbs, 2 tbsp sugar, and ½ cup melted butter; mix until moistened. Press 1 ½ – 2 tbsp crumb mixture firmly into the bottom of each lined muffin cup. -
Step 3
Pre-bake crust for 5-7 minutes, until lightly golden. Remove and cool slightly. -
Step 4
Ensure cream cheese, eggs, and sour cream are at room temperature. Beat 24 oz cream cheese until smooth and lump-free (2-3 min), scraping bowl. Gradually add 1 cup sugar, beat until combined and lighter (2-3 min). Mix in ½ cup sour cream, 1 tbsp flour, 1 tbsp vanilla, and ¼ tsp salt on low speed until just combined. Add 3 eggs, one at a time, beating on the lowest speed just until incorporated; do not overmix. -
Step 5
Gently crush ½ cup freeze-dried strawberries. In a medium bowl, whisk ½ cup flour, ½ cup sugar, and 3 tbsp dry strawberry gelatin mix. Add ½ cup melted butter; mix until crumbly. Optional: add 1-2 drops food coloring. Fold in crushed freeze-dried strawberries. Spread mixture evenly on a parchment-lined baking sheet. -
Step 6
Bake at 325°F (160°C) for 8-10 minutes, until lightly golden and crumbly. Stir halfway if needed. Cool completely on the baking sheet, then break apart any clumps. -
Step 7
Fill each muffin cup ¾ full with cheesecake batter over the pre-baked crusts. Bake for 18-22 minutes, until edges are set and centers have a slight jiggle. Do not overbake. -
Step 8
Turn off oven, prop door open, and let cheesecakes cool inside for 30-60 minutes. Transfer to a wire rack and cool completely at room temperature (1-2 hours). Chill in the refrigerator for at least 4 hours, preferably overnight, for best setting. -
Step 9
Optional: Just before serving, beat 1 cup cold heavy cream with 2 tbsp powdered sugar and ½ tsp vanilla until stiff peaks form. Remove chilled cheesecake bites from muffin tin. Generously sprinkle or press the cooled strawberry crunch topping over each cheesecake. If using, add a dollop of whipped cream on top. Serve and enjoy immediately for optimal crunch.
Important Information
Nutrition Facts (Per Serving)
It is important to consider this information as approximate and not to use it as definitive health advice.
Allergy Information
Please check ingredients for potential allergens and consult a health professional if in doubt.


Leave a Comment