

Greggs Chicken Bake: That flaky, golden pastry, the creamy, savory filling need I say more? Let’s be honest, who hasn’t succumbed to the allure of a warm Greggs Chicken Bake on a chilly day? This iconic bake is more than just a quick lunch; it’s a comforting classic, a taste of British high street culture, and a testament to simple pleasures.
While Greggs keeps the exact recipe under wraps, the inspiration likely stems from traditional British savory pies, a culinary staple for centuries. These pies, often filled with meat and vegetables, were a hearty and convenient way to feed families. Greggs took this concept and streamlined it, creating a portable, affordable, and utterly delicious version that has captured the hearts (and stomachs) of the nation.
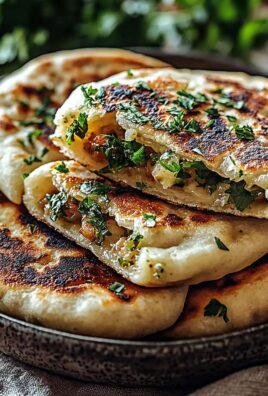
But what makes the Greggs Chicken Bake so irresistible? It’s the perfect combination of textures and flavors. The crisp, buttery pastry gives way to a rich, creamy filling packed with tender chicken pieces. It’s savory, satisfying, and incredibly moreish. Plus, its grab-and-go convenience makes it a perfect lunchtime treat or a quick snack on the run. In this article, I’m going to guide you through creating your very own homemade version of this beloved bake. Get ready to recreate that iconic taste in your own kitchen!

Ingredients:
- For the Rough Puff Pastry:
- 500g strong bread flour, plus extra for dusting
- 10g salt
- 500g cold unsalted butter, cubed
- 250ml ice-cold water
- For the Chicken Filling:
- 500g cooked chicken breast, diced (leftover roast chicken works great!)
- 1 large onion, finely chopped
- 2 cloves garlic, minced
- 50g butter
- 50g plain flour
- 600ml chicken stock
- 150ml double cream
- 1 tbsp Dijon mustard
- 1 tsp dried thyme
- 1/2 tsp ground nutmeg
- Salt and freshly ground black pepper to taste
- 1 tbsp chopped fresh parsley (optional)
- For the Egg Wash:
- 1 large egg, beaten
- 1 tbsp milk
Preparing the Rough Puff Pastry:
Okay, let’s tackle the pastry first. Don’t be intimidated! Rough puff is much easier than full puff pastry, I promise. It’s all about layering the butter to create those flaky layers we all love.
- Combine Dry Ingredients: In a large bowl, whisk together the flour and salt. This ensures the salt is evenly distributed, which is important for the gluten development and flavor.
- Add the Butter: Add the cubed cold butter to the flour mixture. Now, this is key: you want to keep the butter as cold as possible. If it starts to soften too much, pop the bowl in the freezer for 10-15 minutes. Use your fingertips to lightly rub the butter into the flour. You’re not aiming for a smooth mixture; you want to see visible chunks of butter. These chunks are what create the layers! We’re aiming for a shaggy, coarse mixture.
- Add the Water: Gradually add the ice-cold water, mixing with a palette knife or your hands until the dough just comes together. Be careful not to overmix! Overmixing will develop the gluten too much and result in a tough pastry. The dough should be slightly shaggy and not perfectly smooth.
- First Turn: Lightly flour a clean work surface. Turn the dough out onto the surface and gently pat it into a rectangle, about 20x30cm. Fold the top third of the dough down to the center, and then fold the bottom third up to cover the top. This is called a single turn. You’ve essentially created three layers.
- Second Turn: Rotate the dough 90 degrees. Gently pat it back into a rectangle, again about 20x30cm. Repeat the folding process: top third down, bottom third up. This is your second single turn.
- Chill: Wrap the dough tightly in cling film and chill in the refrigerator for at least 30 minutes. This allows the gluten to relax and the butter to firm up, which is crucial for creating flaky layers.
- Third and Fourth Turns: Repeat the turning and chilling process two more times. That’s right, two more single turns, each followed by at least 30 minutes of chilling in the fridge. This gives us a total of four single turns. The more turns, the more layers, the flakier the pastry!
- Final Chill: After the fourth turn, wrap the dough well and chill for at least 1 hour, or preferably overnight. This allows the pastry to fully relax and become easier to work with.
Preparing the Chicken Filling:
While the pastry is chilling (or even the day before), let’s get that delicious chicken filling sorted. This is where the Greggs magic really happens!
- Sauté the Aromatics: In a large saucepan or skillet, melt the butter over medium heat. Add the chopped onion and cook until softened and translucent, about 5-7 minutes. Add the minced garlic and cook for another minute until fragrant. Be careful not to burn the garlic!
- Make the Roux: Stir in the flour and cook for 1-2 minutes, stirring constantly. This creates a roux, which will thicken the sauce. Cook it out for a minute or two to get rid of the raw flour taste.
- Add the Chicken Stock: Gradually whisk in the chicken stock, a little at a time, ensuring there are no lumps. Keep whisking until the sauce is smooth and thickened.
- Simmer and Thicken: Bring the sauce to a simmer and cook for 5-7 minutes, stirring occasionally, until it has thickened to a gravy-like consistency.
- Add the Chicken and Seasonings: Stir in the diced cooked chicken, double cream, Dijon mustard, dried thyme, and ground nutmeg. Season generously with salt and freshly ground black pepper to taste. Remember, you can always add more seasoning later, but you can’t take it away!
- Simmer and Adjust: Simmer for another 5-10 minutes, stirring occasionally, to allow the flavors to meld together. Taste and adjust the seasoning as needed. If the sauce is too thick, add a little more chicken stock or cream. If it’s too thin, simmer for a few more minutes to reduce it.
- Add Parsley (Optional): Stir in the chopped fresh parsley, if using, just before removing from the heat.
- Cool Completely: Remove the filling from the heat and allow it to cool completely. This is important because if you fill the pastry with hot filling, it will melt the butter and prevent the pastry from puffing up properly. You can speed up the cooling process by spreading the filling out on a baking sheet.
Assembling and Baking the Chicken Bakes:
Alright, the pastry is chilled, the filling is cooled, now for the fun part putting it all together!
- Preheat Oven: Preheat your oven to 200°C (180°C fan/Gas Mark 6). Line a baking sheet with parchment paper.
- Roll Out the Pastry: Lightly flour a clean work surface. Remove the chilled pastry from the refrigerator and roll it out into a large rectangle, about 3mm thick. Try to keep the rectangle as even as possible.
- Cut Out Rectangles: Using a sharp knife or pizza cutter, cut the pastry into even rectangles. The size is up to you, but I find that rectangles about 10cm x 15cm work well. You should get about 6-8 rectangles from the pastry.
- Add the Filling: Place a generous spoonful of the cooled chicken filling onto one half of each pastry rectangle, leaving a border around the edges. Don’t overfill them, or the filling will leak out during baking.
- Fold and Seal: Fold the other half of the pastry over the filling to create a rectangular bake. Press the edges firmly together to seal. You can use a fork to crimp the edges for a decorative touch and to ensure a good seal.
- Egg Wash: In a small bowl, whisk together the egg and milk to make an egg wash. Brush the tops of the chicken bakes with the egg wash. This will give them a beautiful golden-brown color.
- Score the Tops: Using a sharp knife, make a few slits in the tops of the chicken bakes. This allows steam to escape during baking and prevents the pastry from bursting.
- Bake: Place the chicken bakes on the prepared baking sheet and bake for 20-25 minutes, or until they are golden brown and the pastry is puffed up.
- Cool Slightly: Remove the chicken bakes from the oven and let them cool on the baking sheet for a few minutes before transferring them to a wire rack to cool completely (or eat them warm I won’t judge!).
Tips for Success:
- Keep Everything Cold: The key to flaky pastry is keeping the butter cold. Work quickly and if the butter starts to soften, pop the dough in the freezer for a few minutes.
- Don’t Overmix: Overmixing the pastry will develop the gluten and result in a tough bake. Mix until just combined.
- Chill, Chill, Chill: Chilling the pastry between turns is essential for allowing the gluten to relax and the butter to firm up. Don’t skip this step!
- Cool the Filling: Make sure the filling is completely cooled before filling the pastry. Hot filling will melt the butter and prevent the pastry from puffing up.
- Experiment with Flavors: Feel free

Conclusion:
So, there you have it! This Greggs Chicken Bake recreation isn’t just a recipe; it’s a passport back to those comforting, savory moments we all crave. I truly believe this recipe is a must-try for anyone who loves a good, flaky pastry filled with creamy, flavorful chicken. It’s surprisingly simple to make at home, and the satisfaction of biting into that golden crust, knowing you created it yourself, is simply unmatched. Forget the long queues and the potential disappointment of a sold-out bake; now you can have your very own, fresh-from-the-oven Greggs Chicken Bake whenever the mood strikes!
But the best part? You can totally customize it! Feeling adventurous? Add a pinch of chili flakes to the chicken filling for a subtle kick. Or, if you’re a cheese lover (like me!), sprinkle some grated cheddar or Gruyère on top before baking for an extra layer of gooey goodness. For a heartier meal, serve your bake with a side of roasted vegetables, like broccoli or carrots. A crisp green salad also makes a refreshing counterpoint to the richness of the pastry. And if you’re looking for a quick and easy lunch, this bake is perfect on its own, or maybe with a dollop of your favorite chutney.
Serving Suggestions: Think beyond just eating it straight from the oven! This bake is fantastic cold, making it ideal for picnics or lunchboxes. You can also reheat it in the oven or microwave just be sure to protect the crust from getting soggy. Consider cutting it into smaller squares for a party appetizer, or serving it alongside a bowl of creamy tomato soup for a comforting winter meal. The possibilities are truly endless!
Variations to Explore: Don’t be afraid to experiment with the filling! Swap out the chicken for turkey or ham for a different flavor profile. Add some diced mushrooms or spinach for extra nutrients. You could even try a vegetarian version with roasted vegetables and a creamy cheese sauce. The key is to have fun and make it your own!
I’ve poured my heart into perfecting this recipe, and I’m confident that you’ll love it as much as I do. It’s more than just a copycat; it’s a celebration of a classic comfort food, made with love and a little bit of kitchen magic.
So, what are you waiting for? Gather your ingredients, preheat your oven, and get ready to embark on a delicious baking adventure. I promise, you won’t regret it! And most importantly, I want to hear all about your experience. Did you make any modifications? What did you serve it with? What did your family and friends think?
Please, please, please, try this Greggs Chicken Bake recipe and share your creations with me! Leave a comment below, tag me on social media, or send me an email. I can’t wait to see your versions and hear your stories. Happy baking! I’m sure you will love this recipe as much as I do.
Greggs Chicken Bake: A Delicious and Nutritious Guide
Flaky, homemade chicken bakes filled with a creamy, savory chicken filling. A delicious and satisfying treat made with rough puff pastry.
Ingredients
- 500g strong bread flour, plus extra for dusting
- 10g salt
- 500g cold unsalted butter, cubed
- 250ml ice-cold water
- 500g cooked chicken breast, diced (leftover roast chicken works great!)
- 1 large onion, finely chopped
- 2 cloves garlic, minced
- 50g butter
- 50g plain flour
- 600ml chicken stock
- 150ml double cream
- 1 tbsp Dijon mustard
- 1 tsp dried thyme
- 1/2 tsp ground nutmeg
- Salt and freshly ground black pepper to taste
- 1 tbsp chopped fresh parsley (optional)
- 1 large egg, beaten
- 1 tbsp milk
Instructions
- In a large bowl, whisk together the flour and salt.
- Add the cubed cold butter to the flour mixture. Use your fingertips to lightly rub the butter into the flour. You want to see visible chunks of butter.
- Gradually add the ice-cold water, mixing with a palette knife or your hands until the dough just comes together. Be careful not to overmix!
- Lightly flour a clean work surface. Turn the dough out onto the surface and gently pat it into a rectangle, about 20x30cm. Fold the top third of the dough down to the center, and then fold the bottom third up to cover the top.
- Rotate the dough 90 degrees. Gently pat it back into a rectangle, again about 20x30cm. Repeat the folding process: top third down, bottom third up.
- Wrap the dough tightly in cling film and chill in the refrigerator for at least 30 minutes.
- Repeat the turning and chilling process two more times.
- After the fourth turn, wrap the dough well and chill for at least 1 hour, or preferably overnight.
- In a large saucepan or skillet, melt the butter over medium heat. Add the chopped onion and cook until softened and translucent, about 5-7 minutes. Add the minced garlic and cook for another minute until fragrant.
- Stir in the flour and cook for 1-2 minutes, stirring constantly.
- Gradually whisk in the chicken stock, a little at a time, ensuring there are no lumps. Keep whisking until the sauce is smooth and thickened.
- Bring the sauce to a simmer and cook for 5-7 minutes, stirring occasionally, until it has thickened to a gravy-like consistency.
- Stir in the diced cooked chicken, double cream, Dijon mustard, dried thyme, and ground nutmeg. Season generously with salt and freshly ground black pepper to taste.
- Simmer for another 5-10 minutes, stirring occasionally, to allow the flavors to meld together. Taste and adjust the seasoning as needed.
- Stir in the chopped fresh parsley, if using, just before removing from the heat.
- Remove the filling from the heat and allow it to cool completely.
- Preheat your oven to 200°C (180°C fan/Gas Mark 6). Line a baking sheet with parchment paper.
- Lightly flour a clean work surface. Remove the chilled pastry from the refrigerator and roll it out into a large rectangle, about 3mm thick.
- Using a sharp knife or pizza cutter, cut the pastry into even rectangles. The size is up to you, but I find that rectangles about 10cm x 15cm work well. You should get about 6-8 rectangles from the pastry.
- Place a generous spoonful of the cooled chicken filling onto one half of each pastry rectangle, leaving a border around the edges.
- Fold the other half of the pastry over the filling to create a rectangular bake. Press the edges firmly together to seal. You can use a fork to crimp the edges for a decorative touch and to ensure a good seal.
- In a small bowl, whisk together the egg and milk to make an egg wash. Brush the tops of the chicken bakes with the egg wash.
- Using a sharp knife, make a few slits in the tops of the chicken bakes.
- Place the chicken bakes on the prepared baking sheet and bake for 20-25 minutes, or until they are golden brown and the pastry is puffed up.
- Remove the chicken bakes from the oven and let them cool on the baking sheet for a few minutes before transferring them to a wire rack to cool completely (or eat them warm I won’t judge!).
Notes
- Keep Everything Cold: The key to flaky pastry is keeping the butter cold. Work quickly and if the butter starts to soften, pop the dough in the freezer for a few minutes.
- Don’t Overmix: Overmixing the pastry will develop the gluten and result in a tough bake. Mix until just combined.
- Chill, Chill, Chill: Chilling the pastry between turns is essential for allowing the gluten to relax and the butter to firm up. Don’t skip this step!
- Cool the Filling: Make sure the filling is completely cooled before filling the pastry. Hot filling will melt the butter and prevent the pastry from puffing up.
- Experiment with Flavors: Feel free to add other vegetables to the filling, such as mushrooms, peas, or carrots. You can also use different herbs and spices to customize the flavor.
Leave a Comment