

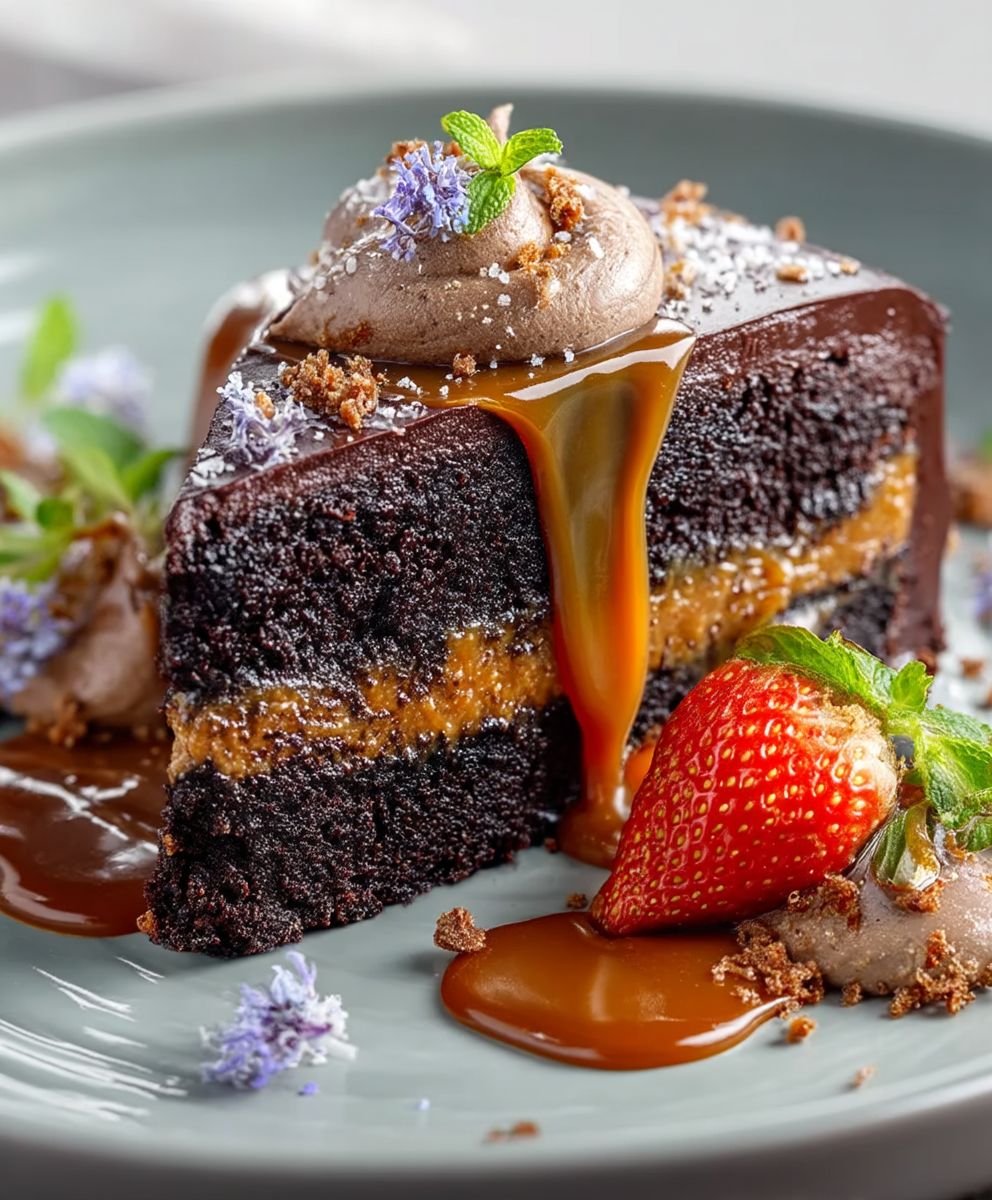
Salted Caramel Chocolate Cake, oh, where do I even begin? Imagine sinking your fork into a slice of decadent, moist chocolate cake, only to be met with a luscious river of homemade salted caramel that perfectly balances the rich cocoa flavor. It’s a symphony of sweet and salty that will have your taste buds singing! This isn’t just a cake; it’s an experience.
While the exact origins of combining salted caramel with chocolate are debated, the pairing’s popularity exploded in the early 2000s, quickly becoming a modern classic. The French fleur de sel, a hand-harvested sea salt, played a pivotal role in elevating caramel from simple sweetness to a sophisticated indulgence. The addition of salt enhances the caramel’s buttery notes and cuts through the richness of the chocolate, creating a truly addictive flavor profile.
People adore this Salted Caramel Chocolate Cake for so many reasons. The contrasting textures the soft, yielding cake, the smooth, flowing caramel, and sometimes even a sprinkle of flaky sea salt on top are incredibly satisfying. It’s also surprisingly easy to make at home, allowing you to impress your friends and family with a show-stopping dessert that tastes like it came straight from a high-end bakery. Plus, who can resist the allure of chocolate and caramel? It’s a match made in dessert heaven!

Ingredients:
- For the Chocolate Cake:
- 2 cups (250g) all-purpose flour
- 2 cups (400g) granulated sugar
- ¾ cup (75g) unsweetened cocoa powder
- 1 ½ teaspoons baking powder
- 1 ½ teaspoons baking soda
- 1 teaspoon salt
- 1 cup (240ml) buttermilk
- ½ cup (120ml) vegetable oil
- 2 large eggs
- 2 teaspoons vanilla extract
- 1 cup (240ml) boiling water
- For the Salted Caramel Sauce:
- 1 cup (200g) granulated sugar
- 6 tablespoons (85g) unsalted butter, cut into pieces
- ½ cup (120ml) heavy cream
- 1 teaspoon sea salt, or to taste
- For the Chocolate Ganache:
- 1 cup (240ml) heavy cream
- 12 ounces (340g) semi-sweet chocolate, chopped
- 2 tablespoons unsalted butter
- For Assembly:
- Flaky sea salt, for sprinkling (optional)
Preparing the Chocolate Cake:
Okay, let’s get started with the chocolate cake! This is the foundation of our masterpiece, so we want to make sure it’s moist, rich, and perfectly chocolatey.
- Preheat and Prep: First things first, preheat your oven to 350°F (175°C). Grease and flour two 9-inch round cake pans. You can also line the bottoms with parchment paper rounds for extra insurance against sticking. I find this really helps get the cakes out cleanly.
- Combine Dry Ingredients: In a large bowl, whisk together the flour, sugar, cocoa powder, baking powder, baking soda, and salt. Make sure everything is evenly distributed. This ensures a consistent rise and flavor throughout the cake.
- Add Wet Ingredients: In a separate bowl, whisk together the buttermilk, oil, eggs, and vanilla extract. Whisk until everything is well combined and smooth.
- Combine Wet and Dry: Gradually add the wet ingredients to the dry ingredients, mixing on low speed until just combined. Be careful not to overmix! Overmixing can lead to a tough cake.
- Add Boiling Water: Slowly pour in the boiling water while mixing on low speed. The batter will be very thin don’t worry, that’s normal! The hot water helps to bloom the cocoa powder and create a super moist cake.
- Divide and Bake: Divide the batter evenly between the prepared cake pans. Bake for 30-35 minutes, or until a wooden skewer inserted into the center comes out clean. Keep an eye on them ovens can vary!
- Cool Completely: Let the cakes cool in the pans for 10 minutes before inverting them onto a wire rack to cool completely. This prevents them from sticking and allows them to cool evenly. Make sure they are completely cool before frosting!
Making the Salted Caramel Sauce:
Now for the star of the show the salted caramel! This is what takes this cake from ordinary to extraordinary. Don’t be intimidated; it’s easier than you think!
- Melt the Sugar: In a medium saucepan, melt the sugar over medium heat. Stir constantly with a heat-resistant spatula until the sugar is melted and amber in color. Be patient! This can take a few minutes, and you want to make sure the sugar doesn’t burn.
- Add Butter: Once the sugar is melted and amber, remove the saucepan from the heat and add the butter. Be careful, as the mixture will bubble up! Stir until the butter is completely melted and incorporated.
- Add Heavy Cream: Slowly pour in the heavy cream while stirring constantly. The mixture will bubble up again, so be cautious. Stir until the caramel is smooth and creamy.
- Add Salt: Stir in the sea salt. Taste and add more salt if desired. I like a good balance of sweet and salty, so don’t be afraid to experiment!
- Cool Slightly: Let the caramel cool slightly before using. It will thicken as it cools. If it becomes too thick, you can gently warm it up over low heat.
Preparing the Chocolate Ganache:
Next up, the decadent chocolate ganache! This is the perfect finishing touch for our cake, adding richness and shine.
- Heat the Cream: In a medium saucepan, heat the heavy cream over medium heat until it just begins to simmer. Do not boil!
- Pour Over Chocolate: Place the chopped chocolate in a heatproof bowl. Pour the hot cream over the chocolate and let it sit for 1 minute to soften the chocolate.
- Stir Until Smooth: Gently stir the mixture until the chocolate is completely melted and the ganache is smooth and glossy.
- Add Butter: Stir in the butter until it is melted and incorporated. This adds extra shine and richness to the ganache.
- Cool Slightly: Let the ganache cool slightly before using. It will thicken as it cools, making it easier to spread.
Assembling the Salted Caramel Chocolate Cake:
Finally, the fun part putting it all together! This is where your creativity can shine.
- Level the Cakes: If your cakes have a dome, use a serrated knife to level them. This will make stacking easier and create a more even cake.
- Place First Layer: Place one cake layer on a serving plate or cake stand.
- Add Caramel: Spread a generous layer of salted caramel sauce over the first cake layer. Be sure to leave a small border around the edge so the caramel doesn’t drip down the sides.
- Place Second Layer: Carefully place the second cake layer on top of the caramel.
- Frost with Ganache: Pour the chocolate ganache over the top of the cake, allowing it to drip down the sides. Use an offset spatula to spread the ganache evenly over the top and sides of the cake.
- Decorate (Optional): Sprinkle with flaky sea salt, if desired. You can also add chocolate shavings, caramel drizzle, or any other decorations you like.
- Chill (Optional): Chill the cake for at least 30 minutes to allow the ganache to set. This will make it easier to slice and serve.
- Serve and Enjoy! Slice and serve your delicious Salted Caramel Chocolate Cake. Get ready for rave reviews!
Conclusion:
Well, there you have it! This Salted Caramel Chocolate Cake is more than just a dessert; it’s an experience. From the rich, moist chocolate layers to the decadent salted caramel swirl and the luscious chocolate ganache, every bite is a symphony of flavors and textures that will leave you craving more. I truly believe this cake is a must-try for any chocolate lover, and here’s why: it’s surprisingly easy to make, the ingredients are readily available, and the end result is a showstopper that will impress your friends and family.
But don’t just take my word for it! The beauty of baking is that you can always put your own spin on things. Feel free to get creative with your serving suggestions and variations. For a truly indulgent experience, serve a slice warm with a scoop of vanilla bean ice cream and a drizzle of extra salted caramel sauce. The contrast between the warm cake and the cold ice cream is simply divine!
Serving Suggestions & Variations:
* Ice Cream Pairing: As mentioned, vanilla bean ice cream is a classic pairing, but don’t be afraid to experiment with other flavors like salted caramel ice cream, chocolate ice cream, or even a coffee-flavored ice cream to complement the chocolate.
* Fruit Accompaniment: Fresh berries, such as raspberries or strawberries, provide a bright and tangy counterpoint to the richness of the cake. A dollop of whipped cream and a few berries make for an elegant presentation.
* Coffee or Tea: A strong cup of coffee or a fragrant tea is the perfect accompaniment to this decadent cake. The bitterness of the coffee or tea helps to balance the sweetness of the cake.
* Nutty Crunch: Add a sprinkle of chopped nuts, such as pecans or walnuts, to the top of the cake for added texture and flavor. Toasted nuts will enhance their flavor even further.
* Caramel Variations: If you’re feeling adventurous, try making your own salted caramel sauce. There are countless recipes online, and it’s a fun way to customize the flavor to your liking. You could also add a touch of bourbon or vanilla extract to your caramel sauce for an extra layer of flavor.
* Chocolate Ganache Alternatives: While I love the classic chocolate ganache, you could also try using a white chocolate ganache or a dark chocolate ganache for a different flavor profile.
* Cake Layer Options: If you’re short on time, you can use a store-bought chocolate cake mix as a base and then focus on making the salted caramel swirl and the chocolate ganache. This is a great way to simplify the recipe without sacrificing flavor.
* Individual Cakes: Bake the batter in muffin tins to create individual salted caramel chocolate cakes. This is a great option for parties or for portion control.
I’m so excited for you to try this recipe and experience the magic of this Salted Caramel Chocolate Cake for yourself. It’s a labor of love, but trust me, the results are well worth the effort. Once you’ve made it, I’d love to hear about your experience! Did you make any variations? What did you think of the flavor combination? What was the reaction of your friends and family? Share your photos and stories in the comments below. I can’t wait to see your creations! Happy baking!
Salted Caramel Chocolate Cake: The Ultimate Decadent Recipe
Decadent chocolate cake layered with homemade salted caramel sauce and rich chocolate ganache. A perfect balance of sweet and salty!
Ingredients
- 2 cups (250g) all-purpose flour
- 2 cups (400g) granulated sugar
- ¾ cup (75g) unsweetened cocoa powder
- 1 ½ teaspoons baking powder
- 1 ½ teaspoons baking soda
- 1 teaspoon salt
- 1 cup (240ml) buttermilk
- ½ cup (120ml) vegetable oil
- 2 large eggs
- 2 teaspoons vanilla extract
- 1 cup (240ml) boiling water
- 1 cup (200g) granulated sugar
- 6 tablespoons (85g) unsalted butter, cut into pieces
- ½ cup (120ml) heavy cream
- 1 teaspoon sea salt, or to taste
- 1 cup (240ml) heavy cream
- 12 ounces (340g) semi-sweet chocolate, chopped
- 2 tablespoons unsalted butter
- Flaky sea salt, for sprinkling (optional)
Instructions
- Preheat oven to 350°F (175°C). Grease and flour two 9-inch round cake pans, lining the bottoms with parchment paper rounds.
- In a large bowl, whisk together flour, sugar, cocoa powder, baking powder, baking soda, and salt.
- In a separate bowl, whisk together buttermilk, oil, eggs, and vanilla extract until smooth.
- Gradually add wet ingredients to dry ingredients, mixing on low speed until just combined. Do not overmix.
- Slowly pour in boiling water while mixing on low speed. The batter will be thin.
- Divide batter evenly between prepared cake pans. Bake for 30-35 minutes, or until a wooden skewer inserted into the center comes out clean.
- Let cakes cool in pans for 10 minutes before inverting them onto a wire rack to cool completely.
- In a medium saucepan, melt sugar over medium heat, stirring constantly until melted and amber in color.
- Remove from heat and add butter. Stir until butter is completely melted and incorporated.
- Slowly pour in heavy cream while stirring constantly. Stir until caramel is smooth and creamy.
- Stir in sea salt. Taste and add more salt if desired.
- Let the caramel cool slightly before using. It will thicken as it cools.
- In a medium saucepan, heat heavy cream over medium heat until it just begins to simmer. Do not boil.
- Place chopped chocolate in a heatproof bowl. Pour hot cream over chocolate and let it sit for 1 minute to soften.
- Gently stir until chocolate is completely melted and ganache is smooth and glossy.
- Stir in butter until melted and incorporated.
- Let ganache cool slightly before using. It will thicken as it cools.
- If cakes have a dome, use a serrated knife to level them.
- Place one cake layer on a serving plate or cake stand.
- Spread a generous layer of salted caramel sauce over the first cake layer, leaving a small border.
- Carefully place the second cake layer on top of the caramel.
- Pour chocolate ganache over the top of the cake, allowing it to drip down the sides. Use an offset spatula to spread evenly.
- Sprinkle with flaky sea salt, if desired.
- Chill the cake for at least 30 minutes to allow the ganache to set (optional).
- Slice and serve.
Notes
- For the cake, be careful not to overmix the batter, as this can lead to a tough cake.
- The hot water in the cake batter helps to bloom the cocoa powder and create a super moist cake.
- When making the caramel, be patient and make sure the sugar doesn’t burn.
- Taste the caramel and adjust the salt to your preference.
- Cool the cakes completely before frosting to prevent the ganache from melting.
- Chilling the cake before serving makes it easier to slice.

Leave a Comment