

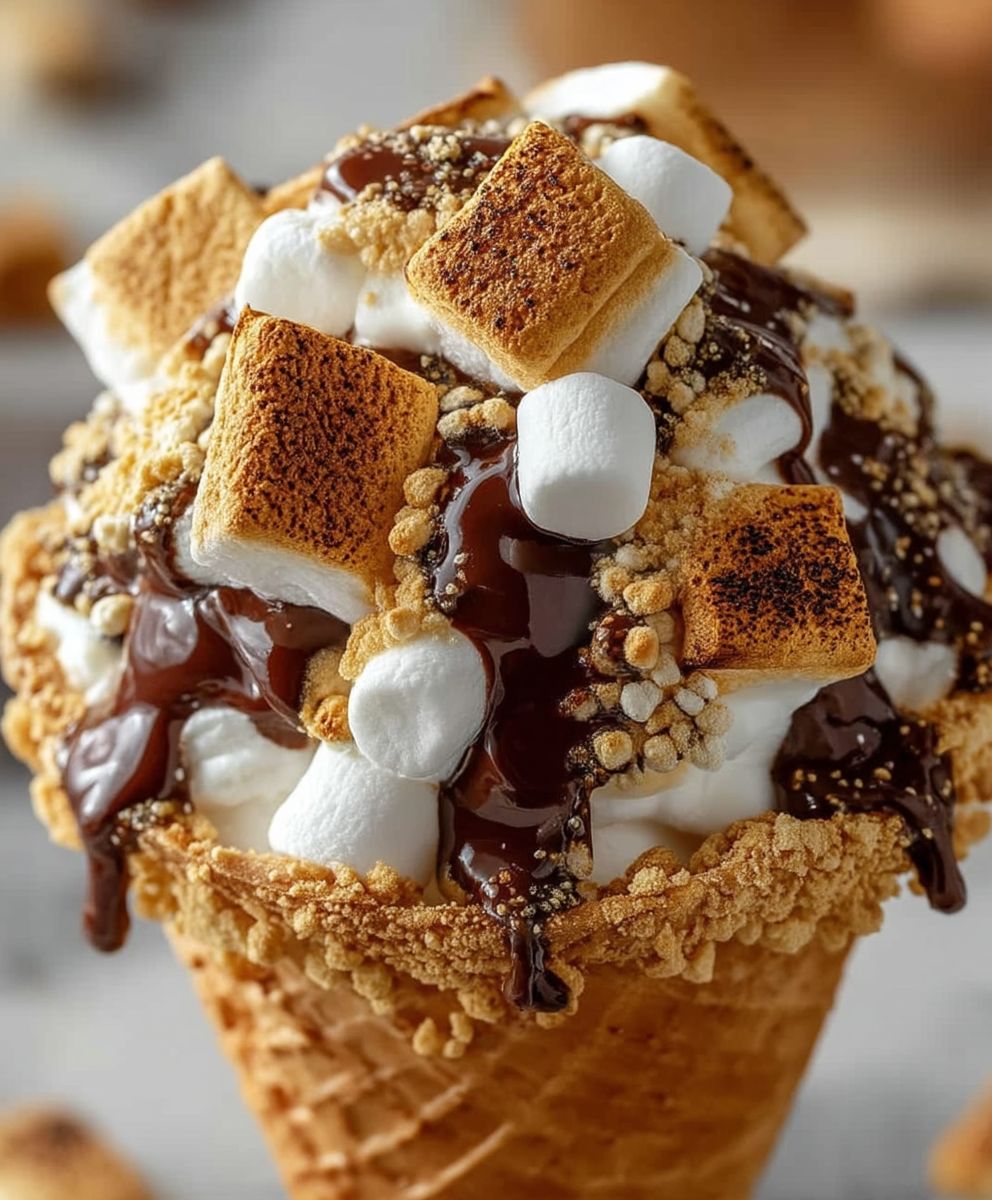
Smores Cones: Prepare to unlock a new level of campfire deliciousness! Forget sticky fingers and melty chocolate disasters; we’re taking the classic s’more and giving it a delightful, mess-free makeover. Imagine all the gooey, chocolatey, marshmallowy goodness you crave, neatly nestled inside a crispy waffle cone. Intrigued? You should be!
While the traditional s’more boasts a history rooted in Girl Scout campfires of the 1920s, the Smores Cones are a modern twist on this beloved treat. They capture the essence of that nostalgic flavor profile but offer a convenient and portable way to enjoy it. Think of it as the sophisticated cousin of the original s’more, perfect for backyard barbecues, camping trips, or even a cozy night in.
What makes these Smores Cones so irresistible? It’s the perfect combination of textures and flavors. The warm, melted chocolate oozes into the fluffy, toasted marshmallow, all balanced by the satisfying crunch of the waffle cone. Plus, they’re incredibly easy to customize! Add your favorite candies, nuts, or even a drizzle of caramel for a truly personalized dessert experience. Get ready to create some unforgettable memories, one delicious cone at a time!

Ingredients:
- 12 waffle cones
- 1 (10.5 ounce) bag miniature marshmallows
- 6 (1.55 ounce) milk chocolate candy bars, broken into pieces
- 1/2 cup graham cracker crumbs (optional, for added flavor and texture)
- Aluminum foil
Preparing the Cones:
Okay, let’s get started! First things first, we need to prep our waffle cones. This is super easy, but it’s an important step to ensure everything melts evenly and the cones don’t burn.
- Preheat your oven to 350°F (175°C). While the oven is heating up, we can get the cones ready.
- Wrap each waffle cone individually in aluminum foil. Make sure to cover the entire cone, leaving only the top open. This will protect the cone from burning and help contain the melty goodness inside. I like to use a double layer of foil just to be extra safe.
- Stand the wrapped cones upright in a baking pan. A muffin tin works perfectly for this, as it keeps the cones from tipping over. If you don’t have a muffin tin, you can use a baking dish and carefully arrange the cones so they support each other.
Filling the Cones:
Now for the fun part stuffing the cones with all the delicious ingredients! This is where you can really customize your S’mores Cones to your liking. Feel free to add extra chocolate, different types of marshmallows, or even a sprinkle of nuts!
- Fill each cone with miniature marshmallows. Pack them in tightly, leaving a little room at the top for the chocolate. Don’t be shy the marshmallows will melt down, so you want to make sure there’s plenty in there.
- Add the milk chocolate pieces. Nestle the chocolate pieces in among the marshmallows, making sure they’re evenly distributed. I like to break the chocolate bars into smaller pieces so they melt more easily.
- Sprinkle with graham cracker crumbs (optional). If you’re using graham cracker crumbs, sprinkle them over the top of the chocolate. This adds a nice graham cracker flavor that really complements the marshmallows and chocolate.
Baking the S’mores Cones:
Time to bake these beauties! Keep a close eye on them while they’re in the oven, as the marshmallows can burn quickly. The goal is to get the marshmallows nice and gooey and the chocolate melted, without burning the cones.
- Bake in the preheated oven for 5-7 minutes. Keep a close watch on the cones. You’ll know they’re ready when the marshmallows are puffed up and slightly golden brown, and the chocolate is melted and gooey.
- Remove from the oven and let cool slightly. Be careful when removing the cones from the oven, as they will be very hot. Let them cool for a few minutes before unwrapping them. This will prevent the marshmallows from sticking to the foil and making a mess.
Serving and Enjoying:
The best part eating them! These S’mores Cones are best enjoyed warm, when the marshmallows are still gooey and the chocolate is melty. They’re perfect for parties, campfires, or just a fun treat on a weeknight.
- Carefully unwrap the foil from each cone. Be gentle, as the cones will be delicate.
- Let cool slightly before serving. While they’re best enjoyed warm, letting them cool for a few minutes will prevent you from burning your mouth.
- Enjoy! Dig in and savor the delicious combination of gooey marshmallows, melty chocolate, and crispy waffle cone.
Tips and Variations:
Want to make your S’mores Cones even more special? Here are a few tips and variations to try:
- Use different types of chocolate. Experiment with dark chocolate, white chocolate, or even flavored chocolate bars.
- Add different toppings. Try adding chopped nuts, sprinkles, shredded coconut, or even a drizzle of caramel sauce.
- Use different types of marshmallows. Jumbo marshmallows, flavored marshmallows, or even marshmallow fluff would all be delicious.
- Make them ahead of time. You can assemble the cones ahead of time and bake them just before serving.
- Use a grill. Wrap the cones in foil and place them on a grill over low heat for a few minutes, until the marshmallows are melted and the chocolate is gooey.
- Add a scoop of ice cream. For an extra decadent treat, top your S’mores Cone with a scoop of vanilla ice cream.
- Peanut Butter Power: A thin layer of peanut butter at the bottom of the cone before adding marshmallows and chocolate adds a nutty, savory element that complements the sweetness perfectly.
- Caramel Craze: Drizzle caramel sauce over the marshmallows and chocolate before baking for a rich, gooey caramel flavor. You can also add caramel bits.
- Nutty Delight: Sprinkle chopped pecans, walnuts, or almonds over the chocolate for added crunch and flavor.
- Mint Chocolate Chip: Use mint chocolate chips instead of regular chocolate for a refreshing twist.
- Salty Sweet: A sprinkle of sea salt on top of the baked cone enhances the sweetness and adds a delightful salty contrast.
- Spicy Kick: Add a pinch of chili powder to the marshmallows for a subtle spicy kick.
- Fruit Fusion: Add sliced strawberries or raspberries to the cone before baking for a fruity and fresh flavor.
- Cookie Crumbles: Instead of graham cracker crumbs, use crushed Oreos or chocolate chip cookies for a different cookie flavor.
- Espresso Enhancement: A sprinkle of instant espresso powder over the chocolate adds a rich coffee flavor.
Troubleshooting:
Sometimes things don’t go exactly as planned. Here are a few common problems and how to fix them:
- Cones are burning. Make sure the cones are completely wrapped in foil. If they’re still burning, reduce the oven temperature or shorten the baking time.
- Marshmallows are not melting. Make sure the oven is preheated to the correct temperature. You may also need to bake the cones for a few minutes longer.
- Chocolate is not melting. Break the chocolate into smaller pieces and make sure it’s evenly distributed among the marshmallows.
- Cones are falling over. Use a muffin tin or baking dish to support the cones while they’re baking.
- Marshmallows are sticking to the foil. Let the cones cool slightly before unwrapping them. You can also spray the foil with cooking spray before wrapping the cones.
Storage:
If you have any leftover S’mores Cones (which is unlikely!), you can store them in an airtight container at room temperature for up to 2 days. However, they’re best enjoyed fresh, so I recommend eating them as soon as possible!
Nutritional Information (Approximate):
Please note that this is an approximate estimate and may vary depending on the specific ingredients used.
- Calories: 250-300 per cone
- Fat: 10-15 grams
- Saturated Fat: 6-8 grams
- Cholesterol: 5-10 mg
- Sodium: 50-75 mg
- Carbohydrates: 35-45 grams
- Sugar: 25-35 grams
- Protein: 2-3 grams
Enjoy your delicious homemade S’mores Cones! I hope you have as much fun making and eating them as I do!
Conclusion:
So there you have it! These S’mores Cones are truly a must-try. I know, I know, I’m biased, but trust me on this one. They’re ridiculously easy to make, require minimal cleanup (always a win in my book!), and deliver that classic s’mores flavor in a fun, portable, and slightly less messy package. What’s not to love?
Think about it: the warm, gooey marshmallow, the melty chocolate, and the satisfying crunch of the cone all perfectly balanced in every single bite. Forget sticky fingers and campfire mishaps; these cones are the civilized (but equally delicious) way to enjoy a s’mores experience. They’re perfect for backyard barbecues, camping trips (ironically!), birthday parties, or even just a cozy night in when you’re craving something sweet and comforting.
But the best part? The versatility! Feel free to get creative with your fillings. While the classic chocolate bar is always a winner, why not experiment with different flavors? Think peanut butter cups, caramel-filled chocolates, or even a sprinkle of sea salt for a sweet and salty twist. For the truly adventurous, consider adding a layer of Nutella or a dollop of raspberry jam before you add the marshmallows. The possibilities are endless!
Serving Suggestions and Variations:
* For an extra touch of elegance, drizzle melted chocolate over the finished cones and sprinkle with chopped nuts or sprinkles.
* If you’re serving these at a party, set up a “S’mores Cone Bar” with a variety of chocolate options, toppings, and even different types of cones (waffle cones, sugar cones, etc.).
* Want to make them even more decadent? Add a scoop of vanilla ice cream on top of the warm s’mores cone.
* For a healthier option, use dark chocolate and whole wheat cones.
* Consider using flavored marshmallows for an extra burst of flavor. Strawberry, vanilla, or even toasted coconut marshmallows would be amazing!
* If you don’t have a grill, you can easily bake these in the oven at 350°F (175°C) for about 5-7 minutes, or until the marshmallows are golden brown and gooey.
* For a vegan version, use vegan marshmallows and vegan chocolate.
I truly believe that these S’mores Cones will become a new family favorite. They’re a guaranteed crowd-pleaser, and they’re so much fun to make with kids. So, gather your ingredients, preheat your grill (or oven!), and get ready to experience s’mores in a whole new way.
I’m so excited for you to try this recipe! And more importantly, I want to hear all about your experience. Did you try any fun variations? Did you make them for a special occasion? What did your family and friends think? Please, please, please share your photos and stories in the comments below. I can’t wait to see what you create! Happy s’mores-ing!
Smores Cones: The Ultimate Guide to Delicious Campfire Treats
Easy and fun S'mores Cones! Waffle cones filled with marshmallows, chocolate, and graham cracker crumbs, baked to gooey perfection. A simple twist on a classic campfire treat!
Ingredients
- 12 waffle cones
- 1 (10.5 ounce) bag miniature marshmallows
- 6 (1.55 ounce) milk chocolate candy bars, broken into pieces
- 1/2 cup graham cracker crumbs (optional, for added flavor and texture)
- Aluminum foil
Instructions
- Preheat: Preheat your oven to 350°F (175°C).
- Wrap Cones: Wrap each waffle cone individually in aluminum foil, leaving the top open. Use a double layer for extra protection.
- Arrange Cones: Stand the wrapped cones upright in a muffin tin or baking dish.
- Fill with Marshmallows: Fill each cone with miniature marshmallows, packing them tightly but leaving room at the top.
- Add Chocolate: Nestle the broken milk chocolate pieces among the marshmallows, distributing them evenly.
- Sprinkle (Optional): Sprinkle graham cracker crumbs over the top of the chocolate.
- Bake: Bake in the preheated oven for 5-7 minutes, or until the marshmallows are puffed and slightly golden brown and the chocolate is melted.
- Cool: Remove from the oven and let cool slightly before unwrapping.
- Unwrap: Carefully unwrap the foil from each cone.
- Serve: Let cool slightly before serving and enjoy!
Notes
- Use different types of chocolate (dark, white, flavored).
- Add toppings like chopped nuts, sprinkles, shredded coconut, or caramel sauce.
- Try different marshmallows (jumbo, flavored, fluff).
- Add a thin layer of peanut butter at the bottom of the cone.
- Drizzle caramel sauce over the marshmallows and chocolate before baking.
- Sprinkle chopped pecans, walnuts, or almonds over the chocolate.
- Use mint chocolate chips instead of regular chocolate.
- A sprinkle of sea salt on top of the baked cone enhances the sweetness.
- Add a pinch of chili powder to the marshmallows for a subtle spicy kick.
- Add sliced strawberries or raspberries to the cone before baking.
- Instead of graham cracker crumbs, use crushed Oreos or chocolate chip cookies.
- A sprinkle of instant espresso powder over the chocolate adds a rich coffee flavor.
- Ensure cones are completely wrapped in foil. Reduce oven temperature or baking time.
- Ensure oven is preheated. Bake for a few minutes longer.
- Break chocolate into smaller pieces and distribute evenly.
- Use a muffin tin or baking dish to support the cones.
- Let cones cool slightly before unwrapping. Spray foil with cooking spray.
- Store leftover cones in an airtight container at room temperature for up to 2 days. Best enjoyed fresh.

Leave a Comment