

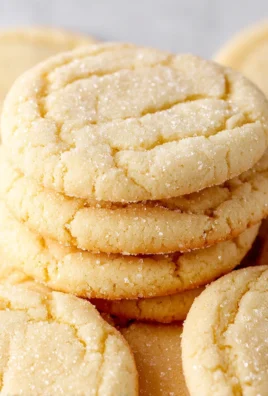
Easter Cake Mix Cookies: the easiest, most festive treat you’ll bake all spring! Imagine biting into a soft, chewy cookie bursting with the bright, cheerful flavors of vanilla cake, all dressed up in pastel sprinkles and candy-coated chocolate eggs. These aren’t just cookies; they’re a celebration on a plate, perfect for sharing with loved ones or enjoying as a sweet indulgence after your Easter feast.
While the exact origins of cake mix cookies are a bit hazy, they emerged as a delightful shortcut in the mid-20th century, capitalizing on the convenience of boxed cake mixes. They quickly became a favorite for busy home bakers looking to whip up a batch of delicious cookies with minimal effort. What makes these Easter Cake Mix Cookies so irresistible? It’s the perfect combination of simplicity and satisfaction. The cake mix base guarantees a moist, tender texture, while the addition of Easter-themed candies and sprinkles adds a playful touch that appeals to both kids and adults.
People adore these cookies because they are incredibly easy to make, requiring just a few ingredients and minimal baking time. Plus, the customization options are endless! You can use different cake mix flavors, add various candies, and decorate them to your heart’s content. Whether you’re a seasoned baker or a complete novice, these cookies are guaranteed to be a crowd-pleaser. Get ready to experience the joy of baking (and eating!) these delightful Easter treats!

Ingredients:
- 1 box (15.25 ounces) Easter Cake Mix (any flavor, but vanilla or white work best!)
- ½ cup (1 stick) unsalted butter, softened
- 2 large eggs
- 1 teaspoon vanilla extract
- ½ cup all-purpose flour (plus more for dusting)
- ½ cup Easter-themed sprinkles (or any sprinkles you like!)
- Optional: ¼ cup powdered sugar, for dusting
Preparing the Dough:
- Cream the Butter and Cake Mix: In a large mixing bowl, cream together the softened butter and the Easter cake mix using an electric mixer on medium speed. Beat until the mixture is light and fluffy, about 2-3 minutes. This step is crucial for creating a tender cookie, so don’t rush it! Make sure the butter is truly softened, but not melted. If it’s too cold, it won’t incorporate properly, and if it’s melted, the cookies will spread too thin.
- Incorporate the Wet Ingredients: Add the eggs one at a time, beating well after each addition. This ensures that each egg is fully incorporated into the batter. Then, stir in the vanilla extract. The vanilla enhances the flavor of the cake mix and adds a touch of warmth to the cookies.
- Gradually Add the Flour: Gradually add the all-purpose flour to the wet ingredients, mixing on low speed until just combined. Be careful not to overmix the dough, as this can develop the gluten in the flour and result in tough cookies. Mix until the flour is just incorporated and no streaks remain. The flour helps to give the cookies structure and prevents them from spreading too much during baking.
- Fold in the Sprinkles: Gently fold in the Easter-themed sprinkles. I like to use a rubber spatula for this step to avoid overmixing. Distribute the sprinkles evenly throughout the dough. The sprinkles add a festive touch and a bit of crunch to the cookies.
- Chill the Dough: Cover the bowl with plastic wrap and chill the dough in the refrigerator for at least 30 minutes. This step is essential for preventing the cookies from spreading too much during baking. Chilling the dough allows the butter to solidify, which helps the cookies hold their shape. You can chill the dough for up to 2 hours if needed.
Baking the Cookies:
- Preheat the Oven: Preheat your oven to 350°F (175°C). Line a baking sheet with parchment paper or a silicone baking mat. Parchment paper prevents the cookies from sticking to the baking sheet and makes cleanup a breeze. A silicone baking mat provides even heat distribution and helps to prevent the cookies from burning on the bottom.
- Scoop the Dough: Remove the chilled dough from the refrigerator. Using a cookie scoop or a spoon, scoop rounded tablespoons of dough onto the prepared baking sheet, leaving about 2 inches between each cookie. This allows the cookies to spread slightly without running into each other.
- Bake the Cookies: Bake for 8-10 minutes, or until the edges are lightly golden brown and the centers are set. Keep a close eye on the cookies, as they can burn easily. The baking time will vary depending on your oven, so start checking them at 8 minutes.
- Cool the Cookies: Remove the baking sheet from the oven and let the cookies cool on the baking sheet for a few minutes before transferring them to a wire rack to cool completely. This allows the cookies to firm up slightly and prevents them from breaking when you transfer them.
Optional: Dusting with Powdered Sugar:
- Dust with Powdered Sugar (Optional): Once the cookies are completely cooled, you can dust them with powdered sugar for an extra touch of sweetness and visual appeal. Place the powdered sugar in a fine-mesh sieve and gently tap it over the cookies. This creates a light and even dusting.
Tips and Tricks for Perfect Easter Cake Mix Cookies:
- Don’t Overmix the Dough: Overmixing the dough can develop the gluten in the flour, resulting in tough cookies. Mix until the flour is just incorporated and no streaks remain.
- Chill the Dough: Chilling the dough is essential for preventing the cookies from spreading too much during baking. Chill the dough for at least 30 minutes, or up to 2 hours.
- Use Softened Butter: Make sure the butter is truly softened, but not melted. If it’s too cold, it won’t incorporate properly, and if it’s melted, the cookies will spread too thin.
- Don’t Overbake the Cookies: Overbaking the cookies will result in dry, crumbly cookies. Bake until the edges are lightly golden brown and the centers are set.
- Experiment with Flavors: Feel free to experiment with different flavors of cake mix. Chocolate cake mix, strawberry cake mix, or lemon cake mix would all be delicious!
- Add Different Sprinkles: Get creative with your sprinkles! Use different colors, shapes, and sizes to create unique and festive cookies.
- Add Chocolate Chips: For an extra touch of indulgence, add chocolate chips to the dough. White chocolate chips, milk chocolate chips, or dark chocolate chips would all be delicious.
- Make Sandwich Cookies: Spread frosting between two cookies to create sandwich cookies. Vanilla frosting, chocolate frosting, or cream cheese frosting would all be delicious.
- Store the Cookies Properly: Store the cookies in an airtight container at room temperature for up to 3 days.
- Freeze the Cookies: You can freeze the cookies for up to 2 months. Wrap them tightly in plastic wrap and then place them in a freezer-safe bag or container. Thaw the cookies at room temperature before serving.
Troubleshooting:
Why are my cookies spreading too thin?
This is usually caused by using butter that is too soft or melted, or by not chilling the dough for long enough. Make sure your butter is softened but not melted, and chill the dough for at least 30 minutes.
Why are my cookies dry and crumbly?
This is usually caused by overbaking the cookies. Bake until the edges are lightly golden brown and the centers are set, but don’t let them get too brown.
Why are my cookies tough?
This is usually caused by overmixing the dough. Mix until the flour is just incorporated and no streaks remain.
Can I use a different type of flour?
I recommend using all-purpose flour for this recipe. Other types of flour may not work as well and could affect the texture of the cookies.
Can I use a different type of sweetener?
The cake mix already contains sugar, so I don’t recommend adding any additional sweetener. If you want to reduce the sweetness, you can use a sugar-free cake mix.
Can I make these cookies gluten-free?
Yes, you can make these cookies gluten-free by using a gluten-free cake mix and gluten-free all-purpose flour. Be sure to check the labels of all ingredients to ensure they are gluten-free.
Can I make these cookies vegan?
It’s tricky to make these vegan due to the eggs and butter. You would need to find vegan substitutes for both, and the texture might be different. Look for vegan cake mix cookie recipes specifically designed for that.
Conclusion:
This Easter, ditch the complicated baking projects and embrace the sheer joy of these Easter Cake Mix Cookies! I promise, you won’t regret it. They’re incredibly easy to make, bursting with festive flavor, and a guaranteed crowd-pleaser. Forget spending hours measuring ingredients and worrying about finicky doughs. This recipe simplifies everything, allowing you to focus on the fun part: decorating and enjoying the holiday with loved ones.
Why are these cookies a must-try? Because they deliver maximum flavor with minimal effort. The cake mix base provides a moist, tender crumb that’s simply irresistible. The addition of Easter-themed sprinkles and candies transforms them into adorable, festive treats that are perfect for gifting, sharing at gatherings, or simply indulging in yourself. Plus, they’re so quick to whip up, you can easily make a batch (or two!) on a whim.
But the best part? The versatility! While I’ve shared my favorite combination of vanilla cake mix, pastel sprinkles, and mini chocolate eggs, the possibilities are truly endless. Feel free to experiment with different cake mix flavors. Chocolate cake mix would create a rich, decadent cookie, while lemon cake mix would add a bright, citrusy twist. You could even use a confetti cake mix for an extra burst of color and fun.
Serving Suggestions and Variations:
* Iced Easter Cookies: For an extra touch of sweetness and elegance, try frosting the cooled cookies with a simple buttercream icing. Tint the icing with pastel colors to match the Easter theme and decorate with more sprinkles or edible glitter.
* Easter Cookie Sandwiches: Spread a layer of frosting or cream cheese filling between two cookies to create delightful cookie sandwiches.
* Easter Cookie Pops: Insert lollipop sticks into the cookies before baking to create fun and festive cookie pops. Dip them in melted chocolate and decorate with sprinkles for an extra special treat.
* Gluten-Free Easter Cookies: Simply substitute the regular cake mix with a gluten-free version to accommodate dietary restrictions.
* Add-Ins Galore: Get creative with your add-ins! Consider incorporating chopped nuts, shredded coconut, dried fruit, or even mini marshmallows into the dough.
* Different Candies: Swap out the mini chocolate eggs for other Easter candies like jelly beans, Cadbury Mini Eggs, or even chopped-up Peeps.
These Easter Cake Mix Cookies are more than just a recipe; they’re an invitation to create joyful memories and celebrate the season with delicious, homemade treats. They are the perfect way to get the kids involved in the kitchen, and the simplicity of the recipe means even the youngest bakers can participate. Imagine the smiles on their faces as they sprinkle, decorate, and, of course, taste-test their creations!
So, what are you waiting for? Gather your ingredients, preheat your oven, and get ready to bake up a batch of these irresistible Easter Cake Mix Cookies. I’m confident that they’ll become a new family favorite.
I’m so excited for you to try this recipe! Once you do, I’d love to hear about your experience. Did you make any variations? What were your favorite add-ins? Share your photos and stories in the comments below! Happy baking, and Happy Easter!
Easter Cake Mix Cookies: Easy Recipe & Baking Tips
Easy, festive Easter Cake Mix Cookies! Soft, chewy, and made with simple ingredients, perfect for a quick treat. Customize with your favorite sprinkles and cake mix flavor!
Ingredients
- 1 box (15.25 ounces) Easter Cake Mix (any flavor, but vanilla or white work best!)
- ½ cup (1 stick) unsalted butter, softened
- 2 large eggs
- 1 teaspoon vanilla extract
- ½ cup all-purpose flour (plus more for dusting)
- ½ cup Easter-themed sprinkles (or any sprinkles you like!)
- Optional: ¼ cup powdered sugar, for dusting
Instructions
- Cream together the softened butter and the Easter cake mix using an electric mixer on medium speed. Beat until the mixture is light and fluffy, about 2-3 minutes.
- Add the eggs one at a time, beating well after each addition. Then, stir in the vanilla extract.
- Gradually add the all-purpose flour to the wet ingredients, mixing on low speed until just combined. Be careful not to overmix the dough.
- Gently fold in the Easter-themed sprinkles. Distribute the sprinkles evenly throughout the dough.
- Cover the bowl with plastic wrap and chill the dough in the refrigerator for at least 30 minutes.
- Preheat your oven to 350°F (175°C). Line a baking sheet with parchment paper or a silicone baking mat.
- Remove the chilled dough from the refrigerator. Using a cookie scoop or a spoon, scoop rounded tablespoons of dough onto the prepared baking sheet, leaving about 2 inches between each cookie.
- Bake for 8-10 minutes, or until the edges are lightly golden brown and the centers are set.
- Remove the baking sheet from the oven and let the cookies cool on the baking sheet for a few minutes before transferring them to a wire rack to cool completely.
- Dust with powdered sugar for an extra touch of sweetness and visual appeal. Place the powdered sugar in a fine-mesh sieve and gently tap it over the cookies.
Notes
- Don’t Overmix the Dough: Overmixing the dough can develop the gluten in the flour, resulting in tough cookies. Mix until the flour is just incorporated and no streaks remain.
- Chill the Dough: Chilling the dough is essential for preventing the cookies from spreading too much during baking. Chill the dough for at least 30 minutes, or up to 2 hours.
- Use Softened Butter: Make sure the butter is truly softened, but not melted. If it’s too cold, it won’t incorporate properly, and if it’s melted, the cookies will spread too thin.
- Don’t Overbake the Cookies: Overbaking the cookies will result in dry, crumbly cookies. Bake until the edges are lightly golden brown and the centers are set.
- Experiment with Flavors: Feel free to experiment with different flavors of cake mix. Chocolate cake mix, strawberry cake mix, or lemon cake mix would all be delicious!
- Add Different Sprinkles: Get creative with your sprinkles! Use different colors, shapes, and sizes to create unique and festive cookies.
- Add Chocolate Chips: For an extra touch of indulgence, add chocolate chips to the dough. White chocolate chips, milk chocolate chips, or dark chocolate chips would all be delicious.
- Make Sandwich Cookies: Spread frosting between two cookies to create sandwich cookies. Vanilla frosting, chocolate frosting, or cream cheese frosting would all be delicious.
- Store the Cookies Properly: Store the cookies in an airtight container at room temperature for up to 3 days.
- Freeze the Cookies: You can freeze the cookies for up to 2 months. Wrap them tightly in plastic wrap and then place them in a freezer-safe bag or container. Thaw the cookies at room temperature before serving.
Leave a Comment