

Authentic Mexican Carnitas: Prepare to embark on a culinary journey south of the border, right in your own kitchen! Imagine sinking your teeth into tender, juicy, and flavorful pork, slow-cooked to perfection until it practically melts in your mouth. This isn’t just any pork dish; it’s a celebration of Mexican culinary heritage, a dish steeped in tradition and bursting with authentic flavors.
Carnitas, meaning “little meats,” originated in the state of Michoacán, Mexico, and has been a staple of Mexican cuisine for generations. Traditionally, it’s prepared in a large copper pot, allowing the pork to confit in its own rendered fat, resulting in an unparalleled richness and depth of flavor. While we might not all have a copper pot handy, fear not! This recipe brings the authentic taste of Mexican carnitas to your home using readily available equipment.
What makes authentic Mexican carnitas so irresistible? It’s the perfect combination of textures crispy, golden-brown edges giving way to incredibly tender, succulent meat. The flavor is a symphony of savory pork, hints of citrus, and aromatic spices. Whether enjoyed in tacos, burritos, or simply on its own with a squeeze of lime and your favorite salsa, carnitas are a crowd-pleaser that’s sure to impress. Plus, it’s surprisingly easy to make, perfect for feeding a crowd or meal prepping for the week. Get ready to experience the magic of authentic Mexican carnitas!

Ingredients:
- 5 lbs Pork Shoulder (Boston Butt), cut into 2-3 inch chunks
- 1 large Orange, quartered
- 1 large Onion, quartered
- 4 cloves Garlic, smashed
- 2 Bay Leaves
- 1 tbsp Dried Oregano, Mexican preferred
- 1 tsp Ground Cumin
- 1/2 tsp Ground Coriander
- 1/4 tsp Ground Cinnamon
- 1/4 tsp Ground Cloves
- 1/2 cup Lard (or vegetable oil)
- 1/4 cup Kosher Salt, plus more to taste
- 1 tsp Black Pepper, freshly ground, plus more to taste
- 1/2 cup Mexican Coke (optional, but adds a nice sweetness and color)
- Water, enough to cover the pork
Preparing the Pork and Aromatics:
Okay, let’s get started! First things first, we need to prep our pork. I like to use a good quality pork shoulder, also known as Boston Butt. Make sure it’s cut into manageable chunks, about 2-3 inches each. This helps with even cooking and rendering of the fat.
Now, grab your orange and onion. Quarter them both. The orange adds a lovely citrusy note that balances the richness of the pork, and the onion provides a savory depth. Don’t skip these!
Smash your garlic cloves. You don’t need to mince them; just give them a good whack with the side of your knife. This releases their flavor beautifully. Gather your bay leaves, dried oregano, cumin, coriander, cinnamon, and cloves. These spices are what give carnitas their signature warm and aromatic flavor. I highly recommend using Mexican oregano if you can find it; it has a slightly different flavor profile than Mediterranean oregano.
The Braising Process:
This is where the magic happens! We’re going to slowly braise the pork in a flavorful liquid until it’s fall-apart tender. Trust me, the patience is worth it.
- Combine Ingredients in a Large Pot: In a large, heavy-bottomed pot or Dutch oven, combine the pork chunks, quartered orange and onion, smashed garlic, bay leaves, dried oregano, cumin, coriander, cinnamon, cloves, lard (or vegetable oil), salt, and pepper.
- Add Liquid: Pour in the Mexican Coke (if using) and enough water to completely cover the pork. The liquid is crucial for the braising process, keeping the pork moist and allowing it to become incredibly tender.
- Bring to a Boil, Then Simmer: Bring the mixture to a boil over high heat. Once boiling, reduce the heat to low, cover the pot tightly, and let it simmer gently for about 3-4 hours, or until the pork is incredibly tender and easily shreds with a fork. The exact cooking time will depend on the size of your pork chunks and the heat of your stove. Check it periodically to make sure the liquid hasn’t evaporated completely; if it has, add a little more water.
- Shred the Pork: Once the pork is cooked through, remove it from the pot with a slotted spoon and place it in a large bowl. Use two forks to shred the pork into bite-sized pieces. Discard the orange, onion, garlic, and bay leaves from the braising liquid.
The Crisping Stage:
This is what separates good carnitas from truly amazing carnitas! We’re going to crisp up the shredded pork in its own rendered fat, creating those irresistible crispy edges and a rich, savory flavor.
- Strain the Braising Liquid: Carefully strain the braising liquid through a fine-mesh sieve into a separate bowl or container. This will remove any small bits of bone or spices.
- Return Pork and Some Liquid to the Pot: Return the shredded pork to the pot. Pour about 1-2 cups of the strained braising liquid back into the pot with the pork. You don’t want to drown the pork, just enough to keep it moist and help it crisp up. The amount of liquid you add will depend on how much fat rendered out of the pork during the braising process. You want enough fat to coat the bottom of the pot and help the pork crisp up nicely.
- Crisp the Pork: Increase the heat to medium-high. Cook the pork, stirring occasionally, until it’s nicely browned and crispy on the edges. This will take about 20-30 minutes. Be careful not to burn the pork; adjust the heat as needed. The key is to let the pork sit undisturbed for a few minutes at a time to allow it to develop a good crust before stirring.
- Adjust Seasoning: Taste the carnitas and adjust the seasoning with salt and pepper as needed. Remember that the braising liquid is already seasoned, so you may not need to add much.
Serving Suggestions:
Now for the best part enjoying your homemade carnitas! There are so many ways to serve them. Here are a few of my favorites:
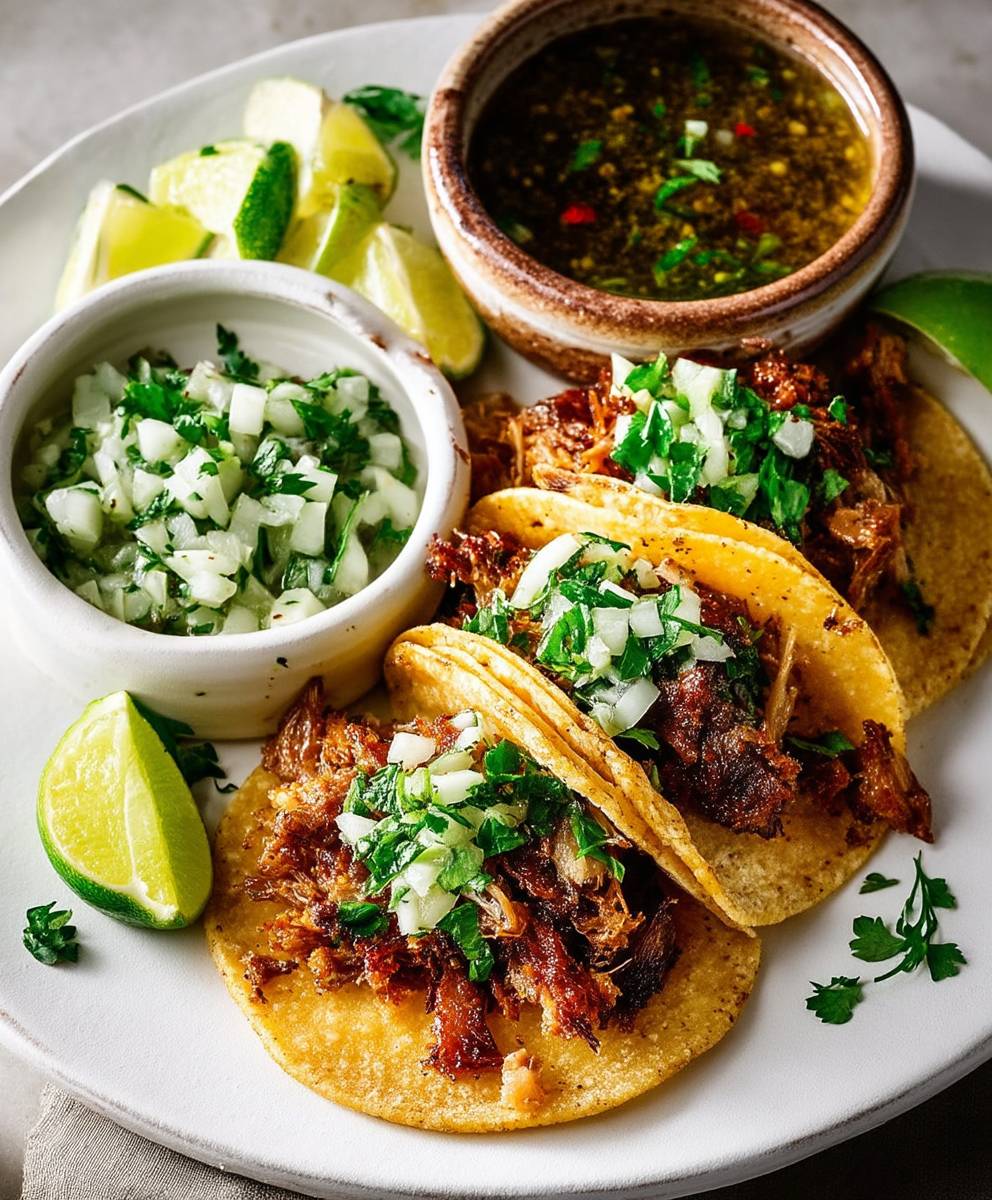
- Tacos: Warm corn tortillas, carnitas, chopped onion, cilantro, salsa, and a squeeze of lime. This is the classic way to enjoy carnitas!
- Burritos: Load up a large flour tortilla with carnitas, rice, beans, cheese, salsa, and your favorite toppings.
- Quesadillas: Fill a tortilla with carnitas and cheese, then grill or pan-fry until golden brown and the cheese is melted.
- Carnitas Bowls: Create a delicious and healthy bowl with carnitas, rice, beans, avocado, salsa, and a dollop of sour cream or Greek yogurt.
- Simply on their own: Serve the carnitas with a side of rice, beans, and your favorite Mexican condiments.
Tips for Success:
- Don’t overcrowd the pot: If you’re making a large batch of carnitas, it’s better to cook it in batches to ensure even browning and crisping.
- Use a heavy-bottomed pot: This will help prevent the pork from sticking and burning.
- Be patient: The braising and crisping processes take time, but the results are well worth the effort.
- Don’t be afraid to experiment: Feel free to add other spices or ingredients to the braising liquid, such as chili powder, smoked paprika, or a splash of beer.
- Leftovers: Carnitas are even better the next day! Store them in an airtight container in the refrigerator for up to 3-4 days. Reheat them in a skillet or in the oven until warmed through and crispy.
Enjoy your delicious, authentic Mexican carnitas! I hope you love this recipe as much as I do. Let me know in the comments how they turn out!
Conclusion:
So, there you have it! My take on authentic Mexican carnitas, a dish that’s truly a labor of love, but oh-so-worth it in the end. I know, I know, the cooking time might seem a little daunting, but trust me, the melt-in-your-mouth, crispy-on-the-outside pork you’ll get is unlike anything you’ve ever tasted. It’s an explosion of flavor that will transport you straight to a bustling street food stall in Mexico.
Why is this recipe a must-try? Well, beyond the incredible taste, it’s about experiencing a piece of culinary tradition. It’s about slowing down, savoring the process, and creating something truly special for yourself, your family, or your friends. This isn’t just another pork recipe; it’s an experience. It’s the kind of dish that people will rave about and ask you to make again and again. And let’s be honest, who doesn’t love being known for their amazing cooking skills?
But the best part? The versatility! While these carnitas are absolutely divine on their own, shredded and piled high on warm tortillas with a sprinkle of cilantro and a squeeze of lime, the possibilities are truly endless. Think about using them to create incredible tacos, burritos, or even a hearty carnitas bowl with rice, beans, and all your favorite toppings. You could even use the shredded pork in a quesadilla or as a filling for empanadas.
And speaking of variations, don’t be afraid to experiment! If you like a little heat, add a few dried chiles to the cooking liquid. Or, for a sweeter note, try incorporating a bit of orange juice or Coca-Cola (yes, really!) into the braising liquid. Some people even add a splash of beer for extra depth of flavor. The key is to find what works best for your taste buds and to have fun with it. Feel free to adjust the seasonings to your liking. If you prefer a more savory flavor, add more salt and pepper. If you like a little sweetness, add a touch of brown sugar. The beauty of cooking is that it’s all about personal preference.
Serving Suggestions:
- Classic Tacos: Warm corn tortillas, shredded carnitas, chopped cilantro, diced onion, a squeeze of lime, and your favorite salsa.
- Carnitas Burrito Bowls: Rice, black beans, corn, guacamole, sour cream, salsa, and a generous helping of carnitas.
- Carnitas Quesadillas: Melted cheese, carnitas, and your favorite toppings grilled in a tortilla.
- Carnitas Nachos: Tortilla chips, melted cheese, carnitas, jalapenos, sour cream, guacamole, and salsa.
I truly believe that anyone can make these authentic Mexican carnitas with a little patience and attention to detail. So, I urge you to give this recipe a try. Gather your ingredients, put on some music, and get ready to embark on a culinary adventure. I promise you won’t regret it!
And most importantly, I want to hear about your experience! Did you try the recipe? What variations did you make? What did you think? Share your photos and stories in the comments below. I can’t wait to see what you create! Happy cooking!
Authentic Mexican Carnitas: The Ultimate Guide to Making Perfect Carnitas
Tender, juicy, and crispy Mexican carnitas made from slow-braised pork shoulder, then crisped to perfection. Perfect for tacos, burritos, or bowls!
Ingredients
- 5 lbs Pork Shoulder (Boston Butt), cut into 2-3 inch chunks
- 1 large Orange, quartered
- 1 large Onion, quartered
- 4 cloves Garlic, smashed
- 2 Bay Leaves
- 1 tbsp Dried Oregano, Mexican preferred
- 1 tsp Ground Cumin
- 1/2 tsp Ground Coriander
- 1/4 tsp Ground Cinnamon
- 1/4 tsp Ground Cloves
- 1/2 cup Lard (or vegetable oil)
- 1/4 cup Kosher Salt, plus more to taste
- 1 tsp Black Pepper, freshly ground, plus more to taste
- 1/2 cup Mexican Coke (optional, but adds a nice sweetness and color)
- Water, enough to cover the pork
Instructions
- Combine Ingredients in a Large Pot: In a large, heavy-bottomed pot or Dutch oven, combine the pork chunks, quartered orange and onion, smashed garlic, bay leaves, dried oregano, cumin, coriander, cinnamon, cloves, lard (or vegetable oil), salt, and pepper.
- Add Liquid: Pour in the Mexican Coke (if using) and enough water to completely cover the pork.
- Bring to a Boil, Then Simmer: Bring the mixture to a boil over high heat. Once boiling, reduce the heat to low, cover the pot tightly, and let it simmer gently for about 3-4 hours, or until the pork is incredibly tender and easily shreds with a fork. Check it periodically to make sure the liquid hasn’t evaporated completely; if it has, add a little more water.
- Shred the Pork: Once the pork is cooked through, remove it from the pot with a slotted spoon and place it in a large bowl. Use two forks to shred the pork into bite-sized pieces. Discard the orange, onion, garlic, and bay leaves from the braising liquid.
- Strain the Braising Liquid: Carefully strain the braising liquid through a fine-mesh sieve into a separate bowl or container. This will remove any small bits of bone or spices.
- Return Pork and Some Liquid to the Pot: Return the shredded pork to the pot. Pour about 1-2 cups of the strained braising liquid back into the pot with the pork.
- Crisp the Pork: Increase the heat to medium-high. Cook the pork, stirring occasionally, until it’s nicely browned and crispy on the edges. This will take about 20-30 minutes. Be careful not to burn the pork; adjust the heat as needed. The key is to let the pork sit undisturbed for a few minutes at a time to allow it to develop a good crust before stirring.
- Adjust Seasoning: Taste the carnitas and adjust the seasoning with salt and pepper as needed.
Notes
- Use a good quality pork shoulder (Boston Butt).
- Mexican oregano is preferred for a slightly different flavor profile.
- Don’t overcrowd the pot when crisping the pork; cook in batches if necessary.
- Use a heavy-bottomed pot to prevent sticking and burning.
- Be patient during the braising and crisping processes.
- Experiment with other spices or ingredients in the braising liquid.
- Leftovers are even better the next day! Store in an airtight container in the refrigerator for up to 3-4 days. Reheat in a skillet or in the oven until warmed through and crispy.


Leave a Comment