

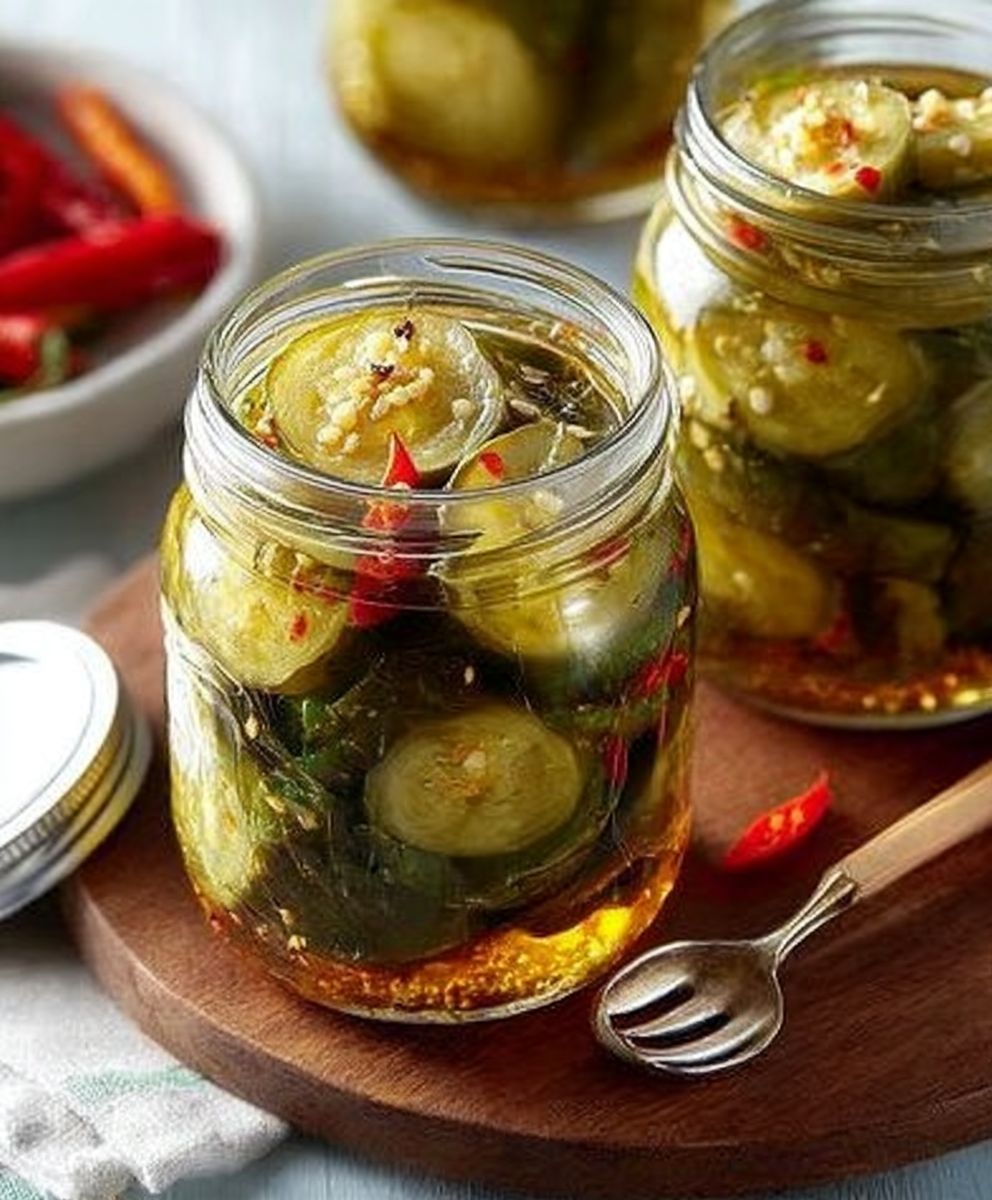
Bread and Butter Pickles: that sweet, tangy crunch that elevates everything from burgers to charcuterie boards. Have you ever wondered how something so simple could pack such a flavorful punch? I certainly have! These aren’t your average dill pickles; they offer a delightful sweetness balanced by a subtle tang, making them utterly irresistible.
While the exact origins are debated, the most popular story attributes these delightful pickles to Omar and Cora Fanning, Illinois cucumber farmers in the 1920s. During a lean year, they bartered their surplus cucumbers for bread and butter, hence the name! This resourceful act birthed a culinary staple that continues to be enjoyed generations later. The beauty of bread and butter pickles lies in their versatility and ease of preparation.
People adore these pickles for their unique flavor profile. The sweetness, often derived from sugar and spices like turmeric and mustard seed, perfectly complements the vinegar’s tang. The crisp texture provides a satisfying crunch that makes them incredibly addictive. Plus, they’re incredibly convenient! Whether you’re making them from scratch or grabbing a jar from the store, they’re always ready to add a burst of flavor to your meal. I find myself reaching for them constantly!

Ingredients:
- 6 cups thinly sliced cucumbers (about 3 pounds)
- 2 cups thinly sliced onions (about 1 pound)
- 1/4 cup pickling salt
- 2 cups white vinegar (5% acidity)
- 2 cups apple cider vinegar (5% acidity)
- 2 cups granulated sugar
- 1 tablespoon mustard seeds
- 1 teaspoon celery seeds
- 1/2 teaspoon ground turmeric
- 1/4 teaspoon ground cloves
- Optional: 1/4 teaspoon red pepper flakes (for a little heat)
- Optional: 2 cloves garlic, minced
- Ice cubes
Preparing the Vegetables:
- Slice the cucumbers and onions: This is the most time-consuming part, but it’s crucial for even pickling. I like to use a mandoline slicer for consistent thickness, but a sharp knife works just fine. Aim for slices about 1/8 inch thick. Thicker slices will take longer to pickle, and thinner slices might get too soft.
- Combine vegetables and salt: In a large, non-reactive bowl (stainless steel or glass is best; avoid aluminum), combine the sliced cucumbers and onions. Sprinkle the pickling salt evenly over the vegetables.
- Add ice and water: Cover the vegetables with ice cubes and cold water. The ice water helps to keep the cucumbers crisp.
- Let stand for 2-4 hours: This step is essential for drawing out excess moisture from the cucumbers, which will result in a crisper pickle. The salt also helps to inhibit the growth of unwanted bacteria. I usually let mine sit for at least 2 hours, but 4 hours is even better. Don’t skip this step!
- Drain and rinse: After the soaking time, drain the cucumbers and onions thoroughly. Rinse them under cold running water to remove the excess salt. Rinse them really well! You don’t want overly salty pickles.
- Drain again: Drain the vegetables very well. I like to use a salad spinner to remove as much excess water as possible. You can also gently pat them dry with paper towels.
Preparing the Pickling Brine:
- Combine vinegars, sugar, and spices: In a large, non-reactive saucepan, combine the white vinegar, apple cider vinegar, granulated sugar, mustard seeds, celery seeds, turmeric, ground cloves, and optional red pepper flakes and minced garlic (if using).
- Bring to a boil: Over medium-high heat, bring the mixture to a rolling boil, stirring constantly to dissolve the sugar. Make sure the sugar is completely dissolved before moving on to the next step.
- Reduce heat and simmer: Once the mixture is boiling, reduce the heat to low and simmer for 5 minutes, stirring occasionally. This allows the flavors of the spices to meld together and infuse the vinegar.
Pickling and Canning (Optional):
- Add vegetables to the brine: Add the drained cucumbers and onions to the simmering brine.
- Bring back to a simmer: Gently stir the vegetables into the brine, ensuring they are all submerged. Bring the mixture back to a simmer.
- Simmer for 10 minutes: Simmer for 10 minutes, stirring occasionally, until the cucumbers turn a slightly translucent color. Be careful not to overcook them, or they will become too soft.
For Refrigerator Pickles (No Canning):
- Cool slightly: Remove the saucepan from the heat and let the mixture cool slightly for about 15-20 minutes. This will prevent the jars from cracking when you pour in the hot pickles.
- Pack into jars: Pack the pickles and brine into clean jars, leaving about 1/2 inch of headspace at the top.
- Refrigerate: Let the jars cool completely before refrigerating. The pickles will taste best after they have been refrigerated for at least 24 hours, allowing the flavors to fully develop. They will keep in the refrigerator for up to 2 months.
For Canning (Shelf-Stable Pickles):
- Prepare canning jars: Wash canning jars, lids, and bands in hot, soapy water. Rinse well. Sterilize the jars by boiling them in a large pot of water for 10 minutes. Keep the jars hot until ready to use. You can also sterilize them in the dishwasher.
- Pack into jars: Pack the hot pickles and brine into the hot, sterilized jars, leaving 1/2 inch of headspace. Remove any air bubbles by running a non-metallic spatula or bubble remover along the inside of the jar.
- Wipe jar rims: Wipe the rims of the jars with a clean, damp cloth to remove any spills or drips.
- Place lids and bands: Place the lids on the jars and screw on the bands until fingertip tight. Do not overtighten.
- Process in a water bath canner: Place the jars in a water bath canner filled with enough water to cover the jars by at least 1 inch. Bring the water to a rolling boil and process for 10 minutes. Adjust processing time for altitude if necessary (add 5 minutes for 1,001-3,000 feet, 10 minutes for 3,001-6,000 feet, 15 minutes for 6,001-8,000 feet, and 20 minutes for 8,001-10,000 feet).
- Remove from canner: Turn off the heat and carefully remove the jars from the canner using a jar lifter. Place the jars on a towel-lined surface to cool.
- Check for seal: As the jars cool, you should hear a popping sound as the lids seal. After the jars have cooled completely (about 12-24 hours), check the seals by pressing down on the center of the lid. If the lid flexes up and down, it is not sealed and should be refrigerated immediately.
- Store: Properly sealed jars can be stored in a cool, dark place for up to 1 year. Refrigerate after opening.
Important Notes:
- Use pickling salt: Pickling salt is pure sodium chloride without any additives like iodine or anti-caking agents, which can darken the pickles and affect their flavor.
- Use the correct vinegar: Use vinegar with 5% acidity for safe pickling. Do not dilute the vinegar.
- Don’t overcook: Overcooked pickles will be soft and mushy.
- Proper canning is essential: If you choose to can your pickles, follow proper canning procedures to ensure food safety.
Conclusion:
And there you have it! These Bread and Butter Pickles are so much more than just a condiment; they’re a burst of sunshine in a jar, a testament to simple ingredients transformed into something truly special. I genuinely believe this recipe is a must-try for anyone who appreciates that perfect balance of sweet, tangy, and crunchy. The subtle warmth of the spices elevates these pickles beyond the ordinary, making them utterly irresistible.
Why is this recipe a must-try? Well, beyond the incredible flavor, it’s incredibly satisfying to create something so delicious from scratch. You control the ingredients, ensuring the highest quality and tailoring the sweetness and spice to your exact preferences. Plus, the process itself is surprisingly therapeutic. There’s something deeply rewarding about transforming fresh cucumbers into jars of vibrant, flavorful pickles. And let’s be honest, who can resist the satisfying *pop* of a freshly opened jar?
But the real magic lies in the versatility of these Bread and Butter Pickles. They’re not just for burgers and sandwiches (though they are phenomenal on both!). Think beyond the usual suspects and consider the endless possibilities.
Serving Suggestions and Variations:
* Elevate your charcuterie board: Add a small bowl of these pickles to your next charcuterie board for a sweet and tangy counterpoint to the savory meats and cheeses.
* Perfect picnic partner: Pack a jar for your next picnic. They’re the ideal accompaniment to sandwiches, salads, and grilled meats.
* Salad sensation: Dice them up and add them to potato salad, tuna salad, or even a simple green salad for a burst of flavor and texture.
* Grilled cheese game-changer: Layer them into your next grilled cheese sandwich for an unexpected and utterly delicious twist. Trust me on this one!
* Spice it up: For a spicier kick, add a pinch of red pepper flakes or a thinly sliced jalapeño to the brine.
* Herbal infusion: Experiment with different herbs like dill, tarragon, or even a sprig of rosemary for a unique flavor profile.
* Sweeten the deal: If you prefer a sweeter pickle, increase the amount of sugar slightly. Conversely, reduce the sugar for a tangier pickle.
* Onion options: While I used yellow onion, feel free to experiment with red onion or even shallots for a different flavor dimension.
I truly hope you’ll give this Bread and Butter Pickles recipe a try. It’s a project that’s both fun and rewarding, and the results are guaranteed to impress. Once you taste these homemade pickles, you’ll never want to go back to store-bought again!
I’m so excited to hear about your experiences making these pickles. Did you try any variations? Did you find the perfect pairing? Please, share your thoughts, tips, and photos in the comments below! I can’t wait to see what you create and learn from your culinary adventures. Happy pickling!
Bread and Butter Pickles: The Ultimate Guide to Making & Enjoying Them
Crisp and tangy homemade cucumber and onion pickles, perfect as a side dish or snack. These pickles are easy to make and can be enjoyed fresh from the refrigerator or preserved through canning.
Ingredients
- 6 cups thinly sliced cucumbers (about 3 pounds)
- 2 cups thinly sliced onions (about 1 pound)
- 1/4 cup pickling salt
- 2 cups white vinegar (5% acidity)
- 2 cups apple cider vinegar (5% acidity)
- 2 cups granulated sugar
- 1 tablespoon mustard seeds
- 1 teaspoon celery seeds
- 1/2 teaspoon ground turmeric
- 1/4 teaspoon ground cloves
- Optional: 1/4 teaspoon red pepper flakes (for a little heat)
- Optional: 2 cloves garlic, minced
- Ice cubes
Instructions
- Slice the cucumbers and onions: Aim for slices about 1/8 inch thick.
- Combine vegetables and salt: In a large, non-reactive bowl, combine the sliced cucumbers and onions. Sprinkle the pickling salt evenly over the vegetables.
- Add ice and water: Cover the vegetables with ice cubes and cold water.
- Let stand for 2-4 hours: Let the mixture stand for 2-4 hours.
- Drain and rinse: After the soaking time, drain the cucumbers and onions thoroughly. Rinse them under cold running water to remove the excess salt.
- Drain again: Drain the vegetables very well. Use a salad spinner or pat dry with paper towels.
- Combine vinegars, sugar, and spices: In a large, non-reactive saucepan, combine the white vinegar, apple cider vinegar, granulated sugar, mustard seeds, celery seeds, turmeric, ground cloves, and optional red pepper flakes and minced garlic (if using).
- Bring to a boil: Over medium-high heat, bring the mixture to a rolling boil, stirring constantly to dissolve the sugar.
- Reduce heat and simmer: Once the mixture is boiling, reduce the heat to low and simmer for 5 minutes, stirring occasionally.
- Add vegetables to the brine: Add the drained cucumbers and onions to the simmering brine.
- Bring back to a simmer: Gently stir the vegetables into the brine, ensuring they are all submerged. Bring the mixture back to a simmer.
- Simmer for 10 minutes: Simmer for 10 minutes, stirring occasionally, until the cucumbers turn a slightly translucent color.
- Cool slightly: Remove the saucepan from the heat and let the mixture cool slightly for about 15-20 minutes.
- Pack into jars: Pack the pickles and brine into clean jars, leaving about 1/2 inch of headspace at the top.
- Refrigerate: Let the jars cool completely before refrigerating. The pickles will taste best after they have been refrigerated for at least 24 hours. They will keep in the refrigerator for up to 2 months.
- Wash canning jars, lids, and bands in hot, soapy water. Rinse well. Sterilize the jars by boiling them in a large pot of water for 10 minutes. Keep the jars hot until ready to use.
- Pack into jars: Pack the hot pickles and brine into the hot, sterilized jars, leaving 1/2 inch of headspace. Remove any air bubbles.
- Wipe jar rims: Wipe the rims of the jars with a clean, damp cloth.
- Place lids and bands: Place the lids on the jars and screw on the bands until fingertip tight.
- Process in a water bath canner: Place the jars in a water bath canner filled with enough water to cover the jars by at least 1 inch. Bring the water to a rolling boil and process for 10 minutes. Adjust processing time for altitude if necessary (add 5 minutes for 1,001-3,000 feet, 10 minutes for 3,001-6,000 feet, 15 minutes for 6,001-8,000 feet, and 20 minutes for 8,001-10,000 feet).
- Remove from canner: Turn off the heat and carefully remove the jars from the canner using a jar lifter. Place the jars on a towel-lined surface to cool.
- Check for seal: After the jars have cooled completely (about 12-24 hours), check the seals.
- Store: Properly sealed jars can be stored in a cool, dark place for up to 1 year. Refrigerate after opening.
Notes
- Use pickling salt.
- Use vinegar with 5% acidity. Do not dilute the vinegar.
- Don’t overcook the pickles.
- If canning, follow proper canning procedures.
- For best flavor, let the pickles sit in the refrigerator for at least 24 hours before eating.

Leave a Comment