

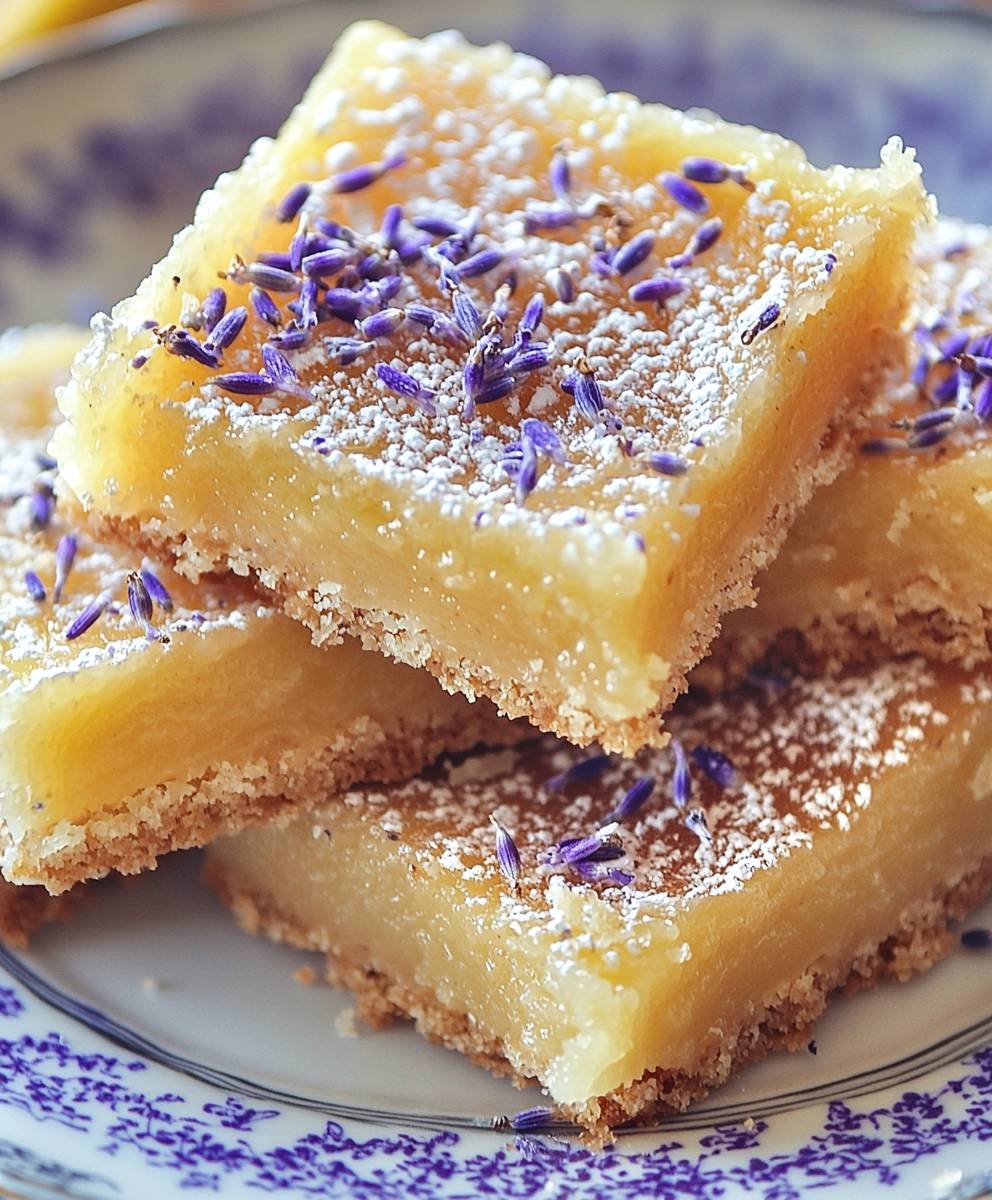
Lavender Lemon Bars: Prepare to be enchanted! Imagine sinking your teeth into a treat that perfectly balances the bright, zesty tang of lemon with the subtle, floral perfume of lavender. These aren’t just lemon bars; they’re an experience, a miniature vacation for your taste buds. I’m thrilled to share this recipe with you, a delightful twist on a classic that’s sure to impress.
While the exact origins of lemon bars are debated, their popularity soared in the mid-20th century, becoming a staple in American bake sales and family gatherings. This updated version elevates the traditional recipe by incorporating lavender, a herb revered for its calming properties and delicate flavor. Lavender has been used for centuries in culinary applications, particularly in Europe, adding a touch of elegance and sophistication to desserts.
What makes these Lavender Lemon Bars so irresistible? It’s the harmonious blend of flavors and textures. The buttery, crumbly shortbread crust provides a sturdy foundation for the smooth, creamy, and intensely lemony filling. The addition of lavender adds a unique aromatic dimension that complements the citrus beautifully. People adore these bars because they are easy to make, visually stunning, and offer a sophisticated flavor profile that’s both comforting and exciting. Plus, they are perfect for any occasion, from afternoon tea to a potluck dinner. Get ready to bake a batch and experience the magic for yourself!

Ingredients:
- For the Crust:
- 1 ½ cups all-purpose flour
- ½ cup (1 stick) unsalted butter, cold and cubed
- ½ cup powdered sugar
- ¼ teaspoon salt
- 2 tablespoons ice water
- For the Filling:
- 4 large eggs
- 1 ½ cups granulated sugar
- ¼ cup all-purpose flour
- ¼ teaspoon baking powder
- ½ cup freshly squeezed lemon juice (from about 3-4 lemons)
- 2 tablespoons lemon zest (from about 3-4 lemons)
- 1 tablespoon culinary lavender buds, finely ground (see notes below)
- Powdered sugar, for dusting (optional)
Preparing the Crust:
- Combine Dry Ingredients: In a large bowl, whisk together the flour, powdered sugar, and salt. This ensures the powdered sugar is evenly distributed, preventing lumps in your crust.
- Cut in the Butter: Add the cold, cubed butter to the flour mixture. Using a pastry blender or your fingertips (work quickly to keep the butter cold!), cut the butter into the flour until the mixture resembles coarse crumbs. You should still see small pieces of butter throughout. This is crucial for creating a flaky crust. If the butter gets too warm, the crust will be tough.
- Add Ice Water: Gradually add the ice water, one tablespoon at a time, mixing gently after each addition. The dough should just start to come together. Be careful not to overmix, as this will develop the gluten in the flour and result in a tough crust. I usually find that 2 tablespoons is perfect, but depending on the humidity, you might need a little more or less.
- Form the Dough: Gently press the dough together to form a disc. Wrap the disc in plastic wrap and refrigerate for at least 30 minutes. This allows the gluten to relax and the butter to firm up, which will prevent the crust from shrinking during baking. I sometimes chill it for an hour or even longer if I’m prepping ahead.
- Preheat Oven and Prepare Pan: Preheat your oven to 350°F (175°C). Grease and flour a 9×13 inch baking pan. You can also line the pan with parchment paper, leaving an overhang on the sides, for easy removal of the bars after baking. I prefer the parchment paper method it makes cleanup a breeze!
- Roll Out the Dough: On a lightly floured surface, roll out the chilled dough to fit the bottom of the prepared baking pan. You want it to be an even thickness throughout. If the dough is sticking, sprinkle a little more flour underneath.
- Press into Pan: Carefully transfer the rolled-out dough to the prepared baking pan and gently press it into the bottom and up the sides of the pan. Use a fork to prick the bottom of the crust several times. This will prevent the crust from puffing up during baking.
- Pre-bake the Crust: Bake the crust for 15-20 minutes, or until it is lightly golden brown. This pre-baking step is essential to ensure that the crust is fully cooked and doesn’t become soggy when the filling is added. Keep a close eye on it you want it to be golden, not burnt!
Preparing the Lavender Lemon Filling:
- Whisk Eggs and Sugar: While the crust is pre-baking, prepare the filling. In a large bowl, whisk together the eggs and granulated sugar until light and fluffy. This usually takes about 2-3 minutes. The mixture should be pale yellow and slightly thickened.
- Combine Dry Ingredients: In a separate bowl, whisk together the flour and baking powder. This ensures that the baking powder is evenly distributed, which will help the filling rise properly.
- Add Dry Ingredients to Wet Ingredients: Gradually add the flour mixture to the egg mixture, whisking until just combined. Be careful not to overmix, as this can develop the gluten in the flour and result in a tough filling.
- Add Lemon Juice, Zest, and Lavender: Stir in the lemon juice, lemon zest, and ground lavender buds. Mix until everything is well combined. The mixture will be quite liquidy that’s perfectly normal!
Baking the Lavender Lemon Bars:
- Pour Filling into Crust: Once the crust is pre-baked, remove it from the oven and immediately pour the lemon filling over the hot crust. Spread the filling evenly over the crust.
- Bake the Bars: Return the pan to the oven and bake for 20-25 minutes, or until the filling is set and no longer jiggles in the center. The edges of the filling should be lightly golden brown. The baking time may vary depending on your oven, so keep a close eye on them.
- Cool Completely: Remove the pan from the oven and let the bars cool completely in the pan on a wire rack. This is important because the filling will continue to set as it cools. If you try to cut the bars while they are still warm, they will be messy and difficult to handle. I usually let them cool for at least 2-3 hours, or even overnight.
Cutting and Serving:
- Dust with Powdered Sugar (Optional): Once the bars are completely cool, dust them generously with powdered sugar, if desired. This adds a touch of sweetness and makes them look extra pretty.
- Cut into Squares: Using a sharp knife, cut the bars into squares. For clean cuts, you can wipe the knife clean between each cut. If you lined the pan with parchment paper, you can lift the bars out of the pan using the overhang and then cut them on a cutting board.
- Serve and Enjoy: Serve the lavender lemon bars and enjoy! They are delicious on their own, or you can serve them with a dollop of whipped cream or a scoop of vanilla ice cream. They are also perfect for afternoon tea or a special occasion.
Notes on Lavender:
It’s crucial to use culinary lavender buds for this recipe. Regular lavender, like you might find in potpourri, can have a strong, soapy flavor. Culinary lavender is specifically grown for cooking and has a more delicate, floral flavor. I recommend purchasing culinary lavender from a reputable source. To grind the lavender buds, you can use a spice grinder or a mortar and pestle. You want them to be finely ground so that they distribute evenly throughout the filling and don’t have a gritty texture.
Tips for Success:
- Use Cold Butter: Cold butter is essential for creating a flaky crust. Make sure your butter is very cold before you start cutting it into the flour.
- Don’t Overmix: Overmixing the dough or the filling will result in a tough texture. Mix only until the ingredients are just combined.
- Pre-bake the Crust: Pre-baking the crust ensures that it is fully cooked and doesn’t become soggy when the filling is added.
- Cool Completely: Let the bars cool completely before cutting them. This will allow the filling to set properly and make them easier to handle.
- Lemon Zest: When zesting the lemons, be sure to only zest the yellow part of the peel. The white pith underneath is bitter and will affect the flavor of the bars.
- Storage: Store the lavender lemon bars in an airtight container at room temperature for up to 3 days, or in the refrigerator for up to 5 days.
Variations:
Want to switch things up? Here are a few ideas:
- Other Citrus: Try using other citrus fruits, such as oranges, limes, or grapefruits, in place of the lemons.
- Herbs: Experiment with other herbs, such as rosemary or thyme, in addition to or in place of the lavender.
- Nuts: Add chopped nuts, such as almonds or pecans, to the crust or the filling.
- Glaze: Drizzle the cooled bars with a simple glaze made from powdered sugar and lemon juice.
Conclusion:
And there you have it! These Lavender Lemon Bars are truly something special, a delightful dance of sweet and floral that will brighten even the dreariest of days. I genuinely believe this recipe is a must-try for anyone who appreciates a sophisticated twist on a classic dessert. The combination of the tangy lemon curd and the subtle, calming lavender is simply divine, creating a flavor profile that’s both refreshing and comforting.
But why should you take my word for it? Because these aren’t just any lemon bars; they’re an experience. The aroma alone, as they bake, is enough to transport you to a sun-drenched lavender field. And the taste? Well, that’s where the magic truly happens. The buttery, crumbly crust provides the perfect foundation for the smooth, luscious lemon filling, infused with the delicate essence of lavender. It’s a symphony of textures and flavors that will leave you wanting more.
Beyond the incredible taste, these Lavender Lemon Bars are surprisingly easy to make. The recipe is straightforward, with clear instructions that even novice bakers can follow with confidence. And the best part? You probably already have most of the ingredients in your pantry! So, there’s really no excuse not to give them a try.
Now, let’s talk serving suggestions and variations. While these bars are absolutely perfect on their own, there are plenty of ways to elevate them even further. For a simple yet elegant presentation, dust them with powdered sugar just before serving. A dollop of whipped cream or a scoop of vanilla ice cream also makes a wonderful accompaniment.
Feeling adventurous? Consider these variations:
* **Lavender Honey Glaze:** Whisk together honey and a touch of lavender extract for a sweet and floral glaze.
* **Berry Topping:** Top the bars with fresh raspberries or blueberries for a burst of fruity flavor.
* **Almond Crust:** Substitute some of the flour in the crust with almond flour for a nutty twist.
* Lavender Infused Sugar: Use lavender infused sugar for the crust and the filling to enhance the lavender flavor.
These are just a few ideas to get you started. Feel free to experiment and create your own unique version of these Lavender Lemon Bars. The possibilities are endless!
But seriously, don’t just take my word for it. I urge you to bake these Lavender Lemon Bars yourself and experience the magic firsthand. I’m confident that you’ll fall in love with their unique flavor and delightful texture.
And once you’ve made them, I’d love to hear about your experience! Share your photos and comments on social media using [Your Recipe Hashtag] or leave a review on the recipe page. Let me know what you think, what variations you tried, and how much you enjoyed them. Your feedback is invaluable and helps me to create even better recipes in the future.
So, go ahead, grab your ingredients, preheat your oven, and get ready to bake a batch of these irresistible Lavender Lemon Bars. You won’t regret it! Happy baking! I am sure you will enjoy this lavender lemon bars recipe.
Lavender Lemon Bars: A Delightful & Easy Recipe
Delightful lavender lemon bars with a buttery, flaky crust and a tangy, floral filling. A perfect balance of sweet and tart!
Ingredients
- 1 ½ cups all-purpose flour
- ½ cup (1 stick) unsalted butter, cold and cubed
- ½ cup powdered sugar
- ¼ teaspoon salt
- 2 tablespoons ice water
- 4 large eggs
- 1 ½ cups granulated sugar
- ¼ cup all-purpose flour
- ¼ teaspoon baking powder
- ½ cup freshly squeezed lemon juice (from about 3-4 lemons)
- 2 tablespoons lemon zest (from about 3-4 lemons)
- 1 tablespoon culinary lavender buds, finely ground
- Powdered sugar, for dusting (optional)
Instructions
- Combine Dry Ingredients: In a large bowl, whisk together the flour, powdered sugar, and salt.
- Cut in the Butter: Add the cold, cubed butter to the flour mixture. Using a pastry blender or your fingertips, cut the butter into the flour until the mixture resembles coarse crumbs.
- Add Ice Water: Gradually add the ice water, one tablespoon at a time, mixing gently after each addition. The dough should just start to come together.
- Form the Dough: Gently press the dough together to form a disc. Wrap the disc in plastic wrap and refrigerate for at least 30 minutes.
- Preheat Oven and Prepare Pan: Preheat your oven to 350°F (175°C). Grease and flour a 9×13 inch baking pan (or line with parchment paper).
- Roll Out the Dough: On a lightly floured surface, roll out the chilled dough to fit the bottom of the prepared baking pan.
- Press into Pan: Carefully transfer the rolled-out dough to the prepared baking pan and gently press it into the bottom and up the sides of the pan. Use a fork to prick the bottom of the crust several times.
- Pre-bake the Crust: Bake the crust for 15-20 minutes, or until it is lightly golden brown.
- Whisk Eggs and Sugar: While the crust is pre-baking, prepare the filling. In a large bowl, whisk together the eggs and granulated sugar until light and fluffy.
- Combine Dry Ingredients: In a separate bowl, whisk together the flour and baking powder.
- Add Dry Ingredients to Wet Ingredients: Gradually add the flour mixture to the egg mixture, whisking until just combined.
- Add Lemon Juice, Zest, and Lavender: Stir in the lemon juice, lemon zest, and ground lavender buds. Mix until everything is well combined.
- Pour Filling into Crust: Once the crust is pre-baked, remove it from the oven and immediately pour the lemon filling over the hot crust. Spread the filling evenly over the crust.
- Bake the Bars: Return the pan to the oven and bake for 20-25 minutes, or until the filling is set and no longer jiggles in the center.
- Cool Completely: Remove the pan from the oven and let the bars cool completely in the pan on a wire rack.
- Dust with Powdered Sugar (Optional): Once the bars are completely cool, dust them generously with powdered sugar, if desired.
- Cut into Squares: Using a sharp knife, cut the bars into squares.
- Serve and Enjoy: Serve the lavender lemon bars and enjoy!
Notes
- Culinary Lavender: Use culinary lavender buds for the best flavor. Regular lavender can taste soapy.
- Cold Butter: Cold butter is key for a flaky crust.
- Don’t Overmix: Overmixing leads to a tough texture.
- Pre-bake Crust: Prevents a soggy crust.
- Cool Completely: Allows the filling to set properly.
- Lemon Zest: Only zest the yellow part of the peel to avoid bitterness.
- Storage: Store in an airtight container at room temperature for up to 3 days, or in the refrigerator for up to 5 days.

Leave a Comment