

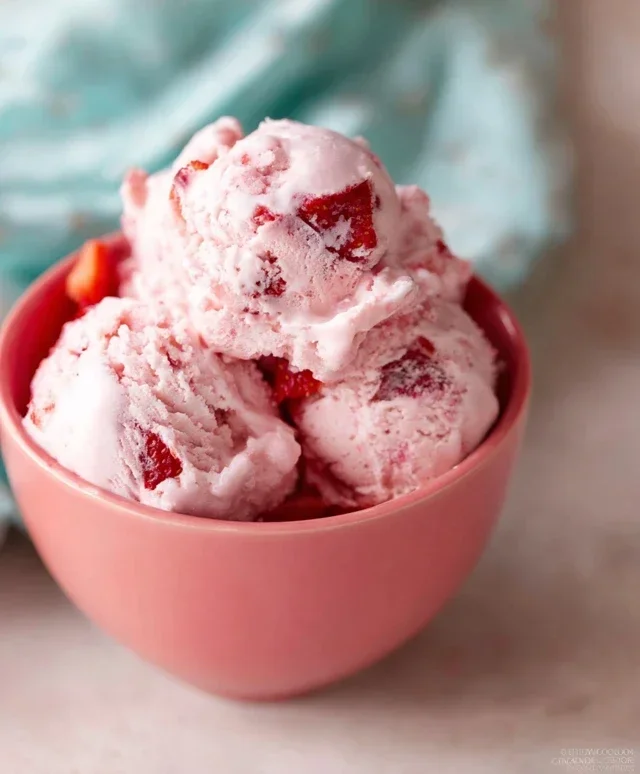
Homemade strawberry ice cream is more than just a dessert; it’s a vibrant snapshot of summer, a burst of pure, unadulterated joy in every spoonful. There’s something undeniably magical about that first taste of perfectly ripe strawberries transformed into a creamy, dreamy frozen treat. It’s no wonder people flock to this classic. The simple elegance of homemade strawberry ice cream lies in its ability to capture the essence of the fruit itself, intensified and elevated by the rich dairy base. Unlike store-bought varieties, our recipe lets you control the sweetness and the quality of your ingredients, ensuring a flavour that’s both intense and incredibly fresh. This isn’t just ice cream; it’s an experience, a nostalgic trip back to carefree days and a testament to the simple pleasure of creating something truly delicious with your own two hands.
Why You’ll Love This Recipe
The Sweetness of Real Fruit
Forget artificial flavours. This recipe celebrates the natural, vibrant sweetness of fresh strawberries, making every bite taste like sunshine.
Effortless Elegance
While it feels like a luxurious indulgence, this homemade strawberry ice cream is surprisingly easy to whip up, perfect for impressing guests or treating yourself.

Homemade Strawberry Ice Cream
There’s nothing quite like the vibrant, sweet, and slightly tart taste of homemade strawberry ice cream. Forget those artificial flavors and icy textures; we’re going to create a creamy, dreamy frozen treat bursting with the natural goodness of fresh strawberries. This recipe is surprisingly simple, and the results are truly spectacular. Imagin extracte diving into a bowl of pure summer bliss, made with your own two hands. It’s a rewarding process that yields an incredibly delicious reward. So, grab your apron and let’s get churning!
Ingredients:
Crafting the Strawberry Base
This is where the magic begin extracts! We’ll start by transforming our fresh strawberries into a luscious puree that will form the heart of our ice cream.
1. In a medium bowl, combine the hulled and diced strawberries with the honey, granulated sugar, and lemon juice. The honey adds a subtle floral sweetness that complements the strawberries beautifully, while the sugar provides the necessary sweetness and helps with the ice cream’s texture. The lemon juice is a secret weapon; it brightens the strawberry flavor, cutting through the sweetness and adding a delightful tang that makes the fruit really pop. Give everything a good stir to ensure the sugar starts to dissolve. Let this mixture sit for about 15-20 minutes at room temperature. This maceration process allows the strawberries to release their juices, creating a more intense flavor and softening them for easier pureeing.
2. Once the strawberries have had a chance to macerate, transfer the mixture to a blender or food processor. Blend until you achieve a smooth, vibrant puree. You want it to be completely smooth, with no discernible chunks of strawberry. If you prefer a slightly chunkier ice cream, you can pulse it a few times instead of blending until completely smooth, leaving some small pieces for texture. After pureeing, I like to strain the mixture through a fine-mesh sieve into another clean bowl. This step is optional but highly recommended for the smoothest possible ice cream, as it removes any seeds. Gently press the puree through the sieve with the back of a spoon. Discard the solids left in the sieve.
Building the Creamy Dream
Now it’s time to add the rich, creamy elements that will give our strawberry ice cream its luxurious texture.
3. To the strained strawberry puree, add the heavy whipping cream, half and half, and vanilla extract. The heavy whipping cream is crucial for achieving that classic rich and creamy mouthfeel. Half and half provides a nice balance, adding creaminess without making the ice cream overly dense. The vanilla extract enhances all the flavors and adds another layer of aromatic complexity. Whisk everything together thoroughly until it’s all well combined and you have a uniform, pnon-alcoholic ale pink liquid. Don’t over-whisk at this stage, as we’re not trying to whip the cream; we just want everything to be incorporated.
The Chilling Process
This is where our ice cream base transforms into frozen perfection.
4. Cover the bowl with plastic wrap, ensuring the wrap is pressed directly onto the surface of the mixture to prevent a skin from forming. Refrigerate this mixture for at least 2-4 hours, or preferably overnight. This chilling step is absolutely essential. It allows the flavors to meld together beautifully and ensures the base is thoroughly cold. A cold base churns more efficiently and results in smaller ice crystals, which means smoother, creamier ice cream. Don’t rush this part; patience is key to outstanding ice cream!
5. Once the base is thoroughly chilled, it’s time to churn it according to your ice cream maker’s instructions. Typically, this involves pouring the cold base into your pre-frozen ice cream maker bowl and letting it churn for about 20-30 minutes, or until it reaches a soft-serve consistency. The exact time will vary depending on your machine. As it churns, you’ll see the liquid gradually thicken and become more like ice cream. Resist the urge to peek too often, as opening the lid releases cold air and can slow down the churning process.
The Final Freeze
The final stage solidifies our delicious creation.
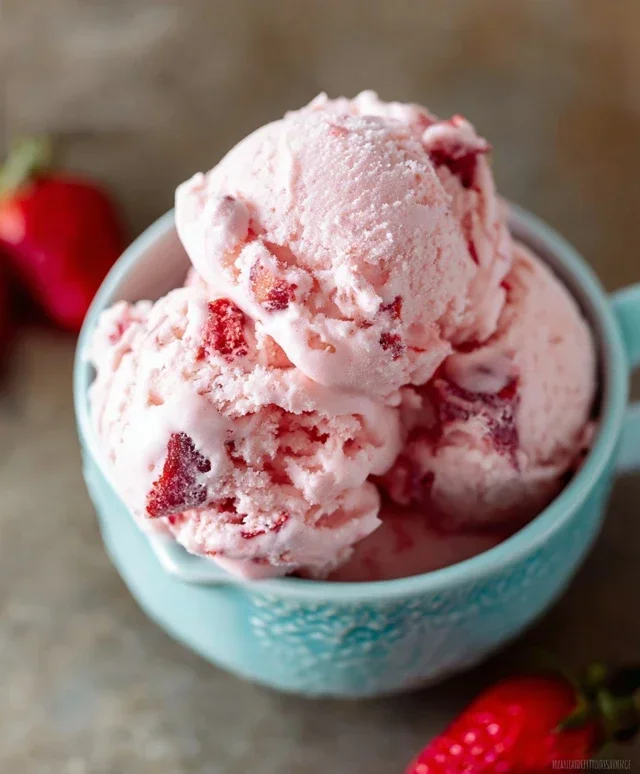
6. Once the ice cream has reached a soft-serve consistency from churning, transfer it to an airtight container. For the best texture, press a piece of parchment paper or plastic wrap directly onto the surface of the ice cream before sealing the container. This helps prevent ice crystals from forming on top. Place the container in the freezer for at least 4-6 hours, or until it’s firm enough to scoop. The longer it freezes, the firmer it will become. When it’s ready, scoop generously into bowls and enjoy your incredibly delicious, homemade strawberry ice cream!
Conclusion:
And there you have it – a delightful journey into creating your very own homemade strawberry ice cream! This recipe is simply fantastic because it allows you to control every ingredient, ensuring a vibrant, fresh strawberry flavor that store-bought varieties often can’t match. The creamy texture, combined with the natural sweetness and slight tartness of ripe strawberries, makes this a truly special treat. It’s perfect for a warm summer day, a celebratory dessert, or anytime you’re craving something wonderfully comforting and delicious.
I encourage you to give this homemade strawberry ice cream recipe a try. It’s incredibly rewarding to churn your own ice cream and the results are always worth it. Experiment with different types of strawberries to discover your favorite flavor profile. For serving, consider a drizzle of balsamic glaze for a sophisticated twist, a dollop of whipped cream, or even some fresh mint for a pop of color and aroma. If you’re feeling adventurous, try adding a swirl of chocolate or a scattering of toasted almonds for added texture and flavor complexity.
Frequently Asked Questions:
Why is my strawberry ice cream not smooth?
Texture issues can arise from a few factors. Ensure your ice cream maker is properly chilled, as this is crucial for quick freezing. Also, over-churning can sometimes lead to iciness. Follow the churn times recommended by your machine, and avoid overfilling it. Using a good quality blender or food processor to puree your strawberries can also help achieve a smoother base.
Can I make this recipe without an ice cream maker?
Absolutely! While an ice cream maker makes the process easier, you can still achieve delicious results using the “no-churn” method. Pour your strawberry mixture into a freezer-safe container. Every 30-45 minutes for the first 3-4 hours, stir vigorously with a fork, breaking up ice crystals. This manual stirring helps create a creamier texture.
How can I make the strawberry flavor more intense?
For a more concentrated strawberry flavor, consider roasting your strawberries before pureeing them. Roasting caramelizes their sugars, intensifying their sweetness and aroma. You could also add a tablespoon or two of fresh lemon juice to brighten the berry flavor, or a hint of pure strawberry extract if you desire an even bolder taste.
Homemade Strawberry Ice Cream
A simple and delicious homemade strawberry ice cream recipe, perfect for a refreshing summer treat.
Ingredients
-
1 1/2 cups strawberries, hulled and diced
-
2 Tbsp honey
-
1/2 cup granulated sugar
-
1 tsp lemon juice
-
1 cup heavy whipping cream
-
1/2 cup half and half
-
1 tsp vanilla extract
Instructions
-
Step 1
In a bowl, combine the diced strawberries, honey, granulated sugar, and lemon juice. Stir to coat the strawberries and let them macerate for about 15-20 minutes, stirring occasionally, until the sugar is dissolved and the strawberries have released their juices. -
Step 2
Transfer the strawberry mixture to a blender or food processor and puree until smooth. Strain through a fine-mesh sieve to remove seeds, if desired, pressing down on the solids. Discard the solids. -
Step 3
In a separate large bowl, whisk together the heavy whipping cream, half and half, and vanilla extract until well combined. -
Step 4
Gently fold the strawberry puree into the cream mixture until just combined. Be careful not to overmix. -
Step 5
Pour the mixture into an ice cream maker and churn according to the manufacturer’s instructions until it reaches a soft-serve consistency. -
Step 6
Transfer the ice cream to an airtight container and freeze for at least 2-4 hours, or until firm, before serving.
Important Information
Nutrition Facts (Per Serving)
It is important to consider this information as approximate and not to use it as definitive health advice.
Allergy Information
Please check ingredients for potential allergens and consult a health professional if in doubt.

Leave a Comment