

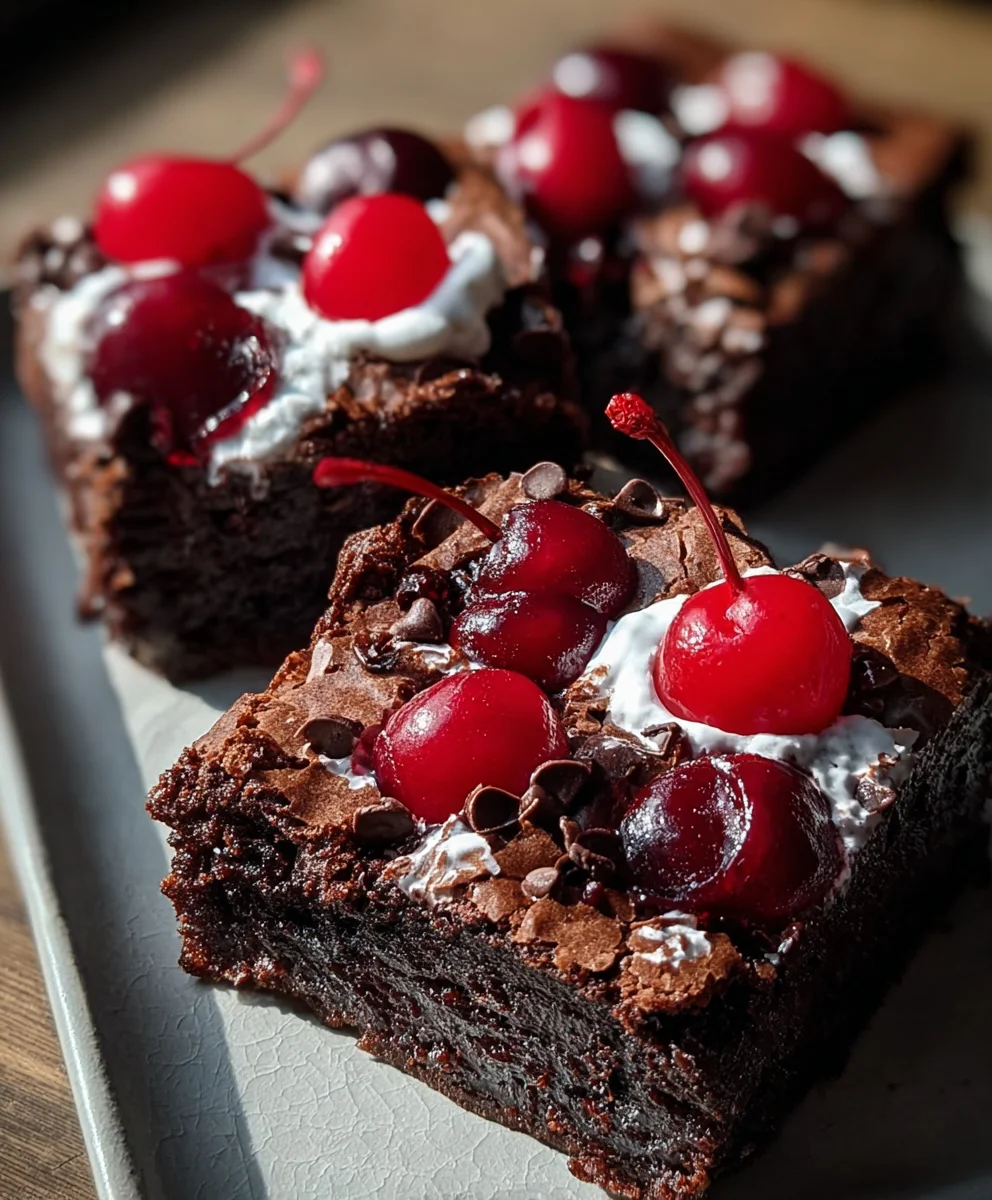
Small-Batch Black Forest Brownies are more than just a dessert; they’re a miniature slice of indulgence, a decadent escape that transforms ordinary moments into something truly extraordinary. If you’ve ever found yourself dreaming of that classic Black Forest cake – the rich chocolate, the tart cherries, the ethereal whipped cream – then get ready to fall head over heels for their brownie iteration. What is it about these fudgy squares that captures our hearts? Perhaps it’s the perfect balance of intense dark chocolate and the bright, juicy pop of cherries, creating a symphony of flavors and textures that dances on your palate. We love them because they deliver all the beloved elements of the traditional dessert in a convenient, perfectly portioned package. These aren’t your average brownies; they’re a carefully crafted treat designed to satisfy your deepest chocolate cravings without overwhelming your kitchen or your appetite. The magic lies in the small-batch approach, ensuring every single brownie is a testament to pure, unadulterated chocolate bliss, infused with the unmistakable charm of Black Forest goodness.

Ingredients:
- ¼ cup unsalted butter
- ½ cup granulated sugar
- 1 large egg
- ½ tsp vanilla extract
- ¼ cup cocoa powder
- ¼ cup all-purpose flour
- ⅛ tsp salt
- ½ cup canned or jarred cherries (drained, juice reserved)
- 2 tbsp cherry juice (from can)
- ½ cup whipped cream
- Chocolate shavings (optional)
Small-Batch Black Forest Brownies
Preparing the Batter
- First, let’s get our baking setup ready. Preheat your oven to 350°F (175°C). This is a standard temperature for most brownie recipes and will ensure even baking. While the oven is heating, lightly grease an 8×8 inch baking pan and line it with parchment paper. Overlapping the parchment paper slightly over the edges will make it super easy to lift the brownies out once they’re baked. This step is crucial for clean removal and presentation.
- In a medium heatproof bowl, melt the ¼ cup of unsalted butter. You can do this either in the microwave in short bursts, checking and stirring every 30 seconds, or over a double boiler on the stovetop. Once melted, remove it from the heat and let it cool slightly for a minute or two. Add the ½ cup of granulated sugar to the melted butter and whisk them together until well combined. The mixture should look glossy and smooth. This emulsification is important for the texture of the brownies.
- Now, let’s incorporate the wet ingredients. Add the 1 large egg to the butter and sugar mixture. Whisk vigorously until the egg is fully incorporated and the batter starts to become lighter in color and slightly fluffy. This aeration from the egg will contribute to the brownie’s tender crum extractb. Next, stir in the ½ tsp of vanilla extract. The vanilla not only adds a wonderful aroma but also enhances the other flavors present, particularly the chocolate.
Incorporating Dry Ingredients and Cherries
- In a separate small bowl, whisk together the ¼ cup of cocoa powder, ¼ cup of all-purpose flour, and ⅛ tsp of salt. Whisking the dry ingredients separately before adding them to the wet mixture helps to distribute the flour and cocoa evenly, preventing clumps and ensuring consistent flavor throughout the brownies. Now, gradually add these dry ingredients to the wet batter. Using a spatula, gently fold them in until just combined. Be careful not to overmix at this stage; overmixing can lead to tough brownies. Stop mixing as soon as you no longer see streaks of dry flour.
- This is where we add that signature Black Forest flavor! Gently fold in the ½ cup of drained cherries. I like to give them a rough chop if they are whole, just to distribute them more evenly and prevent large, gooey pockets. It’s important that the cherries are well-drained to avoid adding too much moisture to the batter, which could affect the baking time and texture. The few whole or halved cherries that remain will be a delightful surprise in each bite.
Baking and Finishing Touches
- Pour the batter into your prepared baking pan. Use your spatula to spread it evenly into the corners, ensuring a uniform layer for consistent baking. Now, it’s time to bake! Place the pan in the preheated oven and bake for 20-25 minutes. The exact baking time will depend on your oven, so keep an eye on them. You’ll know they’re ready when the edges look set and a toothpick inserted into the center comes out withrum extractist crumbs attached, not wet batter. Resist the urge to overbake, as this will result in dry brownies.
- Once baked, carefully remove the brownies from the oven. Let them cool in the pan on a wire rack for about 15-20 minutes. This cooling period is essential; it allows the brownies to set up properly. While they are still warm, but not hot, we’ll add a simple yet delicious glaze. In a small bowl, whisk together the 2 tbsp of reserved cherry juice with a tablespoon or two of powdered sugar until you have a drizzly consistency. Drizzle this over the top of the brownies. This adds a touch of sweetness and a hint of extra cherry flavor.
- After the drizzle has set slightly, it’s time for the final flourish. If you’re feeling extra fancy, you can dust the top with a bit of powdered sugar or, as I love to do for a true Black Forest experience, sprinkle generously with chocolate shavings. If you’re feeling ambitious, you can also serve these warm brownies with a dollop of the ½ cup of whipped cream on the side. The contrast of the warm, fudgy brownie with cool, airy whipped cream is simply divine. Cut them into small squares or rectangles, as this recipe is designed for a delightful small batch. Enjoy every decadent bite!

Conclusion:
There you have it! Our recipe for Small-Batch Black Forest Brownies is complete. We’ve guided you through creating these intensely chocolatey, cherry-studded, and cream-topped delights that are perfect for a small gathering or a decadent solo treat. The richness of the dark chocolate beautifully balances the tartness of the cherries, all elevated by that light, airy whipped cream. We hope you enjoy making and devouring them as much as we do! These brownies are incredibly versatile. Serve them slightly warm for a fudgier texture, or chilled for a firmer bite. They make a fantastic dessert on their own, but you could also pair them with a scoop of vanilla bean ice cream for an extra layer of indulgence. Feel free to experiment with different types of cherries, perhaps a mix of fresh and preserved, or even a splash of cherry liqueur extract in the batter for an adult twist. Don’t be afraid to get creative with your topping – a dusting of cocoa powder or some chocolate shavings would be lovely too. So go forth, bake these Small-Batch Black Forest Brownies, and savor every delicious moment!
FAQs
Can I make these Small-Batch Black Forest Brownies ahead of time?
Absolutely! These brownies actually benefit from chilling. You can bake them a day or two in advance, store them in an airtight container in the refrigerator, and then frost and serve them when ready. This allows the flavors to meld beautifully.
What kind of cherries should I use for Small-Batch Black Forest Brownies?
While traditional Black Forest cake often uses Morello cherries (which are a type of sour cherry), you can certainly use other tart cherries. Fresh pitted tart cherries work wonderfully. If using sweeter cherries like Bing, you might want to reduce the sugar slightly or add a tiny squeeze of lemon juice to balance the sweetness.
Can I freeze these Small-Batch Black Forest Brownies?
Yes, you can! It’s best to freeze them unfrosted. Wrap individual brownies tightly in plastic wrap, then place them in a freezer-safe container or bag. They should keep well for up to 2-3 months. Thaw them overnight in the refrigerator and then frost before serving.
Small-Batch Black Forest Brownies
Decadent small-batch brownies inspired by the classic Black Forest cake, featuring a rich chocolate base, tart cherries, and a light whipped cream topping.
Ingredients
-
1/4 cup unsalted butter
-
1/2 cup granulated sugar
-
1 large egg
-
1/2 tsp vanilla extract
-
1/4 cup cocoa powder
-
1/4 cup all-purpose flour
-
1/8 tsp salt
-
1/2 cup canned or jarred cherries (drained, juice reserved)
-
2 tbsp cherry juice (from can)
-
1/2 cup whipped cream
-
Chocolate shavings (optional)
Instructions
-
Step 1
Preheat oven to 350°F (175°C). Lightly grease and line an 8×8 inch baking pan with parchment paper. -
Step 2
Melt butter in a heatproof bowl. Whisk in granulated sugar until well combined and glossy. Let cool slightly. -
Step 3
Add egg to the butter-sugar mixture and whisk vigorously until lighter in color and slightly fluffy. Stir in vanilla extract. -
Step 4
In a separate bowl, whisk together cocoa powder, all-purpose flour, and salt. Gradually add dry ingredients to the wet batter and gently fold until just combined. Do not overmix. -
Step 5
Gently fold in the drained cherries. Pour batter into the prepared pan and spread evenly. -
Step 6
Bake for 20-25 minutes, or until a toothpick inserted into the center comes out with moist crumbs. Let cool in the pan on a wire rack for 15-20 minutes. -
Step 7
Whisk together reserved cherry juice and 1-2 tablespoons of powdered sugar until drizzly. Drizzle over the slightly warm brownies. -
Step 8
Once the drizzle has set slightly, sprinkle with chocolate shavings (optional). Serve with whipped cream.
Important Information
Nutrition Facts (Per Serving)
It is important to consider this information as approximate and not to use it as definitive health advice.
Allergy Information
Please check ingredients for potential allergens and consult a health professional if in doubt.
Leave a Comment