

Strawberry icebox cake: just the name conjures up images of sunny afternoons, family gatherings, and that unmistakable taste of summer. But this isn’t just any dessert; it’s a nostalgic trip back to simpler times, a no-bake marvel that has graced tables for generations. Are you ready to experience a dessert that’s as easy to make as it is delightful to devour?
The beauty of a classic icebox cake lies in its effortless construction. No oven required! This makes it the perfect treat for those hot summer days when the mere thought of turning on the oven sends shivers down your spine. While the exact origins are debated, icebox cakes gained immense popularity in the early 20th century, coinciding with the widespread adoption of electric refrigerators (hence the name!). They were a revelation a way to create a decadent dessert without the fuss of traditional baking.
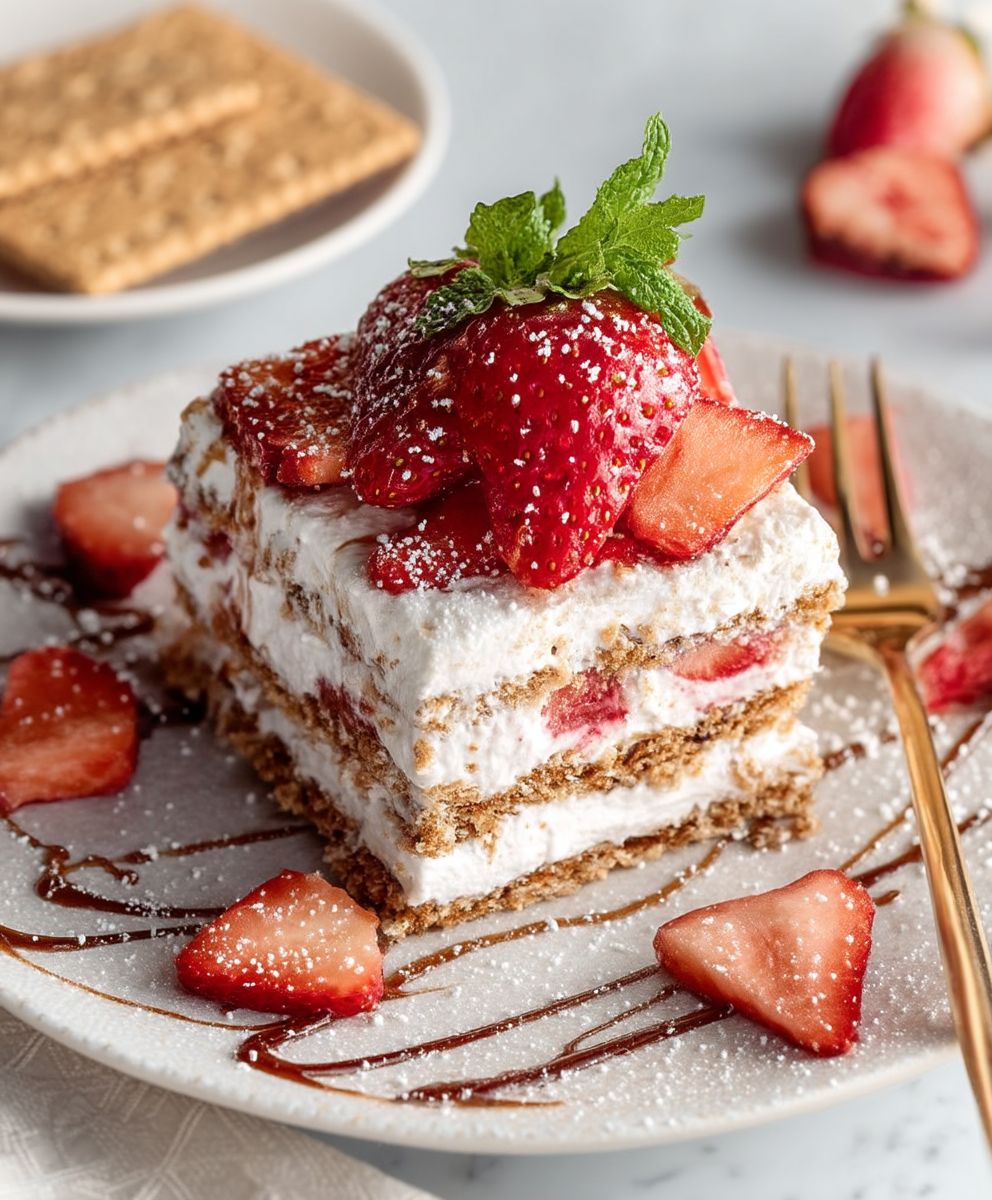
What makes a strawberry icebox cake so irresistible? It’s the perfect marriage of textures: the creamy, cool filling contrasting beautifully with the slightly softened graham crackers. The burst of fresh strawberry flavor elevates it to a whole new level of deliciousness. It’s a symphony of sweet, tangy, and creamy that dances on your palate. Plus, let’s be honest, its simplicity is a major draw. In a world of complicated recipes and elaborate techniques, the strawberry icebox cake stands as a testament to the fact that sometimes, the simplest things are truly the best. Get ready to create a dessert that will have everyone asking for seconds!

Ingredients:
- 1 (14.3 ounce) package graham crackers
- 1 (8 ounce) package cream cheese, softened
- 1 (14 ounce) can sweetened condensed milk
- 1 teaspoon vanilla extract
- 1 (8 ounce) container frozen whipped topping, thawed
- 2 pounds fresh strawberries, hulled and sliced
Preparing the Cream Cheese Mixture:
Okay, let’s get started! The first thing we need to do is create the creamy base that will hold everything together. This part is super easy, I promise!
-
Soften the cream cheese: Make sure your cream cheese is nice and soft. If you forgot to take it out of the fridge ahead of time (we’ve all been there!), you can microwave it for about 15-20 seconds, but keep a close eye on it so it doesn’t melt. You want it to be easily spreadable.
-
Combine cream cheese and condensed milk: In a large bowl, add the softened cream cheese and the entire can of sweetened condensed milk. Using an electric mixer (handheld or stand mixer), beat these two ingredients together until they are completely smooth and creamy. This usually takes about 2-3 minutes. Scrape down the sides of the bowl a couple of times to make sure everything is fully incorporated.
-
Add vanilla extract: Now, stir in the vanilla extract. This adds a lovely little touch of flavor that complements the cream cheese and strawberries perfectly. Just a teaspoon is all you need.
-
Fold in the whipped topping: Gently fold in the thawed whipped topping. Be careful not to overmix, as this can deflate the whipped topping and make the mixture less airy. You want to fold it in until it’s just combined, leaving some streaks of whipped topping visible. This will give the cake a light and fluffy texture.
Assembling the Icebox Cake:
Now for the fun part putting it all together! This is where the magic happens, and you’ll start to see your icebox cake taking shape.
-
Prepare your pan: Choose a 9×13 inch baking dish. You can use a glass dish, a metal pan, or even a disposable aluminum pan. No need to grease it, as the graham crackers and cream cheese mixture will prevent the cake from sticking.
-
Create the first layer of graham crackers: Arrange a layer of graham crackers on the bottom of the pan. You may need to break some of the graham crackers to fit snugly and cover the entire bottom surface. Don’t worry if they’re not perfectly aligned; the cream cheese mixture will fill in any gaps.
-
Spread a layer of cream cheese mixture: Spread about one-third of the cream cheese mixture evenly over the graham cracker layer. Use a spatula or spoon to smooth it out. Make sure to cover all the graham crackers completely.
-
Add a layer of sliced strawberries: Arrange a layer of sliced strawberries over the cream cheese mixture. Use about half of the sliced strawberries for this layer. Try to distribute them evenly so that each bite of the cake will have a delicious strawberry flavor.
-
Repeat layers: Repeat the layers of graham crackers, cream cheese mixture, and strawberries two more times. So, you’ll have a total of three layers of graham crackers, three layers of cream cheese mixture, and two layers of strawberries. Make sure to use up all the graham crackers and cream cheese mixture.
-
Final layer of strawberries (optional): If you have some strawberries left over after layering, you can use them to decorate the top of the cake. This is totally optional, but it makes the cake look extra pretty!
Chilling and Serving:
Patience is key here! The chilling time is crucial for the graham crackers to soften and the flavors to meld together. Trust me, it’s worth the wait!
-
Cover and chill: Cover the icebox cake tightly with plastic wrap or aluminum foil. This will prevent it from drying out in the refrigerator and absorbing any unwanted odors.
-
Chill for at least 4 hours: Refrigerate the cake for at least 4 hours, or preferably overnight. The longer it chills, the better the graham crackers will soften and the flavors will meld together. I usually make it the night before I want to serve it.
-
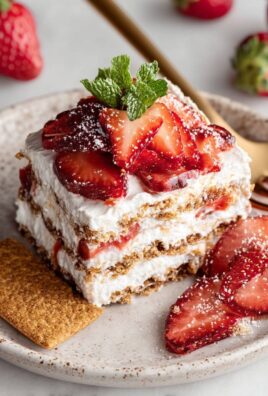
Slice and serve: Once the cake has chilled sufficiently, remove it from the refrigerator. Slice it into squares or rectangles and serve. You can garnish each slice with a fresh strawberry or a dollop of whipped cream, if desired.
Tips and Variations:
Want to customize your icebox cake? Here are a few ideas to get you started!
-
Different fruits: Instead of strawberries, you can use other fruits like raspberries, blueberries, peaches, or bananas. Just make sure to slice them thinly so they layer nicely.
-
Chocolate graham crackers: For a chocolatey twist, use chocolate graham crackers instead of regular graham crackers.
-
Lemon zest: Add a teaspoon of lemon zest to the cream cheese mixture for a bright and citrusy flavor.
-
Nutella: Spread a thin layer of Nutella between the graham cracker layers for a decadent treat.
-
Coffee flavor: Dip the graham crackers in coffee before layering them for a coffee-flavored icebox cake.
-
Make it individual: Assemble the icebox cake in individual serving dishes or glasses for a pretty presentation.
Storage Instructions:
If you have any leftovers (which is unlikely!), here’s how to store them:
-
Refrigerate: Store the leftover icebox cake in an airtight container in the refrigerator for up to 3 days. The graham crackers may become a bit softer over time, but the cake will still taste delicious.
-
Freezing: While you can freeze icebox cake, the texture may change slightly upon thawing. The graham crackers may become a bit soggy. If you do freeze it, wrap it tightly in plastic wrap and then in aluminum foil. Freeze for up to 2 months. Thaw in the refrigerator overnight before serving.
Troubleshooting:
Here are some common issues you might encounter and how to fix them:
-
Graham crackers are too hard: If the graham crackers are still too hard after chilling, try adding a thin layer of milk or juice between the layers. This will help soften them up.
-
Cream cheese mixture is too thick: If the cream cheese mixture is too thick, add a tablespoon or two of milk or cream to thin it out.
-
Cake is too sweet: If the cake is too sweet for your taste, reduce the amount of sweetened condensed milk or use a less sweet fruit.
-
Cake is too runny: If the cake is too runny, make sure you’ve chilled it for long enough. You can also add a tablespoon of cornstarch to the cream cheese mixture to help thicken it.
Nutritional Information (Approximate):
Please note that the nutritional information is an estimate and may vary depending on the specific ingredients used.
-
Serving Size: 1 slice (1/12 of the cake)
-
Calories: Approximately 350-400
-
Fat: 20-25g
-
Saturated Fat: 12-15g
-
Cholesterol: 60-70mg
-
<
Conclusion:
This Strawberry Icebox Cake isn’t just a dessert; it’s a nostalgic trip down memory lane with a modern twist! Its the perfect blend of creamy, fruity, and subtly sweet, making it an absolute must-try for anyone looking for a simple yet impressive treat. The ease of preparation alone makes it a winner no baking required! Imagine layers of graham crackers softening into a cake-like texture, embraced by a luscious, homemade strawberry whipped cream. It’s a symphony of flavors and textures that will have everyone reaching for seconds.
But the best part? It’s incredibly versatile! While I’ve shared my go-to recipe, feel free to get creative. For a richer experience, try using chocolate graham crackers instead of the regular ones. Or, if you’re feeling adventurous, incorporate other berries like blueberries, raspberries, or even a mix of all three for a vibrant and colorful twist. A drizzle of chocolate sauce or a sprinkle of chopped nuts can also elevate this simple dessert to a whole new level.
Serving suggestions are endless! This Strawberry Icebox Cake is fantastic on its own, chilled and ready to enjoy. It’s the ideal dessert for a summer barbecue, a potluck gathering, or even just a weeknight treat. You can also dress it up by serving it with a scoop of vanilla ice cream or a dollop of extra whipped cream. For a more elegant presentation, consider layering it in individual parfait glasses. And if you have any leftovers (though I highly doubt you will!), it keeps well in the refrigerator for a few days, making it perfect for enjoying over time.
I truly believe this recipe is a game-changer. It’s quick, easy, and delivers incredible flavor with minimal effort. Its the kind of dessert that becomes a family favorite, passed down through generations. Its also a fantastic way to use up fresh strawberries during peak season, ensuring you get the most out of their deliciousness.
Ready to dive in?
I wholeheartedly encourage you to give this recipe a try. I’m confident that you’ll be amazed by how simple it is to create such a delightful and satisfying dessert. Don’t be afraid to experiment with different variations and make it your own!
Share Your Creations!
Once you’ve made your own Strawberry Icebox Cake, I’d absolutely love to hear about your experience! Did you stick to the original recipe, or did you add your own unique twist? What did your family and friends think? Share your photos and stories in the comments below. I can’t wait to see your creations and hear all about your icebox cake adventures. Happy baking (or rather, assembling!) and enjoy every delicious bite! Let me know if you have any questions, and I’ll be happy to help. This is one recipe you won’t regret trying!
Strawberry Icebox Cake: The Easiest No-Bake Dessert Recipe
Easy and refreshing no-bake Strawberry Icebox Cake! Layers of graham crackers, creamy filling, and fresh strawberries make this the perfect summer dessert.
Ingredients
- 1 (14.3 ounce) package graham crackers
- 1 (8 ounce) package cream cheese, softened
- 1 (14 ounce) can sweetened condensed milk
- 1 teaspoon vanilla extract
- 1 (8 ounce) container frozen whipped topping, thawed
- 2 pounds fresh strawberries, hulled and sliced
Instructions
- Soften the cream cheese: Make sure your cream cheese is nice and soft. If you forgot to take it out of the fridge ahead of time, you can microwave it for about 15-20 seconds, but keep a close eye on it so it doesn’t melt. You want it to be easily spreadable.
- Combine cream cheese and condensed milk: In a large bowl, add the softened cream cheese and the entire can of sweetened condensed milk. Using an electric mixer (handheld or stand mixer), beat these two ingredients together until they are completely smooth and creamy. This usually takes about 2-3 minutes. Scrape down the sides of the bowl a couple of times to make sure everything is fully incorporated.
- Add vanilla extract: Now, stir in the vanilla extract. This adds a lovely little touch of flavor that complements the cream cheese and strawberries perfectly. Just a teaspoon is all you need.
- Fold in the whipped topping: Gently fold in the thawed whipped topping. Be careful not to overmix, as this can deflate the whipped topping and make the mixture less airy. You want to fold it in until it’s just combined, leaving some streaks of whipped topping visible. This will give the cake a light and fluffy texture.
- Prepare your pan: Choose a 9×13 inch baking dish. You can use a glass dish, a metal pan, or even a disposable aluminum pan. No need to grease it, as the graham crackers and cream cheese mixture will prevent the cake from sticking.
- Create the first layer of graham crackers: Arrange a layer of graham crackers on the bottom of the pan. You may need to break some of the graham crackers to fit snugly and cover the entire bottom surface. Don’t worry if they’re not perfectly aligned; the cream cheese mixture will fill in any gaps.
- Spread a layer of cream cheese mixture: Spread about one-third of the cream cheese mixture evenly over the graham cracker layer. Use a spatula or spoon to smooth it out. Make sure to cover all the graham crackers completely.
- Add a layer of sliced strawberries: Arrange a layer of sliced strawberries over the cream cheese mixture. Use about half of the sliced strawberries for this layer. Try to distribute them evenly so that each bite of the cake will have a delicious strawberry flavor.
- Repeat layers: Repeat the layers of graham crackers, cream cheese mixture, and strawberries two more times. So, you’ll have a total of three layers of graham crackers, three layers of cream cheese mixture, and two layers of strawberries. Make sure to use up all the graham crackers and cream cheese mixture.
- Final layer of strawberries (optional): If you have some strawberries left over after layering, you can use them to decorate the top of the cake. This is totally optional, but it makes the cake look extra pretty!
- Cover and chill: Cover the icebox cake tightly with plastic wrap or aluminum foil. This will prevent it from drying out in the refrigerator and absorbing any unwanted odors.
- Chill for at least 4 hours: Refrigerate the cake for at least 4 hours, or preferably overnight. The longer it chills, the better the graham crackers will soften and the flavors will meld together. I usually make it the night before I want to serve it.
- Slice and serve: Once the cake has chilled sufficiently, remove it from the refrigerator. Slice it into squares or rectangles and serve. You can garnish each slice with a fresh strawberry or a dollop of whipped cream, if desired.
Notes
- Different fruits: Instead of strawberries, you can use other fruits like raspberries, blueberries, peaches, or bananas. Just make sure to slice them thinly so they layer nicely.
- Chocolate graham crackers: For a chocolatey twist, use chocolate graham crackers instead of regular graham crackers.
- Lemon zest: Add a teaspoon of lemon zest to the cream cheese mixture for a bright and citrusy flavor.
- Nutella: Spread a thin layer of Nutella between the graham cracker layers for a decadent treat.
- Coffee flavor: Dip the graham crackers in coffee before layering them for a coffee-flavored icebox cake.
- Make it individual: Assemble the icebox cake in individual serving dishes or glasses for a pretty presentation.
- Storage: Store leftover icebox cake in an airtight container in the refrigerator for up to 3 days. For longer storage, freeze wrapped tightly for up to 2 months. Thaw in the refrigerator overnight before serving.
- Troubleshooting: If the graham crackers are too hard after chilling, try adding a thin layer of milk or juice between the layers. If the cream cheese mixture is too thick, add a tablespoon or two of milk or cream to thin it out.

Leave a Comment