

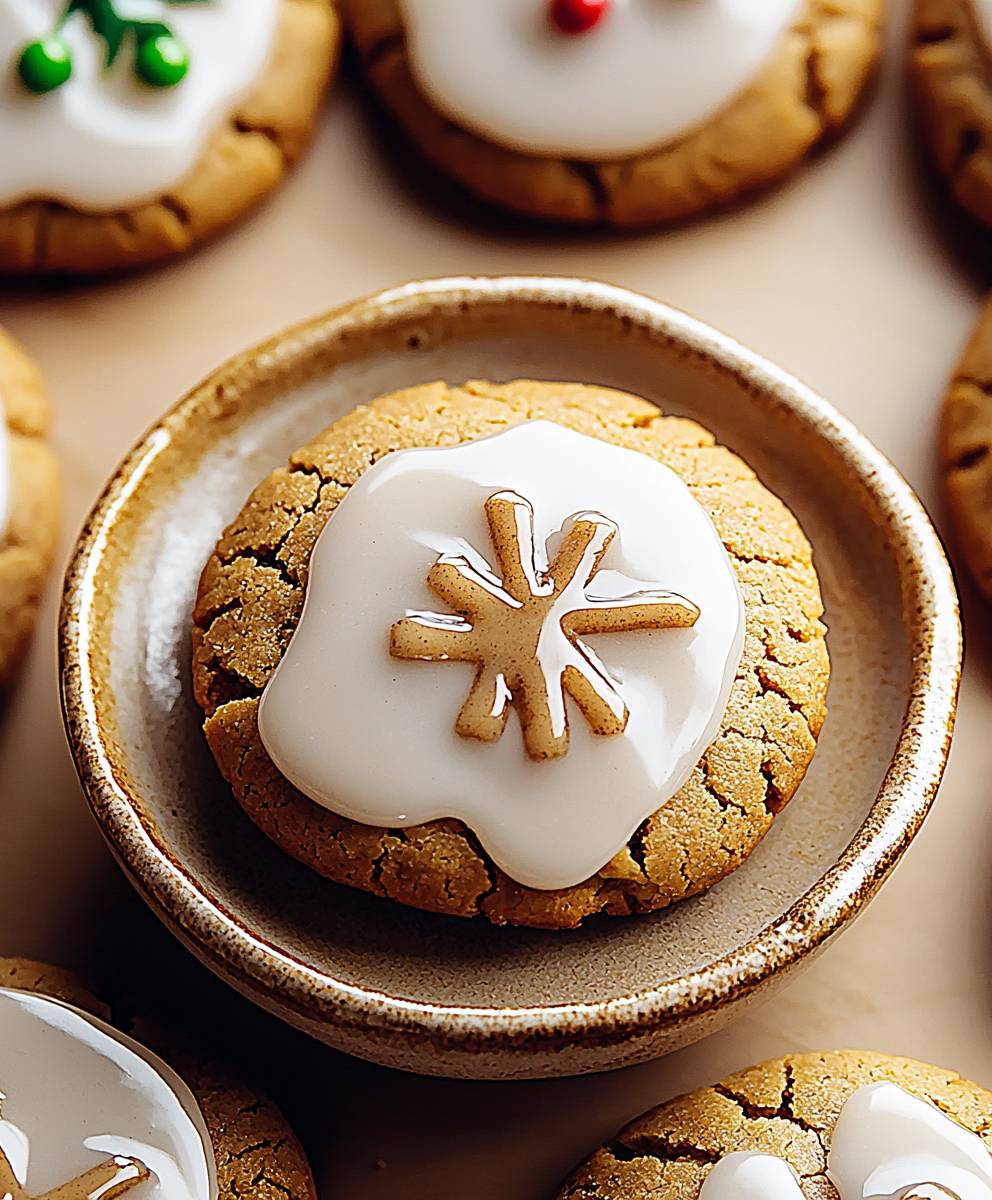
Soft Gingerbread Cookies: the very words conjure up images of cozy fireplaces, twinkling lights, and the warm, spicy aroma that fills the air during the holiday season. But what if I told you that these delightful treats are more than just a festive indulgence? They’re a delicious piece of history, a tradition passed down through generations, and a guaranteed crowd-pleaser any time of year!
Gingerbread, in various forms, has been around for centuries, with roots tracing back to ancient Greece and Egypt. It wasn’t until the Middle Ages that gingerbread, as we know it, began to take shape in Europe, becoming a staple at fairs and festivals. The addition of molasses and spices like cinnamon, cloves, and ginger transformed simple bread into the richly flavored and aromatic soft gingerbread cookies we adore today.
What is it about these cookies that makes them so irresistible? Is it the melt-in-your-mouth texture, the perfect balance of sweet and spicy, or the sheer joy of decorating them with loved ones? Perhaps it’s all of the above! These cookies are incredibly versatile. They are perfect for an afternoon treat with a cup of tea, a delightful addition to any holiday dessert platter, or a thoughtful homemade gift. Their soft, chewy texture and warm, comforting flavors make them a favorite for both young and old. So, let’s get baking and create some unforgettable memories with these classic cookies!

Ingredients:
- For the Cookies:
- 3 cups all-purpose flour, plus more for dusting
- 1 teaspoon baking soda
- 1 teaspoon ground cinnamon
- 1 teaspoon ground ginger
- 1/2 teaspoon ground cloves
- 1/4 teaspoon ground nutmeg
- 1/2 teaspoon salt
- 3/4 cup (1 1/2 sticks) unsalted butter, softened
- 3/4 cup packed dark brown sugar
- 1/2 cup granulated sugar
- 1 large egg
- 1 cup molasses
- 2 teaspoons vanilla extract
- For the Royal Icing:
- 4 cups powdered sugar, sifted
- 3 tablespoons meringue powder
- 1/2 cup warm water, plus more as needed
- Gel food coloring (optional, for decorating)
Preparing the Gingerbread Cookie Dough
- Combine the Dry Ingredients: In a large bowl, whisk together the flour, baking soda, cinnamon, ginger, cloves, nutmeg, and salt. Make sure everything is evenly distributed. This ensures that the spices and baking soda are properly incorporated into the dough, leading to a consistent flavor and texture.
- Cream the Butter and Sugars: In a separate large bowl (or the bowl of a stand mixer), cream together the softened butter, brown sugar, and granulated sugar until light and fluffy. This usually takes about 3-5 minutes. The mixture should be pale and airy. Creaming the butter and sugar is crucial for creating a tender cookie. The air incorporated during this process helps to leaven the cookies and gives them a soft texture.
- Add the Egg and Molasses: Beat in the egg until well combined. Then, add the molasses and vanilla extract and mix until everything is smooth and uniform in color. The molasses adds a distinctive flavor and moisture to the gingerbread cookies, while the vanilla enhances the overall sweetness.
- Gradually Add the Dry Ingredients: Gradually add the dry ingredients to the wet ingredients, mixing on low speed until just combined. Be careful not to overmix the dough, as this can develop the gluten in the flour and result in tough cookies. Mix until the flour is just incorporated, and then stop.
- Chill the Dough: Divide the dough in half, flatten each half into a disc, and wrap each disc tightly in plastic wrap. Refrigerate the dough for at least 2 hours, or preferably overnight. Chilling the dough is essential for preventing the cookies from spreading too much during baking. It also makes the dough easier to handle and roll out.
Rolling, Cutting, and Baking the Cookies
- Preheat the Oven: Preheat your oven to 350°F (175°C). Line baking sheets with parchment paper or silicone baking mats. This will prevent the cookies from sticking and make cleanup easier.
- Roll Out the Dough: On a lightly floured surface, roll out one disc of dough to about 1/4 inch thickness. Keep the other disc of dough refrigerated until you’re ready to use it. This prevents the dough from becoming too soft and difficult to handle.
- Cut Out the Cookies: Use cookie cutters to cut out your desired shapes. Re-roll the scraps of dough and cut out more cookies until all the dough is used. I like to use a variety of gingerbread men, stars, and Christmas tree shapes!
- Bake the Cookies: Place the cut-out cookies onto the prepared baking sheets, leaving about 1 inch of space between each cookie. Bake for 8-10 minutes, or until the edges are lightly golden brown. The baking time may vary depending on your oven, so keep a close eye on the cookies.
- Cool the Cookies: Remove the baking sheets from the oven and let the cookies cool on the baking sheets for a few minutes before transferring them to a wire rack to cool completely. Cooling the cookies on the baking sheets allows them to firm up slightly, making them easier to transfer without breaking.
Preparing the Royal Icing
- Combine the Ingredients: In a large bowl (or the bowl of a stand mixer), combine the sifted powdered sugar and meringue powder. Sifting the powdered sugar is important to remove any lumps and ensure a smooth icing.
- Add the Water: Gradually add the warm water to the powdered sugar mixture, mixing on low speed until a smooth icing forms. Add more water, 1 tablespoon at a time, until the icing reaches your desired consistency. The consistency of the icing is crucial for decorating. You’ll want a thicker consistency for outlining and a thinner consistency for flooding.
- Divide and Color the Icing (Optional): If you want to color the icing, divide it into separate bowls and add a few drops of gel food coloring to each bowl. Mix well until the color is evenly distributed. Gel food coloring is preferred over liquid food coloring because it won’t thin out the icing as much.
- Prepare Piping Bags: Transfer the icing to piping bags fitted with small round tips. You can also use zip-top bags and snip off a small corner.
Decorating the Gingerbread Cookies
- Outline the Cookies: Use a slightly thicker consistency of royal icing to outline the edges of the cookies. This will create a border that will prevent the thinner flooding icing from running off the edges.
- Flood the Cookies: Use a thinner consistency of royal icing to flood the inside of the outlined cookies. You can use a toothpick or scribe tool to spread the icing evenly and pop any air bubbles.
- Add Details: Once the base layer of icing has dried (this usually takes a few hours), you can add details such as sprinkles, candies, or more intricate icing designs. Get creative and have fun with it!
- Let the Icing Dry Completely: Allow the decorated cookies to dry completely before storing them. This usually takes several hours or overnight.
Tips for Perfect Gingerbread Cookies:
- Don’t Overbake: Overbaked gingerbread cookies will be dry and hard. Bake them just until the edges are lightly golden brown.
- Chill the Dough: Chilling the dough is essential for preventing the cookies from spreading too much during baking.
- Use Quality Spices: Freshly ground spices will give your gingerbread cookies the best flavor.
- Adjust Icing Consistency: The consistency of the royal icing is crucial for decorating. Experiment with adding more or less water until you achieve the desired consistency.
- Storage: Store the decorated gingerbread cookies in an airtight container at room temperature for up to a week.
Troubleshooting:
- Cookies Spreading Too Much: If your cookies are spreading too much during baking, the dough may not be cold enough. Try chilling the dough for a longer period of time. Also, make sure your oven is not too hot.
- Icing Too Thin: If your royal icing is too thin, add more sifted powdered sugar, a tablespoon at a time, until it reaches the desired consistency.
- Icing Too Thick: If your royal icing is too thick, add more water, a teaspoon at a time, until it reaches the desired consistency.
Conclusion:
So, there you have it! These Soft Gingerbread Cookies are more than just a holiday treat; they’re a warm hug in cookie form, perfect for any time of year. I truly believe this recipe is a must-try, and here’s why: the texture is unbelievably soft and chewy, the spices are perfectly balanced, and the aroma that fills your kitchen while they bake is simply divine. Forget those hard, crunchy gingerbread men these cookies are in a league of their own.
But the best part? They’re incredibly versatile! While they’re fantastic on their own, warm from the oven with a glass of milk, there are so many ways to enjoy them. For a classic touch, try decorating them with royal icing in festive designs. Get the kids involved it’s a fun and creative activity that everyone will love! If you’re feeling adventurous, you could even dip them in melted dark chocolate for an extra layer of indulgence.
Looking for serving suggestions? These cookies are perfect for holiday gatherings, bake sales, or even as a thoughtful homemade gift. Package them in a pretty tin or tie them with a ribbon for a personal touch. They also make a wonderful addition to a dessert platter or a cozy afternoon tea. And don’t forget to crumble them over ice cream or yogurt for a delicious and unexpected topping!
Beyond the classic icing, consider these variations:
* Lemon Glaze: A tangy lemon glaze adds a bright, citrusy note that complements the warm spices beautifully.
* Maple Cream Cheese Frosting: For a richer, more decadent treat, top these cookies with a maple cream cheese frosting. The creamy texture and sweet maple flavor are a match made in heaven.
* Spiced Sugar Coating: Before baking, roll the dough balls in a mixture of sugar and gingerbread spices for a sparkly and flavorful coating.
* Sandwich Cookies: Fill two cookies with a layer of cream cheese frosting or Nutella for a delightful sandwich cookie.
I’ve poured my heart into perfecting this recipe, and I’m confident that you’ll love it as much as I do. The secret to truly exceptional Soft Gingerbread Cookies lies in the quality of the ingredients and the careful attention to detail. Don’t skimp on the spices they’re what give these cookies their signature flavor. And be sure to chill the dough before baking to prevent the cookies from spreading too much.
Now, it’s your turn! I encourage you to give this recipe a try. I promise you won’t be disappointed. And please, don’t be shy share your experience with me! I’d love to hear how they turned out, what variations you tried, and any tips or tricks you discovered along the way. You can leave a comment below, tag me on social media, or even send me an email. I’m always eager to connect with fellow bakers and share the joy of creating delicious treats. Happy baking! Let me know if you have any questions, and I can’t wait to see your gingerbread creations!
Soft Gingerbread Cookies: The Ultimate Holiday Recipe
Festive and delicious gingerbread cookies, perfectly spiced and decorated with smooth royal icing. A holiday classic!
Ingredients
- 3 cups all-purpose flour, plus more for dusting
- 1 teaspoon baking soda
- 1 teaspoon ground cinnamon
- 1 teaspoon ground ginger
- 1/2 teaspoon ground cloves
- 1/4 teaspoon ground nutmeg
- 1/2 teaspoon salt
- 3/4 cup (1 1/2 sticks) unsalted butter, softened
- 3/4 cup packed dark brown sugar
- 1/2 cup granulated sugar
- 1 large egg
- 1 cup molasses
- 2 teaspoons vanilla extract
- 4 cups powdered sugar, sifted
- 3 tablespoons meringue powder
- 1/2 cup warm water, plus more as needed
- Gel food coloring (optional, for decorating)
Instructions
- Combine the Dry Ingredients: In a large bowl, whisk together the flour, baking soda, cinnamon, ginger, cloves, nutmeg, and salt. Make sure everything is evenly distributed. This ensures that the spices and baking soda are properly incorporated into the dough, leading to a consistent flavor and texture.
- Cream the Butter and Sugars: In a separate large bowl (or the bowl of a stand mixer), cream together the softened butter, brown sugar, and granulated sugar until light and fluffy. This usually takes about 3-5 minutes. The mixture should be pale and airy. Creaming the butter and sugar is crucial for creating a tender cookie. The air incorporated during this process helps to leaven the cookies and gives them a soft texture.
- Add the Egg and Molasses: Beat in the egg until well combined. Then, add the molasses and vanilla extract and mix until everything is smooth and uniform in color. The molasses adds a distinctive flavor and moisture to the gingerbread cookies, while the vanilla enhances the overall sweetness.
- Gradually Add the Dry Ingredients: Gradually add the dry ingredients to the wet ingredients, mixing on low speed until just combined. Be careful not to overmix the dough, as this can develop the gluten in the flour and result in tough cookies. Mix until the flour is just incorporated, and then stop.
- Chill the Dough: Divide the dough in half, flatten each half into a disc, and wrap each disc tightly in plastic wrap. Refrigerate the dough for at least 2 hours, or preferably overnight. Chilling the dough is essential for preventing the cookies from spreading too much during baking. It also makes the dough easier to handle and roll out.
- Preheat the Oven: Preheat your oven to 350°F (175°C). Line baking sheets with parchment paper or silicone baking mats. This will prevent the cookies from sticking and make cleanup easier.
- Roll Out the Dough: On a lightly floured surface, roll out one disc of dough to about 1/4 inch thickness. Keep the other disc of dough refrigerated until you’re ready to use it. This prevents the dough from becoming too soft and difficult to handle.
- Cut Out the Cookies: Use cookie cutters to cut out your desired shapes. Re-roll the scraps of dough and cut out more cookies until all the dough is used. I like to use a variety of gingerbread men, stars, and Christmas tree shapes!
- Bake the Cookies: Place the cut-out cookies onto the prepared baking sheets, leaving about 1 inch of space between each cookie. Bake for 8-10 minutes, or until the edges are lightly golden brown. The baking time may vary depending on your oven, so keep a close eye on the cookies.
- Cool the Cookies: Remove the baking sheets from the oven and let the cookies cool on the baking sheets for a few minutes before transferring them to a wire rack to cool completely. Cooling the cookies on the baking sheets allows them to firm up slightly, making them easier to transfer without breaking.
- Combine the Ingredients: In a large bowl (or the bowl of a stand mixer), combine the sifted powdered sugar and meringue powder. Sifting the powdered sugar is important to remove any lumps and ensure a smooth icing.
- Add the Water: Gradually add the warm water to the powdered sugar mixture, mixing on low speed until a smooth icing forms. Add more water, 1 tablespoon at a time, until the icing reaches your desired consistency. The consistency of the icing is crucial for decorating. You’ll want a thicker consistency for outlining and a thinner consistency for flooding.
- Divide and Color the Icing (Optional): If you want to color the icing, divide it into separate bowls and add a few drops of gel food coloring to each bowl. Mix well until the color is evenly distributed. Gel food coloring is preferred over liquid food coloring because it won’t thin out the icing as much.
- Prepare Piping Bags: Transfer the icing to piping bags fitted with small round tips. You can also use zip-top bags and snip off a small corner.
- Outline the Cookies: Use a slightly thicker consistency of royal icing to outline the edges of the cookies. This will create a border that will prevent the thinner flooding icing from running off the edges.
- Flood the Cookies: Use a thinner consistency of royal icing to flood the inside of the outlined cookies. You can use a toothpick or scribe tool to spread the icing evenly and pop any air bubbles.
- Add Details: Once the base layer of icing has dried (this usually takes a few hours), you can add details such as sprinkles, candies, or more intricate icing designs. Get creative and have fun with it!
- Let the Icing Dry Completely: Allow the decorated cookies to dry completely before storing them. This usually takes several hours or overnight.
Notes
- Don’t Overbake: Overbaked gingerbread cookies will be dry and hard. Bake them just until the edges are lightly golden brown.
- Chill the Dough: Chilling the dough is essential for preventing the cookies from spreading too much during baking.
- Use Quality Spices: Freshly ground spices will give your gingerbread cookies the best flavor.
- Adjust Icing Consistency: The consistency of the royal icing is crucial for decorating. Experiment with adding more or less water until you achieve the desired consistency.
- Storage: Store the decorated gingerbread cookies in an airtight container at room temperature for up to a week.
- Cookies Spreading Too Much: If your cookies are spreading too much during baking, the dough may not be cold enough. Try chilling the dough for a longer period of time. Also, make sure your oven is not too hot.
- Icing Too Thin: If your royal icing is too thin, add more sifted powdered sugar, a tablespoon at a time, until it reaches the desired consistency.
- Icing Too Thick: If your royal icing is too thick, add more water, a teaspoon at a time, until it reaches the desired consistency.

Leave a Comment