

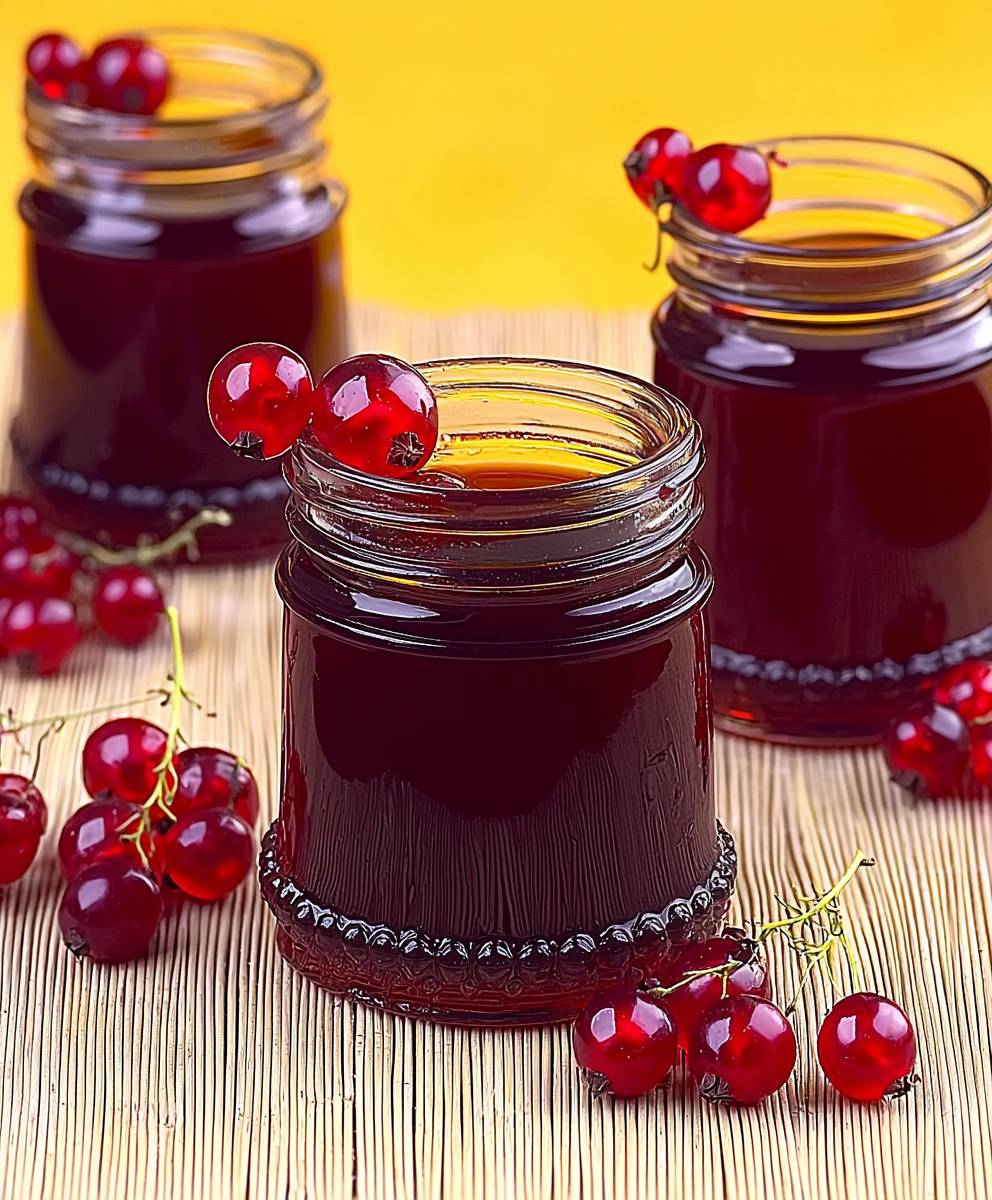
Redcurrant syrup, a vibrant elixir bursting with summer’s tart sweetness, is more than just a condiment; it’s a taste of history and a versatile ingredient that deserves a place in every kitchen. Imagine drizzling a ruby-red cascade over your morning pancakes, adding a sophisticated twist to your cocktails, or glazing a succulent roast chicken with its tangy goodness. Are you intrigued yet?
While the exact origins are debated, fruit syrups like this have been enjoyed for centuries, often used as a way to preserve the fleeting bounty of the harvest. In many European cultures, redcurrants were prized for their medicinal properties and their ability to add a refreshing zing to both sweet and savory dishes. This tradition of preserving and enjoying the intense flavor of redcurrants has been passed down through generations, resulting in the delicious redcurrant syrup we know and love today.
But what makes this syrup so irresistible? It’s the perfect balance of tartness and sweetness, a flavor profile that awakens the palate and adds a delightful complexity to any dish. People adore it for its versatility it’s equally at home in a delicate dessert as it is in a hearty main course. Plus, making your own redcurrant syrup is surprisingly easy, allowing you to control the ingredients and create a truly unique and flavorful experience. So, let’s embark on a culinary adventure and discover the magic of homemade redcurrant syrup!

Ingredients:
- 1 kg fresh redcurrants, stemmed and washed
- 500g granulated sugar (adjust to taste depending on the tartness of the currants)
- 250ml water
- 1 tablespoon lemon juice (optional, but helps with preservation and brightness)
- Sterilized bottles or jars for storage
- Cheesecloth or a fine-mesh sieve
Preparing the Redcurrants:
- Wash and Stem the Redcurrants: Gently wash the redcurrants under cold running water to remove any dirt or debris. Carefully remove the stems. This can be a bit tedious, but it’s important for a smooth syrup. I usually do this while watching TV to make it less of a chore!
- Combine Redcurrants and Water: In a large, heavy-bottomed saucepan, combine the washed and stemmed redcurrants with the water. The water helps to release the juices from the currants.
- Simmer the Mixture: Place the saucepan over medium heat and bring the mixture to a simmer. Once simmering, reduce the heat to low and cook for about 15-20 minutes, or until the redcurrants have softened and released their juices. You’ll notice the currants bursting and the liquid becoming a vibrant red. Stir occasionally to prevent sticking.
- Mash the Redcurrants: Using a potato masher or the back of a spoon, gently mash the redcurrants to further release their juices. Be careful not to splash the hot liquid. This step is crucial for extracting as much flavor as possible.
Straining the Redcurrant Juice:
- Prepare the Straining Setup: Place a large bowl underneath a colander lined with several layers of cheesecloth or a fine-mesh sieve. Make sure the sieve is sturdy enough to hold the weight of the redcurrant pulp.
- Pour the Redcurrant Mixture: Carefully pour the cooked redcurrant mixture into the cheesecloth-lined colander or sieve.
- Let the Juice Drip: Allow the juice to drip through the cheesecloth or sieve naturally. This can take several hours, or even overnight. Avoid pressing or squeezing the pulp, as this can result in a cloudy syrup. Patience is key here! I usually leave it overnight in the refrigerator to prevent any spoilage.
- Optional: Second Straining (for Extra Clarity): If you want an even clearer syrup, you can strain the juice a second time through a fresh piece of cheesecloth or a clean fine-mesh sieve. This will remove any remaining sediment.
Making the Redcurrant Syrup:
- Measure the Redcurrant Juice: Once you have strained the juice, measure the amount of juice you have. This is important for determining the correct amount of sugar to add.
- Combine Juice and Sugar: In a clean, heavy-bottomed saucepan, combine the measured redcurrant juice with the granulated sugar. A general rule of thumb is to use a 2:1 ratio of juice to sugar (e.g., 2 cups of juice to 1 cup of sugar), but you can adjust this to your taste. If your redcurrants are particularly tart, you might want to use a slightly higher ratio of sugar.
- Add Lemon Juice (Optional): If using, add the lemon juice to the saucepan. The lemon juice helps to brighten the flavor of the syrup and also acts as a natural preservative.
- Dissolve the Sugar: Place the saucepan over medium heat and stir constantly until the sugar is completely dissolved. Make sure there are no sugar crystals remaining on the bottom of the pan.
- Bring to a Boil: Once the sugar is dissolved, bring the mixture to a gentle boil. Reduce the heat slightly to maintain a steady simmer.
- Simmer and Skim: Simmer the syrup for about 10-15 minutes, or until it has thickened slightly. As the syrup simmers, you may notice some foam or scum forming on the surface. Use a spoon to skim off any impurities. This will help to create a clearer and more visually appealing syrup.
- Test for Doneness: To test if the syrup is ready, place a small spoonful of the syrup onto a chilled plate. Let it cool for a few seconds, then gently push it with your finger. If the syrup wrinkles and forms a soft gel, it is ready. If it is still too runny, continue to simmer for a few more minutes and test again. Be careful not to overcook the syrup, as it will become too thick and sticky.
Bottling and Storing the Redcurrant Syrup:
- Sterilize Bottles or Jars: While the syrup is simmering, sterilize your bottles or jars. You can do this by boiling them in water for 10 minutes, or by running them through a hot cycle in your dishwasher. Make sure the bottles are completely dry before filling them.
- Carefully Pour the Syrup: Carefully pour the hot syrup into the sterilized bottles or jars, leaving about 1/2 inch of headspace at the top. A funnel can be helpful for this step to prevent spills.
- Seal the Bottles: If using bottles with screw-top lids, tighten the lids securely. If using jars with two-part lids (lids and rings), place the lids on the jars and screw on the rings fingertip-tight.
- Process for Longer Shelf Life (Optional): For longer shelf life, you can process the filled jars in a boiling water bath. Place the jars in a large pot filled with enough boiling water to cover them by at least 1 inch. Bring the water back to a boil and process for 10 minutes. Remove the jars from the water bath and let them cool completely. As the jars cool, you should hear a popping sound, which indicates that the lids have sealed properly.
- Cool and Store: Let the bottles or jars cool completely before storing them. Store the unopened bottles or jars in a cool, dark place. Once opened, store the syrup in the refrigerator.
Tips and Variations:
- Adjust Sweetness: The amount of sugar can be adjusted to your preference. Taste the juice after straining and add more or less sugar accordingly.
- Add Spices: For a more complex flavor, you can add spices such as cinnamon sticks, cloves, or star anise to the syrup while it is simmering. Remove the spices before bottling.
- Infuse with Herbs: Try infusing the syrup with fresh herbs such as mint, rosemary, or thyme. Add the herbs to the syrup during the last few minutes of simmering and remove them before bottling.
- Use as a Base for Cocktails: Redcurrant syrup is a delicious addition to cocktails. Try using it in place of simple syrup in your favorite recipes.
- Drizzle over Desserts: Drizzle redcurrant syrup over pancakes, waffles, ice cream, or yogurt for a burst of fruity flavor.
- Make Redcurrant Jelly: If you accidentally overcook the syrup and it becomes too thick, don’t worry! You can still use it to make redcurrant jelly. Simply pour the thickened syrup into sterilized jars and let it set.
- Freezing the Syrup: If you don’t plan to use the syrup right away, you can freeze it. Pour the cooled syrup into freezer-safe containers, leaving some headspace for expansion. The syrup will keep in the freezer for several months.
Troubleshooting:
- Cloudy Syrup: If your syrup is cloudy, it could be due to pressing the redcurrant pulp too hard during straining. Next time, allow the juice to drip naturally.
- Syrup Too Thick: If your syrup is too thick, you may have overcooked it. You can try adding a little water to thin it out, but be careful not to add too much.
- Syrup Too Thin: If your syrup is too thin, continue to simmer it for a few more minutes until it reaches the desired consistency.
- Mold Growth: If you notice any mold growth in your syrup, discard it immediately. This is usually a sign that the bottles were not properly sterilized or that the syrup was not stored correctly.
Enjoy your homemade redcurrant syrup! It’s a delightful way to capture the taste of summer and add a touch of elegance to your culinary creations.
Conclusion:
This redcurrant syrup recipe isn’t just another recipe; it’s a gateway to a world of vibrant flavor and culinary possibilities. I truly believe that once you’ve tasted the bright, tangy sweetness of homemade redcurrant syrup, you’ll never go back to store-bought alternatives. It’s a must-try because it captures the essence of summer in a bottle, offering a concentrated burst of sunshine that can elevate everything from your morning pancakes to your evening cocktails. The simplicity of the process, combined with the incredible versatility of the final product, makes it a winner in my book.
Think of the endless possibilities! Drizzle it over vanilla ice cream for a simple yet elegant dessert. Stir it into sparkling water for a refreshing redcurrant spritzer. Use it as a glaze for grilled chicken or pork, adding a touch of fruity sweetness to savory dishes. For a truly decadent treat, try swirling it into your favorite cheesecake batter before baking. And don’t forget the cocktails! Redcurrant syrup is a fantastic addition to gin and tonics, margaritas, or even a simple vodka soda.
But the fun doesn’t stop there! Feel free to experiment with variations to make this recipe your own. Add a sprig of rosemary or thyme during the simmering process for a subtle herbal note. A pinch of cardamom or a sliver of ginger can add warmth and complexity. For a spicier kick, try adding a small chili pepper to the pot. You can also adjust the amount of sugar to suit your personal preference. If you prefer a less sweet syrup, simply reduce the sugar by a quarter or even a half. Remember to taste as you go and adjust accordingly.
Serving suggestions are just as diverse. Beyond the obvious uses like pancakes and waffles, consider using your redcurrant syrup as a base for homemade fruit leather. Simply spread a thin layer of the syrup onto a baking sheet lined with parchment paper and bake at a low temperature until it’s dried and leathery. It’s a healthy and delicious snack that kids and adults alike will love. You can also use it to make redcurrant jelly. Just add pectin according to the package instructions and you’ll have a beautiful and flavorful jelly to spread on toast or scones.
I’m so excited for you to try this recipe and discover the magic of homemade redcurrant syrup for yourself. It’s a rewarding experience that will not only fill your pantry with a delicious ingredient but also inspire you to get creative in the kitchen.
So, what are you waiting for? Gather your redcurrants, grab your saucepan, and get ready to create something truly special. I’m confident that you’ll love the results. And when you do, please share your experience! I’d love to hear how you used your redcurrant syrup and what variations you tried. Share your photos and stories on social media using [Your Hashtag] or leave a comment below. Let’s spread the redcurrant love! I can’t wait to see what you create! Happy cooking!
Redcurrant Syrup: The Ultimate Guide to Making & Using It
A vibrant and flavorful homemade redcurrant syrup, perfect for cocktails, desserts, or adding a fruity twist to your favorite dishes. Capture the taste of summer with this easy-to-make recipe!
Ingredients
- 1 kg fresh redcurrants, stemmed and washed
- 500g granulated sugar (adjust to taste depending on the tartness of the currants)
- 250ml water
- 1 tablespoon lemon juice (optional, but helps with preservation and brightness)
- Sterilized bottles or jars for storage
- Cheesecloth or a fine-mesh sieve
Instructions
- Wash and Stem the Redcurrants: Gently wash the redcurrants under cold running water to remove any dirt or debris. Carefully remove the stems.
- Combine Redcurrants and Water: In a large, heavy-bottomed saucepan, combine the washed and stemmed redcurrants with the water.
- Simmer the Mixture: Place the saucepan over medium heat and bring the mixture to a simmer. Once simmering, reduce the heat to low and cook for about 15-20 minutes, or until the redcurrants have softened and released their juices. Stir occasionally to prevent sticking.
- Mash the Redcurrants: Using a potato masher or the back of a spoon, gently mash the redcurrants to further release their juices.
- Prepare the Straining Setup: Place a large bowl underneath a colander lined with several layers of cheesecloth or a fine-mesh sieve.
- Pour the Redcurrant Mixture: Carefully pour the cooked redcurrant mixture into the cheesecloth-lined colander or sieve.
- Let the Juice Drip: Allow the juice to drip through the cheesecloth or sieve naturally. This can take several hours, or even overnight. Avoid pressing or squeezing the pulp.
- Optional: Second Straining (for Extra Clarity): If you want an even clearer syrup, you can strain the juice a second time through a fresh piece of cheesecloth or a clean fine-mesh sieve.
- Measure the Redcurrant Juice: Once you have strained the juice, measure the amount of juice you have.
- Combine Juice and Sugar: In a clean, heavy-bottomed saucepan, combine the measured redcurrant juice with the granulated sugar. A general rule of thumb is to use a 2:1 ratio of juice to sugar (e.g., 2 cups of juice to 1 cup of sugar), but you can adjust this to your taste.
- Add Lemon Juice (Optional): If using, add the lemon juice to the saucepan.
- Dissolve the Sugar: Place the saucepan over medium heat and stir constantly until the sugar is completely dissolved.
- Bring to a Boil: Once the sugar is dissolved, bring the mixture to a gentle boil. Reduce the heat slightly to maintain a steady simmer.
- Simmer and Skim: Simmer the syrup for about 10-15 minutes, or until it has thickened slightly. As the syrup simmers, you may notice some foam or scum forming on the surface. Use a spoon to skim off any impurities.
- Test for Doneness: To test if the syrup is ready, place a small spoonful of the syrup onto a chilled plate. Let it cool for a few seconds, then gently push it with your finger. If the syrup wrinkles and forms a soft gel, it is ready. If it is still too runny, continue to simmer for a few more minutes and test again.
- Sterilize Bottles or Jars: While the syrup is simmering, sterilize your bottles or jars. You can do this by boiling them in water for 10 minutes, or by running them through a hot cycle in your dishwasher. Make sure the bottles are completely dry before filling them.
- Carefully Pour the Syrup: Carefully pour the hot syrup into the sterilized bottles or jars, leaving about 1/2 inch of headspace at the top. A funnel can be helpful for this step to prevent spills.
- Seal the Bottles: If using bottles with screw-top lids, tighten the lids securely. If using jars with two-part lids (lids and rings), place the lids on the jars and screw on the rings fingertip-tight.
- Process for Longer Shelf Life (Optional): For longer shelf life, you can process the filled jars in a boiling water bath. Place the jars in a large pot filled with enough boiling water to cover them by at least 1 inch. Bring the water back to a boil and process for 10 minutes. Remove the jars from the water bath and let them cool completely. As the jars cool, you should hear a popping sound, which indicates that the lids have sealed properly.
- Cool and Store: Let the bottles or jars cool completely before storing them. Store the unopened bottles or jars in a cool, dark place. Once opened, store the syrup in the refrigerator.
Notes
- Adjust Sweetness: The amount of sugar can be adjusted to your preference. Taste the juice after straining and add more or less sugar accordingly.
- Add Spices: For a more complex flavor, you can add spices such as cinnamon sticks, cloves, or star anise to the syrup while it is simmering. Remove the spices before bottling.
- Infuse with Herbs: Try infusing the syrup with fresh herbs such as mint, rosemary, or thyme. Add the herbs to the syrup during the last few minutes of simmering and remove them before bottling.
- Use as a Base for Cocktails: Redcurrant syrup is a delicious addition to cocktails. Try using it in place of simple syrup in your favorite recipes.
- Drizzle over Desserts: Drizzle redcurrant syrup over pancakes, waffles, ice cream, or yogurt for a burst of fruity flavor.
- Make Redcurrant Jelly: If you accidentally overcook the syrup and it becomes too thick, don’t worry! You can still use it to make redcurrant jelly. Simply pour the thickened syrup into sterilized jars and let it set.
- Freezing the Syrup: If you don’t plan to use the syrup right away, you can freeze it. Pour the cooled syrup into freezer-safe containers, leaving some headspace for expansion. The syrup will keep in the freezer for several months.
- Cloudy Syrup: If your syrup is cloudy, it could be due to pressing the redcurrant pulp too hard during straining. Next time, allow the juice to drip naturally.
- Syrup Too Thick: If your syrup is too thick, you may have overcooked it. You can try adding a little water to thin it out, but be careful not to add too much.
- Syrup Too Thin: If your syrup is too thin, continue to simmer it for a few more minutes until it reaches the desired consistency.
- Mold Growth: If you notice any mold growth in your syrup, discard it immediately. This is usually a sign that the bottles were not properly sterilized or that the syrup was not stored correctly.


Leave a Comment