

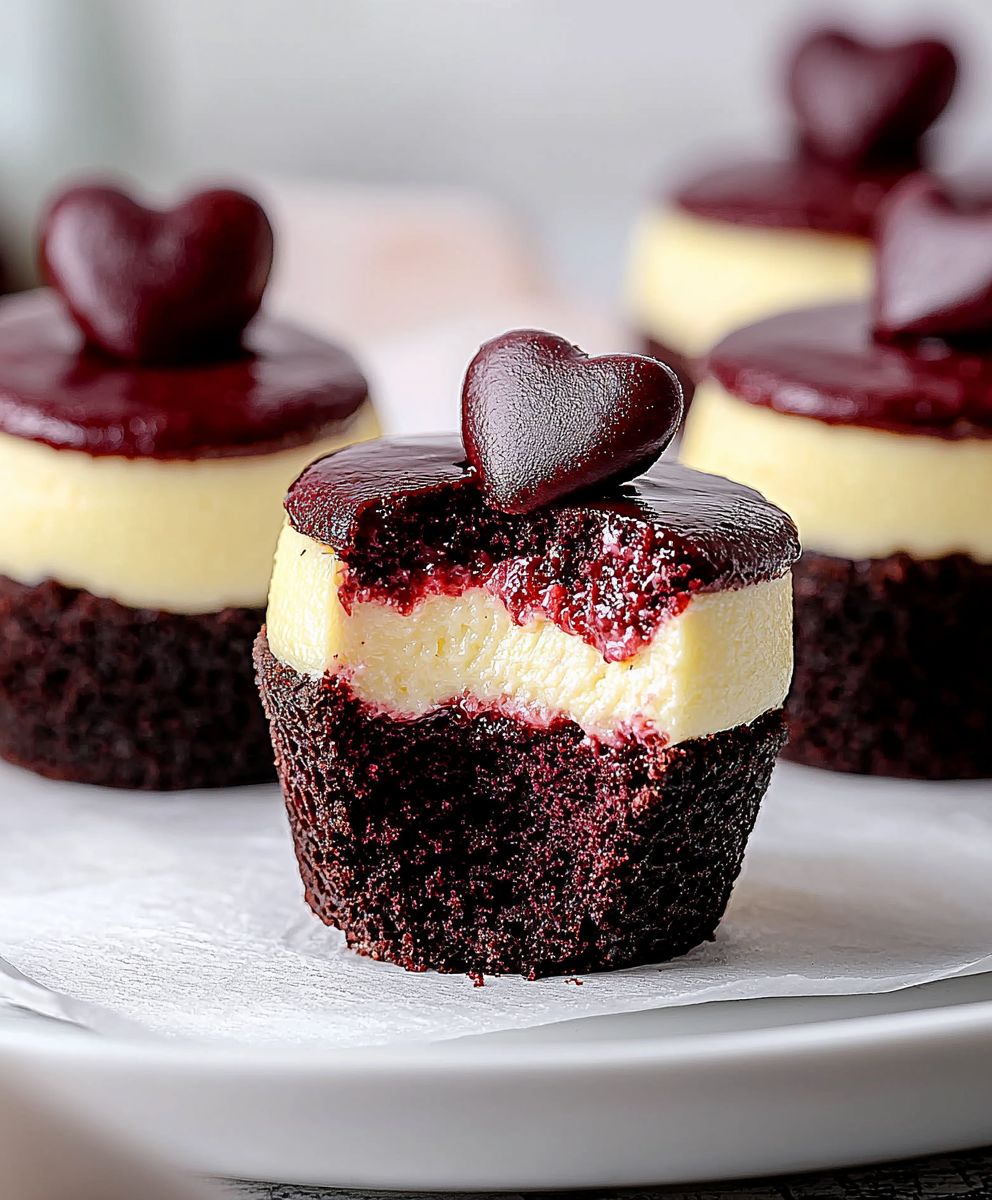
Red Velvet Cheesecake: Just the name alone conjures images of decadent indulgence, doesn’t it? Imagine sinking your fork into a creamy, dreamy dessert that perfectly marries the tangy richness of cheesecake with the subtle cocoa notes and vibrant color of red velvet cake. This isn’t just a dessert; it’s an experience!
While the exact origins of red velvet cake are debated, its popularity soared in the mid-20th century, often associated with upscale hotels and restaurants. Some believe its signature red hue was originally derived from the chemical reaction between cocoa powder, buttermilk, and vinegar. Today, we often rely on food coloring to achieve that iconic vibrant red, but the essence remains the same: a slightly tangy, incredibly moist cake that’s simply irresistible. Now, imagine that delightful flavor profile transformed into a luscious cheesecake!
People adore red velvet cheesecake for its stunning visual appeal, its delightful combination of textures, and its unforgettable flavor. The smooth, creamy cheesecake filling contrasts beautifully with the slightly crumbly red velvet base, creating a symphony of sensations in every bite. It’s the perfect dessert for special occasions, holidays, or simply when you want to treat yourself to something truly extraordinary. Get ready to impress your friends and family with this show-stopping dessert thats surprisingly easy to make!

Ingredients:
- For the Red Velvet Cake Layers:
- 2 ½ cups all-purpose flour
- 2 cups granulated sugar
- 1 teaspoon baking soda
- 1 teaspoon baking powder
- 1 teaspoon salt
- 1 ½ cups vegetable oil
- 1 cup buttermilk
- 2 large eggs
- 2 tablespoons unsweetened cocoa powder
- 1 ounce (2 tablespoons) red food coloring
- 1 teaspoon white vinegar
- 1 teaspoon vanilla extract
- For the Cheesecake Layer:
- 32 ounces cream cheese, softened
- 1 ½ cups granulated sugar
- 4 large eggs
- 1 cup sour cream
- 2 teaspoons vanilla extract
- For the Cream Cheese Frosting:
- 16 ounces cream cheese, softened
- 1 cup (2 sticks) unsalted butter, softened
- 4 cups powdered sugar
- 2 teaspoons vanilla extract
- Pinch of salt
Preparing the Red Velvet Cake Layers:
- Preheat and Prep: First things first, preheat your oven to 350°F (175°C). Grease and flour two 9-inch round cake pans. I like to use parchment paper rounds on the bottom for extra insurance against sticking. Trust me, it’s worth the extra step!
- Dry Ingredients: In a large bowl, whisk together the flour, sugar, baking soda, baking powder, and salt. Make sure everything is evenly distributed. This helps ensure a consistent texture in your cake.
- Wet Ingredients: In a separate bowl, whisk together the oil, buttermilk, eggs, cocoa powder, red food coloring, vinegar, and vanilla extract. Don’t be alarmed by the amount of food coloring; it’s what gives red velvet its signature hue!
- Combine Wet and Dry: Gradually add the wet ingredients to the dry ingredients, mixing on low speed until just combined. Be careful not to overmix! Overmixing can lead to a tough cake.
- Divide and Bake: Divide the batter evenly between the prepared cake pans. Bake for 25-30 minutes, or until a toothpick inserted into the center comes out clean. Let the cakes cool in the pans for 10 minutes before inverting them onto a wire rack to cool completely.
Making the Cheesecake Layer:
- Cream Cheese Prep: Make sure your cream cheese is properly softened! This is crucial for a smooth, lump-free cheesecake. If it’s not soft enough, you’ll end up with a grainy texture.
- Cream Cheese and Sugar: In a large bowl (or the bowl of your stand mixer), beat the softened cream cheese and sugar until smooth and creamy. This may take a few minutes, so be patient.
- Add Eggs: Add the eggs one at a time, beating well after each addition. Again, make sure everything is fully incorporated.
- Sour Cream and Vanilla: Stir in the sour cream and vanilla extract until just combined. Be careful not to overmix at this stage, as it can introduce air into the batter, which can cause cracks during baking.
Assembling and Baking the Red Velvet Cheesecake:
- Prep the Springform Pan: Grease a 9-inch springform pan. Wrap the bottom of the pan tightly with aluminum foil to prevent water from seeping in during the water bath. This is a must for a creamy, crack-free cheesecake!
- First Cake Layer: Place one of the cooled red velvet cake layers in the bottom of the prepared springform pan.
- Pour Cheesecake Batter: Pour the cheesecake batter over the cake layer, spreading it evenly.
- Second Cake Layer: Gently place the second red velvet cake layer on top of the cheesecake batter.
- Water Bath: Place the springform pan inside a larger roasting pan. Carefully pour hot water into the roasting pan until it reaches about halfway up the sides of the springform pan. This creates a humid environment that helps the cheesecake bake evenly and prevents cracking.
- Bake: Bake in the preheated oven for 55-70 minutes, or until the cheesecake is set around the edges but still slightly jiggly in the center. The baking time can vary depending on your oven, so keep an eye on it.
- Cooling Process: Turn off the oven and crack the oven door slightly. Let the cheesecake cool in the oven for 1 hour. This gradual cooling helps prevent cracking.
- Refrigerate: Remove the cheesecake from the water bath and let it cool completely on a wire rack. Then, cover it with plastic wrap and refrigerate for at least 6 hours, or preferably overnight. This allows the cheesecake to fully set and develop its flavor.
Making the Cream Cheese Frosting:
- Cream Cheese and Butter: In a large bowl (or the bowl of your stand mixer), beat the softened cream cheese and butter until smooth and creamy. Make sure there are no lumps!
- Add Powdered Sugar: Gradually add the powdered sugar, beating on low speed until combined. Then, increase the speed to medium and beat until light and fluffy.
- Vanilla and Salt: Stir in the vanilla extract and salt.
Frosting and Serving:
- Release and Frost: Run a thin knife around the edge of the springform pan to loosen the cheesecake. Carefully release the sides of the pan.
- Frost the Cheesecake: Frost the top of the cheesecake with the cream cheese frosting. You can get creative with your frosting technique! I like to use a piping bag for a more decorative look, but a simple offset spatula works just as well.
- Garnish (Optional): If you want to get fancy, you can garnish the cheesecake with red velvet cake crumbs, chocolate shavings, or fresh berries.
- Serve: Slice and serve! This red velvet cheesecake is best enjoyed chilled.
Conclusion:
And there you have it! This Red Velvet Cheesecake is more than just a dessert; it’s an experience. The rich, velvety texture of the red velvet cake perfectly complements the creamy, tangy cheesecake filling, creating a symphony of flavors that will dance on your taste buds. It’s a showstopper, a crowd-pleaser, and honestly, a little bit addictive. I know I’ve already made it three times this month!
Why is this a must-try? Because it’s the perfect marriage of two beloved desserts. You get the comforting familiarity of red velvet cake with the decadent indulgence of cheesecake, all in one glorious bite. It’s impressive enough for special occasions, yet simple enough to whip up for a weekend treat. Plus, the vibrant red hue makes it visually stunning perfect for Instagram!
But the best part? It’s surprisingly easy to make. I’ve broken down each step to ensure success, even for novice bakers. Don’t be intimidated by the seemingly long ingredient list; most of it is pantry staples. And trust me, the end result is worth every minute of effort.
Looking for serving suggestions? A dollop of whipped cream or a scoop of vanilla ice cream is always a welcome addition. For a touch of elegance, drizzle with melted white chocolate or sprinkle with red velvet cake crumbs. You could even add a few fresh raspberries or strawberries for a burst of fruity freshness.
And if you’re feeling adventurous, here are a few variations to try:
* Chocolate Lover’s Dream: Add chocolate chips to the cheesecake filling and drizzle with chocolate ganache.
* Oreo Overload: Crush Oreo cookies and mix them into the crust and cheesecake filling.
* Peppermint Twist: Add peppermint extract to the cheesecake filling and top with crushed peppermint candies during the holidays.
* Mini Red Velvet Cheesecakes: Bake the batter in muffin tins for individual servings perfect for parties!
* Red Velvet Cheesecake Bars: Press the crust into a baking pan, pour the cheesecake filling over it, and bake until set. Cut into bars for easy serving.
I’m confident that this Red Velvet Cheesecake will become a new favorite in your household. It’s a guaranteed hit with family and friends, and it’s sure to impress even the most discerning dessert connoisseurs.
So, what are you waiting for? Gather your ingredients, preheat your oven, and get ready to create a masterpiece. I can’t wait to hear about your baking adventures!
Once you’ve tried this recipe, please come back and share your experience in the comments below. Did you make any modifications? What did your family think? Any tips or tricks to share? I’m always eager to learn from fellow bakers and see your creative interpretations of this classic dessert. Happy baking! I hope you enjoy this recipe as much as I do!
Red Velvet Cheesecake: The Ultimate Guide to Baking Perfection
Moist red velvet cake layered with creamy cheesecake and topped with tangy cream cheese frosting. Perfect for any special occasion!
Ingredients
- 2 ½ cups all-purpose flour
- 2 cups granulated sugar
- 1 teaspoon baking soda
- 1 teaspoon baking powder
- 1 teaspoon salt
- 1 ½ cups vegetable oil
- 1 cup buttermilk
- 2 large eggs
- 2 tablespoons unsweetened cocoa powder
- 1 ounce (2 tablespoons) red food coloring
- 1 teaspoon white vinegar
- 1 teaspoon vanilla extract
- 32 ounces cream cheese, softened
- 1 ½ cups granulated sugar
- 4 large eggs
- 1 cup sour cream
- 2 teaspoons vanilla extract
- 16 ounces cream cheese, softened
- 1 cup (2 sticks) unsalted butter, softened
- 4 cups powdered sugar
- 2 teaspoons vanilla extract
- Pinch of salt
Instructions
- Preheat your oven to 350°F (175°C). Grease and flour two 9-inch round cake pans. Use parchment paper rounds on the bottom for extra insurance against sticking.
- In a large bowl, whisk together the flour, sugar, baking soda, baking powder, and salt.
- In a separate bowl, whisk together the oil, buttermilk, eggs, cocoa powder, red food coloring, vinegar, and vanilla extract.
- Gradually add the wet ingredients to the dry ingredients, mixing on low speed until just combined. Be careful not to overmix!
- Divide the batter evenly between the prepared cake pans. Bake for 25-30 minutes, or until a toothpick inserted into the center comes out clean. Let the cakes cool in the pans for 10 minutes before inverting them onto a wire rack to cool completely.
- Make sure your cream cheese is properly softened! This is crucial for a smooth, lump-free cheesecake.
- In a large bowl (or the bowl of your stand mixer), beat the softened cream cheese and sugar until smooth and creamy.
- Add the eggs one at a time, beating well after each addition.
- Stir in the sour cream and vanilla extract until just combined. Be careful not to overmix at this stage, as it can introduce air into the batter, which can cause cracks during baking.
- Grease a 9-inch springform pan. Wrap the bottom of the pan tightly with aluminum foil to prevent water from seeping in during the water bath.
- Place one of the cooled red velvet cake layers in the bottom of the prepared springform pan.
- Pour the cheesecake batter over the cake layer, spreading it evenly.
- Gently place the second red velvet cake layer on top of the cheesecake batter.
- Place the springform pan inside a larger roasting pan. Carefully pour hot water into the roasting pan until it reaches about halfway up the sides of the springform pan.
- Bake in the preheated oven for 55-70 minutes, or until the cheesecake is set around the edges but still slightly jiggly in the center. The baking time can vary depending on your oven, so keep an eye on it.
- Turn off the oven and crack the oven door slightly. Let the cheesecake cool in the oven for 1 hour. This gradual cooling helps prevent cracking.
- Remove the cheesecake from the water bath and let it cool completely on a wire rack. Then, cover it with plastic wrap and refrigerate for at least 6 hours, or preferably overnight. This allows the cheesecake to fully set and develop its flavor.
- In a large bowl (or the bowl of your stand mixer), beat the softened cream cheese and butter until smooth and creamy. Make sure there are no lumps!
- Gradually add the powdered sugar, beating on low speed until combined. Then, increase the speed to medium and beat until light and fluffy.
- Stir in the vanilla extract and salt.
- Run a thin knife around the edge of the springform pan to loosen the cheesecake. Carefully release the sides of the pan.
- Frost the top of the cheesecake with the cream cheese frosting.
- If you want to get fancy, you can garnish the cheesecake with red velvet cake crumbs, chocolate shavings, or fresh berries.
- Slice and serve! This red velvet cheesecake is best enjoyed chilled.
Notes
- Make sure all your ingredients, especially the cream cheese and butter, are properly softened for the best results.
- Don’t overmix the cake batter or cheesecake batter, as this can lead to a tough cake or cracked cheesecake.
- The water bath is crucial for a creamy, crack-free cheesecake. Don’t skip it!
- Allow the cheesecake to cool gradually in the oven and then refrigerate it for at least 6 hours to allow it to fully set.
Leave a Comment