

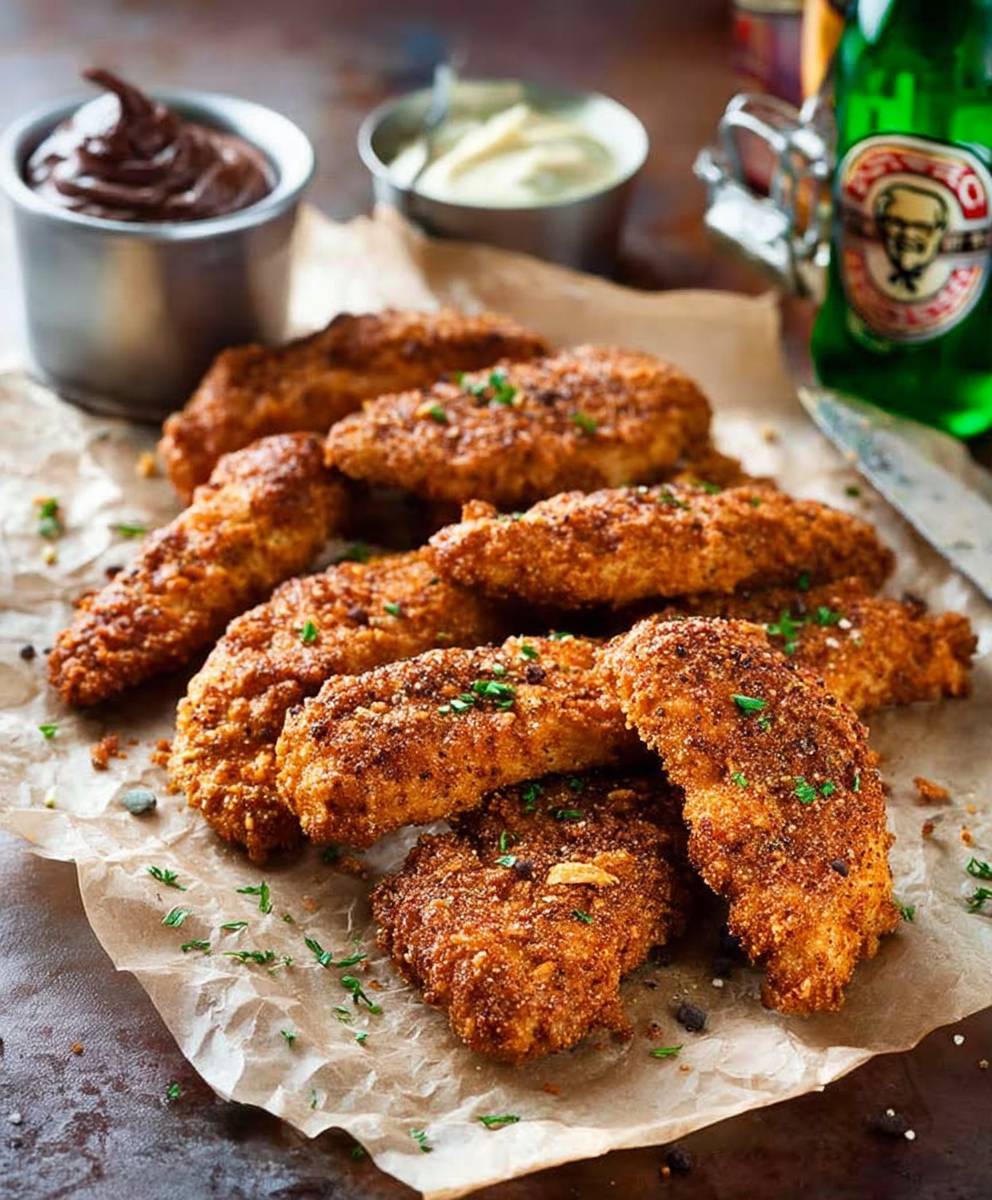
Oven Fried Chicken Tenders: Crispy, juicy, and unbelievably delicious without all the guilt of deep frying! Are you craving that satisfying crunch of fried chicken but want to skip the mess and extra calories? Then you’ve come to the right place. I’m about to share my secret to achieving perfectly “fried” chicken tenders right in your oven.
While the concept of fried chicken has deep roots in various cultures, particularly in the American South, this oven-baked version offers a modern twist on a classic comfort food. The original fried chicken, often associated with resourcefulness and family gatherings, has evolved over time. My oven fried chicken tenders recipe takes that beloved flavor profile and simplifies the process, making it accessible for busy weeknights and health-conscious individuals alike.
What’s not to love? These tenders boast a golden-brown, crispy exterior that gives way to tender, flavorful chicken inside. They’re incredibly versatile perfect for dipping in your favorite sauces, adding to salads, or enjoying as a satisfying snack. Plus, baking them in the oven means less oil, less mess, and a healthier alternative to traditional frying. Get ready to experience the ultimate comfort food without the guilt!

Ingredients:
- For the Chicken:
- 2 lbs boneless, skinless chicken breasts, cut into 1-inch thick strips
- 1 cup buttermilk
- 1 tablespoon hot sauce (like Frank’s RedHot, optional)
- 1 teaspoon salt
- 1/2 teaspoon black pepper
- For the Breading:
- 2 cups all-purpose flour
- 1 cup panko breadcrumbs
- 1/2 cup cornstarch
- 2 tablespoons paprika
- 2 tablespoons garlic powder
- 1 tablespoon onion powder
- 1 tablespoon dried thyme
- 1 tablespoon dried oregano
- 1 teaspoon cayenne pepper (optional, for extra heat)
- 1 teaspoon salt
- 1/2 teaspoon black pepper
- For Baking:
- 1/2 cup olive oil or vegetable oil
Preparing the Chicken
Alright, let’s get started with prepping our chicken! This is a crucial step for ensuring juicy and flavorful tenders.
- Cut the Chicken: First, take your chicken breasts and slice them into strips that are about 1-inch thick. You want them to be uniform in size so they cook evenly. If some pieces are thicker than others, they might take longer to cook, and you could end up with some dry tenders.
- Marinate the Chicken: In a large bowl, whisk together the buttermilk, hot sauce (if you’re using it I highly recommend it for a little kick!), salt, and pepper. This buttermilk marinade is going to work wonders, tenderizing the chicken and infusing it with flavor.
- Submerge the Chicken: Add the chicken strips to the buttermilk mixture, making sure they’re fully submerged. Cover the bowl with plastic wrap or a lid and refrigerate for at least 30 minutes. Ideally, you’d let it marinate for 2-4 hours, or even overnight for maximum flavor and tenderness. The longer it marinates, the better!
Preparing the Breading Mixture
Now, let’s move on to the breading. This is where we’ll create that crispy, flavorful coating that makes these tenders so irresistible.
- Combine Dry Ingredients: In a large, shallow dish (like a pie plate or a baking dish), whisk together the flour, panko breadcrumbs, cornstarch, paprika, garlic powder, onion powder, dried thyme, dried oregano, cayenne pepper (if using), salt, and pepper. Make sure everything is well combined so that each tender gets an even coating of all the spices.
- Whisk Thoroughly: Give the mixture a good whisk to ensure there are no clumps of flour or spices. The cornstarch is key here it helps create a super crispy coating. The panko breadcrumbs add extra crunch that regular breadcrumbs just can’t match.
Breading the Chicken
This is where the magic happens! We’re going to coat the marinated chicken in our flavorful breading mixture.
- Set Up Your Breading Station: Take the bowl with the marinated chicken and the dish with the breading mixture. It’s helpful to have a clean plate or baking sheet nearby to place the breaded tenders.
- Dredge the Chicken: Remove a chicken strip from the buttermilk marinade, letting any excess drip off. Then, place it in the breading mixture and use your hands to press the breading onto the chicken, making sure it’s completely coated on all sides.
- Press and Coat: Really press the breading into the chicken to help it adhere. This will ensure a nice, thick, and crispy coating.
- Repeat: Transfer the breaded chicken tender to the clean plate or baking sheet. Repeat the process with the remaining chicken strips until they are all breaded.
Baking the Chicken Tenders
Time to bake these beauties! We’re going to use a high oven temperature and a generous amount of oil to mimic the results of frying, but without all the extra grease.
- Preheat the Oven: Preheat your oven to 425°F (220°C). This high temperature is essential for getting that crispy, golden-brown crust.
- Prepare the Baking Sheet: Pour the olive oil (or vegetable oil) onto a large baking sheet. Spread the oil evenly over the entire surface of the baking sheet. This is important because the oil will help crisp up the bottom of the tenders.
- Place the Chicken Tenders: Arrange the breaded chicken tenders on the oiled baking sheet in a single layer. Make sure they’re not touching each other, as this will prevent them from browning properly.
- Bake: Bake for 12-15 minutes, then flip the tenders over and bake for another 10-12 minutes, or until they are golden brown and cooked through. The internal temperature of the chicken should reach 165°F (74°C). Use a meat thermometer to check for doneness.
- Check for Doneness: If the tenders are browning too quickly, you can loosely tent the baking sheet with aluminum foil to prevent them from burning.
- Rest: Once the tenders are cooked through, remove them from the oven and let them rest for a few minutes before serving. This will allow the juices to redistribute, resulting in even juicier tenders.
Serving Suggestions
These oven-fried chicken tenders are incredibly versatile and can be served with a variety of dipping sauces and sides.
- Dipping Sauces: Ranch dressing, honey mustard, barbecue sauce, ketchup, buffalo sauce, or a homemade aioli are all fantastic choices.
- Sides: Serve them with french fries, coleslaw, mashed potatoes, corn on the cob, or a simple salad.
- Other Ideas: You can also use these tenders to make chicken sandwiches, wraps, or salads. They’re also great as a party appetizer.
Enjoy your delicious and healthier oven-fried chicken tenders! They’re crispy, flavorful, and so much easier to make than traditional fried chicken.
Conclusion:
So there you have it! These Oven Fried Chicken Tenders are truly a game-changer. Forget the greasy, guilt-inducing fried chicken of your past. This recipe delivers all the crispy, golden-brown deliciousness you crave, but with a fraction of the fat and effort. It’s a win-win! I know, I know, it sounds too good to be true, but trust me, once you try these, you’ll be hooked.
Why is this recipe a must-try? Well, first and foremost, it’s incredibly easy. From start to finish, you’re looking at minimal prep time and simple steps. No complicated techniques or fancy equipment required. Secondly, it’s healthier. Baking instead of frying significantly reduces the amount of oil absorbed by the chicken, making it a much lighter and more wholesome option. And finally, and perhaps most importantly, it tastes amazing! The combination of the crispy coating and the juicy, tender chicken inside is simply irresistible.
But the fun doesn’t stop there! These Oven Fried Chicken Tenders are incredibly versatile. Serve them as a main course with your favorite sides like mashed potatoes, coleslaw, or a simple green salad. They’re also fantastic as an appetizer for parties or game nights. And for the kids (or the kid in you!), they’re perfect for dipping in ketchup, honey mustard, barbecue sauce, or even a creamy ranch dressing.
Looking for some variations? Get creative with your seasoning! Try adding a pinch of cayenne pepper to the breadcrumb mixture for a little kick. Or, experiment with different herbs and spices like garlic powder, onion powder, paprika, or Italian seasoning. You can also use different types of breadcrumbs, such as panko breadcrumbs for an extra crispy texture, or gluten-free breadcrumbs for a gluten-free option. For a parmesan-crusted version, add a generous amount of grated parmesan cheese to the breadcrumb mixture. Another great idea is to marinate the chicken tenders in buttermilk for a few hours before coating them. This will make them even more tender and flavorful. You could also try using different cuts of chicken, like chicken breasts cut into strips, or even boneless, skinless chicken thighs.
I’m absolutely confident that you’re going to love this recipe. It’s quick, easy, healthy(ish!), and incredibly delicious. Its a perfect weeknight meal solution, a crowd-pleasing appetizer, or a fun snack for any occasion. So, what are you waiting for? Head to your kitchen, gather your ingredients, and give these Oven Fried Chicken Tenders a try!
I’m so excited to hear what you think! Once you’ve made them, please come back and leave a comment below. Let me know how they turned out, what variations you tried, and what your family and friends thought. Did you add any special seasonings? Did you find a dipping sauce that perfectly complements the flavor? Sharing your experiences will not only help me improve the recipe but also inspire other readers to try it out. Don’t be shy your feedback is invaluable! Happy cooking!
Oven Fried Chicken Tenders: Crispy, Healthy, and Delicious Recipe
Crispy, flavorful oven-baked chicken tenders a healthier and equally delicious alternative to fried chicken! Marinated for tenderness and coated in a crunchy breadcrumb mixture, perfect for dipping or adding to dishes.
Ingredients
- 2 lbs boneless, skinless chicken breasts, cut into 1-inch thick strips
- 1 cup buttermilk
- 1 tablespoon hot sauce (like Frank’s RedHot, optional)
- 1 teaspoon salt
- 1/2 teaspoon black pepper
- 2 cups all-purpose flour
- 1 cup panko breadcrumbs
- 1/2 cup cornstarch
- 2 tablespoons paprika
- 2 tablespoons garlic powder
- 1 tablespoon onion powder
- 1 tablespoon dried thyme
- 1 tablespoon dried oregano
- 1 teaspoon cayenne pepper (optional, for extra heat)
- 1 teaspoon salt
- 1/2 teaspoon black pepper
- 1/2 cup olive oil or vegetable oil
Instructions
- Cut the Chicken: Slice chicken breasts into 1-inch thick strips.
- Marinate the Chicken: In a large bowl, whisk together buttermilk, hot sauce (optional), salt, and pepper. Add chicken strips, ensuring they are fully submerged. Cover and refrigerate for at least 30 minutes, ideally 2-4 hours or overnight.
- Combine Dry Ingredients: In a large, shallow dish, whisk together flour, panko breadcrumbs, cornstarch, paprika, garlic powder, onion powder, dried thyme, dried oregano, cayenne pepper (if using), salt, and pepper. Ensure everything is well combined.
- Set Up Breading Station: Take the bowl with the marinated chicken and the dish with the breading mixture. Have a clean plate or baking sheet nearby.
- Dredge the Chicken: Remove a chicken strip from the buttermilk marinade, letting any excess drip off. Place it in the breading mixture and use your hands to press the breading onto the chicken, making sure it’s completely coated on all sides.
- Press and Coat: Really press the breading into the chicken to help it adhere. This will ensure a nice, thick, and crispy coating.
- Repeat: Transfer the breaded chicken tender to the clean plate or baking sheet. Repeat the process with the remaining chicken strips until they are all breaded.
- Preheat the Oven: Preheat your oven to 425°F (220°C).
- Prepare the Baking Sheet: Pour the olive oil (or vegetable oil) onto a large baking sheet. Spread the oil evenly over the entire surface of the baking sheet.
- Place the Chicken Tenders: Arrange the breaded chicken tenders on the oiled baking sheet in a single layer. Make sure they’re not touching each other, as this will prevent them from browning properly.
- Bake: Bake for 12-15 minutes, then flip the tenders over and bake for another 10-12 minutes, or until they are golden brown and cooked through. The internal temperature of the chicken should reach 165°F (74°C). Use a meat thermometer to check for doneness.
- Check for Doneness: If the tenders are browning too quickly, you can loosely tent the baking sheet with aluminum foil to prevent them from burning.
- Rest: Once the tenders are cooked through, remove them from the oven and let them rest for a few minutes before serving. This will allow the juices to redistribute, resulting in even juicier tenders.
- Serve: Serve with your favorite dipping sauces and sides.
Notes
- Marinating the chicken for longer (up to overnight) will result in more flavorful and tender chicken.
- Press the breading firmly onto the chicken to ensure a good coating.
- Don’t overcrowd the baking sheet; bake in batches if necessary.
- Use a meat thermometer to ensure the chicken is cooked to a safe internal temperature of 165°F (74°C).
- Serve with ranch dressing, honey mustard, barbecue sauce, ketchup, buffalo sauce, or a homemade aioli.
- Serve them with french fries, coleslaw, mashed potatoes, corn on the cob, or a simple salad.
- You can also use these tenders to make chicken sandwiches, wraps, or salads. They’re also great as a party appetizer.
Leave a Comment