

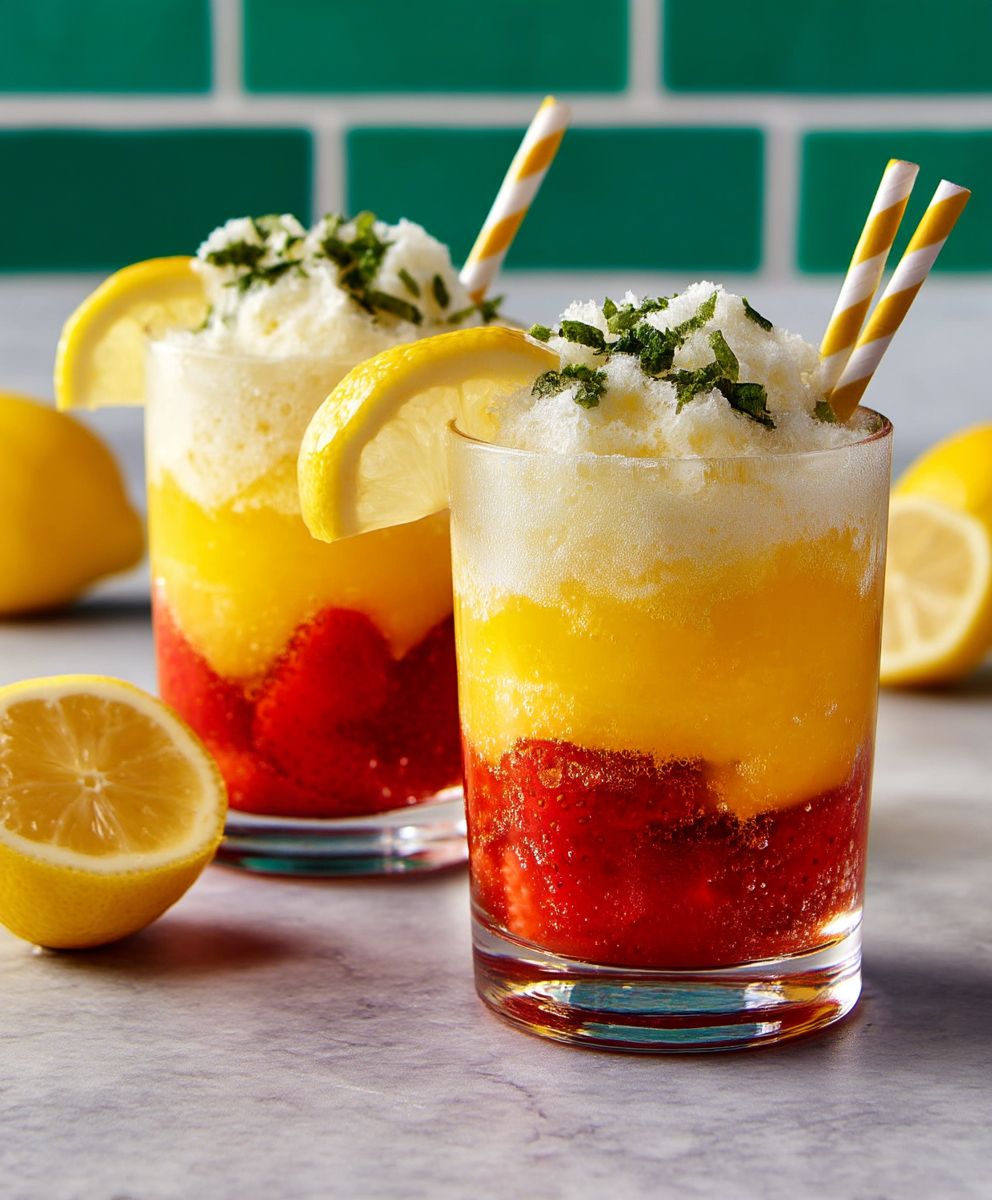
Ombre Lemonade Drops: Prepare to be captivated by these delightful little bursts of sunshine! Imagine a treat that’s not only visually stunning but also delivers a tangy, sweet, and utterly refreshing lemonade flavor in every single bite. These aren’t your average candies; they’re a miniature work of art, perfect for impressing guests, gifting to loved ones, or simply indulging in a moment of pure, lemony bliss.
While the exact origins of hard candy are debated, the concept of preserving flavors in a sugary form has been around for centuries. These Ombre Lemonade Drops take that tradition and elevate it with a modern twist. The ombre effect, a gradient of color from light to dark, adds a touch of elegance and sophistication, making them a standout treat for any occasion.
What makes these lemonade drops so irresistible? It’s the perfect balance of sweet and sour, the satisfying crunch, and the vibrant lemon flavor that awakens your taste buds. Plus, they’re surprisingly easy to make at home, allowing you to customize the color and intensity of the lemon flavor to your liking. Whether you’re a seasoned candy maker or a beginner in the kitchen, this recipe is sure to become a new favorite. Get ready to create a batch of these dazzling drops and experience the joy of homemade candy!

Ingredients:
- For the Lemonade Base:
- 1 ½ cups granulated sugar
- 8 cups water, divided
- 1 ½ cups freshly squeezed lemon juice (from about 8-10 lemons)
- For the Coloring:
- Red food coloring gel
- Yellow food coloring gel
- Blue food coloring gel
- Equipment:
- Ice cube trays (various sizes and shapes for a fun effect!)
- Small bowls or cups for mixing colors
- Measuring cups and spoons
- Pitcher or large container
- Spoon or whisk
Making the Lemonade Base
Okay, let’s start with the foundation of our Ombre Lemonade Drops the lemonade itself! This is a super simple recipe, and you can adjust the sweetness to your liking. I prefer a slightly tart lemonade, but feel free to add more sugar if you have a sweeter tooth.
- Make a Simple Syrup: In a saucepan, combine the granulated sugar with 2 cups of water. Heat over medium heat, stirring constantly, until the sugar is completely dissolved. This usually takes about 5-7 minutes. You don’t want the mixture to boil, just gently heat it until clear. Once the sugar is dissolved, remove the saucepan from the heat and let the simple syrup cool completely. This is important because adding hot syrup to lemon juice can alter the flavor.
- Combine Lemon Juice and Syrup: In a large pitcher or container, combine the cooled simple syrup with the freshly squeezed lemon juice. Stir well to combine.
- Add Remaining Water: Add the remaining 6 cups of water to the pitcher and stir again. Taste the lemonade and adjust the sweetness if needed. If it’s too tart, add a little more simple syrup (you can make extra and store it in the fridge). If it’s too sweet, add a splash more lemon juice.
- Chill the Lemonade: Cover the pitcher and refrigerate the lemonade for at least 30 minutes, or even better, for a couple of hours. This allows the flavors to meld together and the lemonade to get nice and cold.
Creating the Ombre Colors
Now for the fun part creating the beautiful ombre effect! This is where you get to be creative and experiment with different color combinations. I’m using red, yellow, and blue to create a range of colors, but you can use any colors you like. Just remember that food coloring gel is very concentrated, so start with a tiny amount and add more gradually until you achieve the desired shade.
- Prepare Your Coloring Stations: Set out several small bowls or cups. The number of bowls will depend on how many different shades you want to create. I usually aim for at least 5-6 different shades for a good ombre effect.
- Divide the Lemonade: Pour a small amount of the chilled lemonade into each bowl. The amount of lemonade in each bowl doesn’t have to be exact, but try to keep it roughly the same.
- Start Coloring: Begin adding food coloring gel to each bowl. Start with the lightest shade first. For example, if you’re using red, yellow, and blue, you might start with a very pale yellow. Add a tiny drop of yellow food coloring gel to one bowl and stir well. Add more gel, a tiny bit at a time, until you reach the desired shade.
- Create the Gradient: In the next bowl, add a slightly darker shade of yellow. In the following bowl, you might add a mixture of yellow and a tiny bit of red to create a light orange. Continue adding different combinations of colors to each bowl, gradually increasing the intensity of the color. For example, you could have shades of yellow, light orange, orange, reddish-orange, and red. You can also create shades of blue and green by using blue and yellow food coloring. Don’t be afraid to experiment!
- Mix Thoroughly: Make sure to stir each bowl thoroughly after adding food coloring to ensure the color is evenly distributed.
Freezing the Lemonade Drops
This is where the magic happens! Carefully layering the different shades of lemonade in your ice cube trays will create the stunning ombre effect. I like to use a variety of ice cube tray shapes and sizes for a more interesting presentation. You can find trays in all sorts of fun shapes, like stars, hearts, and even dinosaurs!
- Layering the Colors: Start with the lightest shade of lemonade and carefully pour a small amount into each ice cube compartment. Don’t fill the compartments all the way to the top. Leave some room for the next layer.
- Add the Next Shade: Once you’ve filled all the compartments with the first layer, carefully add the next shade of lemonade on top. Again, don’t fill the compartments completely.
- Continue Layering: Continue layering the different shades of lemonade, one on top of the other, until you’ve filled all the compartments. You can create a smooth gradient by gradually transitioning from one shade to the next, or you can create a more distinct ombre effect by using bolder color contrasts.
- Freeze: Carefully transfer the ice cube trays to the freezer and freeze for at least 4-6 hours, or preferably overnight, until the lemonade drops are completely frozen solid.
Serving Your Ombre Lemonade Drops
Finally, the moment we’ve been waiting for! Serving your beautiful Ombre Lemonade Drops is super easy. You can add them to a glass of plain water, sparkling water, or even more lemonade for an extra burst of flavor and color. They’re perfect for parties, picnics, or just a refreshing treat on a hot day.
- Unmold the Lemonade Drops: Once the lemonade drops are frozen solid, carefully remove them from the ice cube trays. You may need to run the bottom of the trays under warm water for a few seconds to loosen the drops.
- Serve and Enjoy: Add the Ombre Lemonade Drops to your favorite beverage and enjoy! Watch as the colors slowly melt and create a beautiful swirling effect.
Tips and Variations:
- Experiment with Flavors: Try adding different fruit purees or extracts to the lemonade base for a variety of flavors. Strawberry, raspberry, and blueberry are all great options.
- Add Herbs: Infuse the lemonade with fresh herbs like mint, basil, or rosemary for a more sophisticated flavor.
- Make it Sparkling: Use sparkling water or club soda instead of plain water for a fizzy and refreshing twist.
- Use Natural Food Coloring: If you prefer to avoid artificial food coloring, you can use natural food coloring made from fruits and vegetables. Beet juice can be used for red, turmeric for yellow, and spirulina for blue.
- Layering Techniques: For a more defined ombre, freeze each layer for about 30 minutes before adding the next. This will prevent the colors from blending too much.
- Adult Version: For an adult version, add a splash of vodka, gin, or rum to the lemonade base before freezing.
Storage:
Store the frozen Ombre Lemonade Drops in a freezer bag or airtight container in the freezer for up to 2-3 months.
Conclusion:
This isn’t just another lemonade recipe; it’s a burst of sunshine in every sip, a visual delight, and a guaranteed crowd-pleaser. The Ombre Lemonade Drops are more than just refreshing; they’re an experience. From the vibrant layers to the tangy-sweet flavor, this recipe is a must-try for anyone looking to add a touch of magic to their summer gatherings, afternoon treats, or even just a simple moment of self-care.
Why is this recipe a must-try? Because it’s incredibly easy to make, stunningly beautiful, and utterly delicious. The ombre effect is surprisingly simple to achieve, even for beginner cooks, and the resulting lemonade is a symphony of flavors that will tantalize your taste buds. Forget boring, store-bought lemonade; this homemade version is bursting with fresh lemon flavor and a touch of sweetness that will leave you wanting more. Plus, the visual appeal is undeniable. Imagine serving these gorgeous layered drinks at your next party your guests will be wowed!
But the best part? This recipe is incredibly versatile. Feel free to experiment with different fruit purees to create your own unique ombre combinations. Strawberry, raspberry, or even mango puree would work beautifully. You could also add a splash of sparkling water or club soda for a fizzy twist. For a more adult-friendly version, consider adding a shot of vodka or gin. Garnish with fresh mint sprigs, lemon slices, or even edible flowers for an extra touch of elegance.
Serving Suggestions and Variations:
* For a party: Prepare a large batch of each layer in separate pitchers and let your guests create their own ombre masterpieces. Provide a variety of fruit purees and garnishes for a fun and interactive experience.
* For a picnic: Pack the lemonade in individual mason jars for easy transport and a charming presentation.
* For a hot day: Freeze the lemonade in popsicle molds for a refreshing and healthy treat.
* For a festive occasion: Add edible glitter to the lemonade for a touch of sparkle.
* For a healthier option: Use a natural sweetener like honey or agave nectar instead of sugar.
I’m absolutely confident that you’ll love this recipe as much as I do. It’s the perfect way to beat the heat, impress your friends and family, and add a little bit of joy to your day. The Ombre Lemonade Drops are a guaranteed hit, and I can’t wait to hear what you think!
So, what are you waiting for? Gather your ingredients, put on some music, and get ready to create some magic in your kitchen. I promise you won’t regret it.
I’m so excited for you to try this recipe! Once you’ve made your own batch of Ombre Lemonade Drops, please come back and share your experience in the comments below. I’d love to hear about your variations, your serving suggestions, and any tips or tricks you discovered along the way. Did you try a different fruit puree? Did you add a special garnish? Let me know! Your feedback is invaluable, and it helps me to improve my recipes and create even more delicious content for you. Don’t forget to snap a photo of your beautiful lemonade creations and tag me on social media! I can’t wait to see what you come up with. Happy sipping!
Ombre Lemonade Drops: A Refreshing Summer Treat
Colorful, refreshing frozen treats made with homemade lemonade and vibrant layers. Perfect for parties or summer refreshment.
Ingredients
- 1 ½ cups granulated sugar
- 8 cups water, divided
- 1 ½ cups freshly squeezed lemon juice (from about 8-10 lemons)
- Red food coloring gel
- Yellow food coloring gel
- Blue food coloring gel
Instructions
- Make a Simple Syrup: In a saucepan, combine the granulated sugar with 2 cups of water. Heat over medium heat, stirring constantly, until the sugar is completely dissolved (5-7 minutes). Do not boil. Let the simple syrup cool completely.
- Combine Lemon Juice and Syrup: In a large pitcher or container, combine the cooled simple syrup with the freshly squeezed lemon juice. Stir well.
- Add Remaining Water: Add the remaining 6 cups of water to the pitcher and stir again. Taste and adjust sweetness as needed with more simple syrup or lemon juice.
- Chill the Lemonade: Cover the pitcher and refrigerate for at least 30 minutes (or a couple of hours) to allow flavors to meld.
- Prepare Coloring Stations: Set out several small bowls or cups (5-6 for a good ombre effect).
- Divide the Lemonade: Pour a small amount of the chilled lemonade into each bowl (roughly the same amount in each).
- Start Coloring: Begin adding food coloring gel to each bowl, starting with the lightest shade. Add a tiny drop of food coloring gel to one bowl and stir well. Add more gel, a tiny bit at a time, until you reach the desired shade.
- Create the Gradient: In the next bowl, add a slightly darker shade of yellow. In the following bowl, you might add a mixture of yellow and a tiny bit of red to create a light orange. Continue adding different combinations of colors to each bowl, gradually increasing the intensity of the color.
- Mix Thoroughly: Stir each bowl thoroughly after adding food coloring to ensure the color is evenly distributed.
- Layering the Colors: Start with the lightest shade of lemonade and carefully pour a small amount into each ice cube compartment. Don’t fill the compartments all the way to the top. Leave some room for the next layer.
- Add the Next Shade: Once you’ve filled all the compartments with the first layer, carefully add the next shade of lemonade on top. Again, don’t fill the compartments completely.
- Continue Layering: Continue layering the different shades of lemonade, one on top of the other, until you’ve filled all the compartments.
- Freeze: Carefully transfer the ice cube trays to the freezer and freeze for at least 4-6 hours, or preferably overnight, until the lemonade drops are completely frozen solid.
- Unmold the Lemonade Drops: Once the lemonade drops are frozen solid, carefully remove them from the ice cube trays. You may need to run the bottom of the trays under warm water for a few seconds to loosen the drops.
- Serve and Enjoy: Add the Ombre Lemonade Drops to your favorite beverage and enjoy! Watch as the colors slowly melt and create a beautiful swirling effect.
Notes
- Adjust the sweetness of the lemonade to your preference.
- Experiment with different color combinations for the ombre effect.
- Use a variety of ice cube tray shapes and sizes for a more interesting presentation.
- For a more defined ombre, freeze each layer for about 30 minutes before adding the next.
- Store the frozen Ombre Lemonade Drops in a freezer bag or airtight container in the freezer for up to 2-3 months.
- Try adding different fruit purees or extracts to the lemonade base for a variety of flavors.
- Infuse the lemonade with fresh herbs like mint, basil, or rosemary for a more sophisticated flavor.
- Use sparkling water or club soda instead of plain water for a fizzy and refreshing twist.
- If you prefer to avoid artificial food coloring, you can use natural food coloring made from fruits and vegetables. Beet juice can be used for red, turmeric for yellow, and spirulina for blue.
- For an adult version, add a splash of vodka, gin, or rum to the lemonade base before freezing.
Leave a Comment