

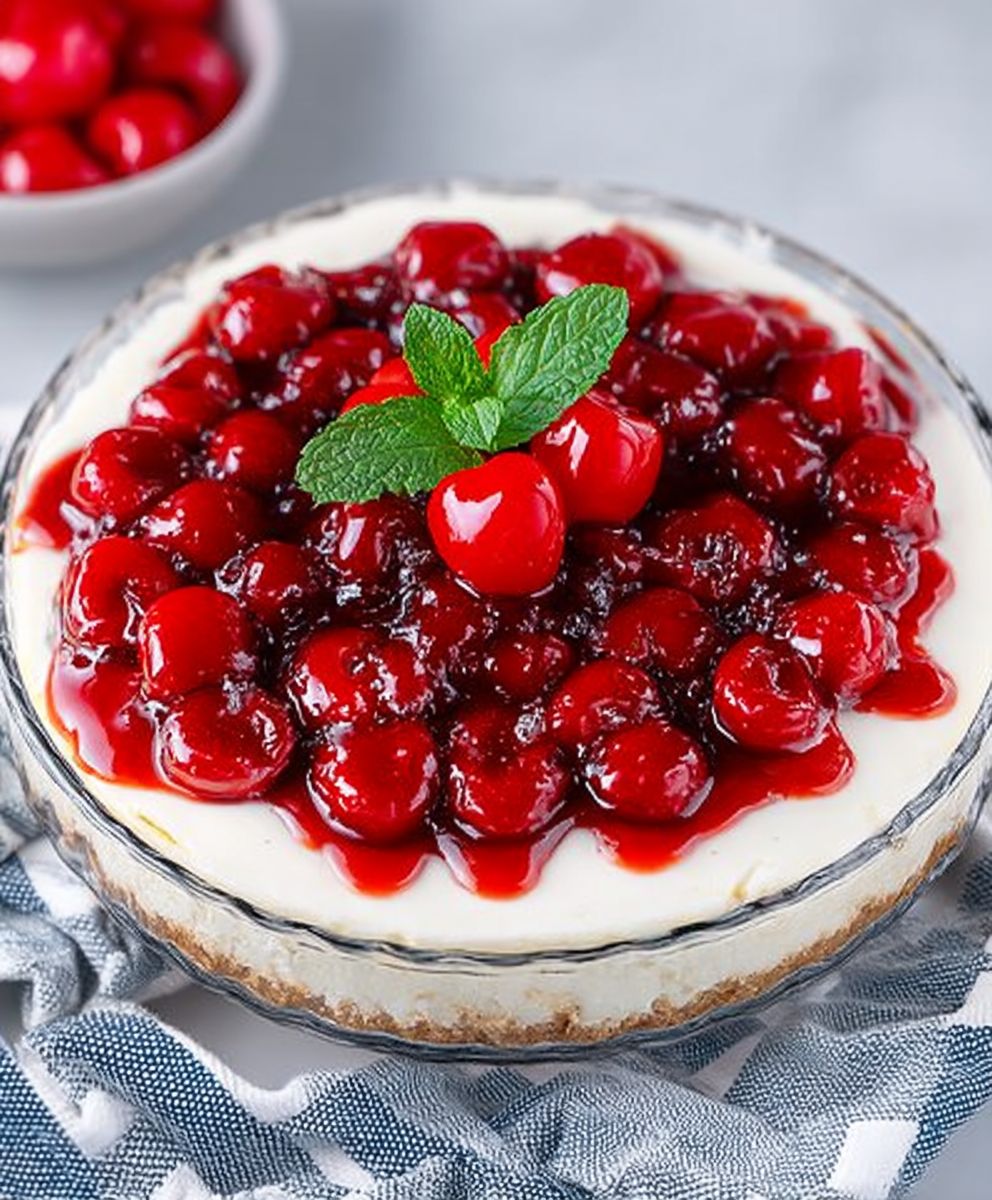
No Crust Cherry Cheesecake: Prepare to be amazed! Imagine sinking your fork into a creamy, decadent cheesecake, bursting with sweet and tart cherry flavor, all without the fuss of a traditional crust. Sounds too good to be true? It’s not! This recipe delivers all the satisfaction of a classic cheesecake, but with a fraction of the effort.
While the exact origins of cheesecake are debated, its history stretches back to ancient Greece. Over centuries, it has evolved into countless variations, each reflecting the unique culinary traditions of different cultures. This no-crust version, however, is a modern marvel, born from a desire for simplicity and speed without sacrificing flavor.
What makes this no crust cherry cheesecake so irresistible? It’s the perfect combination of textures: the smooth, velvety cheesecake filling contrasts beautifully with the juicy, slightly tangy cherry topping. Plus, the absence of a crust allows the pure, unadulterated flavor of the cheesecake to shine through. People adore this dish because it’s incredibly easy to make, requiring minimal ingredients and baking time. It’s a show-stopping dessert that’s perfect for any occasion, from casual weeknight dinners to elegant dinner parties. Get ready to impress your friends and family with this unbelievably delicious and surprisingly simple treat!

Ingredients:
- For the Cheesecake Filling:
- 24 ounces (3 packages) cream cheese, softened to room temperature
- 1 1/4 cups granulated sugar
- 1/4 cup sour cream
- 2 large eggs
- 1 teaspoon vanilla extract
- 1/4 teaspoon almond extract (optional, but highly recommended!)
- Pinch of salt
- For the Cherry Topping:
- 2 (21 ounce) cans cherry pie filling
- 1 tablespoon lemon juice
- 1/2 teaspoon almond extract (optional, enhances the cherry flavor)
- 1 tablespoon cornstarch (if you want a thicker sauce)
Preparing the Cheesecake Filling:
- Preheat your oven and prepare your baking pan: Preheat your oven to 325°F (160°C). This lower temperature helps prevent cracking. Grease a 9-inch springform pan really well. I like to use cooking spray, then line the bottom with parchment paper for extra insurance. This makes it super easy to release the cheesecake later.
- Beat the cream cheese: In a large bowl (or the bowl of your stand mixer), beat the softened cream cheese with an electric mixer on medium speed until it’s completely smooth and creamy. This is a crucial step! Any lumps in the cream cheese will translate to lumps in your cheesecake. Scrape down the sides of the bowl as needed. This usually takes about 3-5 minutes.
- Add the sugar gradually: Gradually add the granulated sugar to the cream cheese, beating on medium speed until well combined. Again, scrape down the sides of the bowl to make sure everything is incorporated evenly. Over-mixing at this stage can incorporate too much air, which can lead to cracking, so mix until just combined.
- Incorporate the sour cream: Add the sour cream and beat until just combined. Sour cream adds a lovely tang and richness to the cheesecake. Don’t overmix!
- Add the eggs one at a time: Add the eggs one at a time, beating on low speed after each addition until just combined. It’s really important not to overmix after adding the eggs. Overmixing will incorporate too much air, which can cause the cheesecake to puff up during baking and then collapse and crack as it cools.
- Add the extracts and salt: Stir in the vanilla extract, almond extract (if using), and salt. Mix until just combined. The almond extract really complements the cherry topping, so I highly recommend it!
- Pour into the prepared pan: Pour the cheesecake filling into the prepared springform pan. Gently tap the pan on the counter a few times to release any air bubbles.
Baking the Cheesecake:
- Bake in a water bath (recommended): For the best results and to prevent cracking, bake the cheesecake in a water bath. Wrap the bottom of the springform pan tightly with heavy-duty aluminum foil (use two layers to be safe). Place the wrapped pan in a larger roasting pan. Pour hot water into the roasting pan until it reaches about halfway up the sides of the springform pan.
- Bake: Carefully transfer the roasting pan with the cheesecake to the preheated oven. Bake for 55-70 minutes, or until the edges are set but the center still has a slight jiggle. The exact baking time will depend on your oven.
- Turn off the oven and let it cool: Turn off the oven and crack the oven door slightly. Let the cheesecake cool in the oven for 1 hour. This slow cooling process helps prevent cracking.
- Remove from the water bath and cool completely: After 1 hour, remove the cheesecake from the water bath and let it cool completely on a wire rack.
- Chill: Once the cheesecake is completely cool, cover it with plastic wrap and refrigerate for at least 4 hours, or preferably overnight. This allows the cheesecake to set completely and develop its flavor.
Preparing the Cherry Topping:
- Combine the cherry pie filling: In a medium saucepan, combine the two cans of cherry pie filling.
- Add the lemon juice and almond extract: Stir in the lemon juice and almond extract (if using). The lemon juice brightens the cherry flavor, and the almond extract enhances it.
- Thicken the sauce (optional): If you want a thicker sauce, whisk the cornstarch with 2 tablespoons of cold water in a small bowl to create a slurry. Add the cornstarch slurry to the saucepan and stir well.
- Cook the topping: Cook the cherry mixture over medium heat, stirring constantly, until it comes to a simmer and thickens slightly. This usually takes about 5-7 minutes. If you didn’t use cornstarch, just heat it through.
- Cool the topping: Remove the saucepan from the heat and let the cherry topping cool completely.
Assembling the No-Crust Cherry Cheesecake:
- Release the cheesecake: Once the cheesecake is thoroughly chilled, carefully run a thin knife around the edge of the springform pan to loosen it. Release the sides of the springform pan.
- Transfer to a serving plate: Gently slide the cheesecake off the bottom of the springform pan and onto a serving plate. If you used parchment paper, it should come off easily.
- Top with cherry topping: Spoon the cooled cherry topping evenly over the top of the cheesecake.
- Serve: Slice and serve the no-crust cherry cheesecake. Enjoy!
Tips for Success:
- Use room temperature ingredients: Make sure your cream cheese, sour cream, and eggs are all at room temperature. This will help them blend together smoothly and prevent lumps in your cheesecake.
- Don’t overmix: Overmixing the batter, especially after adding the eggs, can incorporate too much air and cause the cheesecake to crack. Mix until just combined.
- Bake in a water bath: A water bath helps to keep the cheesecake moist and prevents it from cracking. If you don’t want to use a water bath, you can try baking the cheesecake at a lower temperature (300°F) for a longer period of time.
- Cool slowly: Cooling the cheesecake slowly in the oven and then in the refrigerator helps to prevent cracking.
- Chill thoroughly: Chilling the cheesecake for at least 4 hours, or preferably overnight, allows it to set completely and develop its flavor.
- Get creative with toppings: While cherry topping is classic, feel free to experiment with other toppings, such as blueberry pie filling, chocolate ganache, or fresh fruit.
- Make it ahead: This cheesecake can be made a day or two in advance. Just store it covered in the refrigerator.
Variations:
- Chocolate Cherry Cheesecake: Add 1/4 cup of unsweetened cocoa powder to the cheesecake filling for a chocolatey twist.
- Almond Cherry Cheesecake: Increase the almond extract to 1/2 teaspoon in both the filling and the topping for a stronger almond flavor.
- Low-Sugar Cheesecake: Use a sugar substitute like erythritol or stevia to reduce the sugar content. Be sure to adjust the amount according to the package directions.
- Individual Cheesecakes: Pour the cheesecake filling into muffin tins lined with cupcake liners for individual cheesecakes. Reduce the baking time accordingly.
Conclusion:
And there you have it! This No Crust Cherry Cheesecake is more than just a dessert; it’s a creamy, dreamy experience that’s surprisingly simple to create. I truly believe this recipe is a must-try for anyone who loves cheesecake but wants a lighter, easier alternative. The absence of a crust not only cuts down on prep time but also allows the luscious cherry flavor to really shine through. It’s the perfect balance of sweet and tart, with a velvety smooth texture that will have you coming back for seconds (and maybe thirds!).
Why is this recipe a must-try? Well, beyond its simplicity and incredible taste, it’s incredibly versatile. It’s perfect for a weeknight treat, a potluck gathering, or even a special occasion. Plus, it’s naturally gluten-free, making it a great option for those with dietary restrictions. I’ve made this cheesecake countless times, and it’s always a crowd-pleaser. The compliments just keep rolling in!
Serving Suggestions and Variations:
Now, let’s talk about how you can make this No Crust Cherry Cheesecake your own. While the classic cherry topping is undeniably delicious, feel free to experiment with other fruit compotes. Imagine a blueberry swirl, a tangy raspberry sauce, or even a decadent chocolate ganache drizzled on top. The possibilities are endless!
For serving, a dollop of whipped cream or a scoop of vanilla ice cream adds a touch of elegance. You could also sprinkle some chopped nuts, like almonds or pecans, for a bit of crunch. If you’re feeling adventurous, try adding a hint of almond extract to the cheesecake batter for a subtle, nutty flavor.
Another variation I love is to make mini cheesecakes in muffin tins. This is perfect for portion control and makes them easy to transport. Just adjust the baking time accordingly they’ll likely be done in about 20-25 minutes.
And if you are looking for a richer flavor, try using full-fat cream cheese. It will add a depth of flavor that is hard to beat.
Time to Get Baking!
I’m so excited for you to try this recipe! I know you’ll love how easy it is to make and how incredibly delicious it tastes. Don’t be intimidated by the lack of a crust it’s what makes this cheesecake so special.
So, grab your ingredients, preheat your oven, and get ready to create a dessert that will impress your friends and family. I promise, this No Crust Cherry Cheesecake will become a new favorite in your household.
Once you’ve made it, I’d absolutely love to hear about your experience! Share your photos, your variations, and your thoughts in the comments below. Did you try a different fruit topping? Did you add a secret ingredient? I’m always looking for new ideas and inspiration.
Happy baking, and enjoy every creamy, cherry-filled bite! I can’t wait to see what you create! Remember to tag me in your photos on social media I’m always thrilled to see your culinary creations. Let’s spread the cheesecake love!
No Crust Cherry Cheesecake: The Ultimate Guide & Recipe
A creamy, no-crust cheesecake topped with a luscious homemade cherry topping. This easy recipe is perfect for any occasion and is sure to impress!
Ingredients
- 24 ounces (3 packages) cream cheese, softened to room temperature
- 1 1/4 cups granulated sugar
- 1/4 cup sour cream
- 2 large eggs
- 1 teaspoon vanilla extract
- 1/4 teaspoon almond extract (optional, but highly recommended!)
- Pinch of salt
- 2 (21 ounce) cans cherry pie filling
- 1 tablespoon lemon juice
- 1/2 teaspoon almond extract (optional, enhances the cherry flavor)
- 1 tablespoon cornstarch (if you want a thicker sauce)
Instructions
- Preheat oven to 325°F (160°C). Grease a 9-inch springform pan well and line the bottom with parchment paper.
- Beat softened cream cheese with an electric mixer on medium speed until smooth and creamy (3-5 minutes). Scrape down the sides of the bowl as needed.
- Gradually add granulated sugar, beating on medium speed until well combined. Scrape down the sides of the bowl. Mix until just combined.
- Add sour cream and beat until just combined.
- Add eggs one at a time, beating on low speed after each addition until just combined.
- Stir in vanilla extract, almond extract (if using), and salt. Mix until just combined.
- Pour the cheesecake filling into the prepared springform pan. Gently tap the pan on the counter to release air bubbles.
- Wrap the bottom of the springform pan tightly with heavy-duty aluminum foil (double layer). Place the wrapped pan in a larger roasting pan. Pour hot water into the roasting pan until it reaches halfway up the sides of the springform pan.
- Carefully transfer the roasting pan with the cheesecake to the preheated oven. Bake for 55-70 minutes, or until the edges are set but the center still has a slight jiggle.
- Turn off the oven and crack the oven door slightly. Let the cheesecake cool in the oven for 1 hour.
- Remove from the water bath and let cool completely on a wire rack.
- Cover with plastic wrap and refrigerate for at least 4 hours, or preferably overnight.
- In a medium saucepan, combine the two cans of cherry pie filling.
- Stir in the lemon juice and almond extract (if using).
- If desired, whisk cornstarch with 2 tablespoons of cold water to create a slurry. Add the slurry to the saucepan and stir well.
- Cook the cherry mixture over medium heat, stirring constantly, until it comes to a simmer and thickens slightly (5-7 minutes). If you didn’t use cornstarch, just heat it through.
- Remove from heat and let cool completely.
- Run a thin knife around the edge of the springform pan to loosen it. Release the sides of the springform pan.
- Gently slide the cheesecake off the bottom of the springform pan and onto a serving plate.
- Spoon the cooled cherry topping evenly over the top of the cheesecake.
- Slice and serve.
Notes
- Use room temperature ingredients for a smooth batter.
- Don’t overmix the batter, especially after adding the eggs.
- A water bath is highly recommended to prevent cracking.
- Cool the cheesecake slowly to prevent cracking.
- Chill thoroughly for the best flavor and texture.
- Get creative with toppings! Try blueberry, chocolate ganache, or fresh fruit.
- Make it ahead of time and store in the refrigerator.

Leave a Comment