

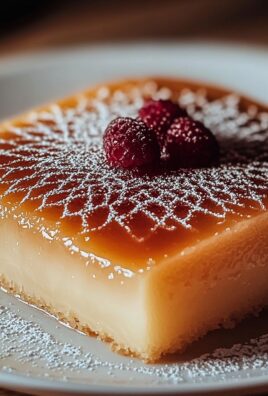
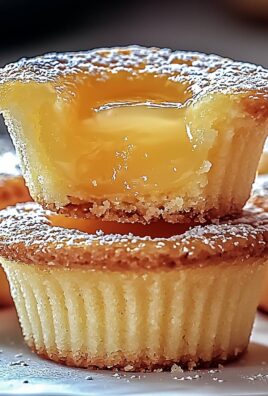
Lemon bar cookie cups: Prepare to be amazed! Imagine the tangy, bright flavor of a classic lemon bar, perfectly nestled in a buttery, melt-in-your-mouth sugar cookie cup. These aren’t just desserts; they’re miniature sunshine explosions ready to brighten your day. I’m so excited to share this recipe with you!
Lemon bars themselves have a fascinating history, with roots tracing back to the early 20th century in American cookbooks. They quickly gained popularity for their simplicity and refreshing taste, becoming a staple at bake sales and family gatherings. But we’re taking that classic treat to a whole new level!
What makes these lemon bar cookie cups so irresistible? It’s the perfect combination of textures and flavors. The crisp, slightly sweet cookie base provides a delightful contrast to the smooth, creamy, and intensely lemony filling. They are incredibly easy to make, perfect for parties, potlucks, or simply satisfying your sweet tooth. Plus, their individual portion size makes them ideal for controlling portions (if you can resist eating more than one!). Get ready to experience a burst of citrusy goodness in every single bite!

Ingredients:
- For the Cookie Cups:
- 1 cup (2 sticks) unsalted butter, softened
- 1/2 cup granulated sugar
- 1/4 cup powdered sugar
- 1 large egg
- 1 teaspoon vanilla extract
- 2 1/4 cups all-purpose flour
- 1/4 teaspoon salt
- For the Lemon Filling:
- 4 large eggs
- 1 1/2 cups granulated sugar
- 1/4 cup all-purpose flour
- 1/4 teaspoon baking powder
- 1/2 cup lemon juice, freshly squeezed (from about 3-4 lemons)
- 2 tablespoons lemon zest (from about 3-4 lemons)
- Powdered sugar, for dusting (optional)
Preparing the Cookie Cups
Okay, let’s get started with the cookie cups! These form the base for our delicious lemon filling, and they’re surprisingly easy to make. Trust me, you’ll love how they turn out.
- Cream the Butter and Sugars: In a large bowl (or the bowl of your stand mixer), cream together the softened butter, granulated sugar, and powdered sugar until light and fluffy. This usually takes about 3-5 minutes. You want the mixture to be pale and airy, so don’t rush this step! It’s crucial for a tender cookie base.
- Add the Egg and Vanilla: Beat in the egg and vanilla extract until well combined. Make sure to scrape down the sides of the bowl to ensure everything is evenly mixed. We don’t want any pockets of unmixed butter or sugar!
- Combine Dry Ingredients: In a separate medium bowl, whisk together the all-purpose flour and salt. Whisking helps to distribute the salt evenly throughout the flour, which is important for the flavor of the cookies.
- Gradually Add Dry Ingredients to Wet Ingredients: Gradually add the dry ingredients to the wet ingredients, mixing on low speed until just combined. Be careful not to overmix! Overmixing can develop the gluten in the flour, resulting in tough cookies. You want a soft and tender cookie cup.
- Chill the Dough: Wrap the dough in plastic wrap and chill in the refrigerator for at least 30 minutes. This step is important because it allows the butter to firm up, which will prevent the cookies from spreading too much in the oven. Chilling also helps to develop the flavors of the dough. I usually chill mine for an hour, but 30 minutes will do in a pinch!
- Preheat Oven and Prepare Muffin Tin: Preheat your oven to 350°F (175°C). Grease a 24-cup mini muffin tin. You can also use cupcake liners if you prefer, but I find that greasing the tin works best for these cookie cups.
- Shape the Cookie Cups: Roll the chilled dough into small balls, about 1 inch in diameter. Place each ball into a mini muffin cup and press it evenly into the bottom and up the sides to form a cup shape. You can use your fingers or the back of a small spoon to do this. Make sure the dough is evenly distributed so the cups bake evenly.
- Bake the Cookie Cups: Bake for 10-12 minutes, or until the edges are lightly golden brown. Keep a close eye on them, as they can burn easily. The centers should still be slightly soft.
- Cool the Cookie Cups: Remove the muffin tin from the oven and let the cookie cups cool in the tin for a few minutes before transferring them to a wire rack to cool completely. This prevents them from breaking while they’re still warm and fragile.
Preparing the Lemon Filling
Now for the star of the show the lemon filling! This is where the magic happens. The tangy, sweet, and creamy filling perfectly complements the buttery cookie cups. Get ready for a burst of lemon flavor!
- Whisk Eggs and Sugar: In a medium bowl, whisk together the eggs and granulated sugar until light and pale. This usually takes about 2-3 minutes. Whisking incorporates air into the mixture, which helps to create a smooth and creamy filling.
- Add Dry Ingredients: Whisk in the all-purpose flour and baking powder until well combined. Make sure there are no lumps of flour or baking powder. These dry ingredients help to thicken the filling and give it structure.
- Add Lemon Juice and Zest: Stir in the lemon juice and lemon zest until well combined. The lemon zest adds a wonderful aroma and intensifies the lemon flavor. Be sure to use freshly squeezed lemon juice for the best flavor! Bottled lemon juice just doesn’t compare.
- Strain the Filling (Optional but Recommended): For an extra smooth filling, you can strain the mixture through a fine-mesh sieve. This will remove any small bits of zest or egg that may not have fully incorporated. This step is optional, but it really does make a difference in the texture of the filling.
Assembling and Baking the Lemon Bar Cookie Cups
Alright, we’re in the home stretch! Now it’s time to put everything together and bake these little beauties. The aroma that will fill your kitchen is simply divine!
- Pour Filling into Cookie Cups: Carefully pour the lemon filling into the cooled cookie cups, filling each cup almost to the top. Be careful not to overfill them, as the filling will expand slightly during baking.
- Bake the Filled Cookie Cups: Bake in the preheated oven for 15-20 minutes, or until the filling is set and no longer jiggles when you gently shake the pan. The filling should be slightly puffed up and golden brown around the edges.
- Cool Completely: Remove the muffin tin from the oven and let the lemon bar cookie cups cool completely in the tin before transferring them to a wire rack. This is important because the filling needs time to set properly. If you try to remove them while they’re still warm, they may fall apart.
- Chill (Optional): For an even firmer filling, you can chill the cookie cups in the refrigerator for at least 30 minutes after they have cooled to room temperature. This is especially helpful if you live in a warm climate.
- Dust with Powdered Sugar (Optional): Before serving, dust the lemon bar cookie cups with powdered sugar, if desired. This adds a touch of sweetness and makes them look even more appealing.
Tips for Success
- Use Room Temperature Ingredients: Using room temperature butter and eggs will help the ingredients to combine more easily and create a smoother batter and filling.
- Don’t Overmix: Overmixing the cookie dough can result in tough cookies. Mix the dry ingredients into the wet ingredients until just combined.
- Use Fresh Lemon Juice and Zest: Freshly squeezed lemon juice and lemon zest will give the lemon filling the best flavor.
- Cool Completely Before Removing: Allow the lemon bar cookie cups to cool completely in the muffin tin before removing them to prevent them from breaking.
- Storage: Store the lemon bar cookie cups in an airtight container in the refrigerator for up to 3 days.
Variations
- Add Berries: Add fresh raspberries, blueberries, or strawberries to the lemon filling before baking for a burst of fruity flavor.
- Make it Gluten-Free: Use a gluten-free all-purpose flour blend to make these cookie cups gluten-free.
- Add a Crust: Instead of making individual cookie cups, you can press the cookie dough into the bottom of a 9×13 inch baking dish to create a crust for a larger lemon bar.
- Different Citrus: Try using lime or orange juice and zest instead of lemon for a different citrus flavor.
Enjoy!
These lemon bar cookie cups are perfect for parties, potlucks, or just a sweet treat any time of day. I hope you enjoy making and eating them as much as I do!

Conclusion:
And there you have it! These Lemon Bar Cookie Cups are truly a must-try recipe, and I’m not just saying that because I created it! The bright, tangy lemon filling nestled in that buttery, crumbly cookie cup is a flavor explosion that will leave you wanting more. Seriously, these little bites of sunshine are the perfect balance of sweet and tart, making them ideal for any occasion, from a casual afternoon treat to a sophisticated dessert spread. What makes these Lemon Bar Cookie Cups so irresistible? It’s the simplicity combined with the incredible flavor. The cookie base is easy to make and provides a delightful textural contrast to the smooth, creamy lemon filling. And that filling? It’s bursting with fresh lemon flavor that will awaken your taste buds. Plus, they are incredibly cute and presentable, making them a guaranteed crowd-pleaser. But the best part about this recipe is its versatility! Feel free to get creative with your serving suggestions and variations. For a truly decadent experience, try topping each cookie cup with a dollop of whipped cream and a sprinkle of lemon zest. Or, if you’re feeling adventurous, add a few fresh berries, like raspberries or blueberries, for a pop of color and added flavor. Another fun variation is to experiment with different types of cookie dough. While I love the classic shortbread-style base, you could also try using a sugar cookie dough or even a gingersnap dough for a unique twist. Imagine the warm spice of gingersnap paired with the bright citrus of the lemon delicious! For a more elegant presentation, you can dust the tops of the Lemon Bar Cookie Cups with powdered sugar just before serving. This adds a touch of sweetness and creates a beautiful visual appeal. You can also arrange them on a tiered dessert stand for a truly impressive display. These Lemon Bar Cookie Cups are also perfect for gifting! Package them in a pretty box or tin, and they’re sure to be a hit with friends, family, and neighbors. Who wouldn’t love to receive a homemade treat that’s as delicious as it is beautiful? I truly believe that everyone should have this recipe in their repertoire. It’s easy, adaptable, and guaranteed to impress. So, what are you waiting for? Grab your ingredients, preheat your oven, and get ready to bake up a batch of these amazing Lemon Bar Cookie Cups. I’m so excited for you to try this recipe and experience the joy of these little lemon delights for yourself. And I would absolutely love to hear about your experience! Did you try any of the variations I suggested? Did you add your own special touch? Please, share your photos and stories in the comments below. Let me know what you think of this lemon bar cookie cup recipe and how you made it your own. Happy baking! Print
Lemon Bar Cookie Cups: A Deliciously Tangy Dessert Recipe
- Total Time: 62 minutes
- Yield: 24 cookie cups 1x
Description
Tangy and sweet lemon filling nestled in buttery, homemade cookie cups. These are the perfect bite-sized dessert for any occasion!
Ingredients
- 1 cup (2 sticks) unsalted butter, softened
- 1/2 cup granulated sugar
- 1/4 cup powdered sugar
- 1 large egg
- 1 teaspoon vanilla extract
- 2 1/4 cups all-purpose flour
- 1/4 teaspoon salt
- 4 large eggs
- 1 1/2 cups granulated sugar
- 1/4 cup all-purpose flour
- 1/4 teaspoon baking powder
- 1/2 cup lemon juice, freshly squeezed (from about 3–4 lemons)
- 2 tablespoons lemon zest (from about 3–4 lemons)
- Powdered sugar, for dusting (optional)
Instructions
- Cream Butter and Sugars: In a large bowl, cream together the softened butter, granulated sugar, and powdered sugar until light and fluffy (3-5 minutes).
- Add Egg and Vanilla: Beat in the egg and vanilla extract until well combined. Scrape down the sides of the bowl.
- Combine Dry Ingredients: In a separate bowl, whisk together the all-purpose flour and salt.
- Add Dry to Wet: Gradually add the dry ingredients to the wet ingredients, mixing on low speed until just combined. Do not overmix.
- Chill Dough: Wrap the dough in plastic wrap and chill in the refrigerator for at least 30 minutes.
- Preheat and Prep: Preheat oven to 350°F (175°C). Grease a 24-cup mini muffin tin.
- Shape Cups: Roll the chilled dough into small balls (about 1 inch in diameter). Place each ball into a mini muffin cup and press evenly into the bottom and up the sides to form a cup shape.
- Bake: Bake for 10-12 minutes, or until the edges are lightly golden brown.
- Cool: Remove from oven and let cool in the tin for a few minutes before transferring to a wire rack to cool completely.
- Whisk Eggs and Sugar: In a medium bowl, whisk together the eggs and granulated sugar until light and pale (2-3 minutes).
- Add Dry Ingredients: Whisk in the all-purpose flour and baking powder until well combined.
- Add Lemon: Stir in the lemon juice and lemon zest until well combined.
- Strain (Optional): For an extra smooth filling, strain the mixture through a fine-mesh sieve.
- Fill Cups: Carefully pour the lemon filling into the cooled cookie cups, filling each cup almost to the top.
- Bake: Bake in the preheated oven for 15-20 minutes, or until the filling is set and no longer jiggles.
- Cool Completely: Remove from oven and let the lemon bar cookie cups cool completely in the tin before transferring to a wire rack.
- Chill (Optional): Chill the cookie cups in the refrigerator for at least 30 minutes after they have cooled to room temperature.
- Dust (Optional): Dust with powdered sugar before serving.
Notes
- Use room temperature ingredients for smoother batter and filling.
- Don’t overmix the cookie dough.
- Use fresh lemon juice and zest for the best flavor.
- Cool completely before removing from the muffin tin.
- Storage: Store in an airtight container in the refrigerator for up to 3 days.
- Variations:
- Add fresh berries to the lemon filling before baking.
- Use gluten-free all-purpose flour for a gluten-free version.
- Press the cookie dough into a 9×13 inch baking dish for a larger lemon bar.
- Try using lime or orange juice and zest instead of lemon.
- Prep Time: 30 minutes
- Cook Time: 32 minutes
Leave a Comment