

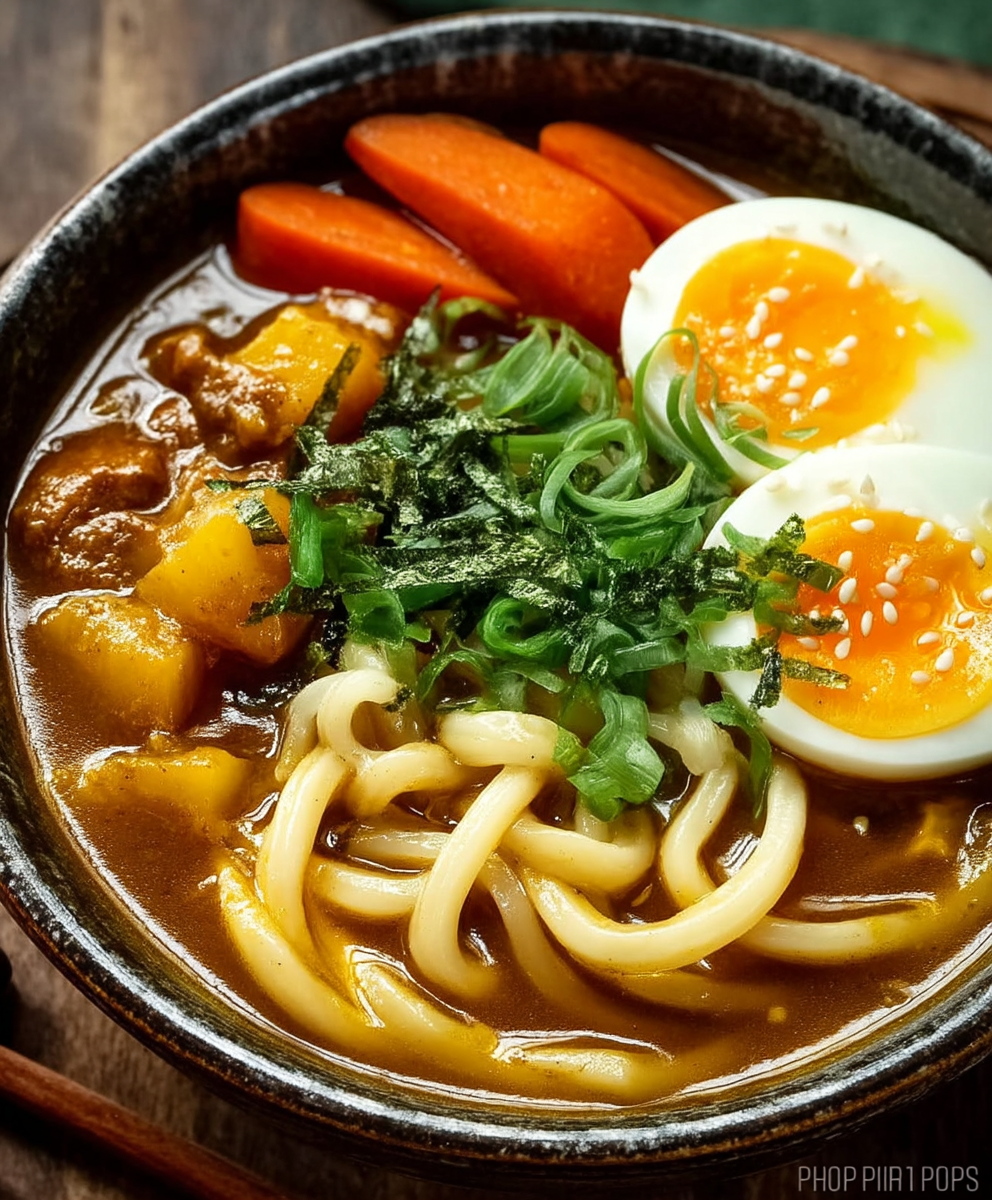
Japanese Curry Udon: Prepare to embark on a culinary adventure that will tantalize your taste buds and warm your soul! Imagine thick, chewy udon noodles swimming in a rich, savory, and slightly sweet curry broth. This isn’t just a meal; it’s an experience, a comforting hug in a bowl that will leave you craving more.
Curry, while not originally from Japan, has been wholeheartedly embraced and transformed into a beloved national dish. Introduced during the Meiji era (1868-1912), it quickly adapted to Japanese palates, resulting in a milder, sweeter, and thicker version compared to its Indian counterpart. The addition of udon noodles elevates this dish to a new level of comfort food perfection. Japanese Curry Udon is a testament to Japan’s ability to take foreign influences and make them uniquely their own.
What makes this dish so irresistible? It’s the harmonious blend of textures and flavors. The slippery, satisfying slurp of the udon noodles, the creamy, umami-packed curry, and the optional toppings like crispy tempura or a perfectly soft-boiled egg create a symphony of sensations. People adore Japanese Curry Udon because it’s both incredibly flavorful and surprisingly easy to make. It’s a weeknight dinner champion, a comforting weekend treat, and a guaranteed crowd-pleaser. So, are you ready to discover the magic of this delightful dish? Let’s get cooking!

Ingredients:
- 1 tablespoon vegetable oil
- 1 pound boneless, skinless chicken thighs, cut into 1-inch pieces (or substitute with beef or tofu)
- 1 medium onion, chopped
- 2 carrots, peeled and chopped
- 2 potatoes, peeled and chopped
- 4 cups dashi broth (or chicken broth)
- 1 package (approximately 3.5 ounces) Japanese curry roux (such as Golden Curry, Vermont Curry, or Java Curry)
- 1 tablespoon soy sauce
- 1 tablespoon mirin
- 1 teaspoon grated ginger
- 1 teaspoon minced garlic
- 1 package (approximately 12-16 ounces) pre-cooked udon noodles
- Optional toppings: sliced green onions, pickled ginger (beni shoga), a soft-boiled egg, tempura flakes (tenkasu)
Preparing the Curry
- Sauté the Chicken: Heat the vegetable oil in a large pot or Dutch oven over medium-high heat. Add the chicken pieces and cook until browned on all sides. Don’t overcrowd the pot; cook in batches if necessary to ensure proper browning. Remove the chicken from the pot and set aside.
- Sauté the Vegetables: Add the chopped onion to the pot and cook until softened and translucent, about 5-7 minutes. Add the chopped carrots and potatoes and cook for another 5-7 minutes, stirring occasionally, until they begin to soften slightly.
- Combine and Simmer: Return the browned chicken to the pot with the vegetables. Pour in the dashi broth (or chicken broth). Bring the mixture to a boil, then reduce the heat to low, cover, and simmer for 15-20 minutes, or until the potatoes and carrots are tender.
- Dissolve the Curry Roux: Remove the pot from the heat. Break the Japanese curry roux into pieces and add them to the pot. Stir well until the roux is completely dissolved and the curry sauce is smooth. This step is crucial to prevent lumps. If you find it difficult to dissolve, you can use a whisk.
- Season the Curry: Add the soy sauce, mirin, grated ginger, and minced garlic to the curry. Stir well to combine. Taste and adjust the seasoning as needed. You can add a pinch of salt or a dash of sugar to balance the flavors.
- Simmer the Curry (Again): Return the pot to low heat and simmer the curry for another 10-15 minutes, stirring occasionally, to allow the flavors to meld together. The curry will thicken slightly as it simmers. Be careful not to let it burn on the bottom of the pot.
Preparing the Udon Noodles
- Cook the Udon Noodles: While the curry is simmering, prepare the udon noodles according to the package directions. Most pre-cooked udon noodles can be heated by briefly boiling them in water for 1-2 minutes, or by microwaving them. Drain the noodles well after cooking.
Assembling the Curry Udon
- Portion the Noodles: Divide the cooked udon noodles among bowls.
- Ladle the Curry: Ladle the hot Japanese curry over the udon noodles in each bowl. Make sure each bowl gets a generous amount of chicken, vegetables, and curry sauce.
- Add Toppings (Optional): Garnish with your desired toppings. Sliced green onions, pickled ginger (beni shoga), a soft-boiled egg, and tempura flakes (tenkasu) are all popular choices.
- Serve Immediately: Serve the Japanese Curry Udon immediately while it’s hot. Enjoy!
Tips and Variations:
Spice Level:
Japanese curry roux comes in different spice levels, from mild to extra hot. Choose the spice level that suits your preference. If you’re unsure, start with a mild or medium spice level and add a pinch of cayenne pepper or chili flakes if you want to increase the heat.
Protein Options:
While chicken is a common choice for Japanese curry, you can easily substitute it with other proteins. Beef, pork, tofu, or even shrimp would all work well. If using beef, consider using stew meat or chuck roast for a richer flavor. If using tofu, press it to remove excess water before cooking.
Vegetable Variations:
Feel free to add other vegetables to your curry. Mushrooms, bell peppers, and spinach are all good options. Add them to the pot along with the carrots and potatoes.
Dashi Broth Substitute:
If you don’t have dashi broth on hand, you can use chicken broth or vegetable broth as a substitute. For a more authentic flavor, you can make your own dashi broth using kombu (dried kelp) and bonito flakes (dried tuna flakes).
Thickening the Curry:
If you find that your curry is too thin, you can thicken it by adding a cornstarch slurry (1 tablespoon cornstarch mixed with 2 tablespoons cold water) to the pot while it’s simmering. Stir well and let it simmer for a few more minutes until the curry thickens to your desired consistency.
Making it Vegetarian/Vegan:
To make this dish vegetarian or vegan, substitute the chicken with tofu or other plant-based protein. Use vegetable broth instead of dashi broth or chicken broth. Make sure the curry roux you use is vegetarian or vegan, as some brands may contain animal products.
Leftovers:
Leftover Japanese Curry Udon can be stored in the refrigerator for up to 3 days. Reheat it gently on the stovetop or in the microwave before serving. The curry may thicken slightly as it sits, so you may need to add a little water or broth to thin it out.
Freezing:
While you can freeze Japanese Curry, the texture of the potatoes and carrots may change slightly after thawing. If you plan to freeze it, it’s best to undercook the potatoes and carrots slightly. Store the curry in an airtight container in the freezer for up to 2 months. Thaw it in the refrigerator overnight before reheating.
Serving Suggestions:
Japanese Curry Udon is a complete meal on its own, but you can also serve it with a side of Japanese pickles (tsukemono) or a simple salad.
Udon Noodle Types:
There are different types of udon noodles available, including fresh, frozen, and dried. Pre-cooked udon noodles are the most convenient option for this recipe, but you can use any type of udon noodles you prefer. Just be sure to cook them according to the package directions.
Adjusting Sweetness:
Some people prefer a sweeter curry. If you find the curry not sweet enough, add a teaspoon or two of honey or sugar to adjust the sweetness to your liking.
Adding Apples or Honey:
A common addition to Japanese curry is grated apple or a touch of honey. These ingredients add a subtle sweetness and depth of flavor. Add about half an apple, grated, or a tablespoon of honey during the simmering phase of the curry.
Using a Slow Cooker:
You can adapt this recipe for a slow cooker. Brown the chicken and sauté the vegetables as directed. Then, transfer everything to the slow cooker, add the broth, and cook on low for 6-8 hours or on high for 3-4 hours. Stir in the curry roux during the last hour of cooking.
Making it Gluten-Free:
To make this dish gluten-free, you’ll need to make a few substitutions. Use gluten-free udon noodles (made from rice flour or other gluten-free flours). Ensure that the curry roux is also gluten-free; some brands offer gluten-free options. Tamari can be used as a gluten-free alternative to soy sauce.
Enhancing the Umami Flavor:
To boost the umami flavor of the curry, consider adding a small piece of kombu (dried kelp) to the broth while it’s simmering. Remove the kombu before serving.
Adding a Touch of Creaminess:
For a richer and creamier curry, stir in a tablespoon or two of heavy cream or coconut milk during the last few minutes of cooking.
Experimenting with Spices:
While Japanese curry roux provides a complex blend of spices, you can experiment with adding your own spices to customize the flavor. Turmeric, cumin, coriander, and garam masala are all good options. Add a small amount of each spice to avoid overpowering the flavor of the curry roux.
Conclusion:
This Japanese Curry Udon isn’t just another noodle dish; it’s a warm, comforting hug in a bowl, bursting with savory, slightly sweet, and deeply satisfying flavors. The rich curry broth clings perfectly to the thick, chewy udon noodles, creating a textural and taste sensation that’s simply irresistible. I truly believe this recipe is a must-try for anyone looking to expand their culinary horizons and experience the magic of authentic Japanese comfort food.
Why is this Japanese Curry Udon a must-try? Because it’s incredibly versatile! You can easily adapt it to your own preferences and dietary needs. Feeling adventurous? Add a dash of chili oil for a spicy kick. Prefer a vegetarian option? Simply swap out the dashi for vegetable broth and omit the meat. The possibilities are endless!
Beyond its adaptability, this recipe is also surprisingly simple to make. Don’t let the seemingly long list of ingredients intimidate you. Most of them are pantry staples or easily found at your local Asian grocery store. And the cooking process itself is straightforward and rewarding. You’ll be amazed at how quickly you can whip up a restaurant-quality meal in the comfort of your own kitchen.
Serving Suggestions and Variations:
* Toppings Galore: Elevate your Japanese Curry Udon with a variety of toppings. A soft-boiled egg adds richness and creaminess, while thinly sliced green onions provide a fresh, vibrant contrast. Crispy fried tofu or tempura vegetables are also fantastic additions. Don’t forget the pickled ginger (beni shoga) for a tangy, palate-cleansing bite.
* Protein Power: While this recipe calls for thinly sliced beef, feel free to experiment with other protein options. Chicken, pork, or even shrimp would work beautifully. For a vegetarian twist, try adding firm tofu or edamame.
* Spice It Up: If you’re a fan of spicy food, don’t hesitate to add a pinch of cayenne pepper or a few drops of chili oil to the broth. You can also use a spicier curry roux for an extra kick.
* Vegetable Variety: Feel free to add other vegetables to the curry. Carrots, potatoes, and onions are classic additions, but you can also try adding mushrooms, spinach, or even bell peppers.
* Make it a Set Meal: Serve your Japanese Curry Udon with a side of gyoza (Japanese dumplings) or a simple salad for a complete and satisfying meal.
I’m so excited for you to try this recipe! I poured my heart into perfecting it, and I’m confident that you’ll love it as much as I do. The key to a truly great Japanese Curry Udon lies in the quality of the ingredients and the attention to detail. Don’t be afraid to experiment and adjust the recipe to your own taste.
Once you’ve made it, I’d love to hear about your experience! Share your photos and comments on social media using [Your Hashtag Here]. Let me know what variations you tried and what toppings you added. I’m always looking for new and creative ways to enjoy this classic dish. Happy cooking, and I hope you enjoy every slurp! I can’t wait to see what you create!
Japanese Curry Udon: A Delicious & Easy Recipe
Warm and comforting Japanese Curry Udon featuring tender chicken, hearty vegetables, and thick udon noodles in a rich and flavorful curry broth.
Ingredients
- 1 tablespoon vegetable oil
- 1 pound boneless, skinless chicken thighs, cut into 1-inch pieces (or substitute with beef or tofu)
- 1 medium onion, chopped
- 2 carrots, peeled and chopped
- 2 potatoes, peeled and chopped
- 4 cups dashi broth (or chicken broth)
- 1 package (approximately 3.5 ounces) Japanese curry roux (such as Golden Curry, Vermont Curry, or Java Curry)
- 1 tablespoon soy sauce
- 1 tablespoon mirin
- 1 teaspoon grated ginger
- 1 teaspoon minced garlic
- 1 package (approximately 12-16 ounces) pre-cooked udon noodles
- Optional toppings: sliced green onions, pickled ginger (beni shoga), a soft-boiled egg, tempura flakes (tenkasu)
Instructions
- Sauté the Chicken: Heat the vegetable oil in a large pot or Dutch oven over medium-high heat. Add the chicken pieces and cook until browned on all sides. Don’t overcrowd the pot; cook in batches if necessary to ensure proper browning. Remove the chicken from the pot and set aside.
- Sauté the Vegetables: Add the chopped onion to the pot and cook until softened and translucent, about 5-7 minutes. Add the chopped carrots and potatoes and cook for another 5-7 minutes, stirring occasionally, until they begin to soften slightly.
- Combine and Simmer: Return the browned chicken to the pot with the vegetables. Pour in the dashi broth (or chicken broth). Bring the mixture to a boil, then reduce the heat to low, cover, and simmer for 15-20 minutes, or until the potatoes and carrots are tender.
- Dissolve the Curry Roux: Remove the pot from the heat. Break the Japanese curry roux into pieces and add them to the pot. Stir well until the roux is completely dissolved and the curry sauce is smooth. This step is crucial to prevent lumps. If you find it difficult to dissolve, you can use a whisk.
- Season the Curry: Add the soy sauce, mirin, grated ginger, and minced garlic to the curry. Stir well to combine. Taste and adjust the seasoning as needed. You can add a pinch of salt or a dash of sugar to balance the flavors.
- Simmer the Curry (Again): Return the pot to low heat and simmer the curry for another 10-15 minutes, stirring occasionally, to allow the flavors to meld together. The curry will thicken slightly as it simmers. Be careful not to let it burn on the bottom of the pot.
- Cook the Udon Noodles: While the curry is simmering, prepare the udon noodles according to the package directions. Most pre-cooked udon noodles can be heated by briefly boiling them in water for 1-2 minutes, or by microwaving them. Drain the noodles well after cooking.
- Portion the Noodles: Divide the cooked udon noodles among bowls.
- Ladle the Curry: Ladle the hot Japanese curry over the udon noodles in each bowl. Make sure each bowl gets a generous amount of chicken, vegetables, and curry sauce.
- Add Toppings (Optional): Garnish with your desired toppings. Sliced green onions, pickled ginger (beni shoga), a soft-boiled egg, and tempura flakes (tenkasu) are all popular choices.
- Serve Immediately: Serve the Japanese Curry Udon immediately while it’s hot. Enjoy!
Notes
- Spice Level: Japanese curry roux comes in different spice levels, from mild to extra hot. Choose the spice level that suits your preference. If you’re unsure, start with a mild or medium spice level and add a pinch of cayenne pepper or chili flakes if you want to increase the heat.
- Protein Options: While chicken is a common choice for Japanese curry, you can easily substitute it with other proteins. Beef, pork, tofu, or even shrimp would all work well. If using beef, consider using stew meat or chuck roast for a richer flavor. If using tofu, press it to remove excess water before cooking.
- Vegetable Variations: Feel free to add other vegetables to your curry. Mushrooms, bell peppers, and spinach are all good options. Add them to the pot along with the carrots and potatoes.
- Dashi Broth Substitute: If you don’t have dashi broth on hand, you can use chicken broth or vegetable broth as a substitute. For a more authentic flavor, you can make your own dashi broth using kombu (dried kelp) and bonito flakes (dried tuna flakes).
- Thickening the Curry: If you find that your curry is too thin, you can thicken it by adding a cornstarch slurry (1 tablespoon cornstarch mixed with 2 tablespoons cold water) to the pot while it’s simmering. Stir well and let it simmer for a few more minutes until the curry thickens to your desired consistency.
- Making it Vegetarian/Vegan: To make this dish vegetarian or vegan, substitute the chicken with tofu or other plant-based protein. Use vegetable broth instead of dashi broth or chicken broth. Make sure the curry roux you use is vegetarian or vegan, as some brands may contain animal products.
- Leftovers: Leftover Japanese Curry Udon can be stored in the refrigerator for up to 3 days. Reheat it gently on the stovetop or in the microwave before serving. The curry may thicken slightly as it sits, so you may need to add a little water or broth to thin it out.
- Freezing: While you can freeze Japanese Curry, the texture of the potatoes and carrots may change slightly after thawing. If you plan to freeze it, it’s best to undercook the potatoes and carrots slightly. Store the curry in an airtight container in the freezer for up to 2 months. Thaw it in the refrigerator overnight before reheating.
- Serving Suggestions: Japanese Curry Udon is a complete meal on its own, but you can also serve it with a side of Japanese pickles (tsukemono) or a simple salad.
- Udon Noodle Types: There are different types of udon noodles available, including fresh, frozen, and dried. Pre-cooked udon noodles are the most convenient option for this recipe, but you can use any type of udon noodles you prefer. Just be sure to cook them according to the package directions.
- Adjusting Sweetness: Some people prefer a sweeter curry. If you find the curry not sweet enough, add a teaspoon or two of honey or sugar to adjust the sweetness to your liking.
- Adding Apples or Honey: A common addition to Japanese curry is grated apple or a touch of honey. These ingredients add a subtle sweetness and depth of flavor. Add about half an apple, grated, or a tablespoon of honey during the simmering phase of the curry.
- Using a Slow Cooker: You can adapt this recipe for a slow cooker. Brown the chicken and sauté the vegetables as directed. Then, transfer everything to the slow cooker, add the broth, and cook on low for 6-8 hours or on high for 3-4 hours. Stir in the curry roux during the last hour of cooking.
- Making it Gluten-Free: To make this dish gluten-free, you’ll need to make a few substitutions. Use gluten-free udon noodles (made from rice flour or other gluten-free flours). Ensure that the curry roux is also gluten-free; some brands offer gluten-free options. Tamari can be used as a gluten-free alternative to soy sauce.
- Enhancing the Umami Flavor: To boost the umami flavor of the curry, consider adding a small piece of kombu (dried kelp) to the broth while it’s simmering. Remove the kombu before serving.
- Adding a Touch of Creaminess: For a richer and creamier curry, stir in a tablespoon or two of heavy cream or coconut milk during the last few minutes of cooking.
- Experimenting with Spices: While Japanese curry roux provides a complex blend of spices, you can experiment with adding your own spices to customize the flavor. Turmeric, cumin, coriander, and garam masala are all good options. Add a small amount of each spice to avoid overpowering the flavor of the curry roux.

Leave a Comment