

Hot Chocolate Icebox Pie: Just the name conjures up images of cozy winter nights, doesn’t it? But what if I told you that you could enjoy that same comforting flavor in a cool, refreshing dessert, perfect for any time of year? This isn’t just any pie; it’s a slice of pure nostalgia, a no-bake wonder that will transport you back to childhood memories of sipping warm cocoa by the fire.
Icebox pies, a delightful invention born out of necessity before widespread refrigeration, were a staple in American households. They offered a simple, delicious way to create a sweet treat without the need for an oven. This Hot Chocolate Icebox Pie takes that classic concept and elevates it with the rich, decadent flavor of hot chocolate. Think of it as a sophisticated twist on a beloved classic.
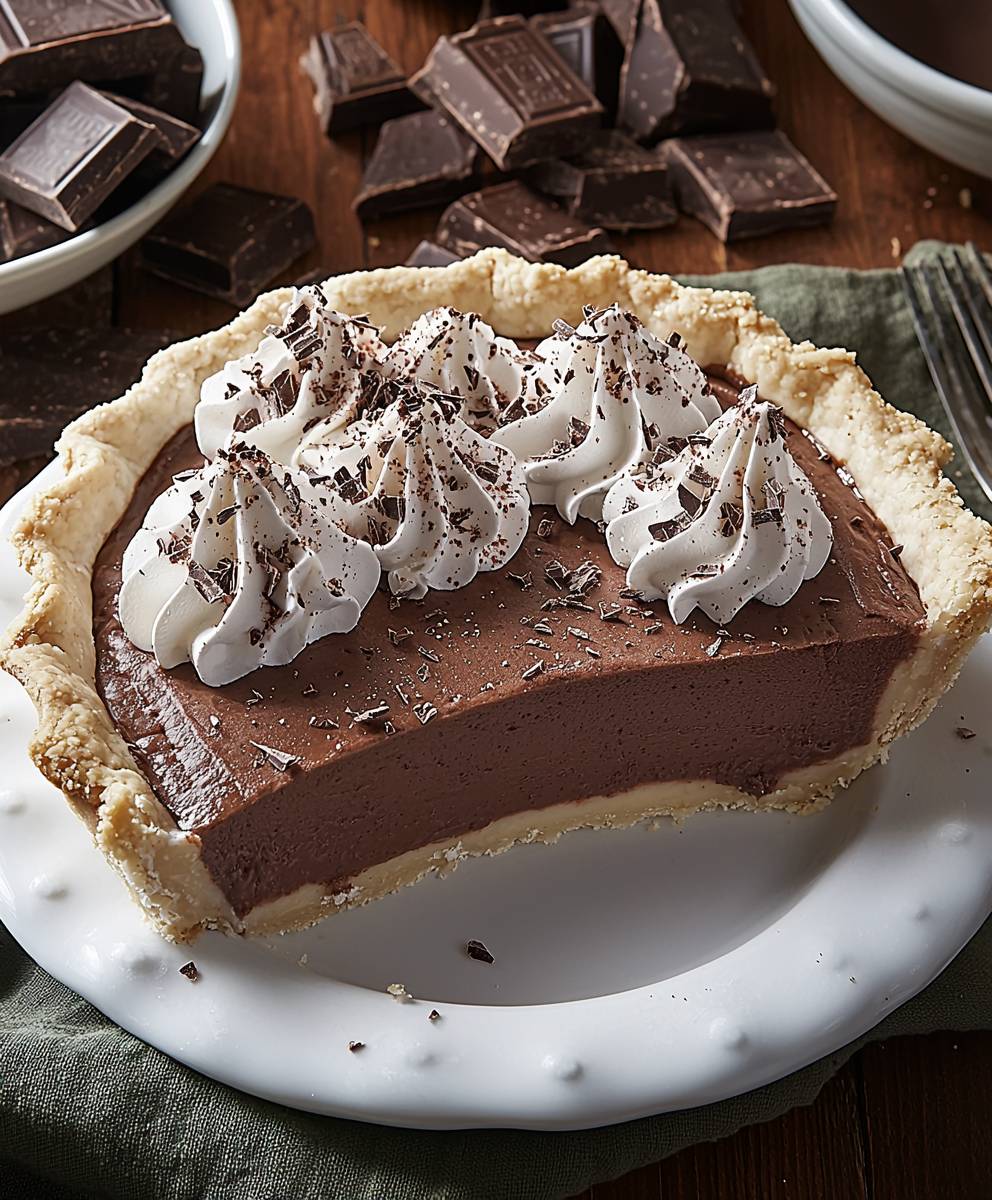
What makes this pie so irresistible? It’s the perfect balance of creamy, chocolatey goodness and a satisfyingly crisp crust. The smooth, melt-in-your-mouth filling is intensely chocolatey, reminiscent of your favorite hot cocoa, while the cool temperature provides a refreshing contrast. Plus, the no-bake aspect makes it incredibly convenient perfect for potlucks, parties, or simply a delightful treat on a warm evening. Trust me, one bite of this Hot Chocolate Icebox Pie, and you’ll be hooked!

Ingredients:
- For the Crust:
- 1 ½ cups chocolate wafer crumbs (about 36 wafers)
- 5 tablespoons unsalted butter, melted
- 2 tablespoons granulated sugar
- For the Hot Chocolate Filling:
- 4 cups whole milk
- 1 cup heavy cream
- 1 cup granulated sugar
- ½ cup unsweetened cocoa powder
- ¼ teaspoon salt
- 6 ounces bittersweet chocolate, finely chopped
- 2 tablespoons cornstarch
- 2 tablespoons cold water
- 1 teaspoon vanilla extract
- For the Whipped Cream Topping:
- 1 ½ cups heavy cream
- 3 tablespoons powdered sugar
- ½ teaspoon vanilla extract
- Optional Garnishes:
- Mini marshmallows
- Chocolate shavings
- Cocoa powder
Preparing the Chocolate Wafer Crust
Okay, let’s start with the foundation of our delicious Hot Chocolate Icebox Pie the chocolate wafer crust! This is super easy and requires no baking, which is perfect for a no-fuss dessert.
- Crush the Chocolate Wafers: First, you’ll need to crush your chocolate wafers into fine crumbs. You can do this in a food processor, pulsing until you get a consistent crumb texture. If you don’t have a food processor, no worries! Just place the wafers in a large zip-top bag, seal it tightly, and use a rolling pin to crush them. Make sure you get them nice and fine larger pieces can make the crust a bit crumbly.
- Combine the Crumbs with Sugar and Butter: In a medium bowl, combine the chocolate wafer crumbs, granulated sugar, and melted butter. Mix everything together really well until the crumbs are evenly moistened. The mixture should resemble wet sand. This is what will hold our crust together.
- Press the Crust into the Pie Plate: Now, transfer the crumb mixture to a 9-inch pie plate. Use the bottom of a measuring cup or your fingers to firmly press the crumbs evenly across the bottom and up the sides of the pie plate. Make sure the crust is compact and uniform in thickness. This will give you a nice, sturdy base for the filling.
- Chill the Crust: Once the crust is pressed into the pie plate, cover it with plastic wrap and place it in the refrigerator to chill for at least 30 minutes. This will help the crust set and prevent it from falling apart when we add the filling. You can even chill it for longer up to a few hours if you’re prepping ahead of time.
Making the Hot Chocolate Filling
Now for the star of the show the rich and decadent hot chocolate filling! This is where the magic happens, and it’s surprisingly simple to make. Just follow these steps, and you’ll have a creamy, dreamy filling in no time.
- Combine Milk, Cream, Sugar, Cocoa Powder, and Salt: In a large saucepan, whisk together the whole milk, heavy cream, granulated sugar, unsweetened cocoa powder, and salt. Make sure everything is well combined and there are no lumps of cocoa powder.
- Heat the Mixture: Place the saucepan over medium heat and bring the mixture to a simmer, stirring constantly. You want to heat it gently so the sugar dissolves and the cocoa powder is fully incorporated. Be careful not to let it boil!
- Add the Chocolate: Once the mixture is simmering, remove the saucepan from the heat and add the finely chopped bittersweet chocolate. Let it sit for a minute or two to soften, then whisk until the chocolate is completely melted and the mixture is smooth and glossy.
- Prepare the Cornstarch Slurry: In a small bowl, whisk together the cornstarch and cold water until you have a smooth slurry. This will help thicken the filling.
- Thicken the Filling: Return the saucepan to medium heat. Slowly pour the cornstarch slurry into the hot chocolate mixture, whisking constantly to prevent lumps from forming. Continue to cook, stirring constantly, until the filling thickens to a pudding-like consistency. This should take about 1-2 minutes.
- Remove from Heat and Add Vanilla: Once the filling has thickened, remove the saucepan from the heat and stir in the vanilla extract. This will add a lovely aroma and enhance the chocolate flavor.
- Cool Slightly: Let the filling cool slightly for about 5-10 minutes before pouring it into the crust. This will help prevent the crust from becoming soggy.
Assembling the Icebox Pie
We’re almost there! Now it’s time to put everything together and let the magic happen in the refrigerator.
- Pour the Filling into the Crust: Carefully pour the slightly cooled hot chocolate filling into the chilled chocolate wafer crust. Spread it evenly to fill the crust completely.
- Cover and Chill: Cover the pie with plastic wrap, pressing it gently onto the surface of the filling to prevent a skin from forming. Place the pie in the refrigerator and chill for at least 4 hours, or preferably overnight. This will allow the filling to set completely and the flavors to meld together.
Making the Whipped Cream Topping
No Hot Chocolate Icebox Pie is complete without a generous dollop of whipped cream! This is the perfect finishing touch to add a light and airy contrast to the rich chocolate filling.
- Chill the Bowl and Whisk: Before you start, make sure your mixing bowl and whisk (or whisk attachment for your stand mixer) are well chilled. This will help the cream whip up faster and hold its shape better. You can even put them in the freezer for a few minutes.
- Combine Cream, Sugar, and Vanilla: In the chilled bowl, combine the heavy cream, powdered sugar, and vanilla extract.
- Whip the Cream: Using a whisk or an electric mixer, whip the cream until stiff peaks form. Be careful not to overwhip, or it will turn into butter! You want the cream to be thick and fluffy, with peaks that hold their shape when you lift the whisk.
Finishing Touches and Serving
The final step is to add the whipped cream topping and any optional garnishes to make your Hot Chocolate Icebox Pie look extra special!
- Spread the Whipped Cream: Once the pie has chilled completely, remove it from the refrigerator and spread the whipped cream evenly over the top. You can create swirls or peaks with a spoon or spatula for a more decorative look.
- Garnish (Optional): If desired, garnish the pie with mini marshmallows, chocolate shavings, or a dusting of cocoa powder. These additions will not only make the pie look beautiful but also add extra flavor and texture.
- Serve and Enjoy: Slice the pie into wedges and serve immediately. Store any leftovers in the refrigerator. This pie is best enjoyed cold, so the filling stays firm and the whipped cream remains fluffy.
Conclusion:
This Hot Chocolate Icebox Pie isn’t just a dessert; it’s a nostalgic hug in every slice. The creamy, rich chocolate filling, perfectly balanced with the crisp, crumbly crust, makes it an absolute showstopper. If you’re looking for a dessert that’s both incredibly easy to make and guaranteed to impress, then look no further. Seriously, this is the kind of recipe that becomes a family favorite, requested time and time again.
But what truly elevates this pie to must-try status is its versatility. While it’s divine served chilled straight from the refrigerator, there are so many ways to customize it to your liking. For a truly decadent experience, try topping each slice with a dollop of freshly whipped cream and a sprinkle of cocoa powder. Or, if you’re feeling adventurous, add a swirl of caramel sauce or a handful of chopped pecans for extra texture and flavor.
For the adults, a splash of coffee liqueur or a hint of peppermint extract in the filling will add a sophisticated twist. And for the kids (or the young at heart!), mini marshmallows toasted under the broiler for a minute or two create a fun and festive topping. You could even experiment with different types of chocolate dark chocolate for a more intense flavor, or milk chocolate for a sweeter, more classic taste.
Don’t be afraid to get creative and make this Hot Chocolate Icebox Pie your own! The beauty of this recipe lies in its simplicity and adaptability. It’s a blank canvas just waiting for your personal touch. Think about adding a layer of peanut butter to the crust before adding the filling, or incorporating crushed Oreos into the crust for an extra chocolatey kick.
I truly believe that everyone should have this recipe in their repertoire. It’s perfect for potlucks, holiday gatherings, or simply a cozy night in. It’s the kind of dessert that brings people together and creates lasting memories.
So, what are you waiting for? Gather your ingredients, preheat your oven (just for the crust!), and get ready to experience the magic of this incredible pie. I promise you won’t be disappointed.
And most importantly, I want to hear about your experience! Did you try any variations? What did your family and friends think? Share your photos and stories in the comments below. I’m so excited to see how you make this Hot Chocolate Icebox Pie your own. Happy baking! I can’t wait to hear all about your delicious creations and any creative twists you added to the recipe. Let’s spread the joy of this easy and delightful dessert!
Hot Chocolate Icebox Pie: The Ultimate No-Bake Dessert
No-bake Hot Chocolate Icebox Pie with chocolate wafer crust, rich filling, and whipped cream. Perfect for any occasion!
Ingredients
- 1 ½ cups chocolate wafer crumbs (about 36 wafers)
- 5 tablespoons unsalted butter, melted
- 2 tablespoons granulated sugar
- 4 cups whole milk
- 1 cup heavy cream
- 1 cup granulated sugar
- ½ cup unsweetened cocoa powder
- ¼ teaspoon salt
- 6 ounces bittersweet chocolate, finely chopped
- 2 tablespoons cornstarch
- 2 tablespoons cold water
- 1 teaspoon vanilla extract
- 1 ½ cups heavy cream
- 3 tablespoons powdered sugar
- ½ teaspoon vanilla extract
- Mini marshmallows
- Chocolate shavings
- Cocoa powder
Instructions
- Prepare the Chocolate Wafer Crust:
- Crush the chocolate wafers into fine crumbs using a food processor or a rolling pin.
- In a medium bowl, combine the chocolate wafer crumbs, granulated sugar, and melted butter. Mix well until the crumbs are evenly moistened.
- Transfer the crumb mixture to a 9-inch pie plate. Use the bottom of a measuring cup or your fingers to firmly press the crumbs evenly across the bottom and up the sides of the pie plate.
- Cover the crust with plastic wrap and chill in the refrigerator for at least 30 minutes.
- Make the Hot Chocolate Filling:
- In a large saucepan, whisk together the whole milk, heavy cream, granulated sugar, unsweetened cocoa powder, and salt.
- Place the saucepan over medium heat and bring the mixture to a simmer, stirring constantly.
- Remove the saucepan from the heat and add the finely chopped bittersweet chocolate. Let it sit for a minute or two to soften, then whisk until the chocolate is completely melted and the mixture is smooth and glossy.
- In a small bowl, whisk together the cornstarch and cold water until you have a smooth slurry.
- Return the saucepan to medium heat. Slowly pour the cornstarch slurry into the hot chocolate mixture, whisking constantly to prevent lumps from forming. Continue to cook, stirring constantly, until the filling thickens to a pudding-like consistency (about 1-2 minutes).
- Remove the saucepan from the heat and stir in the vanilla extract.
- Let the filling cool slightly for about 5-10 minutes before pouring it into the crust.
- Assemble the Icebox Pie:
- Carefully pour the slightly cooled hot chocolate filling into the chilled chocolate wafer crust. Spread it evenly to fill the crust completely.
- Cover the pie with plastic wrap, pressing it gently onto the surface of the filling to prevent a skin from forming. Place the pie in the refrigerator and chill for at least 4 hours, or preferably overnight.
- Make the Whipped Cream Topping:
- Chill your mixing bowl and whisk (or whisk attachment for your stand mixer).
- In the chilled bowl, combine the heavy cream, powdered sugar, and vanilla extract.
- Using a whisk or an electric mixer, whip the cream until stiff peaks form. Be careful not to overwhip.
- Finishing Touches and Serving:
- Once the pie has chilled completely, remove it from the refrigerator and spread the whipped cream evenly over the top.
- If desired, garnish the pie with mini marshmallows, chocolate shavings, or a dusting of cocoa powder.
- Slice the pie into wedges and serve immediately. Store any leftovers in the refrigerator.
Notes
- For the crust, make sure the chocolate wafer crumbs are very fine for the best texture.
- Chilling the crust is important to prevent it from becoming soggy.
- When making the filling, stir constantly to prevent scorching and lumps.
- Chill the bowl and whisk for the whipped cream to help it whip up faster and hold its shape.
- The pie needs to chill for at least 4 hours, but overnight is best for the filling to set properly.


Leave a Comment