

Grilled Corn Husks: Prepare to unlock a smoky, subtly sweet secret weapon for your next barbecue! Forget tossing those husks we’re about to transform them into an integral part of your grilling experience. Have you ever wondered how to infuse your corn with even more flavor and moisture? The answer lies in the very thing you’ve likely been discarding.
Using corn husks for cooking isn’t a new trend; it’s a technique rooted in tradition. Indigenous cultures throughout the Americas have long utilized corn husks for wrapping tamales, steaming vegetables, and, yes, grilling. This resourceful approach not only imparts a unique flavor but also helps to retain moisture, preventing your food from drying out on the grill.
But why are grilled corn husks so beloved? The secret is in the gentle steaming they provide. As the husks heat up, they release moisture that envelops the corn, creating a tender, juicy kernel with a hint of smoky sweetness. It’s a simple technique that elevates the humble ear of corn to a gourmet delight. Plus, it’s incredibly convenient! No need to fuss with foil or complicated grilling setups. With just a few simple steps, you can enjoy perfectly grilled corn every time. So, let’s dive in and discover how to master the art of grilling with corn husks!

Ingredients:
- 8 ears of fresh corn, in husks
- 1/2 cup (1 stick) unsalted butter, melted
- 1/4 cup olive oil
- 2 cloves garlic, minced
- 1 tablespoon chopped fresh cilantro
- 1 tablespoon chopped fresh parsley
- 1 teaspoon chili powder
- 1/2 teaspoon smoked paprika
- 1/4 teaspoon cayenne pepper (optional, for heat)
- Salt and freshly ground black pepper to taste
- Lime wedges, for serving (optional)
Preparing the Corn:
- Soak the corn: This is crucial! Submerge the entire ears of corn, husks and all, in a large tub or sink filled with cold water. Make sure all the corn is fully submerged. I usually weigh them down with a heavy plate or pot. Let them soak for at least 30 minutes, and ideally for 1-2 hours. This prevents the husks from burning on the grill and helps steam the corn from the inside. Trust me, don’t skip this step!
- Prepare the butter mixture: While the corn is soaking, melt the butter in a small saucepan or in the microwave. Be careful not to burn it! Once melted, add the olive oil, minced garlic, cilantro, parsley, chili powder, smoked paprika, and cayenne pepper (if using). Stir well to combine all the flavors. Season with salt and pepper to taste. I usually start with about 1/2 teaspoon of salt and 1/4 teaspoon of pepper, then adjust as needed. The butter mixture is what will give the corn its amazing flavor, so don’t be shy with the seasonings!
- Drain the corn: After the corn has soaked for the appropriate amount of time, remove it from the water and shake off any excess water.
Grilling the Corn:
- Preheat the grill: Preheat your grill to medium heat (around 350-400°F or 175-200°C). If you’re using a charcoal grill, make sure the coals are evenly distributed. For a gas grill, preheat with all burners on medium, then adjust as needed to maintain the temperature.
- Grill the corn in husks: Place the soaked corn directly on the grill grates, husks and all. Grill for about 15-20 minutes, turning occasionally, until the husks are slightly charred and the corn is tender. You’ll notice the husks will start to turn brown and even blacken in some spots that’s perfectly normal and adds to the smoky flavor. The key is to keep turning the corn so that the husks don’t burn completely through.
- Check for doneness: To check if the corn is done, carefully peel back a small portion of the husk (be careful, it will be hot!). Use a fork to pierce a kernel. If it’s tender and juicy, the corn is ready. If not, continue grilling for a few more minutes, turning occasionally.
Peeling and Finishing:
- Remove from grill: Once the corn is cooked through, carefully remove it from the grill using tongs. Place it on a platter or cutting board.
- Peel back the husks: Let the corn cool slightly for a few minutes before handling it. Then, carefully peel back the husks, being mindful of the hot steam that will escape. You can either remove the husks completely or leave them attached at the base of the corn cob for a decorative handle. If you choose to leave the husks attached, tie them back with a piece of kitchen twine for a neater presentation.
- Remove the silk: Once the husks are peeled back, remove any remaining silk from the corn. A clean toothbrush or a damp paper towel can be helpful for this.
- Brush with butter mixture: Using a pastry brush, generously brush the cooked corn with the prepared butter mixture. Make sure to get the butter mixture into all the nooks and crannies of the corn. This is where all the flavor comes in!
- Grill again (optional): For extra char and flavor, you can grill the corn again for a few minutes after brushing it with the butter mixture. Place the corn directly on the grill grates and grill for 2-3 minutes per side, or until slightly charred. Watch it carefully, as the butter can burn quickly.
- Season and serve: Season the grilled corn with additional salt and pepper to taste. Serve immediately with lime wedges, if desired. The lime juice adds a bright, citrusy flavor that complements the smoky, savory corn perfectly.
Tips and Variations:
- Spice it up: If you like your corn with a kick, add more cayenne pepper to the butter mixture or sprinkle some chili flakes on the corn before serving.
- Add cheese: For a cheesy twist, sprinkle the grilled corn with crumbled cotija cheese, queso fresco, or Parmesan cheese after brushing it with the butter mixture.
- Use different herbs: Feel free to experiment with different herbs in the butter mixture. Chopped basil, oregano, or thyme would all be delicious.
- Grill without husks: If you prefer, you can grill the corn without the husks. Just brush the corn with olive oil and grill for about 10-12 minutes, turning occasionally, until tender and slightly charred. Be sure to watch it carefully, as the corn can dry out quickly if grilled without the husks.
- Soaking time is important: Don’t skimp on the soaking time! Soaking the corn for at least 30 minutes is essential for preventing the husks from burning and for steaming the corn from the inside.
- Charcoal vs. Gas Grill: I personally prefer using a charcoal grill for grilled corn, as it imparts a more smoky flavor. However, a gas grill works just fine too. Just make sure to preheat it properly and adjust the heat as needed.
- Leftovers: Leftover grilled corn can be stored in the refrigerator for up to 3 days. Reheat it in the microwave, oven, or on the grill. You can also cut the kernels off the cob and use them in salads, salsas, or soups.
Serving Suggestions:
Grilled corn on the cob is a perfect side dish for any summer barbecue or cookout. It pairs well with grilled chicken, steak, burgers, or fish. It’s also a great addition to salads, tacos, and other Mexican-inspired dishes.
Other Flavor Combinations:
- Mexican Street Corn (Elote): Brush the grilled corn with mayonnaise, sprinkle with cotija cheese, chili powder, and lime juice.
- Garlic Parmesan Corn: Brush the grilled corn with garlic butter and sprinkle with grated Parmesan cheese.
- Spicy Chipotle Corn: Brush the grilled corn with a mixture of melted butter, chipotle powder, and lime juice.
- Herb Butter Corn: Brush the grilled corn with a mixture of melted butter, chopped fresh herbs (such as basil, parsley, and thyme), and garlic.
Enjoy!
Conclusion:
So, there you have it! Grilled corn husks, a surprisingly simple yet incredibly impactful way to elevate your summer grilling game. I know, I know, it might sound a little unconventional, but trust me on this one. The subtle smokiness and earthy aroma that the husks impart to your corn are simply unmatched. It’s a flavor profile that screams summer barbecue, and once you try it, you’ll wonder why you haven’t been grilling your corn this way all along. This method isn’t just about adding flavor; it’s about creating an experience. It’s about slowing down, savoring the process, and enjoying the simple pleasures of perfectly grilled corn.
But why is this recipe a must-try? Well, beyond the incredible flavor, it’s also incredibly easy and requires minimal effort. Seriously, if you can light a grill, you can master this technique. Plus, it’s a fantastic way to impress your friends and family at your next cookout. Imagine their faces when you present them with ears of corn bursting with smoky goodness. They’ll be begging you for the secret, and you can proudly tell them it’s all about the grilled corn husks!
Now, let’s talk serving suggestions and variations. While this grilled corn is delicious on its own, a little embellishment never hurt anyone. For a classic touch, slather the grilled corn with melted butter and a sprinkle of sea salt. Or, for a spicier kick, try a chili-lime butter. Simply mix softened butter with chili powder, lime zest, and a squeeze of lime juice. Another fantastic option is to brush the corn with a mixture of olive oil, garlic, and herbs before grilling. This will infuse the corn with even more flavor and create a beautiful golden crust. If you’re feeling adventurous, consider topping the grilled corn with crumbled cotija cheese, cilantro, and a drizzle of Mexican crema for a delicious elote-inspired treat.
Don’t be afraid to experiment with different seasonings and toppings to find your perfect combination. The possibilities are endless! You can even use the grilled corn kernels in salads, salsas, or as a side dish for your favorite grilled meats. I personally love to shave the kernels off the cob and toss them with black beans, avocado, red onion, and a lime vinaigrette for a refreshing summer salad. Or, try adding the grilled corn to your favorite chili recipe for a smoky depth of flavor.
I’m so excited for you to try this recipe and experience the magic of grilling corn in the husks. It’s a game-changer, I promise! So, fire up your grill, grab some fresh corn, and get ready to enjoy the best grilled corn you’ve ever tasted. And most importantly, don’t forget to share your experience with me! I’d love to hear what you think of the recipe and what variations you tried. Did you add any special seasonings or toppings? Did you serve it with a particular dish? Let me know in the comments below! I can’t wait to see your culinary creations and hear your feedback. Happy grilling!
Remember, the key to truly amazing grilled corn is all in the preparation and the quality of the ingredients. Choose fresh, plump ears of corn with vibrant green husks. Soak the husks thoroughly before grilling to prevent them from burning. And don’t be afraid to experiment with different grilling times and temperatures to find what works best for your grill. With a little practice, you’ll be grilling perfect corn every time. So go ahead, give it a try, and discover the deliciousness of grilled corn husks!
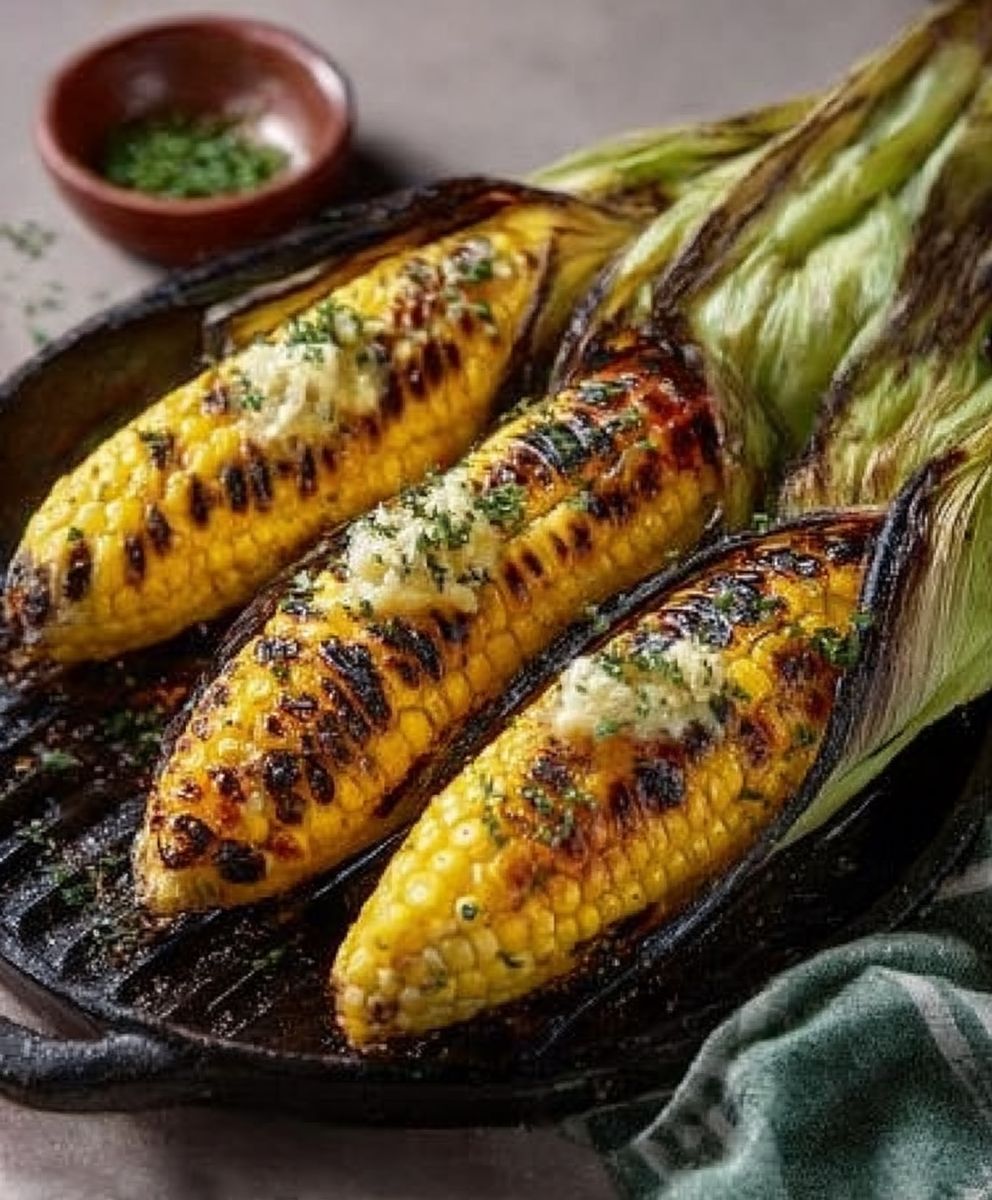
Grilled Corn Husks: The Ultimate Guide to Flavor and Technique
Grilled corn on the cob, soaked in husks and grilled to perfection, then brushed with a flavorful garlic-herb butter. A perfect summer side dish!
Ingredients
- 8 ears of fresh corn, in husks
- 1/2 cup (1 stick) unsalted butter, melted
- 1/4 cup olive oil
- 2 cloves garlic, minced
- 1 tablespoon chopped fresh cilantro
- 1 tablespoon chopped fresh parsley
- 1 teaspoon chili powder
- 1/2 teaspoon smoked paprika
- 1/4 teaspoon cayenne pepper (optional, for heat)
- Salt and freshly ground black pepper to taste
- Lime wedges, for serving (optional)
Instructions
- Soak the corn: Submerge the entire ears of corn, husks and all, in a large tub or sink filled with cold water. Make sure all the corn is fully submerged. Weigh them down with a heavy plate or pot. Let them soak for at least 30 minutes, and ideally for 1-2 hours.
- Prepare the butter mixture: While the corn is soaking, melt the butter in a small saucepan or in the microwave. Once melted, add the olive oil, minced garlic, cilantro, parsley, chili powder, smoked paprika, and cayenne pepper (if using). Stir well to combine all the flavors. Season with salt and pepper to taste.
- Drain the corn: After the corn has soaked for the appropriate amount of time, remove it from the water and shake off any excess water.
- Preheat the grill: Preheat your grill to medium heat (around 350-400°F or 175-200°C).
- Grill the corn in husks: Place the soaked corn directly on the grill grates, husks and all. Grill for about 15-20 minutes, turning occasionally, until the husks are slightly charred and the corn is tender.
- Check for doneness: Carefully peel back a small portion of the husk (be careful, it will be hot!). Use a fork to pierce a kernel. If it’s tender and juicy, the corn is ready. If not, continue grilling for a few more minutes, turning occasionally.
- Remove from grill: Once the corn is cooked through, carefully remove it from the grill using tongs. Place it on a platter or cutting board.
- Peel back the husks: Let the corn cool slightly for a few minutes before handling it. Then, carefully peel back the husks, being mindful of the hot steam that will escape. You can either remove the husks completely or leave them attached at the base of the corn cob for a decorative handle. If you choose to leave the husks attached, tie them back with a piece of kitchen twine for a neater presentation.
- Remove the silk: Once the husks are peeled back, remove any remaining silk from the corn. A clean toothbrush or a damp paper towel can be helpful for this.
- Brush with butter mixture: Using a pastry brush, generously brush the cooked corn with the prepared butter mixture. Make sure to get the butter mixture into all the nooks and crannies of the corn.
- Grill again (optional): For extra char and flavor, you can grill the corn again for a few minutes after brushing it with the butter mixture. Place the corn directly on the grill grates and grill for 2-3 minutes per side, or until slightly charred. Watch it carefully, as the butter can burn quickly.
- Season and serve: Season the grilled corn with additional salt and pepper to taste. Serve immediately with lime wedges, if desired.
Notes
- Soaking the corn for at least 30 minutes is essential for preventing the husks from burning and for steaming the corn from the inside.
- Don’t be shy with the seasonings in the butter mixture.
- For a spicier corn, add more cayenne pepper to the butter mixture or sprinkle some chili flakes on the corn before serving.
- For a cheesy twist, sprinkle the grilled corn with crumbled cotija cheese, queso fresco, or Parmesan cheese after brushing it with the butter mixture.
- Feel free to experiment with different herbs in the butter mixture. Chopped basil, oregano, or thyme would all be delicious.
- If you prefer, you can grill the corn without the husks. Just brush the corn with olive oil and grill for about 10-12 minutes, turning occasionally, until tender and slightly charred. Be sure to watch it carefully, as the corn can dry out quickly if grilled without the husks.
- Leftover grilled corn can be stored in the refrigerator for up to 3 days. Reheat it in the microwave, oven, or on the grill. You can also cut the kernels off the cob and use them in salads, salsas, or soups.


Leave a Comment