

Classic French Madeleines, those delicate, shell-shaped cookies, are more than just a treat; they’re a tiny bite of history and a passport to Parisian patisseries. Have you ever wondered how something so simple could evoke such profound feelings of comfort and nostalgia? I certainly have! These buttery, subtly sweet cakes have a way of transporting you to a cozy café, even if you’re just enjoying them in your own kitchen.
Madeleines have a rich history, with their origins debated but often linked to the town of Commercy in the Lorraine region of France. Legend has it that a young maid named Madeleine baked these small cakes for the Duke of Lorraine, and they quickly gained popularity. Their fame was further cemented by Marcel Proust’s “In Search of Lost Time,” where the taste of a madeleine dipped in tea triggers a flood of memories for the narrator.
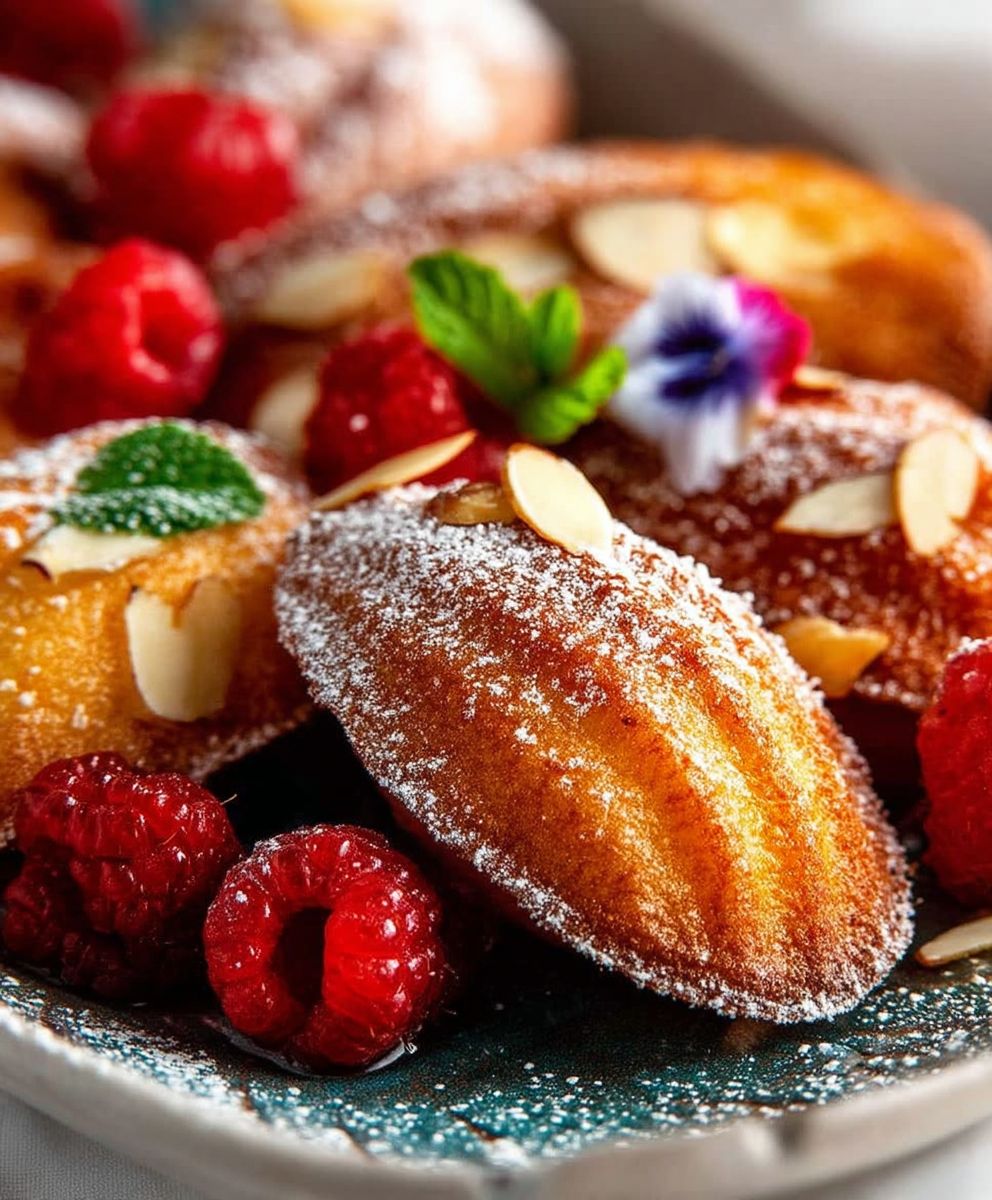
But what is it about classic French Madeleines that makes them so beloved? It’s the perfect combination of a light, airy texture with a rich, buttery flavor. The slightly crisp edges give way to a soft, spongey interior, creating a delightful contrast that’s simply irresistible. Plus, they’re surprisingly easy to make at home, making them a perfect treat for any occasion, from a sophisticated afternoon tea to a simple, comforting dessert. Join me as we unlock the secrets to baking these iconic little cakes and bring a touch of French elegance to your table!

Ingredients:
- 1 cup (125g) all-purpose flour, plus more for dusting
- 1/2 teaspoon baking powder
- 1/4 teaspoon salt
- 1/2 cup (1 stick, 113g) unsalted butter, melted and cooled slightly, plus more for greasing
- 2 large eggs, at room temperature
- 2/3 cup (133g) granulated sugar
- 1 teaspoon vanilla extract
- 1 tablespoon lemon zest, finely grated
- Powdered sugar, for dusting (optional)
Preparing the Madeleine Batter:
Alright, let’s get started with the heart of our madeleines the batter! This is where the magic begins, and trust me, it’s easier than you think. The key is to be gentle and avoid overmixing, which can lead to tough madeleines. We want them light and airy, remember?
- Whisk the Dry Ingredients: In a medium-sized bowl, whisk together the flour, baking powder, and salt. This ensures that the baking powder is evenly distributed throughout the flour, which is crucial for that signature madeleine hump. Give it a good whisk for about 30 seconds. You want everything nicely combined.
- Melt and Cool the Butter: Melt the butter in a small saucepan over low heat or in the microwave in 30-second intervals, stirring in between, until completely melted. Let it cool slightly. It should be warm, but not hot, to avoid cooking the eggs later on. This is important!
- Whisk Eggs and Sugar: In a large bowl, whisk the eggs and sugar together until pale and slightly thickened. This usually takes about 2-3 minutes. You can use a hand mixer or a stand mixer for this step, but a whisk works just fine too. The mixture should ribbon slightly when you lift the whisk. This step is important for creating a light and airy texture.
- Add Vanilla and Lemon Zest: Stir in the vanilla extract and lemon zest. The lemon zest adds a beautiful aroma and a subtle citrusy flavor that complements the buttery madeleine perfectly. Don’t skip this!
- Gently Fold in the Dry Ingredients: Gradually add the dry ingredients to the wet ingredients, folding gently with a spatula until just combined. Be careful not to overmix! Overmixing develops the gluten in the flour, which can result in tough madeleines. We want to keep things light and tender. A few streaks of flour are okay at this stage.
- Incorporate the Melted Butter: Slowly drizzle the cooled melted butter into the batter, folding gently until just combined. Again, be careful not to overmix. Make sure the butter is fully incorporated, but don’t overdo it.
- Chill the Batter: Cover the bowl with plastic wrap and refrigerate the batter for at least 30 minutes, or up to 2 hours. This is a crucial step! Chilling the batter allows the gluten to relax and the flavors to meld together. It also helps to create that characteristic madeleine hump. Don’t skip this step! I usually chill mine for at least an hour.
Preparing the Madeleine Pans and Baking:
Now that our batter is chilled and ready to go, it’s time to prepare the madeleine pans and get baking! This part is also important for achieving those perfect madeleines. Proper pan preparation is key to preventing sticking and ensuring even baking.
- Preheat the Oven: Preheat your oven to 400°F (200°C). Make sure your oven is properly preheated before you start baking. An accurate oven temperature is essential for consistent results.
- Grease and Flour the Madeleine Pans: Generously grease the madeleine pans with melted butter. Then, dust them with flour, tapping out any excess. This will prevent the madeleines from sticking to the pans and ensure that they release easily. You can also use a baking spray that contains flour. Make sure to get into all the nooks and crannies of the shell molds.
- Fill the Madeleine Pans: Spoon the chilled batter into the prepared madeleine pans, filling each mold about 3/4 full. Don’t overfill the molds, as the madeleines will rise during baking. You can use a small spoon or a piping bag to fill the molds.
- Bake the Madeleines: Bake for 10-12 minutes, or until the edges are golden brown and the madeleines spring back lightly when touched. Keep a close eye on them, as baking times may vary depending on your oven. You’ll know they’re ready when they have a nice golden brown color and a slight hump in the center.
- Cool and Release: Let the madeleines cool in the pans for a few minutes before gently inverting them onto a wire rack to cool completely. They should release easily if the pans were properly greased and floured. If they’re sticking, you can gently loosen them with a small offset spatula.
Serving and Storing Your Madeleines:
Congratulations! You’ve just baked a batch of delicious, classic French madeleines. Now it’s time to enjoy the fruits of your labor. Here are a few tips for serving and storing your madeleines to keep them fresh and delicious.
- Dust with Powdered Sugar (Optional): Once the madeleines have cooled slightly, you can dust them with powdered sugar for an extra touch of sweetness and elegance. This is entirely optional, but it does make them look extra special.
- Serve Warm or at Room Temperature: Madeleines are best enjoyed warm or at room temperature. They’re perfect with a cup of coffee or tea.
- Store in an Airtight Container: Store any leftover madeleines in an airtight container at room temperature for up to 2-3 days. They’re best eaten fresh, but they’ll still be delicious for a few days.
- Freezing Madeleines: You can also freeze madeleines for longer storage. Wrap them individually in plastic wrap and then place them in a freezer-safe bag or container. They can be frozen for up to 2-3 months. Thaw them at room temperature before serving.
Tips and Tricks for Perfect Madeleines:
Here are a few extra tips and tricks to help you achieve perfect madeleines every time:
- Use Room Temperature Eggs: Room temperature eggs emulsify better and create a smoother batter.
- Don’t Overmix the Batter: Overmixing develops the gluten in the flour, which can result in tough madeleines.
- Chill the Batter: Chilling the batter is crucial for creating that characteristic madeleine hump.
- Grease and Flour the Pans Thoroughly: Proper pan preparation is key to preventing sticking and ensuring even baking.
- Don’t Overbake: Overbaked madeleines will be dry and crumbly.
- Experiment with Flavors: Feel free to experiment with different flavors, such as orange zest, almond extract, or chocolate chips.
- Invest in Good Madeleine Pans: Good quality madeleine pans will ensure even baking and easy release.
Troubleshooting:
Sometimes things don’t go exactly as planned. Here are a few common problems and their solutions:
- Madeleines are Sticking to the Pans: Make sure you grease and flour the pans thoroughly. You can also use a baking spray that contains flour.
- Madeleines are Flat: Make sure you chill the batter for at least 30 minutes. Also, make sure your baking powder is fresh.
- Madeleines are Tough: Don’t overmix the batter.
- Madeleines are Dry: Don’t overbake them.
- Madeleines Don’t Have a Hump: Chilling the batter is crucial for creating the hump. Also, make sure your oven is hot enough.
Variations:
Once you’ve mastered the basic madeleine recipe, you can start experimenting with different variations. Here are a few ideas:
- Chocolate Madeleines: Add 2 tablespoons of cocoa powder to the dry ingredients.
- Orange Madeleines: Substitute orange zest for the lemon zest.
- Almond Madeleines: Add 1/4 teaspoon of almond extract to the wet ingredients.
- Lemon Glazed Madeleines: Whisk together powdered sugar and lemon juice to create a glaze. Dip the cooled madeleines in the glaze.
- Honey Madeleines: Substitute some
Conclusion:
And there you have it! These Classic French Madeleines are more than just cookies; they’re a little piece of Parisian charm you can bake right in your own kitchen. I truly believe this recipe is a must-try for anyone who appreciates simple elegance and delightful flavors. The delicate, buttery crumb, the subtle hint of lemon, and that iconic shell shape it all comes together to create a truly unforgettable treat.
But why is this recipe so special? It’s the perfect balance of ease and sophistication. You don’t need any fancy equipment or complicated techniques to achieve bakery-worthy results. The ingredients are readily available, and the steps are straightforward, making it a fantastic project for both seasoned bakers and enthusiastic beginners. Plus, the aroma that fills your home as these little cakes bake is simply divine! It’s an instant mood booster, I promise you.
Beyond the sheer deliciousness, these madeleines are incredibly versatile. Enjoy them warm, straight from the oven, with a dusting of powdered sugar for a classic presentation. Or, elevate your afternoon tea with a plate of these golden beauties alongside your favorite brew. They’re also wonderful dipped in melted chocolate or served with a dollop of whipped cream and fresh berries for a more decadent dessert.
Looking for variations? Feel free to experiment with different flavors! A teaspoon of orange zest adds a bright, citrusy note. A pinch of cinnamon or nutmeg brings a warm, comforting spice. For a chocolate twist, try adding a tablespoon of cocoa powder to the batter. You could even incorporate finely chopped nuts like almonds or pecans for added texture and flavor. The possibilities are endless!
Serving suggestions? Oh, where do I even begin! These madeleines are perfect for breakfast, brunch, afternoon tea, or dessert. Pack them in a lunchbox for a delightful midday treat. Bring them to a potluck or bake sale they’re always a crowd-pleaser. Or, simply enjoy them as a quiet indulgence with a good book and a cup of coffee. They also make a thoughtful and charming homemade gift for friends and family. Imagine presenting a beautifully wrapped box of these golden shells it’s sure to bring a smile to anyone’s face.
I’ve poured my heart into perfecting this recipe, and I’m confident that you’ll love it as much as I do. So, gather your ingredients, preheat your oven, and get ready to experience the magic of Classic French Madeleines. Don’t be intimidated by the fancy name this recipe is surprisingly simple and incredibly rewarding.
I’m so excited for you to try this recipe! And more importantly, I’m eager to hear about your experience. Did you try any variations? What did you serve them with? What did your family and friends think? Please, please, please share your photos and stories with me! You can leave a comment below, tag me on social media, or send me an email. I truly value your feedback and I love seeing your creations. Happy baking! I hope these madeleines bring a little bit of joy and sweetness into your life. They certainly have for me!
Classic French Madeleines: A Simple Guide to Baking Perfection
Delicate, buttery, lemon-zest flavored shell-shaped cookies, perfect with coffee or tea.
Ingredients
- 1 cup (125g) all-purpose flour, plus more for dusting
- 1/2 teaspoon baking powder
- 1/4 teaspoon salt
- 1/2 cup (1 stick, 113g) unsalted butter, melted and cooled slightly, plus more for greasing
- 2 large eggs, at room temperature
- 2/3 cup (133g) granulated sugar
- 1 teaspoon vanilla extract
- 1 tablespoon lemon zest, finely grated
- Powdered sugar, for dusting (optional)
Instructions
- Whisk the Dry Ingredients: In a medium-sized bowl, whisk together the flour, baking powder, and salt.
- Melt and Cool the Butter: Melt the butter in a small saucepan over low heat or in the microwave in 30-second intervals, stirring in between, until completely melted. Let it cool slightly.
- Whisk Eggs and Sugar: In a large bowl, whisk the eggs and sugar together until pale and slightly thickened (2-3 minutes).
- Add Vanilla and Lemon Zest: Stir in the vanilla extract and lemon zest.
- Gently Fold in the Dry Ingredients: Gradually add the dry ingredients to the wet ingredients, folding gently with a spatula until just combined. Be careful not to overmix!
- Incorporate the Melted Butter: Slowly drizzle the cooled melted butter into the batter, folding gently until just combined. Again, be careful not to overmix.
- Chill the Batter: Cover the bowl with plastic wrap and refrigerate the batter for at least 30 minutes, or up to 2 hours.
- Preheat the Oven: Preheat your oven to 400°F (200°C).
- Grease and Flour the Madeleine Pans: Generously grease the madeleine pans with melted butter. Then, dust them with flour, tapping out any excess.
- Fill the Madeleine Pans: Spoon the chilled batter into the prepared madeleine pans, filling each mold about 3/4 full.
- Bake the Madeleines: Bake for 10-12 minutes, or until the edges are golden brown and the madeleines spring back lightly when touched.
- Cool and Release: Let the madeleines cool in the pans for a few minutes before gently inverting them onto a wire rack to cool completely.
- Dust with Powdered Sugar (Optional): Once the madeleines have cooled slightly, you can dust them with powdered sugar for an extra touch of sweetness and elegance.
- Serve Warm or at Room Temperature: Madeleines are best enjoyed warm or at room temperature. They’re perfect with a cup of coffee or tea.
- Store in an Airtight Container: Store any leftover madeleines in an airtight container at room temperature for up to 2-3 days. They’re best eaten fresh, but they’ll still be delicious for a few days.
- Freezing Madeleines: You can also freeze madeleines for longer storage. Wrap them individually in plastic wrap and then place them in a freezer-safe bag or container. They can be frozen for up to 2-3 months. Thaw them at room temperature before serving.
Notes
- Use room temperature eggs for better emulsification.
- Don’t overmix the batter to avoid tough madeleines.
- Chilling the batter is crucial for the characteristic madeleine hump.
- Grease and flour the pans thoroughly to prevent sticking.
- Don’t overbake the madeleines.
- Experiment with flavors like orange zest, almond extract, or chocolate chips.
- Invest in good quality madeleine pans.


Leave a Comment