

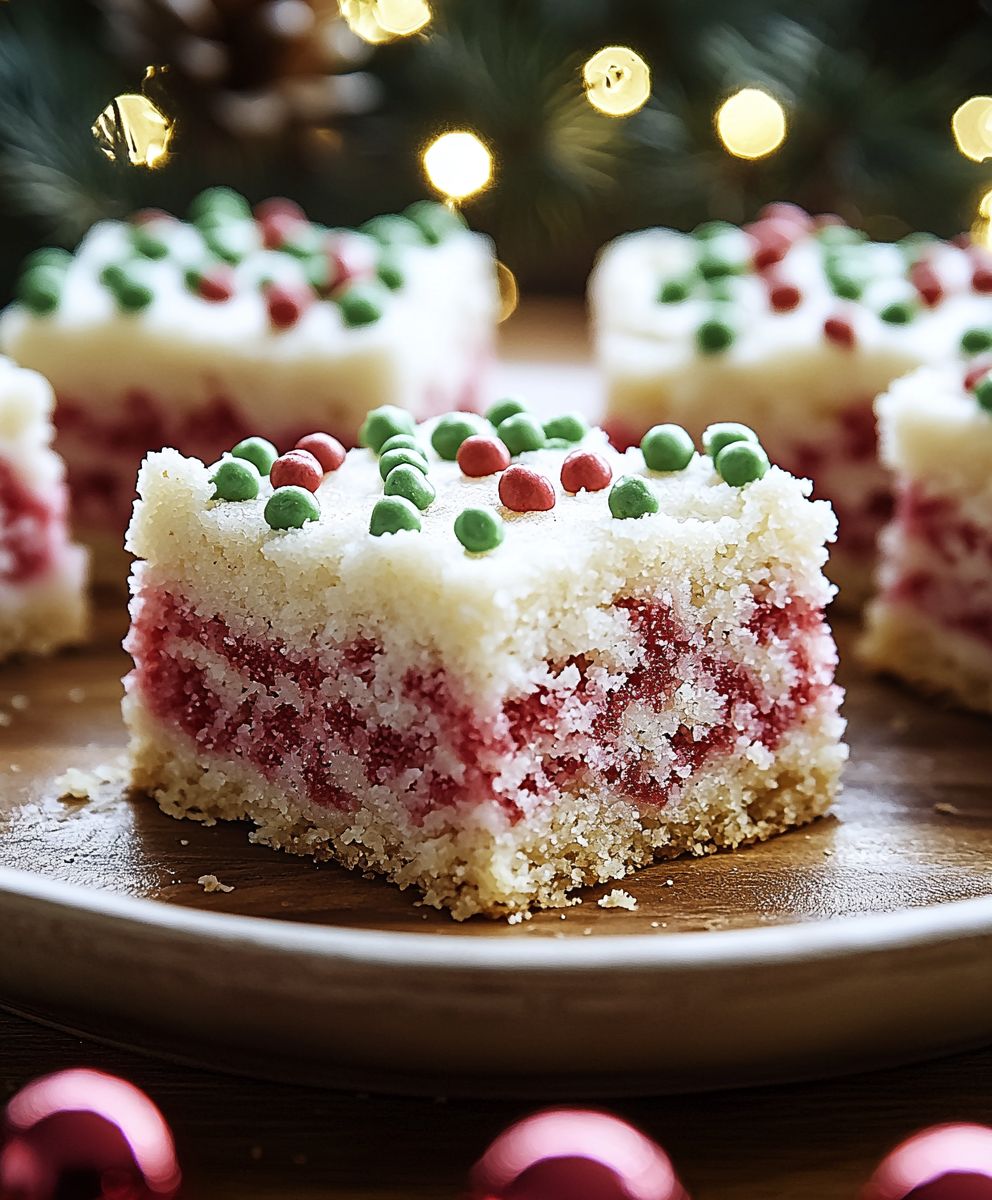
Christmas Sugar Cookie Bars: Forget rolling, cutting, and decorating individual cookies this holiday season! Imagine sinking your teeth into a thick, chewy, and utterly festive bar that captures all the magic of a classic sugar cookie, but with a fraction of the effort. That’s right, we’re talking about Christmas Sugar Cookie Bars, the ultimate holiday baking shortcut that doesn’t compromise on taste or tradition.
Sugar cookies themselves have a rich history, dating back to the mid-1700s in Pennsylvania, where German settlers brought their recipes for “Zuckerplätzchen.” These sweet treats quickly became a beloved part of Christmas celebrations, evolving into the decorated delights we know and love today. But let’s be honest, sometimes the holiday hustle leaves little time for intricate cookie decorating. That’s where these bars come in!
People adore Christmas Sugar Cookie Bars because they offer the same delightful buttery flavor and soft, melt-in-your-mouth texture as traditional sugar cookies, but in a convenient and shareable format. Plus, the vibrant frosting and festive sprinkles make them a visually stunning addition to any holiday dessert table. So, ditch the cookie cutters and embrace the ease of these delicious bars your taste buds (and your sanity) will thank you!

Ingredients:
- For the Cookie Base:
- 1 cup (2 sticks) unsalted butter, softened
- 1 ½ cups granulated sugar
- 2 large eggs
- 1 teaspoon vanilla extract
- 3 cups all-purpose flour
- 1 teaspoon baking powder
- ½ teaspoon salt
- For the Cream Cheese Frosting:
- 8 ounces cream cheese, softened
- ½ cup (1 stick) unsalted butter, softened
- 4 cups powdered sugar
- 2 teaspoons vanilla extract
- 2-4 tablespoons milk or heavy cream (for desired consistency)
- For Decoration:
- Assorted Christmas sprinkles (red, green, white, gold, etc.)
- Optional: Red and green sugar crystals
- Optional: Mini chocolate chips
Preparing the Cookie Base:
- Cream the Butter and Sugar: In a large bowl, or the bowl of your stand mixer, cream together the softened butter and granulated sugar until light and fluffy. This usually takes about 3-5 minutes. Make sure to scrape down the sides of the bowl occasionally to ensure everything is evenly mixed. You want a smooth, pale yellow mixture. Don’t rush this step; it’s crucial for a tender cookie base.
- Add the Eggs and Vanilla: Beat in the eggs one at a time, mixing well after each addition. Then, stir in the vanilla extract. Again, scrape down the bowl to incorporate everything fully. The mixture should be smooth and well combined.
- Combine Dry Ingredients: In a separate medium bowl, whisk together the all-purpose flour, baking powder, and salt. Whisking helps to evenly distribute the baking powder and salt throughout the flour, which is important for a consistent texture.
- Gradually Add Dry Ingredients to Wet Ingredients: Gradually add the dry ingredients to the wet ingredients, mixing on low speed until just combined. Be careful not to overmix! Overmixing can develop the gluten in the flour, resulting in a tough cookie base. Mix until the flour is *almost* completely incorporated, then stop and scrape down the bowl one last time. Finish mixing by hand with a spatula until just combined. A few streaks of flour are okay.
- Press Dough into Pan: Press the cookie dough evenly into a 9×13 inch baking pan. I like to line the pan with parchment paper first, leaving an overhang on the sides. This makes it super easy to lift the cookie bars out of the pan after baking. If the dough is sticky, you can lightly flour your hands or use a piece of parchment paper to help press it down evenly. Make sure the dough is spread into all the corners of the pan.
Baking the Cookie Base:
- Bake: Bake in a preheated oven at 350°F (175°C) for 20-25 minutes, or until the edges are lightly golden brown and the center is set. The baking time may vary depending on your oven, so keep a close eye on it. A toothpick inserted into the center should come out clean, or with just a few moist crumbs attached.
- Cool Completely: Remove the pan from the oven and let the cookie base cool completely in the pan before frosting. This is important because if you frost it while it’s still warm, the frosting will melt and become runny. Patience is key! Letting it cool completely also helps the cookie base firm up, making it easier to cut into bars.
Preparing the Cream Cheese Frosting:
- Cream Cheese and Butter: In a large bowl, or the bowl of your stand mixer, beat together the softened cream cheese and butter until smooth and creamy. Make sure both the cream cheese and butter are at room temperature for the best results. This will prevent lumps in your frosting. Beat for a good 3-5 minutes until the mixture is light and airy.
- Add Powdered Sugar: Gradually add the powdered sugar, one cup at a time, beating on low speed until combined. Be careful not to add the powdered sugar too quickly, or it will create a cloud of dust! Scrape down the sides of the bowl after each addition to ensure everything is evenly mixed.
- Add Vanilla and Milk: Stir in the vanilla extract. Then, add the milk or heavy cream, one tablespoon at a time, until the frosting reaches your desired consistency. You want it to be smooth, creamy, and spreadable. If the frosting is too thick, add a little more milk. If it’s too thin, add a little more powdered sugar.
Frosting and Decorating:
- Frost the Cookie Bars: Once the cookie base is completely cool, spread the cream cheese frosting evenly over the top. Use an offset spatula or a butter knife to create a smooth, even layer of frosting.
- Decorate: Immediately sprinkle the frosting with your favorite Christmas sprinkles, red and green sugar crystals, and mini chocolate chips (if using). The frosting is soft, so the sprinkles will adhere easily. Get creative and have fun with it! You can create patterns, designs, or just sprinkle them randomly.
- Chill (Optional): For best results, chill the frosted cookie bars in the refrigerator for at least 30 minutes before cutting and serving. This will help the frosting set and make the bars easier to cut cleanly.
- Cut and Serve: Cut the cookie bars into squares or rectangles. Use a sharp knife to make clean cuts. If the bars are sticking to the knife, you can run the knife under hot water and dry it before each cut.
Tips for Success:
- Room Temperature Ingredients: Using room temperature butter and cream cheese is crucial for a smooth and creamy frosting.
- Don’t Overmix: Overmixing the cookie dough will result in tough cookie bars. Mix until just combined.
- Cool Completely: Make sure the cookie base is completely cool before frosting to prevent the frosting from melting.
- Get Creative with Decorations: Have fun with the decorations! Use your favorite Christmas sprinkles, candies, and colors.
- Storage: Store the cookie bars in an airtight container in the refrigerator for up to 3-4 days.
Variations:
- Chocolate Chip Cookie Bars: Add 1 cup of chocolate chips to the cookie dough.
- Peppermint Cookie Bars: Add ½ teaspoon of peppermint extract to the cookie dough and sprinkle crushed peppermint candies on top of the frosting.
- Gingerbread Cookie Bars: Add 1 teaspoon of ground ginger, ½ teaspoon of ground cinnamon, and ¼ teaspoon of ground cloves to the cookie dough.
- Eggnog Cookie Bars: Add ¼ cup of eggnog to the cookie dough and sprinkle with nutmeg.
Troubleshooting:
- Cookie base is too dry: Make sure you are measuring the flour correctly. Spoon the flour into the measuring cup and level it off with a knife. Do not pack the flour into the cup.
- Frosting is too thin: Add more powdered sugar, one tablespoon at a time, until the frosting reaches your desired consistency.
- Frosting is too thick: Add more milk or heavy cream, one teaspoon at a time, until the frosting reaches your desired consistency.
- Cookie bars are sticking to the pan: Line the pan with parchment paper before pressing in the cookie dough.
Conclusion:
So, there you have it! These Christmas Sugar Cookie Bars are truly a must-try this holiday season. They’re incredibly easy to make, require no chilling (hallelujah!), and deliver that classic sugar cookie flavor we all crave, but in a fun, shareable bar form. Forget rolling out dough and meticulously cutting shapes this recipe is all about maximum flavor with minimal effort, leaving you more time to actually enjoy the festivities.
What makes these bars so special? It’s the perfect balance of soft, chewy texture and that subtle hint of almond extract that elevates them beyond your average sugar cookie. Plus, the customizable frosting and sprinkles allow you to unleash your inner artist and create a truly festive treat that will wow your family and friends. Seriously, who can resist a colorful, sprinkle-laden sugar cookie bar?
But the best part? The possibilities are endless! While I’ve shared my go-to recipe, feel free to get creative with your serving suggestions and variations. For a richer flavor, try using brown butter in the base. It adds a nutty depth that complements the sweetness beautifully. Or, if you’re a chocolate lover (like me!), swirl in some melted chocolate into the batter before baking for a delightful chocolate-sugar cookie hybrid. You could even add chopped nuts, dried cranberries, or mini chocolate chips for extra texture and flavor.
When it comes to serving, these bars are perfect on their own, but they also pair wonderfully with a scoop of vanilla ice cream or a warm mug of hot chocolate. Cut them into squares for easy sharing at parties, or wrap them individually as adorable homemade gifts. For a truly festive touch, arrange them on a platter with other holiday treats like gingerbread cookies and peppermint bark. Trust me, they’ll disappear in minutes!
And don’t forget about the frosting! While I opted for a simple vanilla buttercream, you can easily customize it with different extracts, food coloring, or even a touch of cream cheese for a tangy twist. Get the kids involved in decorating it’s a fun and festive activity that everyone will enjoy. Let them go wild with sprinkles, edible glitter, and even small candies to create their own unique masterpieces.
I truly believe that these Christmas Sugar Cookie Bars will become a new holiday tradition in your home. They’re the perfect combination of ease, flavor, and festive fun. So, what are you waiting for? Gather your ingredients, preheat your oven, and get ready to bake up a batch of these delicious bars. I promise you won’t regret it!
I’m so excited for you to try this recipe! Once you do, I’d absolutely love to hear about your experience. Did you make any variations? What were your favorite toppings? Share your photos and stories in the comments below I can’t wait to see your creations! Happy baking, and happy holidays!
Remember to tag me in your social media posts so I can see your beautiful Christmas Sugar Cookie Bars! Let’s spread some holiday cheer, one delicious bar at a time!
Christmas Sugar Cookie Bars: Easy Recipe & Festive Fun
Festive and easy Christmas cookie bars with a soft sugar cookie base, creamy cream cheese frosting, and colorful holiday sprinkles. Perfect for sharing!
Ingredients
- 1 cup (2 sticks) unsalted butter, softened
- 1 1/2 cups granulated sugar
- 2 large eggs
- 1 teaspoon vanilla extract
- 3 cups all-purpose flour
- 1 teaspoon baking powder
- 1/2 teaspoon salt
- 8 ounces cream cheese, softened
- 1/2 cup (1 stick) unsalted butter, softened
- 4 cups powdered sugar
- 2 teaspoons vanilla extract
- 2-4 tablespoons milk or heavy cream (for desired consistency)
- Assorted Christmas sprinkles (red, green, white, gold, etc.)
- Optional: Red and green sugar crystals
- Optional: Mini chocolate chips
Instructions
- In a large bowl, or the bowl of your stand mixer, cream together the softened butter and granulated sugar until light and fluffy (3-5 minutes). Scrape down the sides of the bowl occasionally.
- Beat in the eggs one at a time, mixing well after each addition. Stir in the vanilla extract. Scrape down the bowl.
- In a separate medium bowl, whisk together the all-purpose flour, baking powder, and salt.
- Gradually add the dry ingredients to the wet ingredients, mixing on low speed until just combined. Be careful not to overmix! Mix until the flour is *almost* completely incorporated, then stop and scrape down the bowl one last time. Finish mixing by hand with a spatula until just combined. A few streaks of flour are okay.
- Press the cookie dough evenly into a 9×13 inch baking pan. Line the pan with parchment paper first, leaving an overhang on the sides. If the dough is sticky, you can lightly flour your hands or use a piece of parchment paper to help press it down evenly. Make sure the dough is spread into all the corners of the pan.
- Bake in a preheated oven at 350°F (175°C) for 20-25 minutes, or until the edges are lightly golden brown and the center is set. A toothpick inserted into the center should come out clean, or with just a few moist crumbs attached.
- Remove the pan from the oven and let the cookie base cool completely in the pan before frosting.
- In a large bowl, or the bowl of your stand mixer, beat together the softened cream cheese and butter until smooth and creamy (3-5 minutes).
- Gradually add the powdered sugar, one cup at a time, beating on low speed until combined. Scrape down the sides of the bowl after each addition.
- Stir in the vanilla extract. Then, add the milk or heavy cream, one tablespoon at a time, until the frosting reaches your desired consistency.
- Once the cookie base is completely cool, spread the cream cheese frosting evenly over the top.
- Immediately sprinkle the frosting with your favorite Christmas sprinkles, red and green sugar crystals, and mini chocolate chips (if using).
- For best results, chill the frosted cookie bars in the refrigerator for at least 30 minutes before cutting and serving.
- Cut the cookie bars into squares or rectangles. Use a sharp knife to make clean cuts.
Notes
- Using room temperature butter and cream cheese is crucial for a smooth and creamy frosting.
- Don’t overmix the cookie dough; mix until just combined.
- Make sure the cookie base is completely cool before frosting to prevent the frosting from melting.
- Get creative with the decorations!
- Store the cookie bars in an airtight container in the refrigerator for up to 3-4 days.


Leave a Comment