

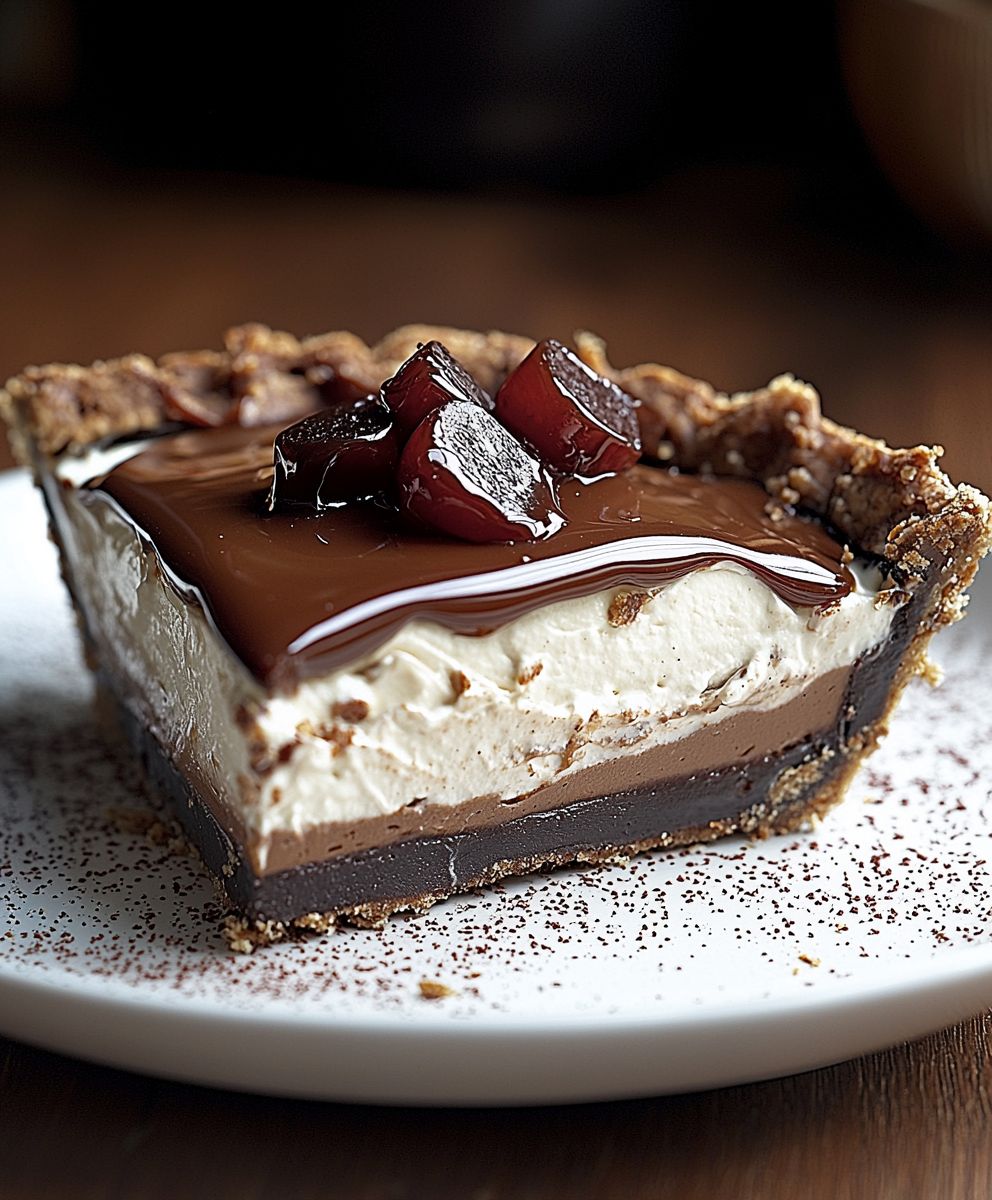
Chocolate Caramel Cream Pie: Prepare to be utterly captivated by a dessert that’s as decadent as it is delightful! Imagine sinking your fork into a symphony of textures a buttery, crumbly crust, a luscious layer of rich caramel, a velvety smooth chocolate cream filling, and a crown of whipped topping. This isn’t just pie; it’s an experience.
While the exact origins of Chocolate Caramel Cream Pie are shrouded in a bit of mystery, its lineage can be traced back to classic American cream pies, which gained popularity in the early 20th century. The addition of caramel elevates this dessert to a whole new level of indulgence, reflecting a growing appreciation for gourmet flavors and sophisticated sweets. Its a modern twist on a comforting classic.
What makes this pie so irresistible? It’s the perfect balance of sweet and salty, rich and creamy. The chocolate provides a deep, satisfying flavor, while the caramel adds a chewy, buttery sweetness that’s simply addictive. And let’s not forget the convenience! While it looks impressive, this pie is surprisingly easy to make, making it the perfect showstopper for any occasion. Whether you’re celebrating a special event or simply craving a sweet treat, this Chocolate Caramel Cream Pie is guaranteed to be a crowd-pleaser. I know it’s one of my absolute favorites to bake!

Ingredients:
- For the Chocolate Crust:
- 1 ½ cups chocolate wafer crumbs (about 36 wafers)
- 5 tablespoons unsalted butter, melted
- ¼ cup granulated sugar
- Pinch of salt
- For the Caramel Layer:
- 1 cup granulated sugar
- 6 tablespoons unsalted butter, cut into pieces
- ½ cup heavy cream
- 1 teaspoon vanilla extract
- ½ teaspoon sea salt
- For the Chocolate Cream Filling:
- 12 ounces bittersweet chocolate, chopped
- 1 ½ cups heavy cream, divided
- 3 large egg yolks
- ¼ cup granulated sugar
- 1 teaspoon vanilla extract
- For the Whipped Cream Topping:
- 1 ½ cups heavy cream
- 3 tablespoons powdered sugar
- ½ teaspoon vanilla extract
- Optional Garnish:
- Chocolate shavings
- Sea salt flakes
Preparing the Chocolate Crust:
- Preheat your oven to 350°F (175°C). This will help the crust set properly.
- In a medium bowl, combine the chocolate wafer crumbs, melted butter, granulated sugar, and salt. Make sure everything is evenly distributed. I like to use a fork to break up any clumps of crumbs.
- Press the mixture firmly into the bottom and up the sides of a 9-inch pie plate. You can use the bottom of a measuring cup to help you get a nice, even crust.
- Bake for 8-10 minutes, or until the crust is set. Keep a close eye on it to prevent burning.
- Remove from the oven and let cool completely before adding the filling. This is crucial for a stable crust!
Making the Caramel Layer:
- In a medium saucepan, combine the granulated sugar and ¼ cup of water over medium heat. Stir until the sugar is dissolved.
- Once the sugar is dissolved, stop stirring and let the mixture cook until it turns a deep amber color. This will take about 8-10 minutes. Watch it carefully, as it can burn quickly!
- Remove the saucepan from the heat and immediately add the butter. Stir until the butter is melted and smooth. Be careful, as the mixture will bubble up.
- Slowly pour in the heavy cream, stirring constantly. The mixture will bubble up again, so be prepared.
- Return the saucepan to low heat and cook for 1-2 minutes, stirring constantly, until the caramel is smooth and creamy.
- Remove from the heat and stir in the vanilla extract and sea salt.
- Let the caramel cool slightly before pouring it over the cooled chocolate crust.
- Pour the caramel evenly over the chocolate crust.
- Refrigerate for at least 2 hours, or until the caramel is firm. This step is important to prevent the caramel from mixing with the chocolate cream filling.
Preparing the Chocolate Cream Filling:
- Place the chopped chocolate in a heatproof bowl.
- In a small saucepan, heat ¾ cup of the heavy cream over medium heat until it just begins to simmer. Do not boil.
- Pour the hot cream over the chocolate and let it sit for 1 minute to soften the chocolate.
- Whisk the chocolate and cream together until smooth and glossy.
- In a separate bowl, whisk together the egg yolks and granulated sugar until pale and slightly thickened.
- Slowly pour the chocolate mixture into the egg yolk mixture, whisking constantly to prevent the eggs from cooking.
- Return the mixture to the saucepan and cook over low heat, stirring constantly, until the mixture thickens slightly and coats the back of a spoon. This will take about 3-5 minutes. Be careful not to overcook the mixture, or the eggs will scramble.
- Remove from the heat and stir in the vanilla extract.
- Let the chocolate mixture cool slightly.
- In a separate bowl, whip the remaining ¾ cup of heavy cream until stiff peaks form.
- Gently fold the whipped cream into the cooled chocolate mixture until just combined. Be careful not to overmix.
- Pour the chocolate cream filling over the caramel layer.
- Refrigerate for at least 4 hours, or preferably overnight, to allow the filling to set completely.
Making the Whipped Cream Topping:
- In a chilled bowl, combine the heavy cream, powdered sugar, and vanilla extract.
- Beat with an electric mixer until stiff peaks form. Be careful not to overwhip.
Assembling the Pie:
- Remove the pie from the refrigerator.
- Spread the whipped cream evenly over the chocolate cream filling.
- Garnish with chocolate shavings and sea salt flakes, if desired.
- Slice and serve. Enjoy!
Tips for Success:
- Use high-quality chocolate. The better the chocolate, the better the flavor of the pie. I recommend using bittersweet chocolate with a cocoa content of at least 70%.
- Don’t overcook the caramel. Overcooked caramel will be bitter and hard. Watch it carefully and remove it from the heat as soon as it reaches a deep amber color.
- Be careful not to burn the chocolate. Chocolate can burn easily, so be sure to use a double boiler or heat it in short intervals in the microwave, stirring in between.
- Chill the pie thoroughly. Chilling the pie allows the flavors to meld together and the filling to set properly. I recommend chilling it for at least 4 hours, or preferably overnight.
- Use a chilled bowl and beaters for the whipped cream. This will help the cream whip up faster and hold its shape better.
- Don’t overwhip the whipped cream. Overwhipped cream will be grainy and stiff. Stop beating the cream as soon as stiff peaks form.
Variations:
- Add nuts to the crust. You can add chopped nuts, such as pecans or walnuts, to the chocolate crust for added flavor and texture.
- Use a different type of chocolate. You can use milk chocolate or white chocolate instead of bittersweet chocolate for the filling.
- Add coffee to the filling. You can add a teaspoon of instant coffee to the chocolate cream filling for a mocha flavor.
- Top with different toppings. You can top the pie with different toppings, such as fresh berries, chopped nuts, or a drizzle of chocolate sauce.
- Make individual pies. You can make individual pies by using mini tart pans instead of a 9-inch pie plate.
Storage:
- Store the pie in the refrigerator for up to 3 days.
Troubleshooting:
- If the crust is too crumbly: Add a little more melted butter to the crust mixture.
- If the caramel is too hard: Add a little more heavy cream to the caramel.
- If the chocolate cream filling is too thin: Cook the filling for a few more minutes over low heat, stirring constantly.
- If the whipped cream is too runny: Add a little more powdered sugar to the whipped cream.
Conclusion:
This Chocolate Caramel Cream Pie isn’t just a dessert; it’s an experience. From the satisfying crunch of the chocolate crust to the silky smooth caramel and the airy whipped cream topping, every bite is a symphony of textures and flavors that will leave you wanting more. I know, I know, I’m biased, but trust me on this one it’s truly special.
Why is this pie a must-try? Because it’s surprisingly easy to make, even though it looks like you spent hours slaving away in the kitchen. The recipe is straightforward, and the results are absolutely stunning. It’s the perfect dessert to impress your friends and family at your next gathering, or simply to treat yourself after a long week. Plus, who can resist the allure of chocolate and caramel? It’s a classic combination for a reason!
But the best part? You can totally customize this pie to your liking! Feeling adventurous? Try adding a pinch of sea salt to the caramel for a salted caramel version that will blow your mind. Or, if you’re a coffee lover, infuse the whipped cream with a tablespoon of instant espresso powder for a mocha twist. For a festive touch during the holidays, sprinkle some crushed peppermint candies on top. The possibilities are endless!
As for serving suggestions, this Chocolate Caramel Cream Pie is delicious on its own, but it’s even better with a scoop of vanilla ice cream or a dollop of freshly whipped cream. A drizzle of chocolate sauce or a sprinkle of cocoa powder adds an extra touch of elegance. And if you’re feeling really decadent, pair it with a glass of dessert wine or a cup of hot coffee.
I’ve poured my heart and soul into perfecting this recipe, and I’m so excited for you to try it. I truly believe that this Chocolate Caramel Cream Pie will become a new favorite in your household. It’s the kind of dessert that creates memories and brings people together.
So, what are you waiting for? Gather your ingredients, preheat your oven, and get ready to bake! I promise you won’t regret it. And when you do, please, please, please share your experience with me! I’d love to hear how it turned out, what variations you tried, and what your family and friends thought. You can leave a comment below, tag me on social media, or even send me an email. I’m always eager to see your creations and hear your feedback.
I’m confident that you’ll find this recipe to be a delightful and rewarding experience. Don’t be intimidated by the multiple layers; each step is simple and manageable. And remember, even if your pie isn’t perfect the first time, it will still taste amazing! Baking is all about learning and experimenting, so have fun with it and don’t be afraid to get creative.
Happy baking, and I can’t wait to hear all about your Chocolate Caramel Cream Pie adventures! I’m sure it will be a showstopper!
Chocolate Caramel Cream Pie: A Decadent Dessert Recipe
Rich chocolate caramel cream pie featuring a chocolate crust, gooey caramel, silky chocolate cream, and fluffy whipped cream.
Ingredients
- 1 ½ cups chocolate wafer crumbs (about 36 wafers)
- 5 tablespoons unsalted butter, melted
- ¼ cup granulated sugar
- Pinch of salt
- 1 cup granulated sugar
- 6 tablespoons unsalted butter, cut into pieces
- ½ cup heavy cream
- 1 teaspoon vanilla extract
- ½ teaspoon sea salt
- 12 ounces bittersweet chocolate, chopped
- 1 ½ cups heavy cream, divided
- 3 large egg yolks
- ¼ cup granulated sugar
- 1 teaspoon vanilla extract
- 1 ½ cups heavy cream
- 3 tablespoons powdered sugar
- ½ teaspoon vanilla extract
- Chocolate shavings
- Sea salt flakes
Instructions
- Prepare the Chocolate Crust: Preheat oven to 350°F (175°C). Combine chocolate wafer crumbs, melted butter, granulated sugar, and salt in a medium bowl. Press firmly into the bottom and up the sides of a 9-inch pie plate. Bake for 8-10 minutes, or until set. Remove from oven and let cool completely.
- Make the Caramel Layer: In a medium saucepan, combine granulated sugar and ¼ cup of water over medium heat. Stir until sugar is dissolved. Stop stirring and let cook until it turns a deep amber color (8-10 minutes). Remove from heat and immediately add butter. Stir until melted and smooth. Slowly pour in heavy cream, stirring constantly. Return to low heat and cook for 1-2 minutes, stirring constantly, until smooth and creamy. Remove from heat and stir in vanilla extract and sea salt. Let cool slightly before pouring over the cooled chocolate crust.
- Pour Caramel Layer: Pour the caramel evenly over the chocolate crust. Refrigerate for at least 2 hours, or until firm.
- Prepare the Chocolate Cream Filling: Place chopped chocolate in a heatproof bowl. In a small saucepan, heat ¾ cup of heavy cream over medium heat until it just begins to simmer. Pour hot cream over chocolate and let sit for 1 minute to soften. Whisk chocolate and cream together until smooth and glossy.
- Prepare the Egg Yolk Mixture: In a separate bowl, whisk together egg yolks and granulated sugar until pale and slightly thickened. Slowly pour the chocolate mixture into the egg yolk mixture, whisking constantly.
- Cook the Filling: Return the mixture to the saucepan and cook over low heat, stirring constantly, until the mixture thickens slightly and coats the back of a spoon (3-5 minutes). Remove from heat and stir in vanilla extract. Let cool slightly.
- Whip Remaining Cream: In a separate bowl, whip the remaining ¾ cup of heavy cream until stiff peaks form.
- Combine Filling: Gently fold the whipped cream into the cooled chocolate mixture until just combined.
- Pour Filling: Pour the chocolate cream filling over the caramel layer. Refrigerate for at least 4 hours, or preferably overnight, to allow the filling to set completely.
- Make the Whipped Cream Topping: In a chilled bowl, combine heavy cream, powdered sugar, and vanilla extract. Beat with an electric mixer until stiff peaks form.
- Assemble the Pie: Remove the pie from the refrigerator. Spread the whipped cream evenly over the chocolate cream filling. Garnish with chocolate shavings and sea salt flakes, if desired. Slice and serve.
Notes
- Use high-quality chocolate (bittersweet with at least 70% cocoa).
- Don’t overcook the caramel.
- Be careful not to burn the chocolate.
- Chill the pie thoroughly.
- Use a chilled bowl and beaters for the whipped cream.
- Don’t overwhip the whipped cream.
- Variations: Add nuts to the crust, use different chocolate, add coffee to the filling, top with different toppings, make individual pies.
- Storage: Store the pie in the refrigerator for up to 3 days.
- Troubleshooting:
* If the crust is too crumbly: Add a little more melted butter.
* If the caramel is too hard: Add a little more heavy cream.
* If the chocolate cream filling is too thin: Cook the filling for a few more minutes over low heat.
* If the whipped cream is too runny: Add a little more powdered sugar.


Leave a Comment