

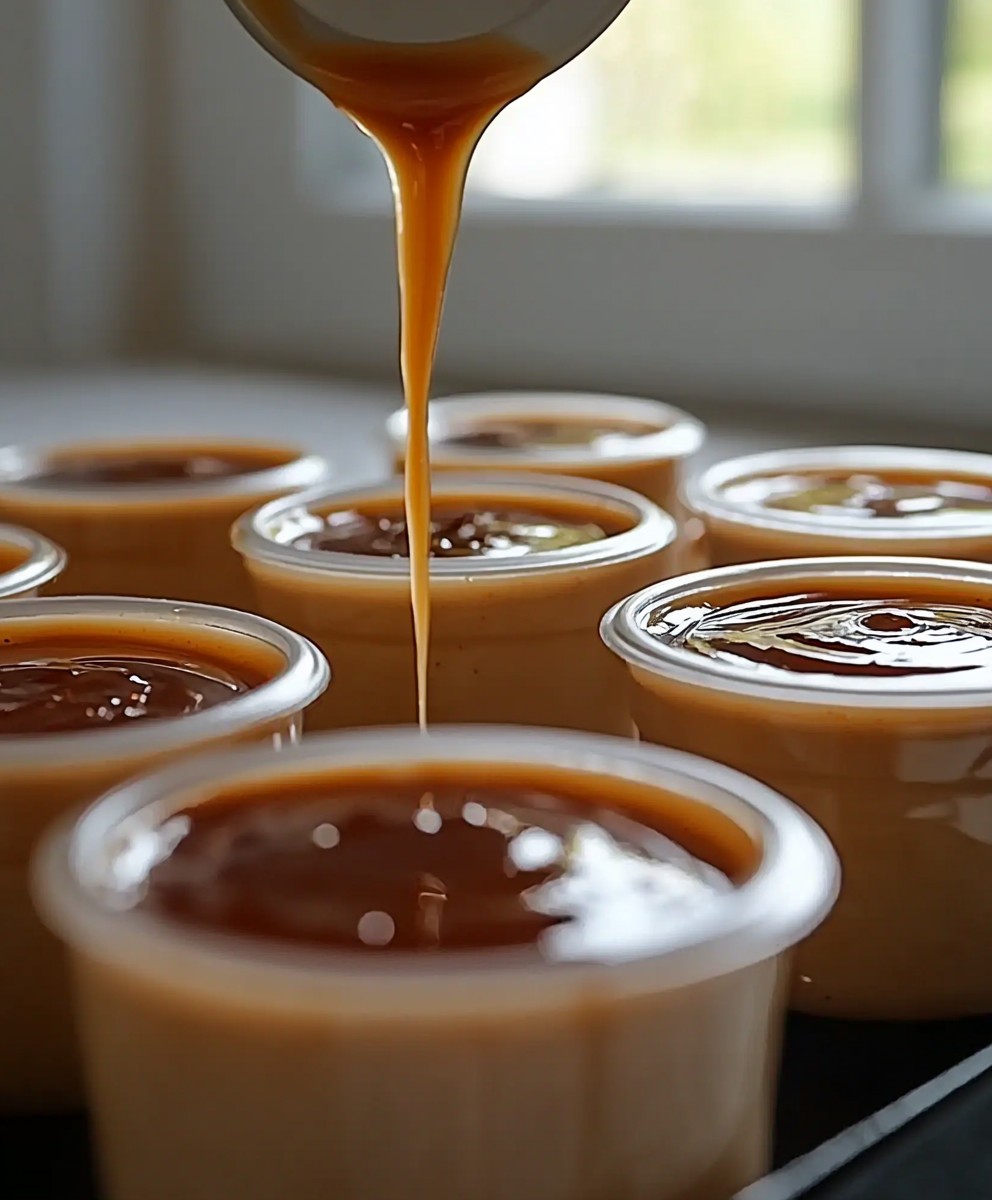
Caramel Cream Pots, oh, where do I even begin? Imagine a dessert so decadent, so utterly divine, that it melts in your mouth like a sweet, sugary dream. That’s precisely what you get with these little pots of pure bliss. Forget everything you thought you knew about caramel; this isn’t just a flavor, it’s an experience!
While the exact origins of caramel cream pots are shrouded in a bit of mystery, similar creamy desserts have graced tables across Europe for centuries. The French, with their penchant for elegant desserts, certainly perfected the art of the “crème,” and this recipe draws heavily from that tradition. It’s a testament to the enduring appeal of simple, high-quality ingredients transformed into something truly extraordinary.
What makes these caramel cream pots so irresistible? It’s the perfect balance of textures: the silky smooth creaminess juxtaposed with the rich, almost chewy caramel. The taste is a symphony of sweet and slightly salty, a combination that keeps you coming back for more. Plus, they’re surprisingly easy to make! No complicated techniques or fancy equipment required. Just a few simple steps and you’ll have a dessert that’s guaranteed to impress. Whether you’re looking for a show-stopping finale to a dinner party or a comforting treat for yourself, these little pots of caramel goodness are the answer.

Ingredients:
- 1 liter (4 cups) heavy cream
- 200g (1 cup) granulated sugar
- 100ml (1/2 cup minus 1 tablespoon) water
- 1 teaspoon vanilla extract
- Pinch of sea salt
- Optional: Whipped cream and sea salt flakes for garnish
Making the Caramel:
- Prepare your workspace: Before you even begin, have all your ingredients measured and ready to go. Caramel can go from perfectly golden to burnt in a matter of seconds, so being prepared is key. Also, have a heatproof spatula or wooden spoon ready for stirring.
- Combine sugar and water: In a heavy-bottomed saucepan (stainless steel is ideal), combine the granulated sugar and water. Swirl the pan gently to ensure the sugar is evenly moistened. Avoid stirring at this stage, as it can cause sugar crystals to form.
- Cook over medium heat: Place the saucepan over medium heat. The mixture will bubble and simmer. At first, the sugar will dissolve completely, and the mixture will be clear.
- Watch for color change: As the water evaporates, the sugar will begin to caramelize. Keep a close eye on the color. It will gradually turn from clear to pale yellow, then amber, and finally a rich, deep golden brown. This process can take anywhere from 10 to 15 minutes, depending on your stove and pan.
- Stir carefully (if needed): Once the caramel starts to develop a golden color, you can gently swirl the pan to ensure even caramelization. If you notice any sugar crystals forming on the sides of the pan, you can use a wet pastry brush to wash them down. Be very careful, as the caramel is extremely hot.
- Achieve the desired color: The key to a perfect caramel is to cook it to the right color. You want a deep amber color, but be careful not to let it burn. Burnt caramel will taste bitter and ruin the entire dish. The color should resemble a dark copper penny.
Adding the Cream:
- Warm the cream (important!): While the sugar is caramelizing, gently warm the heavy cream in a separate saucepan or in the microwave. This is crucial because adding cold cream to hot caramel can cause it to seize up and become grainy. You don’t want to boil the cream, just warm it through.
- Slowly pour in the warm cream: Once the caramel has reached the desired color, remove the saucepan from the heat. Very slowly and carefully pour in the warm heavy cream. Be prepared for the mixture to bubble vigorously this is normal.
- Stir constantly: As you pour in the cream, stir constantly with your heatproof spatula or wooden spoon. The caramel will likely harden and clump up at first, but keep stirring vigorously. The heat from the cream and the continued stirring will eventually melt the caramel back down.
- Cook until smooth: Continue to stir the mixture over low heat until the caramel is completely melted and the mixture is smooth and homogenous. This may take a few minutes. If you still have some stubborn caramel clumps, you can use an immersion blender to smooth it out (but be very careful, as the mixture is hot and can splatter).
- Add vanilla and salt: Once the caramel cream is smooth, remove it from the heat and stir in the vanilla extract and a pinch of sea salt. The salt will enhance the sweetness of the caramel and add a lovely depth of flavor.
Pouring and Chilling:
- Prepare your ramekins or pots: Have your ramekins or small serving pots ready. You can use any heatproof containers you like.
- Pour the caramel cream: Carefully pour the caramel cream into the ramekins, filling them almost to the top.
- Cool slightly: Let the ramekins cool slightly at room temperature for about 30 minutes. This will help prevent condensation from forming on the surface when you chill them.
- Chill in the refrigerator: Cover the ramekins with plastic wrap, pressing it directly onto the surface of the caramel cream to prevent a skin from forming. Chill in the refrigerator for at least 4 hours, or preferably overnight, to allow the caramel cream to set completely.
Serving:
- Remove from refrigerator: When you’re ready to serve, remove the caramel cream pots from the refrigerator.
- Optional garnish: If desired, garnish with a dollop of whipped cream and a sprinkle of sea salt flakes. The whipped cream adds a light and airy contrast to the rich caramel, and the sea salt flakes provide a delightful burst of salty flavor.
- Enjoy! Serve the caramel cream pots chilled and enjoy! The creamy, decadent caramel flavor is sure to be a hit.
Tips for Success:
- Use a heavy-bottomed saucepan: This will help prevent the caramel from burning.
- Warm the cream: Adding cold cream to hot caramel can cause it to seize up.
- Don’t overcook the caramel: Burnt caramel will taste bitter.
- Be patient: Caramel making takes time and attention.
- Use high-quality ingredients: The better the ingredients, the better the final product.
- Salt is your friend: A pinch of sea salt enhances the sweetness and adds depth of flavor.
Variations:
- Salted Caramel: Increase the amount of sea salt to your liking for a more pronounced salted caramel flavor.
- Coffee Caramel: Add a tablespoon of instant coffee granules to the cream while warming it for a coffee-infused caramel.
- Spiced Caramel: Add a pinch of cinnamon, nutmeg, or cardamom to the caramel while it’s cooking for a warm and spicy flavor.
- Bourbon Caramel: Stir in a tablespoon of bourbon after the caramel cream is smooth for a boozy kick.
- Chocolate Caramel: Melt a few ounces of dark chocolate and stir it into the caramel cream after it’s smooth for a chocolate caramel treat.
Troubleshooting:
- Caramel seized up: If the caramel seizes up when you add the cream, don’t panic! Just keep stirring over low heat until it melts back down. You can also use an immersion blender to smooth it out.
- Caramel is grainy: This is usually caused by sugar crystals forming. Make sure to avoid stirring the sugar and water mixture until it starts to caramelize. If you notice crystals forming on the sides of the pan, use a wet pastry brush to wash them down.
- Caramel is burnt: Unfortunately, there’s no saving burnt caramel. You’ll have to start over. Be sure to watch the color carefully and remove the pan from the heat as soon as it reaches the desired color.
- Caramel cream is too thick: If the caramel cream is too thick, you can add a little more warm cream to thin it out.
- Caramel cream is too thin: If the caramel cream is too thin, you can cook it over low heat for a few more minutes to thicken it up.
Storage:
- The caramel cream pots can be stored in the refrigerator for up to 3 days. Make sure to cover them tightly with plastic wrap to prevent them from drying out.
Conclusion:
And there you have it! These Caramel Cream Pots are truly something special, and I genuinely believe they deserve a spot on your dessert rotation. Why? Because they’re incredibly easy to make, require minimal ingredients, and deliver a decadent, intensely satisfying flavor that will impress even the most discerning palate. The smooth, silky texture of the cream, combined with the rich, buttery caramel, creates a symphony of sensations that’s simply irresistible. Forget complicated desserts that take hours to prepare; this recipe offers maximum impact with minimal effort. Its the perfect treat for a weeknight indulgence or a sophisticated ending to a dinner party.
But the best part? The versatility! While these Caramel Cream Pots are divine as is, there are so many ways to customize them to your liking. For a touch of elegance, try topping them with a sprinkle of sea salt to enhance the sweetness of the caramel. A dollop of whipped cream and a few fresh berries, like raspberries or strawberries, will add a burst of freshness and color. If you’re feeling adventurous, consider adding a splash of your favorite liqueur, such as bourbon or rum, to the caramel sauce for an extra layer of flavor. For a more decadent experience, you could even crumble some shortbread cookies on top for a delightful textural contrast.
Serving suggestions are endless! These pots are wonderful chilled, making them a perfect make-ahead dessert for entertaining. You can also serve them at room temperature if you prefer a slightly softer texture. Consider serving them in individual ramekins for an elegant presentation, or in small glasses for a more casual feel. They pair beautifully with a cup of coffee or tea, or even a glass of dessert wine. And if you happen to have any leftover caramel sauce (though I highly doubt you will!), it’s fantastic drizzled over ice cream, pancakes, or waffles.
Ive poured my heart into perfecting this recipe, and Im confident that youll love it as much as I do. Its a guaranteed crowd-pleaser, and I cant wait for you to experience the joy of creating and savoring these delightful treats.
So, what are you waiting for? Gather your ingredients, preheat your oven, and get ready to embark on a culinary adventure. I promise you, these Caramel Cream Pots are worth every single minute of effort. They are a must-try for any dessert lover!
Once youve tried them, I would absolutely love to hear about your experience! Did you make any variations? What did you think of the flavor and texture? Did you serve them to guests, and if so, what was their reaction? Please feel free to share your thoughts and photos in the comments below. Your feedback is invaluable, and it helps me to continue creating and sharing recipes that youll love. Happy baking, and enjoy every delicious spoonful! Don’t forget to rate the recipe if you enjoyed it! I hope this recipe becomes a staple in your home, bringing joy and sweetness to your life for years to come.
Caramel Cream Pots: The Ultimate Guide to Making Delicious Desserts
Rich, homemade caramel cream pots made with simple ingredients. A decadent make-ahead dessert perfect for any occasion.
Ingredients
- 1 liter (4 cups) heavy cream
- 200g (1 cup) granulated sugar
- 100ml (1/2 cup minus 1 tablespoon) water
- 1 teaspoon vanilla extract
- Pinch of sea salt
- Optional: Whipped cream and sea salt flakes for garnish
Instructions
- Prepare your workspace: Before you even begin, have all your ingredients measured and ready to go. Caramel can go from perfectly golden to burnt in a matter of seconds, so being prepared is key. Also, have a heatproof spatula or wooden spoon ready for stirring.
- Combine sugar and water: In a heavy-bottomed saucepan (stainless steel is ideal), combine the granulated sugar and water. Swirl the pan gently to ensure the sugar is evenly moistened. Avoid stirring at this stage, as it can cause sugar crystals to form.
- Cook over medium heat: Place the saucepan over medium heat. The mixture will bubble and simmer. At first, the sugar will dissolve completely, and the mixture will be clear.
- Watch for color change: As the water evaporates, the sugar will begin to caramelize. Keep a close eye on the color. It will gradually turn from clear to pale yellow, then amber, and finally a rich, deep golden brown. This process can take anywhere from 10 to 15 minutes, depending on your stove and pan.
- Stir carefully (if needed): Once the caramel starts to develop a golden color, you can gently swirl the pan to ensure even caramelization. If you notice any sugar crystals forming on the sides of the pan, you can use a wet pastry brush to wash them down. Be very careful, as the caramel is extremely hot.
- Achieve the desired color: The key to a perfect caramel is to cook it to the right color. You want a deep amber color, but be careful not to let it burn. Burnt caramel will taste bitter and ruin the entire dish. The color should resemble a dark copper penny.
- Warm the cream (important!): While the sugar is caramelizing, gently warm the heavy cream in a separate saucepan or in the microwave. This is crucial because adding cold cream to hot caramel can cause it to seize up and become grainy. You don’t want to boil the cream, just warm it through.
- Slowly pour in the warm cream: Once the caramel has reached the desired color, remove the saucepan from the heat. Very slowly and carefully pour in the warm heavy cream. Be prepared for the mixture to bubble vigorously this is normal.
- Stir constantly: As you pour in the cream, stir constantly with your heatproof spatula or wooden spoon. The caramel will likely harden and clump up at first, but keep stirring vigorously. The heat from the cream and the continued stirring will eventually melt the caramel back down.
- Cook until smooth: Continue to stir the mixture over low heat until the caramel is completely melted and the mixture is smooth and homogenous. This may take a few minutes. If you still have some stubborn caramel clumps, you can use an immersion blender to smooth it out (but be very careful, as the mixture is hot and can splatter).
- Add vanilla and salt: Once the caramel cream is smooth, remove it from the heat and stir in the vanilla extract and a pinch of sea salt. The salt will enhance the sweetness of the caramel and add a lovely depth of flavor.
- Prepare your ramekins or pots: Have your ramekins or small serving pots ready. You can use any heatproof containers you like.
- Pour the caramel cream: Carefully pour the caramel cream into the ramekins, filling them almost to the top.
- Cool slightly: Let the ramekins cool slightly at room temperature for about 30 minutes. This will help prevent condensation from forming on the surface when you chill them.
- Chill in the refrigerator: Cover the ramekins with plastic wrap, pressing it directly onto the surface of the caramel cream to prevent a skin from forming. Chill in the refrigerator for at least 4 hours, or preferably overnight, to allow the caramel cream to set completely.
- Remove from refrigerator: When you’re ready to serve, remove the caramel cream pots from the refrigerator.
- Optional garnish: If desired, garnish with a dollop of whipped cream and a sprinkle of sea salt flakes. The whipped cream adds a light and airy contrast to the rich caramel, and the sea salt flakes provide a delightful burst of salty flavor.
- Enjoy! Serve the caramel cream pots chilled and enjoy! The creamy, decadent caramel flavor is sure to be a hit.
Notes
- Use a heavy-bottomed saucepan to prevent burning.
- Warming the cream is crucial to prevent seizing.
- Don’t overcook the caramel, burnt caramel tastes bitter.
- Be patient, caramel making takes time and attention.
- Use high-quality ingredients for the best flavor.
- A pinch of sea salt enhances the sweetness.

Leave a Comment