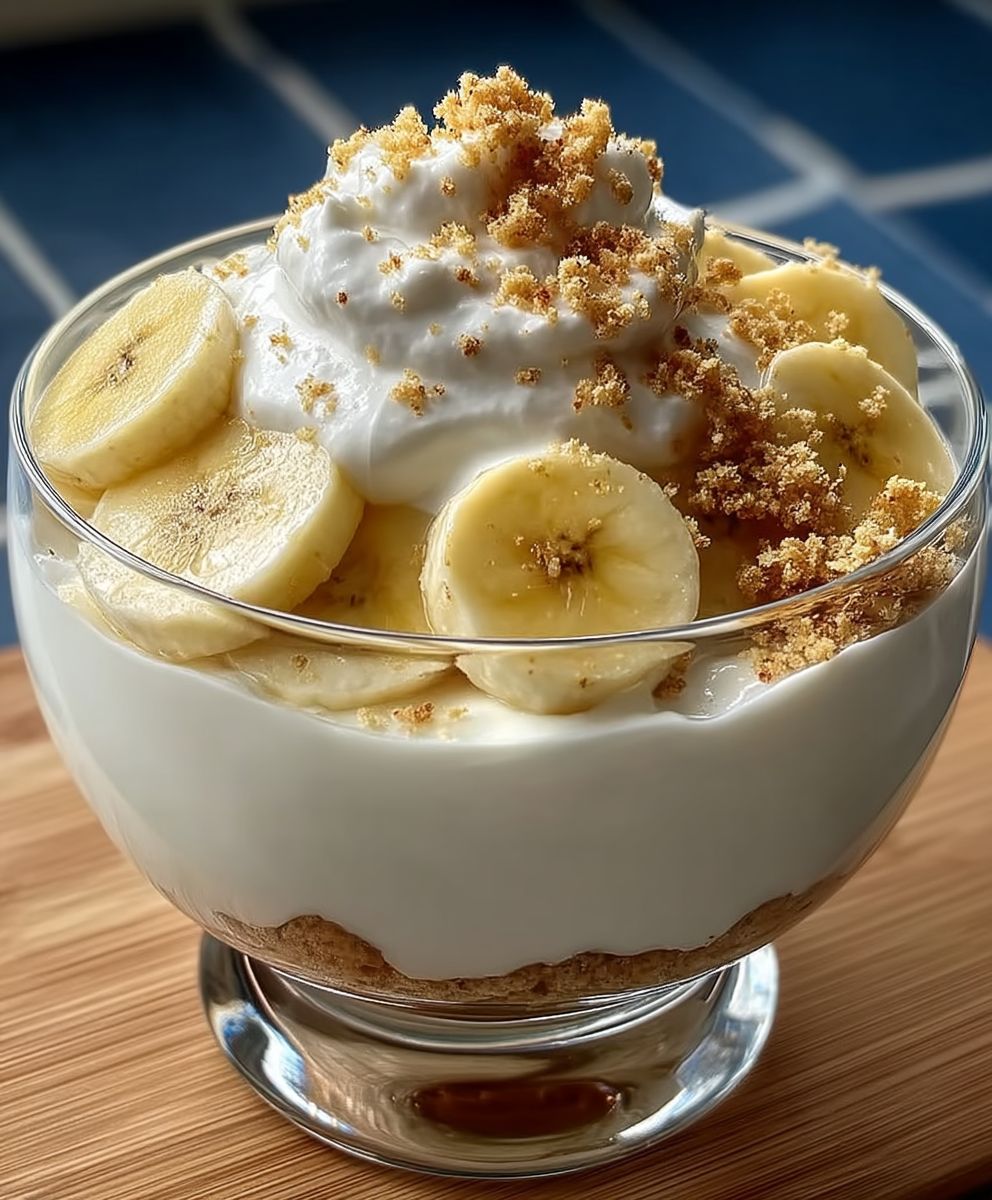
Banana pudding Greek yogurt: Prepare to be amazed! Imagine the creamy, comforting flavors of classic banana pudding, but with a healthy and protein-packed twist. This isn’t your grandma’s banana pudding, although it certainly evokes that same nostalgic warmth. We’re taking a beloved dessert and giving it a modern makeover, perfect for a quick breakfast, a post-workout snack, or even a guilt-free dessert.
Banana pudding, in its traditional form, has roots that trace back to the late 19th century, evolving from earlier English puddings and becoming a Southern staple in the United States. It’s a dish often associated with family gatherings, potlucks, and celebrations, a symbol of comfort and simple pleasures. But let’s face it, sometimes we crave that familiar flavor without all the added sugar and calories.
That’s where this banana pudding Greek yogurt recipe shines. People adore banana pudding for its sweet, creamy texture and the delightful combination of ripe bananas, vanilla wafers, and rich custard. This version captures all of those essential elements while boosting the protein content and reducing the sugar, thanks to the magic of Greek yogurt. It’s a win-win! Get ready to experience a delicious and nutritious treat that will satisfy your sweet tooth without derailing your healthy eating goals. I can’t wait to share this simple and satisfying recipe with you!
Ingredients:
- For the Banana Pudding:
- 4 ripe bananas, sliced
- 1 (14 ounce) can sweetened condensed milk
- 1 (8 ounce) package cream cheese, softened
- 1 (12 ounce) container frozen whipped topping, thawed (such as Cool Whip)
- 2 cups vanilla Greek yogurt (I prefer full-fat for richness, but non-fat works too!)
- 1 teaspoon vanilla extract
- 1/4 teaspoon ground nutmeg (optional, but adds a lovely warmth)
- 1/4 cup milk (any kind will do)
- For the Nilla Wafer Layer:
- 1 (11 ounce) box Nilla Wafers
- Optional Garnishes:
- Additional sliced bananas
- Shaved chocolate
- Whipped cream
- Sprinkles (because why not?)
Preparing the Banana Pudding Base
Alright, let’s get started with the heart of our banana pudding the creamy, dreamy base! This is where the magic happens, and it’s surprisingly simple.
- Cream Together the Cream Cheese and Condensed Milk: In a large bowl, combine the softened cream cheese and sweetened condensed milk. It’s crucial that your cream cheese is truly softened, otherwise you’ll end up with lumps. I usually let mine sit out at room temperature for at least an hour, or you can microwave it in 15-second intervals until it’s nice and pliable. Use an electric mixer (handheld or stand mixer) to beat these two ingredients together until they are completely smooth and creamy. This is the foundation of our pudding, so make sure there are no lumps! Scrape down the sides of the bowl occasionally to ensure everything is evenly incorporated.
- Incorporate the Greek Yogurt: Now, gently fold in the vanilla Greek yogurt. Don’t overmix at this stage; we want to keep the mixture light and airy. The Greek yogurt adds a wonderful tanginess that balances the sweetness of the condensed milk and cream cheese. It also contributes to the pudding’s overall creaminess and makes it a bit healthier than traditional banana pudding recipes. I like to use a large rubber spatula for this step, using a gentle folding motion to combine the yogurt without deflating the mixture.
- Add Vanilla and Nutmeg (Optional): Stir in the vanilla extract and ground nutmeg (if using). The vanilla enhances the overall flavor profile, while the nutmeg adds a subtle warmth that complements the bananas beautifully. A little goes a long way with nutmeg, so don’t overdo it! Just a pinch is enough to add a touch of spice.
- Thin with Milk: Depending on the consistency you prefer, you might want to add a little milk to thin out the pudding. Start with a tablespoon at a time and mix until you reach your desired consistency. I usually add about 1/4 cup to get it just right.
- Fold in the Whipped Topping: Gently fold in the thawed whipped topping. This is what gives the banana pudding its light and fluffy texture. Again, be careful not to overmix, as you don’t want to deflate the whipped topping. Use the same gentle folding motion as you did with the Greek yogurt.
Assembling the Banana Pudding
Now for the fun part layering all those delicious ingredients! This is where you get to be creative and customize your banana pudding to your liking.
- Choose Your Vessel: You can assemble your banana pudding in a large trifle dish, a 9×13 inch baking dish, or individual serving cups. I personally love using a trifle dish because it shows off all the beautiful layers. If you’re using individual cups, this is a great option for portion control and easy serving.
- First Layer: Nilla Wafers: Arrange a layer of Nilla Wafers on the bottom of your chosen dish. You can use them whole or break them into smaller pieces to fit the space. Don’t worry about covering every single inch; the pudding will seep in and soften the wafers.
- Second Layer: Sliced Bananas: Arrange a layer of sliced bananas over the Nilla Wafers. Try to create an even layer so that every bite has a taste of banana. I like to use slightly underripe bananas for this, as they hold their shape better and don’t get too mushy.
- Third Layer: Banana Pudding: Spread a layer of the banana pudding mixture over the bananas. Use a spatula or spoon to evenly distribute the pudding.
- Repeat Layers: Repeat the layers of Nilla Wafers, sliced bananas, and banana pudding until you’ve used up all the ingredients. I usually aim for at least three layers of each.
- Final Layer: Whipped Topping (Optional): If desired, you can top the final layer of banana pudding with a generous dollop of whipped topping. This adds a beautiful finishing touch and makes the pudding even more decadent.
- Garnish (Optional): Get creative with your garnishes! You can sprinkle shaved chocolate, add more sliced bananas, or even use sprinkles for a festive touch.
Chilling and Serving
Patience is key! This banana pudding needs time to chill in the refrigerator so the flavors can meld together and the Nilla Wafers can soften.
- Cover and Chill: Cover the banana pudding tightly with plastic wrap or a lid. This will prevent it from drying out and absorbing any unwanted odors from the refrigerator.
- Chill for at Least 4 Hours: Refrigerate the banana pudding for at least 4 hours, or preferably overnight. This allows the Nilla Wafers to soften and the flavors to meld together beautifully. The longer it chills, the better it tastes!
- Serve and Enjoy: Once the banana pudding has chilled, it’s ready to serve! Scoop it into bowls or spoons and enjoy. You can add extra garnishes just before serving, if desired.
Tips and Tricks for the Best Banana Pudding
Here are a few extra tips to ensure your banana pudding is a smashing success:
- Preventing Banana Browning: Bananas tend to brown quickly, so to prevent this, you can toss the sliced bananas with a little lemon juice or pineapple juice before layering them in the pudding. This will help keep them looking fresh and appealing.
- Nilla Wafer Alternatives: If you’re not a fan of Nilla Wafers, you can substitute them with other cookies, such as graham crackers or shortbread cookies. Just make sure they’re relatively plain so they don’t overpower the banana flavor.
- Making it Ahead: Banana pudding is a great make-ahead dessert. You can assemble it up to 24 hours in advance and store it in the refrigerator until you’re ready to serve.
- Adjusting Sweetness: If you prefer a less sweet banana pudding, you can reduce the amount of sweetened condensed milk or use plain Greek yogurt instead of vanilla.
- Adding a Rum Flavor: For a more adult-friendly version, you can add a tablespoon or two of rum extract to the banana pudding mixture. This will give it a subtle rum flavor that complements the bananas perfectly.
- Layering Tips: When layering the ingredients, try to create even layers so that every bite has a taste of everything. Don’t be afraid to get creative with your layering; there’s no right or wrong way to do it!
- Storage: Leftover banana pudding can be stored in the refrigerator for up to 3 days. However, the Nilla Wafers will continue to soften over time, so it’s best to eat it within a day or two for the best texture.
Variations and Add-ins
Want to spice things up a bit? Here are some fun variations and add-ins to try:
- Chocolate Banana Pudding: Add a few tablespoons of cocoa powder to the banana pudding mixture for a chocolatey twist. You can also use chocolate Nilla Wafers or chocolate shavings for garnish.
- Peanut Butter Banana Pudding: Swirl in a few tablespoons of peanut butter into the banana pudding mixture for a delicious peanut butter and banana combination.
- Caramel Banana Pudding: Drizzle caramel sauce over the layers of banana pudding for a decadent caramel flavor.
- Coconut Banana Pudding: Add shredded coconut to the banana pudding mixture and sprinkle it on top for a tropical twist.
- Strawberry Banana Pudding: Add sliced strawberries to the layers of banana pudding for a refreshing and fruity dessert.
Enjoy!
Conclusion:
This isn’t just another recipe; it’s a game-changer! If you’re looking for a guilt-free indulgence that tastes like pure decadence, then this Banana Pudding Greek Yogurt is an absolute must-try. Seriously, prepare to be amazed. The creamy texture, the sweet banana flavor, and the subtle tang of the Greek yogurt create a symphony of deliciousness that will have you reaching for seconds (and thirds!). Its the perfect way to satisfy your sweet tooth without derailing your healthy eating habits.
But what truly sets this recipe apart is its versatility. While it’s fantastic on its own, there are so many ways to customize it to your liking. For a classic banana pudding experience, try layering it with vanilla wafers and sliced bananas in a parfait glass. The combination of the creamy yogurt and the crunchy wafers is simply divine. Or, if you’re feeling adventurous, add a sprinkle of cinnamon or nutmeg for a warm, comforting flavor.
Looking for even more variations? Consider adding a dollop of whipped cream or a drizzle of honey for extra sweetness. For a protein boost, mix in a scoop of your favorite protein powder. And if you’re a chocolate lover, a few chocolate chips or a swirl of chocolate syrup will take this dessert to the next level. You could even blend it with ice for a refreshing and healthy smoothie! The possibilities are truly endless.
This Banana Pudding Greek Yogurt is also incredibly easy to make. It requires minimal ingredients and comes together in just minutes, making it perfect for busy weeknights or last-minute cravings. Plus, it’s a great way to use up those ripe bananas that are sitting on your counter. No more throwing away overripe fruit!
I truly believe that this recipe will become a staple in your kitchen. It’s healthy, delicious, and incredibly versatile. It’s the perfect snack, dessert, or even breakfast option. And the best part? You can feel good about indulging in it!
So, what are you waiting for? Grab your ingredients and give this recipe a try. I promise you won’t be disappointed. And once you’ve made it, I’d love to hear about your experience. Did you try any of the variations I suggested? Did you add your own unique twist? Share your photos and comments on social media using #BananaPuddingGreekYogurt. I can’t wait to see what you create! Let me know what you think of this Banana Pudding Greek Yogurt. Happy cooking (and eating)! I hope you enjoy this recipe as much as I do. It’s a simple, healthy, and delicious way to enjoy a classic dessert.
Banana Pudding Greek Yogurt: A Healthy & Delicious Dessert Recipe
Classic banana pudding with layers of creamy vanilla pudding, fresh bananas, and Nilla wafers. A perfect make-ahead dessert!
Ingredients
- 4 ripe bananas, sliced
- 1 (14 ounce) can sweetened condensed milk
- 1 (8 ounce) package cream cheese, softened
- 1 (12 ounce) container frozen whipped topping, thawed (such as Cool Whip)
- 2 cups vanilla Greek yogurt (full-fat preferred)
- 1 teaspoon vanilla extract
- 1/4 teaspoon ground nutmeg (optional)
- 1/4 cup milk (any kind)
- 1 (11 ounce) box Nilla Wafers
- Additional sliced bananas
- Shaved chocolate
- Whipped cream
- Sprinkles
Instructions
- Prepare the Pudding Base: In a large bowl, cream together the softened cream cheese and sweetened condensed milk until smooth.
- Gently fold in the vanilla Greek yogurt until combined.
- Stir in the vanilla extract and ground nutmeg (if using).
- Thin with milk to desired consistency.
- Gently fold in the thawed whipped topping.
- Assemble the Pudding: In a trifle dish, 9×13 inch baking dish, or individual serving cups, arrange a layer of Nilla Wafers on the bottom.
- Add a layer of sliced bananas over the Nilla Wafers.
- Spread a layer of the banana pudding mixture over the bananas.
- Repeat layers of Nilla Wafers, sliced bananas, and banana pudding until all ingredients are used.
- Top with whipped topping (optional).
- Garnish as desired.
- Chill: Cover and chill for at least 4 hours, or preferably overnight.
- Serve and enjoy!
Notes
- To prevent banana browning, toss sliced bananas with lemon or pineapple juice.
- Substitute Nilla Wafers with graham crackers or shortbread cookies if desired.
- Can be made up to 24 hours in advance.
- Adjust sweetness by reducing sweetened condensed milk or using plain Greek yogurt.
- Add rum extract for an adult-friendly version.
- Store leftovers in the refrigerator for up to 3 days.


Leave a Comment