

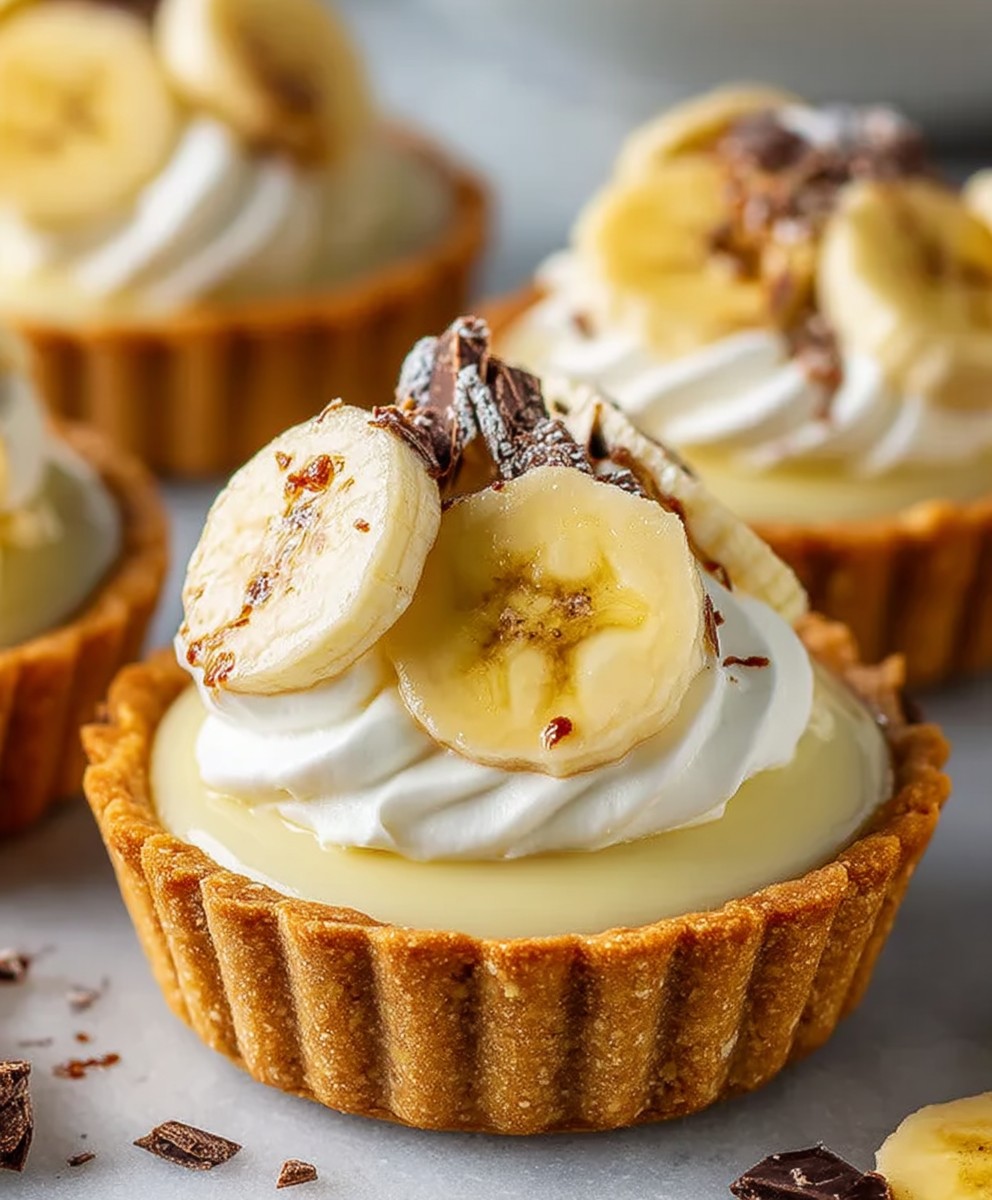
Banana Cream Mini Tarts, those delightful little bites of creamy, banana-infused bliss, are about to become your new favorite dessert! Imagine sinking your teeth into a crisp, buttery tart shell, filled with a luscious, homemade banana cream that’s so smooth it practically melts in your mouth. Topped with a dollop of whipped cream and a sprinkle of nutmeg, these mini tarts are a symphony of textures and flavors that will leave you craving more.
While the exact origins of banana cream pie are debated, its popularity soared in the mid-20th century, becoming a staple in American diners and family gatherings. These Banana Cream Mini Tarts are a modern, individual-sized twist on that classic comfort food. They’re perfect for parties, potlucks, or simply a sweet treat to brighten your day.
What makes these tarts so irresistible? It’s the perfect combination of textures the flaky crust, the silky cream, and the airy whipped topping. The taste is equally captivating, with the sweet, tropical notes of banana perfectly balanced by the richness of the cream and the subtle spice of nutmeg. Plus, their mini size makes them incredibly convenient and portion-controlled (if you can resist eating more than one!). Get ready to impress your friends and family with these adorable and delicious treats!

Ingredients:
- For the Tart Crusts:
- 1 ½ cups all-purpose flour
- ½ cup (1 stick) unsalted butter, cold and cubed
- ¼ cup granulated sugar
- ¼ teaspoon salt
- 4-6 tablespoons ice water
- For the Banana Cream Filling:
- 2 cups whole milk
- ¾ cup granulated sugar
- ¼ cup cornstarch
- ¼ teaspoon salt
- 4 large egg yolks
- 2 tablespoons unsalted butter
- 1 teaspoon vanilla extract
- 2 ripe but firm bananas, sliced
- For the Whipped Cream Topping:
- 1 cup heavy cream
- 2 tablespoons powdered sugar
- ½ teaspoon vanilla extract
- Optional Garnish:
- Chocolate shavings
- Extra banana slices
Preparing the Tart Crusts:
- Combine Dry Ingredients: In a large bowl, whisk together the flour, sugar, and salt. This ensures the salt and sugar are evenly distributed throughout the flour, which is crucial for a consistent crust.
- Cut in the Butter: Add the cold, cubed butter to the flour mixture. Using a pastry blender or your fingertips, cut the butter into the flour until the mixture resembles coarse crumbs. The key here is to work quickly and keep the butter cold. If the butter melts, the crust will be tough instead of flaky. I like to use a pastry blender because it helps me avoid overworking the dough with my warm hands.
- Add Ice Water: Gradually add the ice water, one tablespoon at a time, mixing gently after each addition. Continue adding water until the dough just comes together. Be careful not to add too much water, as this will also make the crust tough. The dough should be slightly shaggy but hold together when pressed.
- Form the Dough: Turn the dough out onto a lightly floured surface and gently form it into a disc. Wrap the disc tightly in plastic wrap and refrigerate for at least 30 minutes. This chilling time is essential because it allows the gluten to relax, which will result in a more tender crust.
- Roll Out the Dough: After chilling, remove the dough from the refrigerator and let it sit for a few minutes to soften slightly. On a lightly floured surface, roll out the dough to about ? inch thickness.
- Cut and Shape the Crusts: Using a cookie cutter or a knife, cut out circles of dough slightly larger than the diameter of your mini tart pans. Gently press the dough circles into the tart pans, making sure to press the dough firmly against the bottom and sides. Trim any excess dough from the edges.
- Dock the Crusts: Use a fork to prick the bottom of each tart crust several times. This prevents the crusts from puffing up during baking.
- Pre-Bake the Crusts: Place the tart pans on a baking sheet and bake in a preheated oven at 375°F (190°C) for 12-15 minutes, or until the crusts are lightly golden brown. Keep a close eye on them, as they can burn easily.
- Cool the Crusts: Remove the tart crusts from the oven and let them cool completely in the pans before filling.
Making the Banana Cream Filling:
- Combine Milk and Sugar: In a medium saucepan, combine the milk and half of the sugar (about 6 tablespoons). Heat over medium heat until the mixture is simmering, stirring occasionally to dissolve the sugar.
- Whisk Egg Yolks and Remaining Sugar: In a separate bowl, whisk together the egg yolks, the remaining sugar, cornstarch, and salt until the mixture is pale and smooth. This step is important because it ensures that the cornstarch is properly incorporated and will prevent lumps from forming in the custard.
- Temper the Egg Yolks: Slowly pour a small amount of the hot milk mixture into the egg yolk mixture, whisking constantly to temper the eggs. This prevents the eggs from scrambling when added to the hot milk. Continue adding the hot milk gradually, whisking constantly, until the egg yolk mixture is warm.
- Cook the Custard: Pour the tempered egg yolk mixture back into the saucepan with the remaining milk mixture. Cook over medium heat, stirring constantly, until the custard thickens and comes to a simmer. Continue cooking for 1-2 minutes more, stirring constantly, to ensure the cornstarch is fully cooked. The custard should be thick enough to coat the back of a spoon.
- Finish the Custard: Remove the saucepan from the heat and stir in the butter and vanilla extract. The butter adds richness and shine to the custard, while the vanilla extract enhances the flavor.
- Cool the Custard: Pour the custard into a bowl and cover the surface with plastic wrap to prevent a skin from forming. Refrigerate for at least 2 hours, or until completely cooled. This allows the custard to thicken further and develop its flavor.
Assembling the Mini Tarts:
- Prepare the Bananas: Just before assembling the tarts, slice the bananas into thin rounds. I recommend slicing them right before assembling to prevent them from browning.
- Fill the Tart Crusts: Spoon a layer of the cooled banana cream filling into each pre-baked tart crust.
- Arrange Banana Slices: Arrange the sliced bananas on top of the banana cream filling. You can create a decorative pattern or simply layer them evenly.
Making the Whipped Cream Topping:
- Chill the Bowl and Whisk: Place the mixing bowl and whisk attachment (or beaters) in the freezer for about 15 minutes before making the whipped cream. This helps the cream whip up faster and hold its shape better.
- Whip the Cream: Pour the heavy cream into the chilled bowl and add the powdered sugar and vanilla extract. Beat on medium speed until stiff peaks form. Be careful not to overwhip the cream, as it can turn into butter.
- Top the Tarts: Spoon or pipe the whipped cream onto the banana-filled tarts. You can use a piping bag with a decorative tip for a more elegant presentation, or simply dollop the whipped cream on top with a spoon.
Final Touches and Serving:
- Garnish (Optional): If desired, garnish the tarts with chocolate shavings or extra banana slices.
- Chill Before Serving: Refrigerate the assembled tarts for at least 30 minutes before serving to allow the flavors to meld together.
- Serve and Enjoy: Serve the banana cream mini tarts chilled and enjoy! These are best enjoyed within a day or two, as the crusts can become soggy over time.
Conclusion:
These Banana Cream Mini Tarts are truly a must-try, and I’m confident they’ll become a new favorite in your household! The combination of the buttery, crumbly crust, the luscious, creamy banana filling, and the light, airy whipped cream topping is simply irresistible. They’re the perfect bite-sized treat for any occasion, from a casual weeknight dessert to a more formal gathering. Forget complicated baking projects; these tarts are surprisingly easy to make, even for beginner bakers. The recipe is straightforward, the ingredients are readily available, and the results are guaranteed to impress.
But what truly elevates these tarts is the incredible flavor profile. The sweetness of the bananas is perfectly balanced by the richness of the cream and the subtle tang of the crust. It’s a symphony of textures and tastes that will leave you wanting more. Plus, they’re just so darn cute! The mini size makes them perfect for portion control (though you might find yourself reaching for a second, or even a third!).
Serving Suggestions and Variations:
The possibilities for customizing these Banana Cream Mini Tarts are endless! While they’re delicious as is, here are a few ideas to get your creative juices flowing:
* Chocolate Drizzle: A drizzle of melted dark or milk chocolate over the whipped cream adds a touch of decadence.
* Toasted Coconut: Sprinkle toasted coconut flakes on top for added texture and a tropical twist.
* Caramel Sauce: A swirl of caramel sauce complements the banana flavor beautifully.
* Nutella Swirl: Add a spoonful of Nutella to the banana cream filling for a hazelnut-chocolatey delight.
* Different Crust: Experiment with different crusts, such as a graham cracker crust or a chocolate cookie crust.
* Seasonal Fruit: Add other seasonal fruits like berries or peaches to the filling for a unique twist.
* Boozy Banana Cream: Add a tablespoon of rum or banana liqueur to the banana cream filling for an adult-friendly version.
* Individual Parfaits: If you don’t have mini tart pans, you can easily assemble these as individual parfaits in small glasses or jars. Layer the crushed cookies, banana cream, and whipped cream for a beautiful and delicious dessert.
These are just a few ideas to get you started. Feel free to experiment and create your own signature version of these delightful mini tarts. I encourage you to get creative and have fun with it!
I truly believe that these Banana Cream Mini Tarts are a recipe you’ll want to make again and again. They’re the perfect combination of easy, delicious, and impressive. So, what are you waiting for? Gather your ingredients, preheat your oven, and get ready to bake up a batch of these irresistible treats.
I’m so excited for you to try this recipe! Once you do, please come back and share your experience in the comments below. Let me know what variations you tried, what your family and friends thought, and any tips or tricks you discovered along the way. I can’t wait to hear all about your baking adventures! Happy baking!
Banana Cream Mini Tarts: The Perfect Bite-Sized Dessert
Delicious mini banana cream tarts with a flaky crust, creamy banana filling, and fluffy whipped cream topping. Perfect for a sweet treat!
Ingredients
- 1 ½ cups all-purpose flour
- ½ cup (1 stick) unsalted butter, cold and cubed
- ¼ cup granulated sugar
- ¼ teaspoon salt
- 4-6 tablespoons ice water
- 2 cups whole milk
- ¾ cup granulated sugar
- ¼ cup cornstarch
- ¼ teaspoon salt
- 4 large egg yolks
- 2 tablespoons unsalted butter
- 1 teaspoon vanilla extract
- 2 ripe but firm bananas, sliced
- 1 cup heavy cream
- 2 tablespoons powdered sugar
- ½ teaspoon vanilla extract
- Chocolate shavings
- Extra banana slices
Instructions
- Combine Dry Ingredients: In a large bowl, whisk together the flour, sugar, and salt.
- Cut in the Butter: Add the cold, cubed butter to the flour mixture. Using a pastry blender or your fingertips, cut the butter into the flour until the mixture resembles coarse crumbs.
- Add Ice Water: Gradually add the ice water, one tablespoon at a time, mixing gently after each addition. Continue adding water until the dough just comes together.
- Form the Dough: Turn the dough out onto a lightly floured surface and gently form it into a disc. Wrap the disc tightly in plastic wrap and refrigerate for at least 30 minutes.
- Roll Out the Dough: After chilling, remove the dough from the refrigerator and let it sit for a few minutes to soften slightly. On a lightly floured surface, roll out the dough to about ? inch thickness.
- Cut and Shape the Crusts: Using a cookie cutter or a knife, cut out circles of dough slightly larger than the diameter of your mini tart pans. Gently press the dough circles into the tart pans, making sure to press the dough firmly against the bottom and sides. Trim any excess dough from the edges.
- Dock the Crusts: Use a fork to prick the bottom of each tart crust several times.
- Pre-Bake the Crusts: Place the tart pans on a baking sheet and bake in a preheated oven at 375°F (190°C) for 12-15 minutes, or until the crusts are lightly golden brown.
- Cool the Crusts: Remove the tart crusts from the oven and let them cool completely in the pans before filling.
- Combine Milk and Sugar: In a medium saucepan, combine the milk and half of the sugar (about 6 tablespoons). Heat over medium heat until the mixture is simmering, stirring occasionally to dissolve the sugar.
- Whisk Egg Yolks and Remaining Sugar: In a separate bowl, whisk together the egg yolks, the remaining sugar, cornstarch, and salt until the mixture is pale and smooth.
- Temper the Egg Yolks: Slowly pour a small amount of the hot milk mixture into the egg yolk mixture, whisking constantly to temper the eggs. Continue adding the hot milk gradually, whisking constantly, until the egg yolk mixture is warm.
- Cook the Custard: Pour the tempered egg yolk mixture back into the saucepan with the remaining milk mixture. Cook over medium heat, stirring constantly, until the custard thickens and comes to a simmer. Continue cooking for 1-2 minutes more, stirring constantly, to ensure the cornstarch is fully cooked.
- Finish the Custard: Remove the saucepan from the heat and stir in the butter and vanilla extract.
- Cool the Custard: Pour the custard into a bowl and cover the surface with plastic wrap to prevent a skin from forming. Refrigerate for at least 2 hours, or until completely cooled.
- Prepare the Bananas: Just before assembling the tarts, slice the bananas into thin rounds.
- Fill the Tart Crusts: Spoon a layer of the cooled banana cream filling into each pre-baked tart crust.
- Arrange Banana Slices: Arrange the sliced bananas on top of the banana cream filling.
- Chill the Bowl and Whisk: Place the mixing bowl and whisk attachment (or beaters) in the freezer for about 15 minutes before making the whipped cream.
- Whip the Cream: Pour the heavy cream into the chilled bowl and add the powdered sugar and vanilla extract. Beat on medium speed until stiff peaks form.
- Top the Tarts: Spoon or pipe the whipped cream onto the banana-filled tarts.
- Garnish (Optional): If desired, garnish the tarts with chocolate shavings or extra banana slices.
- Chill Before Serving: Refrigerate the assembled tarts for at least 30 minutes before serving to allow the flavors to meld together.
- Serve and Enjoy: Serve the banana cream mini tarts chilled and enjoy!
Notes
- Keep the butter cold when making the crust for a flaky texture.
- Don’t overwork the dough for the crust.
- Chill the dough and custard for best results.
- Slice bananas just before assembling to prevent browning.
- Chill the bowl and whisk before whipping cream for a better volume.
- These are best enjoyed within a day or two, as the crusts can become soggy over time.
Leave a Comment