

Authentic Italian Tiramisu, ah, the very words conjure images of creamy, coffee-soaked bliss! Have you ever tasted a dessert so divine it felt like a warm hug on a chilly evening? That’s precisely the experience you’re about to embark on with this classic recipe. Forget those overly sweet, mass-produced imitations; we’re diving headfirst into the real deal, the kind Nonna used to make.
The history of Tiramisu is a bit murky, shrouded in delightful mystery, but most accounts trace its origins back to the Veneto region of Italy in the latter half of the 20th century. Some say it was created in a Treviso restaurant, while others claim it originated in a brothel, intended as an energy boost (hence the name, which literally translates to “pick me up!”). Regardless of its true beginnings, Tiramisu quickly became a beloved staple of Italian cuisine, spreading its irresistible charm across the globe.
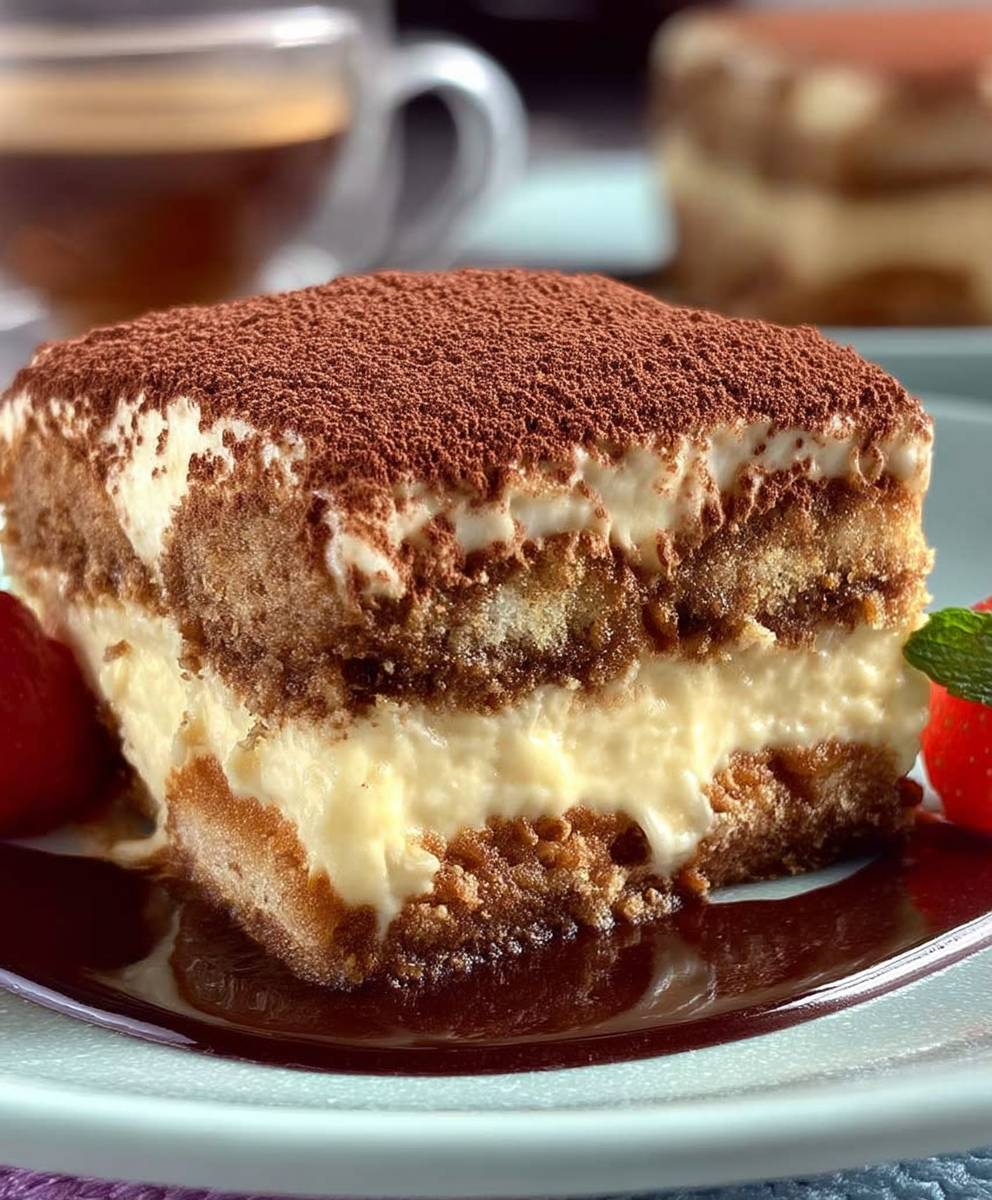
What is it about Authentic Italian Tiramisu that makes it so universally adored? It’s the perfect symphony of textures and flavors: the delicate crunch of ladyfingers soaked in rich espresso, the velvety smoothness of the mascarpone cream, and the subtle bitterness of cocoa powder dusted on top. It’s a dessert that’s both elegant and comforting, sophisticated yet surprisingly easy to make at home. Plus, it’s a fantastic make-ahead dessert, perfect for impressing guests or simply treating yourself to a little slice of Italian heaven. So, are you ready to learn how to create this iconic dessert? Let’s get started!

Ingredients:
- For the Ladyfingers (Savoiardi):
- 1 cup (120g) all-purpose flour
- 1 cup (200g) granulated sugar, divided
- 6 large eggs, separated
- 1 teaspoon vanilla extract
- Pinch of salt
- Powdered sugar, for dusting
- For the Mascarpone Cream:
- 1 ½ cups (360ml) heavy cream, cold
- 1 pound (450g) mascarpone cheese, cold
- ¾ cup (150g) granulated sugar
- 1 teaspoon vanilla extract
- Pinch of salt
- For the Coffee Syrup:
- 2 cups (480ml) strong brewed coffee, cooled
- ¼ cup (60ml) coffee liqueur (such as Kahlua or Tia Maria), optional
- 2 tablespoons granulated sugar
- For Dusting:
- Unsweetened cocoa powder
Making the Ladyfingers (Savoiardi):
- Preheat and Prep: Preheat your oven to 350°F (175°C). Line two baking sheets with parchment paper. This is crucial to prevent sticking!
- Whisk Egg Yolks and Sugar: In a large bowl, whisk together the egg yolks and half of the granulated sugar (½ cup or 100g) until pale yellow and thick. This usually takes about 3-5 minutes with an electric mixer. The mixture should ribbon when you lift the whisk. Add the vanilla extract and a pinch of salt.
- Whisk Egg Whites: In a separate, clean bowl, beat the egg whites with an electric mixer until soft peaks form. Gradually add the remaining granulated sugar (½ cup or 100g) and continue beating until stiff, glossy peaks form. Be careful not to overwhip!
- Combine Mixtures: Gently fold about one-third of the beaten egg whites into the egg yolk mixture to lighten it. Then, gently fold in the remaining egg whites, being careful not to deflate the mixture. This is where patience is key! We want to keep as much air in the batter as possible.
- Add Flour: Sift the flour over the egg mixture. Gently fold it in until just combined. Be careful not to overmix, as this will develop the gluten and make the ladyfingers tough.
- Pipe the Ladyfingers: Transfer the batter to a piping bag fitted with a large round tip (or just cut the tip off a disposable piping bag). Pipe the batter onto the prepared baking sheets in 3-4 inch long strips, about 1 inch apart.
- Dust with Sugar: Dust the ladyfingers generously with powdered sugar. Let them sit for 5-10 minutes, then dust with powdered sugar again. This helps create a slightly crisp exterior.
- Bake: Bake for 12-15 minutes, or until the ladyfingers are lightly golden brown around the edges.
- Cool: Let the ladyfingers cool completely on the baking sheets before removing them. They should be crisp and dry. If they are still soft, you can dry them out further in a low oven (200°F or 95°C) for about 30 minutes.
Making the Mascarpone Cream:
- Whip Heavy Cream: In a large, cold bowl, whip the heavy cream with an electric mixer until soft peaks form. Be careful not to overwhip, or you’ll end up with butter!
- Combine Mascarpone and Sugar: In a separate bowl, beat the mascarpone cheese with the granulated sugar, vanilla extract, and a pinch of salt until smooth and creamy. Make sure the mascarpone is cold; otherwise, it can become grainy.
- Fold in Whipped Cream: Gently fold the whipped cream into the mascarpone mixture until just combined. Again, be gentle to maintain the airiness of the cream.
Making the Coffee Syrup:
- Combine Ingredients: In a shallow dish, combine the cooled strong brewed coffee, coffee liqueur (if using), and granulated sugar. Stir until the sugar is dissolved.
Assembling the Tiramisu:
- Dip the Ladyfingers: Quickly dip each ladyfinger into the coffee syrup, one at a time, for just a few seconds. Don’t soak them for too long, or they will become soggy. You want them to be moist but not falling apart.
- First Layer: Arrange a layer of coffee-soaked ladyfingers in the bottom of a 9×13 inch baking dish (or individual serving dishes). You may need to break some of the ladyfingers to fit.
- Spread Cream: Spread half of the mascarpone cream evenly over the ladyfingers.
- Second Layer: Repeat with another layer of coffee-soaked ladyfingers.
- Final Layer of Cream: Spread the remaining mascarpone cream evenly over the second layer of ladyfingers.
- Chill: Cover the tiramisu with plastic wrap and refrigerate for at least 4 hours, or preferably overnight. This allows the flavors to meld together and the ladyfingers to soften.
- Dust with Cocoa: Just before serving, dust the top of the tiramisu generously with unsweetened cocoa powder.
- Serve: Cut into squares and serve chilled. Enjoy!
Tips for Success:
- Use High-Quality Ingredients: Since tiramisu has so few ingredients, the quality of each one really matters. Use good quality mascarpone cheese, strong coffee, and cocoa powder.
- Don’t Oversoak the Ladyfingers: Soggy ladyfingers are the enemy of a good tiramisu. Dip them quickly and don’t let them sit in the coffee syrup for too long.
- Chill Thoroughly: Chilling the tiramisu is essential for allowing the flavors to develop and the ladyfingers to soften. Don’t skip this step!
- Make Ahead: Tiramisu is a great make-ahead dessert. You can assemble it a day or two in advance and keep it refrigerated until you’re ready to serve it.
- Variations: Feel free to experiment with different flavors. You can add a layer of chocolate shavings, use different types of liqueur, or even add some fruit.
Troubleshooting:
- Ladyfingers are Soggy: You probably soaked them for too long. Next time, dip them more quickly.
- Mascarpone Cream is Grainy: The mascarpone cheese was probably too warm when you mixed it. Make sure it’s cold before you start.
- Tiramisu is Too Sweet: Reduce the amount of sugar in the mascarpone cream or coffee syrup.
- Tiramisu is Too Bitter: Use a milder coffee or add more sugar to the coffee syrup.
Conclusion:
This isn’t just another dessert recipe; it’s an invitation to experience a little slice of Italy right in your own kitchen. From the rich, coffee-soaked ladyfingers to the creamy, decadent mascarpone filling, every layer of this authentic Italian tiramisu sings with flavor and texture. I truly believe that once you taste the difference between a store-bought version and this homemade masterpiece, you’ll never go back! It’s a labor of love, yes, but the payoff is absolutely worth it a dessert that’s guaranteed to impress your family and friends.
But why is this recipe a must-try? Beyond the incredible taste, it’s about the experience. It’s about slowing down, savoring each step of the process, and creating something truly special. It’s about connecting with a culinary tradition that has been cherished for generations. And let’s be honest, who can resist the allure of coffee, chocolate, and creamy goodness all in one delightful package? This tiramisu is the perfect ending to any meal, from a casual weeknight dinner to a celebratory feast.
Now, let’s talk about serving suggestions and variations. While the classic recipe is divine on its own, there’s always room for a little personalization. For a truly indulgent experience, try serving it with a scoop of vanilla bean ice cream or a dollop of freshly whipped cream. A dusting of extra cocoa powder or a few chocolate shavings adds a touch of elegance. If you’re feeling adventurous, you could even drizzle a little coffee liqueur over the top just before serving.
For those who prefer a slightly different flavor profile, consider these variations:
* Berry Tiramisu: Replace the coffee with a berry syrup and incorporate fresh berries into the mascarpone filling. Raspberries and strawberries work particularly well.
* Chocolate Tiramisu: Add a tablespoon or two of cocoa powder to the mascarpone filling and use chocolate-flavored ladyfingers.
* Nutella Tiramisu: Swirl a generous amount of Nutella into the mascarpone filling for a hazelnut-chocolate twist.
* Limoncello Tiramisu: Substitute the coffee with Limoncello for a bright and citrusy flavor.
The possibilities are endless! Feel free to experiment and create your own unique version of this classic dessert.
But no matter how you choose to serve it or which variations you try, the most important thing is to enjoy the process and share your creation with loved ones. This authentic Italian tiramisu is more than just a dessert; it’s a symbol of love, connection, and shared joy.
So, what are you waiting for? Gather your ingredients, put on some Italian music, and get ready to embark on a culinary adventure. I’m confident that you’ll be thrilled with the results. And once you’ve made it, I’d love to hear about your experience! Share your photos, tips, and variations in the comments below. Let’s create a community of tiramisu lovers and inspire each other to keep baking! I can’t wait to see what you create! Buon appetito!
Authentic Italian Tiramisu: The Only Recipe You'll Ever Need
Classic Italian Tiramisu: Coffee-soaked ladyfingers layered with creamy mascarpone, dusted with cocoa. A decadent and irresistible dessert!
Ingredients
- 1 cup (120g) all-purpose flour
- 1 cup (200g) granulated sugar, divided
- 6 large eggs, separated
- 1 teaspoon vanilla extract
- Pinch of salt
- Powdered sugar, for dusting
- 1 ½ cups (360ml) heavy cream, cold
- 1 pound (450g) mascarpone cheese, cold
- ¾ cup (150g) granulated sugar
- 1 teaspoon vanilla extract
- Pinch of salt
- 2 cups (480ml) strong brewed coffee, cooled
- ¼ cup (60ml) coffee liqueur (such as Kahlua or Tia Maria), optional
- 2 tablespoons granulated sugar
- Unsweetened cocoa powder
Instructions
- Preheat your oven to 350°F (175°C). Line two baking sheets with parchment paper.
- In a large bowl, whisk together the egg yolks and half of the granulated sugar (½ cup or 100g) until pale yellow and thick (3-5 minutes). Add the vanilla extract and a pinch of salt.
- In a separate, clean bowl, beat the egg whites with an electric mixer until soft peaks form. Gradually add the remaining granulated sugar (½ cup or 100g) and continue beating until stiff, glossy peaks form.
- Gently fold about one-third of the beaten egg whites into the egg yolk mixture to lighten it. Then, gently fold in the remaining egg whites.
- Sift the flour over the egg mixture. Gently fold it in until just combined.
- Transfer the batter to a piping bag fitted with a large round tip. Pipe the batter onto the prepared baking sheets in 3-4 inch long strips, about 1 inch apart.
- Dust the ladyfingers generously with powdered sugar. Let them sit for 5-10 minutes, then dust with powdered sugar again.
- Bake for 12-15 minutes, or until the ladyfingers are lightly golden brown around the edges.
- Let the ladyfingers cool completely on the baking sheets before removing them. If they are still soft, you can dry them out further in a low oven (200°F or 95°C) for about 30 minutes.
- In a large, cold bowl, whip the heavy cream with an electric mixer until soft peaks form.
- In a separate bowl, beat the mascarpone cheese with the granulated sugar, vanilla extract, and a pinch of salt until smooth and creamy.
- Gently fold the whipped cream into the mascarpone mixture until just combined.
- In a shallow dish, combine the cooled strong brewed coffee, coffee liqueur (if using), and granulated sugar. Stir until the sugar is dissolved.
- Quickly dip each ladyfinger into the coffee syrup, one at a time, for just a few seconds.
- Arrange a layer of coffee-soaked ladyfingers in the bottom of a 9×13 inch baking dish (or individual serving dishes).
- Spread half of the mascarpone cream evenly over the ladyfingers.
- Repeat with another layer of coffee-soaked ladyfingers.
- Spread the remaining mascarpone cream evenly over the second layer of ladyfingers.
- Cover the tiramisu with plastic wrap and refrigerate for at least 4 hours, or preferably overnight.
- Just before serving, dust the top of the tiramisu generously with unsweetened cocoa powder.
- Cut into squares and serve chilled.
Notes
- Use high-quality ingredients for the best flavor.
- Don’t oversoak the ladyfingers.
- Chill thoroughly to allow flavors to meld.
- Tiramisu can be made a day or two in advance.
- Experiment with different flavors and additions.
- If ladyfingers are soggy, dip them more quickly next time.
- If mascarpone cream is grainy, make sure the mascarpone is cold.
- Adjust sugar or coffee levels to taste.

Leave a Comment