

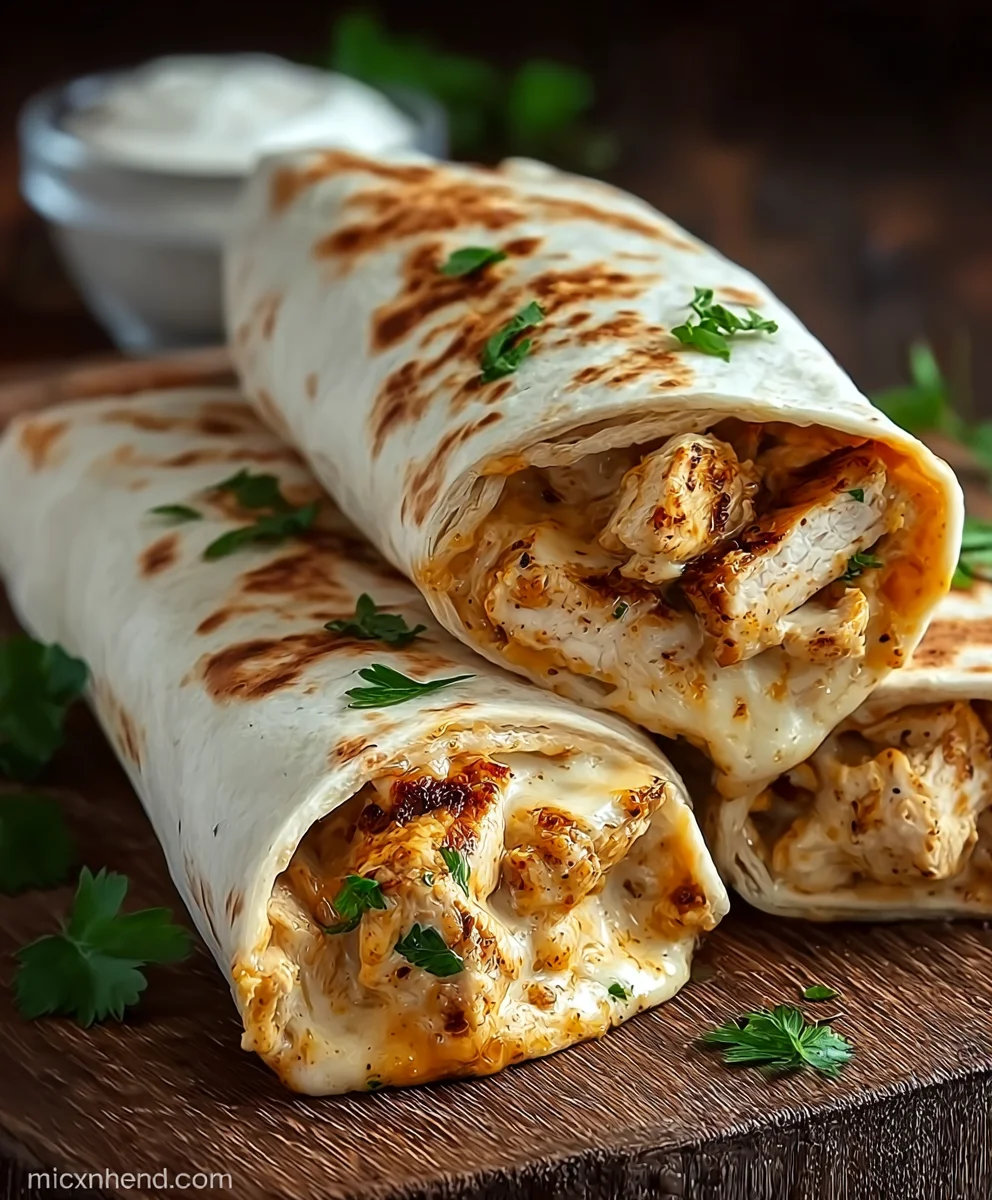
Cheesy Chicken Garlic Wraps are more than just a quick meal; they are a symphony of comfort and flavor that consistently hits the spot. Have you ever craved something that’s both incredibly satisfying and surprisingly easy to whip up? That’s precisely where these delightful wraps shine. They’re the perfect answer for busy weeknights, casual gatherings, or anytime you need a delicious pick-me-up that won’t tie you down in the kitchen for hours. What makes them so universally loved? It’s the irresistible combination of tender, juicy chicken, a pungent kick of garlic, and that glorious, melty cheese that stretches with every bite. We’re talking about a flavor explosion wrapped in a soft tortilla, creating a portable parcel of pure joy.
What Makes These Cheesy Chicken Garlic Wraps So Special?
The magic of these Cheesy Chicken Garlic Wraps lies in their simplicity and the depth of flavor achieved with just a few key ingredients. We elevate the humble chicken breast by infusing it with a rich garlic marinade that’s both savory and aromatic. Then, we generously layer it with your favorite cheese, ensuring that every single bite is gooey and decadent. The balance is perfect – the savory chicken, the punchy garlic, and the creamy cheese all come together harmoniously. They’re customizable too; add your favorite veggies for an extra crunch or a dash of spice if you dare. Get ready to discover your new go-to weeknight wonder.

Ingredients:
- 2 large chicken breasts, diced into bite-sized pieces
- 4 large flour tortillas
- 1 tablespoon olive oil
- 2 teaspoons garlic powder
- 1 teaspoon onion powder
- 1 teaspoon paprika
- Salt and freshly ground black pepper, to your preference
- 1 cup shredded cheddar cheese
- 1/2 cup shredded mozzarella cheese
- 1/2 cup creamy garlic sauce
- Fresh parsley, finely chopped, for garnish
Preparing the Chicken
Seasoning the Chicken
To begin extract crafting these delightful Cheesy Chicken Garlic Wraps, the first crucial step involves preparing our chicken. Take your two large chicken breasts and dice them into uniform, bite-sized pieces. This ensures that the chicken cooks evenly and is easy to manage within the wrap. Once diced, it’s time to season them generously. In a medium bowl, combine the diced chicken with the olive oil. This will help the seasonings adhere beautifully. Now, sprinkle in the garlic powder, onion powder, and paprika. The garlic powder will infuse a robust flavor, the onion powder will add a subtle sweet and savory depth, and the paprika will contribute a lovely warmth and a hint of color. Don’t forget to season with salt and freshly ground black pepper to your liking. A good pinch of salt and a few grinds of pepper are usually a great starting point, but feel free to adjust based on your personal taste. Toss everything together thoroughly with your hands or a spoon, ensuring each piece of chicken is well-coated with the aromatic spices. This marination period, even a short one, will make a significant difference in the final flavor profile of your wraps. Allow the seasoned chicken to sit for at least 5-10 minutes while you prepare your skillet.
Cooking the Chicken
Searing for Flavor
Now that your chicken is seasoned and ready, it’s time to bring it to life in the skillet. Heat a large skillet or frying pan over medium-high heat. Once the pan is hot, add the seasoned chicken in a single layer. It’s important not to overcrowd the pan, as this can cause the chicken to steam rather than sear. If necessary, cook the chicken in batches. Allow the chicken to cook undisturbed for about 3-4 minutes on each side. You’re looking for a beautiful golden-brown sear on all sides, which not only adds visual appeal but also locks in the juices and develops a wonderful depth of flavor. Continue cooking, stirring occasionally, until the chicken is cooked through and no pink remains in the center. This typically takes about 8-10 minutes in total, depending on the size of your diced chicken pieces. Once cooked, remove the chicken from the skillet and set it aside on a plate. You can leave any residual juices in the pan; they’ll add flavor to the next step.
Warming the Tortillas
Softening for Flexibility
While the chicken rests, let’s turn our attention to the tortillas. Soft, pliable tortillas are essential for easy wrapping. You have a few options here. The quickest method is to briefly warm them in the microwave. Stack the tortillas on a plate, cover with a damp paper towel, and microwave on high for about 30-45 seconds, or until they are warm and flexible. Alternatively, you can warm them in a dry skillet over medium heat for about 20-30 seconds per side, just until they are pliable. Be careful not to overcook them, or they can become brittle. Properly warmed tortillas will bend easily without cracking, making the assembly of your Cheesy Chicken Garlic Wraps a breeze.
Assembling the Wraps
Layering the Goodness
It’s time to bring all our delicious components together! Lay one warmed flour tortilla flat on a clean surface. Spread a generous amount of the creamy garlic sauce evenly over the surface of the tortilla, leaving a small border around the edge. This sauce is the flavor powerhouse, so don’t be shy! Next, add a portion of the cooked, seasoned chicken to the center of the tortilla. Distribute it evenly. Now for the cheesy part: sprinkle a good amount of both the shredded cheddar cheese and shredded mozzarella cheese over the chicken. The cheddar will provide a sharp, tangy kick, while the mozzarella will offer a melty, gooey embrace. The combination of these two cheeses is simply divine.
Folding and Melting
Securing the Deliciousness
With all the fillings in place, it’s time to fold your Cheesy Chicken Garlic Wraps. Fold in the two sides of the tortilla towards the center, overlapping them slightly. Then, starting from the bottom edge (the edge closest to you), tightly roll the tortilla upwards, tucking in the filling as you go to create a neat and compact wrap. Repeat this process for all four tortillas. Now, to ensure that incredible cheesy, melty goodness, we’ll lightly grill or pan-fry the assembled wraps. Place the folded wraps seam-side down in the same skillet you used for the chicken (you can wipe it clean if needed, but a little residual chicken flavor is welcome). Cook over medium heat for 2-3 minutes per side, or until the tortillas are golden brown and slightly crispy, and the cheese inside is gloriously melted and gooey. You want to achieve that perfect balance of a warm, pliable tortilla with a wonderfully cheesy, savory filling. Serve immediately for the best experience, garnished with a sprinkle of fresh chopped parsley for a touch of color and freshness.

Conclusion:
And there you have it! Your very own batch of delicious Cheesy Chicken Garlic Wraps, ready to impress. This recipe is a fantastic way to enjoy a flavorful and satisfying meal with minimal fuss. The creamy, garlicky chicken filling combined with melted cheese, all tucked into a soft tortilla, creates a symphony of tastes and textures that’s truly irresistible. We’ve loved putting this together for you and hope you enjoy making and sharing these Cheesy Chicken Garlic Wraps as much as we do.
To elevate your Cheesy Chicken Garlic Wraps experience, consider serving them with a side of crisp salad greens, a tangy coleslaw, or some sweet potato fries. For variations, feel free to add a pinch of chili flakes to the chicken mixture for a hint of spice, or incorporate finely chopped bell peppers for extra color and crunch. You could also experiment with different cheeses, like a sharp cheddar or a smoky Monterey Jack. Don’t be afraid to get creative! We encourage you to make this recipe your own and discover your favorite way to enjoy these wonderful wraps.
Frequently Asked Questions about Cheesy Chicken Garlic Wraps:
Can I make the chicken filling ahead of time?
Yes, absolutely! The chicken and garlic mixture can be prepared a day in advance and stored in an airtight container in the refrigerator. This makes assembly even quicker when you’re ready to make your Cheesy Chicken Garlic Wraps.
What kind of tortillas are best for Cheesy Chicken Garlic Wraps?
You can use any type of tortilla you prefer! Flour tortillas are classic and hold the filling well. Whole wheat tortillas offer a healthier option, and even spinach or sun-dried tomato tortillas can add an interesting twist to your Cheesy Chicken Garlic Wraps.
How can I make this recipe spicier?
To add a kick to your Cheesy Chicken Garlic Wraps, you can incorporate red pepper flakes into the chicken mixture while it’s cooking, or add a swirl of your favorite hot sauce to the filling before wrapping. Sliced jalapeños or a sprinkle of cayenne pepper also work wonderfully.
Cheesy Chicken Garlic Wraps-Quick & Easy Recipe
Delicious and easy-to-make wraps filled with seasoned chicken, melty cheeses, and creamy garlic sauce.
Ingredients
-
2 large chicken breasts, diced
-
4 large flour tortillas
-
1 tablespoon olive oil
-
2 teaspoons garlic powder
-
1 teaspoon onion powder
-
1 teaspoon paprika
-
Salt and pepper, to taste
-
1 cup shredded cheddar cheese
-
1/2 cup shredded mozzarella cheese
-
1/2 cup creamy garlic sauce
-
Fresh parsley, chopped
Instructions
-
Step 1
Dice chicken breasts into bite-sized pieces. In a bowl, toss chicken with olive oil, garlic powder, onion powder, paprika, salt, and pepper. Let sit for 5-10 minutes. -
Step 2
Heat a large skillet over medium-high heat. Add seasoned chicken in a single layer and cook for 3-4 minutes per side until golden brown and cooked through. Remove from skillet and set aside. -
Step 3
Warm tortillas briefly in the microwave (covered with a damp paper towel for 30-45 seconds) or in a dry skillet until pliable. -
Step 4
Lay a warmed tortilla flat. Spread creamy garlic sauce evenly, leaving a border. Top with cooked chicken, then sprinkle generously with cheddar and mozzarella cheeses. -
Step 5
Fold in the sides of the tortilla, then tightly roll it up from the bottom. -
Step 6
Place wraps seam-side down in the skillet over medium heat. Cook for 2-3 minutes per side until golden brown and cheese is melted and gooey. Garnish with fresh parsley before serving.
Important Information
Nutrition Facts (Per Serving)
It is important to consider this information as approximate and not to use it as definitive health advice.
Allergy Information
Please check ingredients for potential allergens and consult a health professional if in doubt.
Leave a Comment