

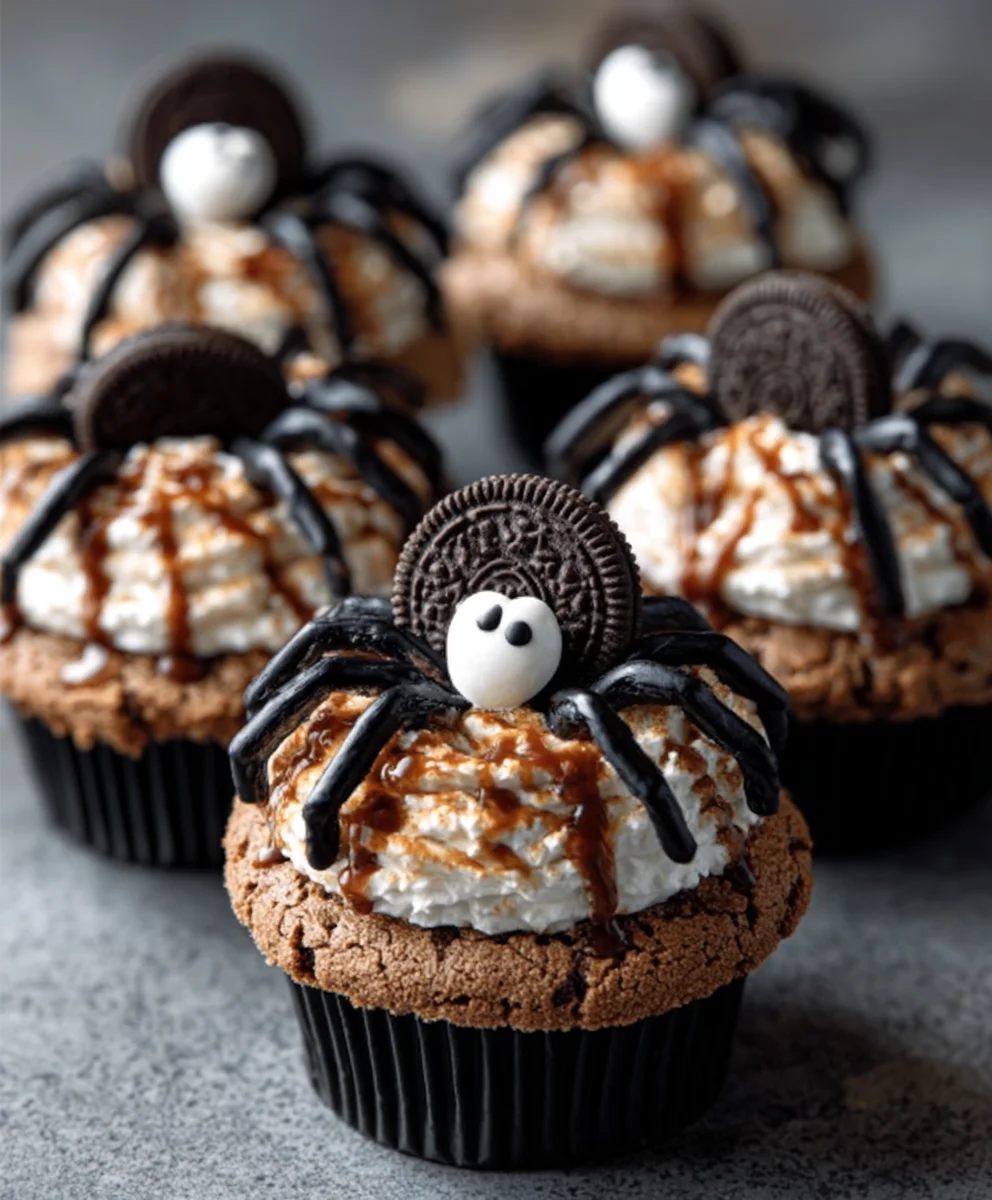
Cookies & Scream Spider Cupcakes are not just a treat; they’re an edible work of art that transforms ordinary baking into a spooky, delightful Halloween spectacle. Imagine sinking your teeth into a perfectly moist chocolate cupcake, rich with cocoa and crowned with a creamy, decadent “scream” of frosting. But what truly sets these Cookies & Scream Spider Cupcakes apart is the whimsical, yet slightly chilling, spider decoration that perches atop each confection. It’s this playful blend of familiar, comforting flavors with an imaginative, festive design that makes them an absolute must-have for any Halloween gathering, a guaranteed hit with both little goblins and grown-up ghouls. They’re the perfect way to add a touch of eerie charm to your dessert table and spark joy with every bite. Get ready to unleash your inner baker and create these unforgettable Halloween delights!

Ingredients:
- 2 ½ cups all-purpose flour
- 1 ½ teaspoons baking powder
- ½ teaspoon salt
- 1 cup (2 sticks) unsalted butter, softened
- 1 ¾ cups granulated sugar
- 2 large eggs
- 1 teaspoon vanilla extract
- 1 cup milk
- 1 ½ cups (about 6 ounces) semi-sweet chocolate chips
- 1 cup powdered sugar
- 2-3 tablespoons milk
- Black gel food coloring
- Red gel food coloring
- 8 ounces cream cheese, softened
- ½ cup (1 stick) unsalted butter, softened
- 1 teaspoon vanilla extract
- 4 cups powdered sugar
- 1/4 cup unsweetened cocoa powder
- 1/4 cup milk
- Black licorice laces (for spider legs)
- Candy eyes (for spider eyes)
- Optional: Halloween-themed cupcake liners
Making the Spiderweb Cupcakes
Step 1: Prepare the Dry Ingredients and Cream the Butter and Sugar
Begin by preheating your oven to 350°F (175°C). If you’re using Halloween-themed cupcake liners, place them in a standard muffin tin now. In a medium bowl, whisk together the 2 ½ cups of all-purpose flour, 1 ½ teaspoons of baking powder, and ½ teaspoon of salt. Set this aside. In a large bowl, using an electric mixer on medium speed, cream together 1 cup of softened unsalted butter and 1 ¾ cups of granulated sugar until the mixture is light, fluffy, and pale yellow, which usually takes about 3-4 minutes. This aeration is crucial for a tender cupcake crumb. Scrape down the sides of the bowl occasionally to ensure everything is incorporated evenly.
Step 2: Incorporate the Wet Ingredients and Chocolate
Add the 2 large eggs, one at a time, to the creamed butter and sugar mixture, beating well after each addition. Next, stir in 1 teaspoon of vanilla extract. Gradually add the dry ingredients to the wet ingredients, alternating with 1 cup of milk, beginning and ending with the dry ingredients. Mix on low speed just until combined, being careful not to overmix, as this can lead to tough cupcakes. Gently fold in the 1 ½ cups of semi-sweet chocolate chips. For an even distribution of chocolate, you can toss the chocolate chips with a tablespoon of the flour mixture before folding them in.
Step 3: Bake the Cupcakes
Divide the batter evenly among the prepared cupcake liners, filling each about two-thirds full. Bake for 18-22 minutes, or until a wooden skewer or toothpick inserted into the center of a cupcake comes out clean. Avoid overbaking, which can result in dry cupcakes. Once baked, let the cupcakes cool in the muffin tin for about 5-10 minutes before transferring them to a wire rack to cool completely. It’s essential that the cupcakes are thoroughly cool before frosting, otherwise, the frosting will melt.
Step 4: Make the Chocolate Spiderweb Frosting
While the cupcakes are cooling, prepare the delicious chocolate frosting. In a large bowl, beat 8 ounces of softened cream cheese and ½ cup of softened unsalted butter until smooth and creamy. Beat in 1 teaspoon of vanilla extract. Gradually add 4 cups of powdered sugar and ¼ cup of unsweetened cocoa powder, alternating with ¼ cup of milk, mixing on low speed until just combined. Once the dry ingredients are incorporated, increase the speed to medium-high and beat for about 2-3 minutes until the frosting is light and fluffy. If the frosting seems too thick, add a little more milk, a teaspoon at a time, until you reach your desired consistency. If it’s too thin, add more powdered sugar.
Step 5: Decorate Your Cookies & Scream Spider Cupcakes
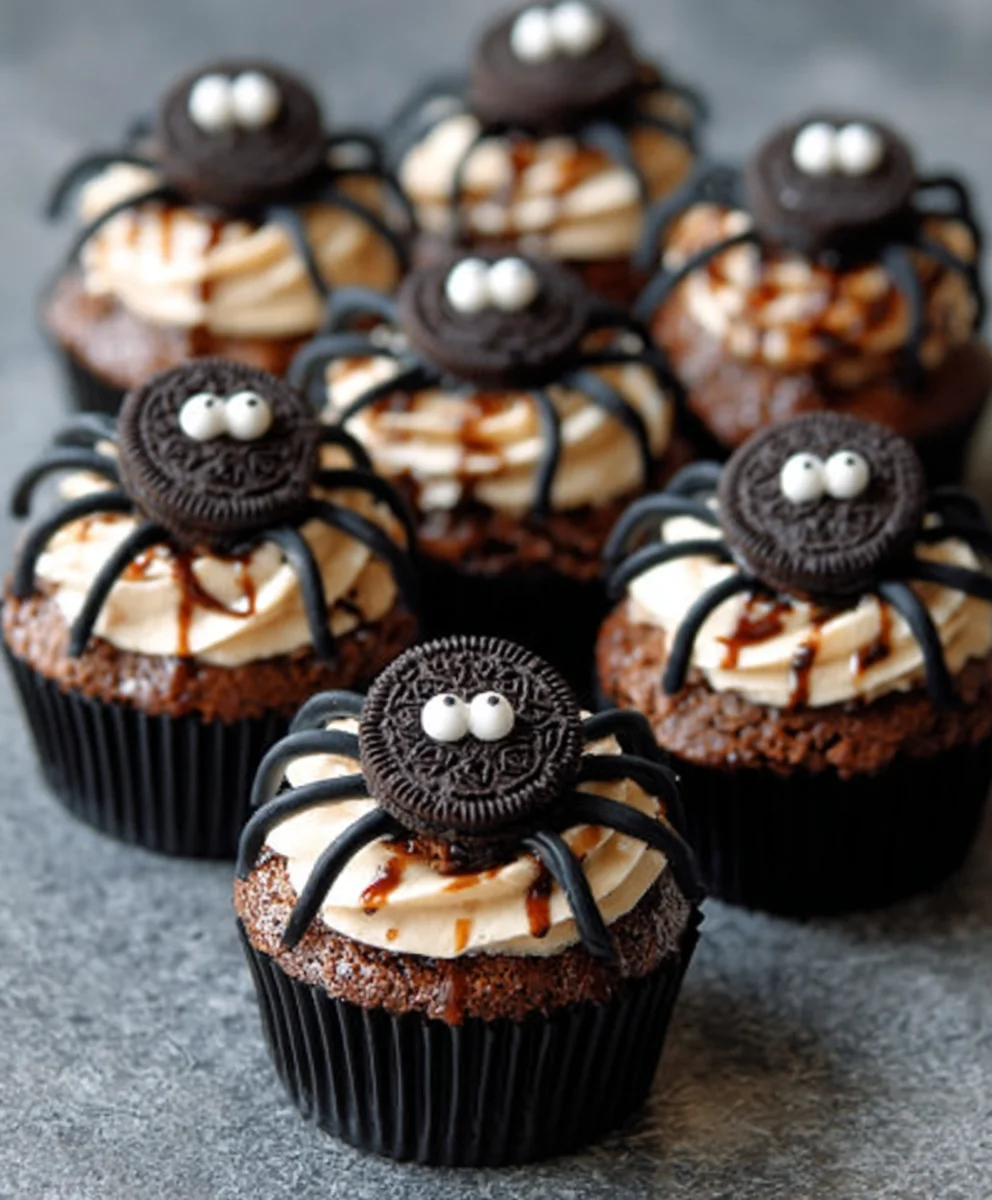
Once the cupcakes have completely cooled, it’s time for the fun decorating! Frost each cupcake generously with the chocolate frosting, using an offset spatula to create a smooth or slightly swirled surface. Now for the spiderwebs! In a small bowl, whisk together 1 cup of powdered sugar with 2-3 tablespoons of milk and a few drops of black gel food coloring until you have a smooth, drizzly consistency. You want it thin enough to pipe easily but not so thin that it runs everywhere. Place this black frosting into a piping bag fitted with a small round tip, or a zip-top bag with the corner snipped off. Start by drawing concentric circles on the frosted cupcake, beginning from the center and working your way outwards. Once you have several circles, drag a toothpick or skewer from the center outwards through each circle to create the spiderweb effect. You can do this multiple times to get the desired pattern. For the spiders, cut the black licorice laces into 8 equal pieces for each spider. Insert four pieces into the top of each cupcake on one side, bending them slightly to create legs. Attach two candy eyes to the front of the frosting where the legs meet to complete your spooky spider! For an extra pop of color and a touch of gore, you can add a tiny dab of red gel food coloring to the frosting before piping some extra web details or even some “spider egg sacs.”
Conclusion:
And there you have it! Your very own batch of these spooktacular Cookies & Scream Spider Cupcakes are ready to impress. We’ve walked through every step, from crafting the rich chocolate cake to piping those eerie spiderwebs and adding those perfectly placed cookie legs. These cupcakes aren’t just a treat for Halloween; they’re a fun project that brings a little bit of playful fright to any occasion. I hope you enjoyed making them as much as I do!
For serving, these creepy crawly creations are best enjoyed fresh, perhaps with a glass of cold milk or a steaming mug of apple cider. They make fantastic centerpieces for a Halloween party, or a fun activity for kids to help decorate. Feel free to get creative with the cookie legs – different shapes or sizes can add unique character to each spider. Don’t be afraid to experiment with food coloring for the frosting to create vibrant, otherworldly spiderwebs!
Remember, baking is all about fun and personal touches. So, embrace the process, and enjoy the delicious, and delightfully spooky, results of your Cookies & Scream Spider Cupcakes!
Frequently Asked Questions:
Q: Can I make the chocolate cake batter ahead of time?
A: Yes, you can prepare the chocolate cake batter up to 24 hours in advance. Store it covered in the refrigerator. You may need to stir it gently to recombine before filling your cupcake liners, and it might take a minute or two longer to bake.
Q: What kind of cookies work best for the spider legs?
A: Chocolate wafer cookies, thin chocolate cookies, or even pretzel sticks dipped in chocolate are excellent choices for the spider legs. The key is to have a cookie that’s sturdy enough to stand up and thin enough to resemble legs. Enjoy experimenting with different textures and flavors!
Cookies & Scream Spider Cupcakes-Spooky Halloween Treat
Spooky and delicious spiderweb cupcakes perfect for Halloween parties, featuring rich chocolate cake and creepy spider decorations.
Ingredients
-
2 ½ cups all-purpose flour
-
1 ½ teaspoons baking powder
-
½ teaspoon salt
-
1 cup (2 sticks) unsalted butter, softened
-
1 ¾ cups granulated sugar
-
2 large eggs
-
1 teaspoon vanilla extract
-
1 cup milk
-
1 ½ cups (about 6 ounces) semi-sweet chocolate chips
-
1 cup powdered sugar
-
2-3 tablespoons milk
-
Black gel food coloring
-
Red gel food coloring
-
8 ounces cream cheese, softened
-
½ cup (1 stick) unsalted butter, softened
-
1 teaspoon vanilla extract
-
4 cups powdered sugar
-
1/4 cup unsweetened cocoa powder
-
1/4 cup milk
-
Black licorice laces (for spider legs)
-
Candy eyes (for spider eyes)
-
Optional: Halloween-themed cupcake liners
Instructions
-
Step 1
Preheat oven to 350°F (175°C). Line muffin tin with Halloween-themed cupcake liners if desired. Whisk together flour, baking powder, and salt in a medium bowl. In a large bowl, cream softened butter and granulated sugar with an electric mixer until light and fluffy. -
Step 2
Add eggs one at a time to the creamed mixture, beating well after each. Stir in vanilla extract. Gradually add dry ingredients and milk alternately to the wet ingredients, beginning and ending with dry ingredients. Mix on low speed just until combined. Gently fold in semi-sweet chocolate chips. -
Step 3
Divide batter evenly into prepared cupcake liners, filling about two-thirds full. Bake for 18-22 minutes, or until a skewer inserted into the center comes out clean. Cool cupcakes in the tin for 5-10 minutes, then transfer to a wire rack to cool completely. -
Step 4
Make the chocolate frosting: Beat softened cream cheese and softened butter until smooth. Beat in vanilla extract. Gradually add powdered sugar and cocoa powder, alternating with milk, mixing on low speed until combined. Beat on medium-high for 2-3 minutes until light and fluffy. Adjust consistency with more milk or powdered sugar if needed. -
Step 5
Decorate the cooled cupcakes. Frost each cupcake with chocolate frosting. For spiderwebs, whisk together powdered sugar, milk, and black gel food coloring until smooth and drizzly. Place in a piping bag or zip-top bag with a corner snipped. Draw concentric circles on the frosting, then drag a toothpick from the center outwards to create webs. Cut licorice laces into 8 pieces for legs, insert into the top of each cupcake on one side. Attach candy eyes to the front of the frosting for spiders. Add red gel food coloring for optional gore.
Important Information
Nutrition Facts (Per Serving)
It is important to consider this information as approximate and not to use it as definitive health advice.
Allergy Information
Please check ingredients for potential allergens and consult a health professional if in doubt.


Leave a Comment