

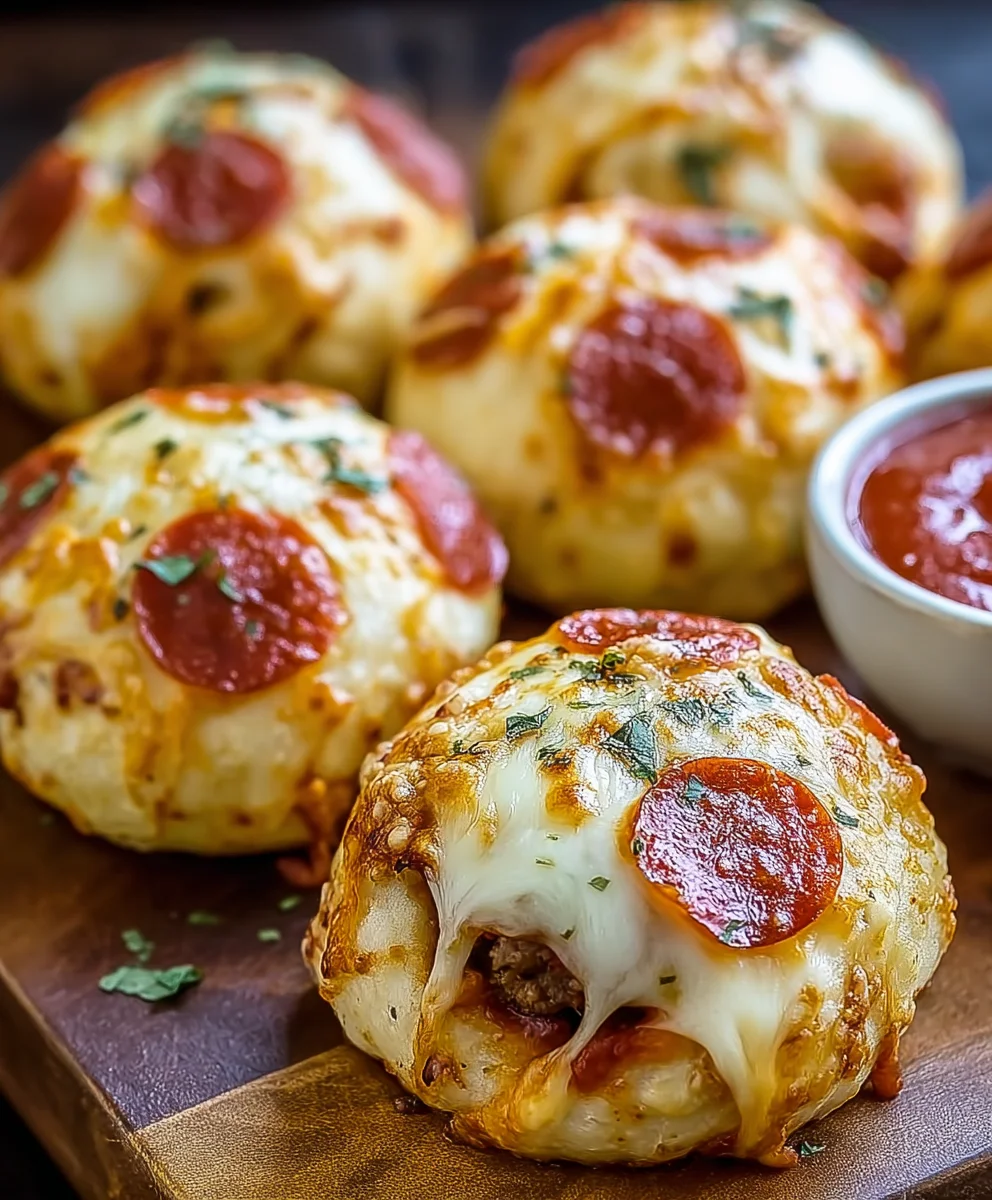
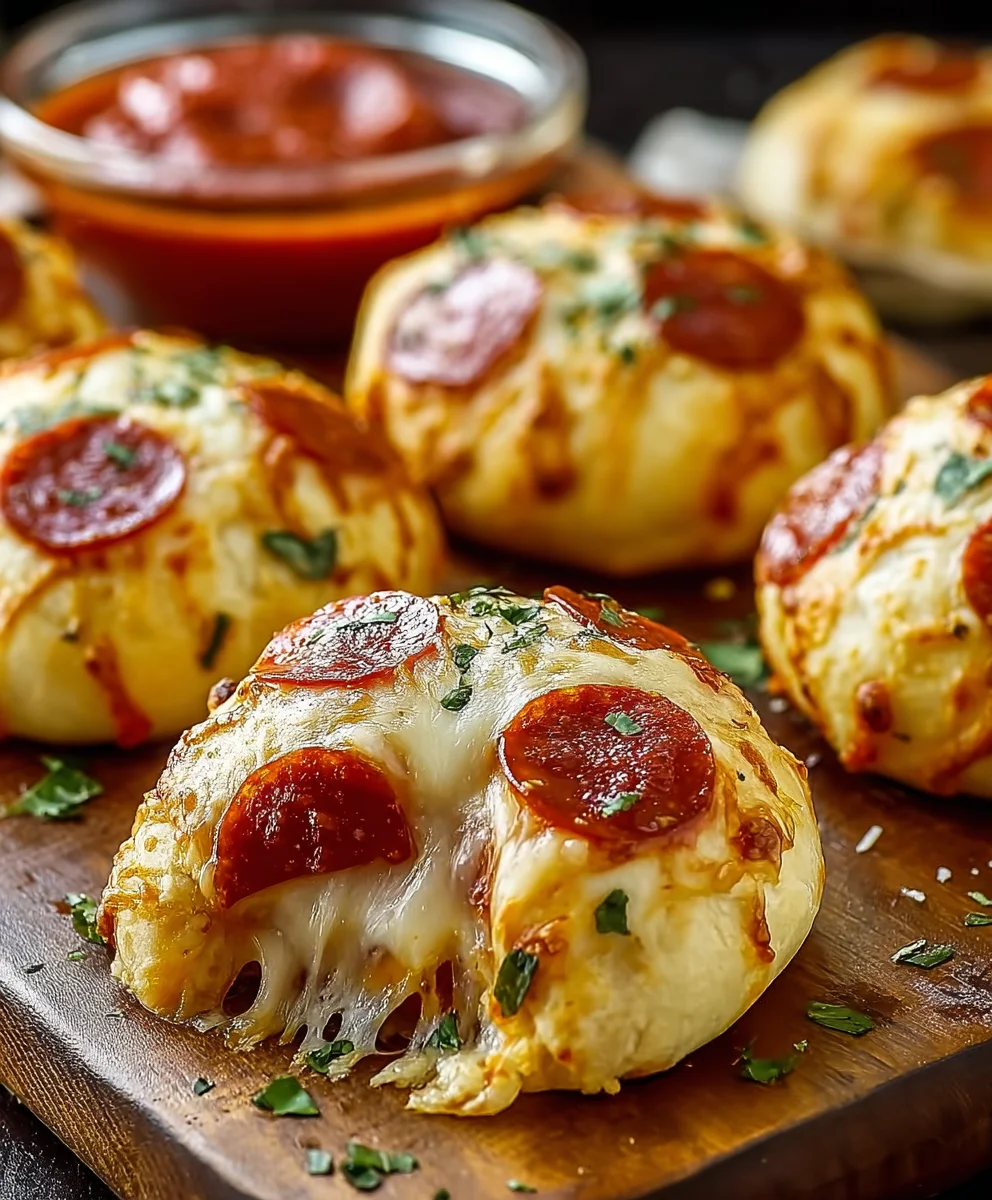
Cheesy Beef Pepperoni Pizza Bombs Recipe—this phrase alone conjures images of irresistible, golden-brown pockets bursting with savory goodness, and I can assure you, the reality lives up to the delicious expectation! I’ve always been fascinated by how simple ingredients can transform into something truly extraordinary, and this recipe is a perfect testament to that culinary magic. While the concept of pizza originated centuries ago in Italy, evolving into a global phenomenon, these “pizza bombs” represent a delightful, modern twist, offering all the beloved flavors of a classic pizza in an incredibly convenient, bite-sized form.
They are an absolute game-changer for casual gatherings, busy weeknights, or simply when you crave a comforting, satisfying snack that’s easy to enjoy. People adore this dish not only for its incredible taste—the perfect melding of tangy pepperoni, seasoned beef, and gooey melted cheese encased in soft, fluffy dough—but also for its sheer fun factor and ease of preparation. Trust me, once you try this Cheesy Beef Pepperoni Pizza Bombs Recipe, it’s destined to become a staple in your culinary repertoire.

Ingredients:
- For the Filling:
- 1 pound lean ground beef (90/10 or 85/15 recommended): Opting for a leaner ground beef helps prevent the pizza bombs from becoming overly greasy. If you use a higher fat percentage, be prepared to drain more fat. This will be the hearty base of our delicious filling.
- 1/2 cup finely diced yellow onion: Adding a touch of aromatic sweetness and depth to our savory filling. Finely dicing ensures it blends seamlessly without large chunks.
- 2 cloves garlic, minced: The quintessential flavor enhancer, bringing that irresistible garlic aroma and taste that pairs perfectly with beef and pepperoni.
- 4 ounces (approximately 1 cup) sliced pepperoni, finely diced or roughly chopped: While you can use pre-diced pepperoni, chopping from whole slices often yields a better texture and burst of flavor. This is a key ingredient for our Cheesy Beef Pepperoni Pizza Bombs Recipe, delivering that classic pizza zest.
- 1/2 cup prepared pizza sauce (your favorite brand): A good quality pizza sauce forms the binding element and provides that essential tangy tomato flavor. Don’t skimp here; it makes a difference!
- 1 teaspoon dried oregano: Essential for that authentic Italian-American pizza flavor. Its earthy, slightly bitter notes perfectly complement the other ingredients.
- 1/2 teaspoon dried basil: Another vital herb that contributes to the classic pizza profile, adding a sweet, peppery touch.
- 1/4 teaspoon red pepper flakes (optional, adjust to taste): If you like a little kick, these flakes will provide a pleasant warmth. Feel free to increase or decrease based on your heat preference.
- Salt and freshly ground black pepper to taste: Seasoning is crucial at every stage. We’ll adjust as we go to ensure our filling is perfectly balanced.
- For the Dough and Assembly:
- 1 (13.8 ounce) can refrigerated pizza crust (such as Pillsbury Classic Pizza Crust): For ultimate convenience, pre-made refrigerated pizza dough is a lifesaver for this recipe. It’s pliable and easy to work with, making the assembly process smooth and quick. You could, of course, use homemade dough if you prefer, just ensure it’s well-chilled for easier handling.
- 1 1/2 cups shredded mozzarella cheese (part-skim recommended): The star of the show for that glorious cheese pull! Part-skim mozzarella melts beautifully without releasing too much oil, keeping our pizza bombs delightfully gooey but not greasy. Feel free to grate your own from a block for superior melting.
- 1/2 cup grated Parmesan cheese: Adds a sharp, salty depth of flavor that complements the mozzarella and rounds out the cheese profile.
- For the Topping and Serving:
- 2 tablespoons unsalted butter, melted: For brushing on top of our pizza bombs before baking, giving them a beautiful golden crust and rich flavor.
- 1/2 teaspoon garlic powder: Mixed with the melted butter, this amplifies the savory garlic notes on the crust.
- 1/4 teaspoon dried parsley (optional, for garnish): Adds a touch of color and fresh aroma to the finished product.
- Extra pizza sauce for dipping: Absolutely essential! These bombs are just begging to be dipped into a warm, tangy marinara or pizza sauce.
Equipment You’ll Need:
- Large skillet or Dutch oven
- Cutting board and sharp knife
- Mixing bowls (medium and small)
- Spatula or wooden spoon
- Baking sheet (standard half-sheet size)
- Parchment paper or silicone baking mat
- Pastry brush
- Measuring cups and spoons
- Can opener (if using canned dough)
Phase 1: Preparing the Beef and Pepperoni Filling
- Brown the Ground Beef:
Heat your large skillet or Dutch oven over medium-high heat. Once hot, add the lean ground beef to the pan. Using a wooden spoon or spatula, break up the beef into small, uniform crumbles as it cooks. Stir frequently to ensure even browning and to prevent large clumps from forming. Our goal here is to get some lovely caramelization on the beef, which builds a fantastic flavor foundation for our Cheesy Beef Pepperoni Pizza Bombs Recipe. This process typically takes about 7-10 minutes. You’ll know it’s ready when the beef is fully browned and no pink remains. - Drain Excess Fat (if necessary):
If your beef has released a significant amount of fat, carefully tilt the pan and use a spoon or paper towels to remove the excess grease. We want a flavorful filling, but not an overly greasy one that might make our pizza bombs soggy. A little fat is fine for flavor, but too much can be detrimental to the texture. - Sauté Aromatics:
Reduce the heat to medium. Add the finely diced yellow onion to the skillet with the browned beef. Cook, stirring occasionally, for about 4-5 minutes, or until the onion has softened and become translucent. Next, add the minced garlic to the skillet. Cook for another 1 minute, stirring constantly, until the garlic is fragrant. Be careful not to burn the garlic, as burnt garlic can taste bitter. The aroma filling your kitchen right now should be absolutely divine! - Incorporate Pepperoni and Seasonings:
Stir in the finely diced or chopped pepperoni into the beef and onion mixture. Cook for 2-3 minutes, allowing the pepperoni to render a bit of its fat and release its wonderful smoky, spicy flavors. Then, add the dried oregano, dried basil, and red pepper flakes (if using). Stir well to distribute the seasonings evenly throughout the filling. The heat from the pan will help to “bloom” the dried herbs, intensifying their flavor. - Add Pizza Sauce and Simmer:
Pour in the 1/2 cup of prepared pizza sauce. Stir everything together until the sauce is fully incorporated and coats all the ingredients. Bring the mixture to a gentle simmer, then reduce the heat to low. Let it simmer for 5-7 minutes, allowing the flavors to meld beautifully and for any excess liquid to cook off. We want a relatively thick filling that won’t make our dough soggy. - Season and Cool the Filling:
Taste the filling and season generously with salt and freshly ground black pepper. Remember, this filling needs to be flavorful on its own, as it’s the heart of our pizza bombs. Adjust seasoning as needed. Once satisfied, remove the skillet from the heat and transfer the filling to a medium bowl. It is absolutely crucial to let the filling cool completely before assembling the pizza bombs. If the filling is warm, it will make the refrigerated pizza dough sticky, difficult to work with, and prone to tearing. You can speed up cooling by spreading it out on a plate or chilling it in the refrigerator for about 20-30 minutes. This step is key for a successful assembly!
Phase 2: Assembling Your Pizza Bombs
- Prepare Your Workspace and Preheat Oven:
Preheat your oven to 400°F (200°C). Line a large baking sheet with parchment paper or a silicone baking mat. This prevents sticking and makes for easy cleanup. Get all your assembly components ready: the cooled beef and pepperoni filling, shredded mozzarella, grated Parmesan, and your can of refrigerated pizza crust. - Prepare the Pizza Dough:
Carefully unroll the can of refrigerated pizza crust onto a lightly floured clean surface or a large piece of parchment paper. Gently stretch or roll the dough into a roughly 10×15-inch rectangle. It doesn’t have to be perfectly precise, but a general rectangular shape will help with even cutting. - Cut the Dough:
Using a sharp knife or a pizza cutter, cut the dough into 24 equal squares. This is typically done by cutting it lengthwise into three strips, then cutting each strip into eight smaller squares. Aim for pieces that are approximately 2.5 x 2.5 inches. Don’t worry if they’re not absolutely perfect; rustic charm is part of homemade cooking! - Fill Each Dough Square:
Take one dough square and gently stretch it out just a little, making it slightly larger and thinner, especially around the edges. This gives us more surface area to work with for sealing. Place about 1 generous teaspoon of the cooled beef and pepperoni filling in the center of the dough square. Do not overfill, as this will make sealing difficult. - Add the Cheese:
Sprinkle about 1/2 tablespoon of shredded mozzarella cheese over the filling, followed by a pinch of grated Parmesan cheese. The cheese will become beautifully gooey and melted inside our bombs. - Form the Pizza Bombs:
This is where the magic happens! Carefully bring up two opposite corners of the dough square over the filling. Pinch them together firmly at the top. Then, bring up the remaining two corners and pinch them together as well. Work your way around, gently gathering all the edges of the dough and pinching them tightly together to fully enclose the filling, forming a small, sealed ball. It’s crucial to seal each bomb completely to prevent any filling or cheese from leaking out during baking. Take your time with this step, ensuring there are no gaps. Roll the sealed dough lightly in your hands to create a neat, round bomb shape. - Arrange on Baking Sheet:
Place each formed pizza bomb seam-side down on your prepared baking sheet. Leave about an inch or two of space between each bomb to allow for even baking and browning. Repeat this process with the remaining dough squares and filling until all your incredible Cheesy Beef Pepperoni Pizza Bombs Recipe components are assembled. You might need two baking sheets, depending on the size of your bombs and your sheet.
Phase 3: Baking Your Cheesy Beef Pepperoni Pizza Bombs
- Prepare the Garlic Butter Topping:
In a small bowl, melt the 2 tablespoons of unsalted butter. Stir in the 1/2 teaspoon of garlic powder and, if using, the 1/4 teaspoon of dried parsley. This garlic butter mixture will give our pizza bombs an amazing aroma, a beautiful golden crust, and an extra layer of savory flavor. - Brush and Bake:
Using a pastry brush, generously brush the tops of each assembled pizza bomb with the garlic butter mixture. Don’t be shy; a good coating contributes significantly to the final taste and appearance. Once brushed, carefully transfer the baking sheet(s) to your preheated 400°F (200°C) oven. - Bake to Golden Perfection:
Bake for 12-18 minutes, or until the pizza bombs are beautifully golden brown on the outside and puffed up. The exact baking time can vary depending on your oven and the thickness of your dough and filling. Keep a close eye on them, especially towards the end of the baking time, to prevent burning. The cheese inside will be wonderfully melted and gooey, and the crust will be crisp and flavorful. - Cool Slightly:
Once baked, carefully remove the baking sheet(s) from the oven. Let the pizza bombs cool on the baking sheet for 5-10 minutes before serving. This cooling period is important for two reasons: firstly, it allows the molten cheese inside to set up a little, preventing burns from super-hot filling; and secondly, it makes them easier to handle and serve. They will still be wonderfully warm and ready to enjoy!
Phase 4: Serving Suggestions and Enjoyment
- Serve Warm with Dipping Sauce:
Arrange your glorious, golden-brown Cheesy Beef Pepperoni Pizza Bombs Recipe on a platter. Serve immediately while they are still warm and the cheese is gooey. The ultimate accompaniment is a small bowl of extra warmed pizza sauce or marinara sauce for dipping. A sprinkle of fresh basil or more dried parsley can add a lovely finishing touch. - Enjoy as an Appetizer or Main Course:
These versatile pizza bombs are perfect for a variety of occasions!- Game Day Snack: They are an absolute crowd-pleaser for any sports gathering.
- Party Appetizer: Easy to pick up and devour, making them ideal for entertaining guests.
- Kids’ Favorite: Children absolutely adore these handheld treats.
- Quick Weeknight Dinner: Paired with a simple side salad, they make a fun and satisfying meal.
- Storage and Reheating:
If you happen to have any leftovers (which is unlikely, they’re that good!), store them in an airtight container in the refrigerator for up to 3 days. To reheat, you can use a microwave for a quick warm-up, but for the best texture, I recommend popping them back into a preheated oven (around 350°F / 175°C) for 8-12 minutes, or until heated through and the crust has crisped up again. This ensures they remain deliciously crispy rather than soft. - Embrace the Flavor Explosion:
Each bite of these Cheesy Beef Pepperoni Pizza Bombs is a burst of classic pizza flavor – savory beef, zesty pepperoni, rich tomato, and ooey-gooey mozzarella, all encased in a tender, garlic-butter crust. It’s a truly satisfying and incredibly fun way to enjoy pizza in a handheld format! Don’t hesitate to experiment with different dipping sauces like ranch or a spicy arrabiata for an extra kick.
Conclusion:
Well, my friends, we’ve reached the end of our culinary journey, and I genuinely hope you’re feeling inspired and hungry! If there’s one recipe I could implore you to try this week, it’s this one. What makes this particular creation an absolute must-try? It’s not just the incredible convenience, though that’s certainly a massive bonus for busy weeknights or impromptu gatherings. No, it’s the symphony of flavors and textures that dance together in every single bite. Imagine a golden, perfectly baked crust, giving way to an explosion of gooey, melted cheese, savory seasoned beef, and the ever-so-satisfying zing of pepperoni. It’s pure comfort food, elevated to a level of irresistible deliciousness that will have everyone, from the pickiest eaters to the most seasoned food critics, asking for more. These aren’t just snacks; they’re little pockets of joy, perfect for sharing, perfect for savoring, and incredibly fun to make.
I’ve found that the sheer versatility of these pizza bombs is one of their most charming qualities. While they’re utterly fantastic straight out of the oven, perhaps with a simple sprinkle of fresh parsley, there are so many delightful ways to enjoy them. For a classic experience, serve them alongside a warm bowl of rich marinara sauce for dipping – that combination is truly unbeatable. But don’t stop there! A creamy ranch dressing also makes an unexpectedly delicious accompaniment, offering a cool contrast to the warm, cheesy goodness. For garlic lovers (and who isn’t?), a small ramekin of melted garlic butter is an absolute revelation. Just imagine dipping a warm bomb into that fragrant, buttery goodness. Beyond dipping, consider them a fantastic sidekick to a light, crisp green salad, transforming a simple meal into something special. They also pair wonderfully with a hearty minestrone or tomato soup on a chilly evening, making for a truly comforting and satisfying dinner.
And let’s talk about variations – the possibilities are truly endless! This Cheesy Beef Pepperoni Pizza Bombs Recipe is just the beginning, a fantastic foundation upon which you can build your own culinary masterpieces. Feel free to experiment with different cheeses; a blend of provolone and mozzarella would be incredible, or perhaps a sharp cheddar for a bolder flavor. Don’t hesitate to swap out the beef for crumbled Italian sausage, diced ham, or even shredded chicken for a different meaty profile. For those who love a bit of heat, a pinch of red pepper flakes mixed into the beef or sprinkled on top before baking will add a delightful kick. Vegetarian friends, fear not! These can easily be adapted by omitting the meat and packing them with your favorite veggies. Think sautéed mushrooms, finely diced bell peppers, black olives, or even a handful of spinach. You could even use a plant-based ground “meat” alternative if you wish. For a gourmet touch, try adding some caramelized onions or sun-dried tomatoes. If you’re feeling adventurous, experiment with the dough too – while canned biscuit dough is wonderfully convenient, puff pastry or even homemade pizza dough can offer different textures and experiences. The beauty of this recipe is its adaptability, allowing you to tailor it perfectly to your family’s preferences and whatever ingredients you have on hand.
So, what are you waiting for? This is more than just a recipe; it’s an invitation to create, to share, and to enjoy truly delicious food with the people you love. I genuinely encourage you to roll up your sleeves, gather your ingredients, and give these amazing pizza bombs a try this week. They’re perfect for game day, a casual get-together with friends, a quick family dinner, or even a fun lunchbox treat. Once you’ve made them, I would absolutely love to hear about your experience! Did you stick to the original recipe, or did you put your own unique twist on it? What were your favorite serving suggestions? Please, don’t be shy – share your photos, your tips, and your triumphs in the comments below or tag me on social media. Your feedback and creative ideas inspire me and our entire cooking community. Let’s make some magic in the kitchen, one perfectly cheesy, beefy, pepperoni-filled bomb at a time!
Delicious Cheesy Beef Pepperoni Pizza Bombs Recipe
Experience the delight of Cheesy Beef Pepperoni Pizza Bombs—irresistible, golden-brown pockets bursting with savory beef, tangy pepperoni, and gooey melted cheese, all encased in soft, fluffy dough. A modern twist on classic pizza, these bite-sized treats are perfect for gatherings, weeknights, or a comforting snack, offering incredible taste and fun in an easy-to-make package.
Ingredients
-
1 lb lean ground beef
-
1/2 cup diced yellow onion
-
2 cloves garlic, minced
-
4 oz (1 cup) finely diced pepperoni
-
1/2 cup pizza sauce
-
1 tsp dried oregano
-
1/2 tsp dried basil
-
1/4 tsp red pepper flakes (optional)
-
Salt and black pepper to taste
-
1 (13.8 oz) can refrigerated pizza crust
-
1 1/2 cups shredded mozzarella cheese
-
1/2 cup grated Parmesan cheese
-
2 tbsp unsalted butter, melted
-
1/2 tsp garlic powder
-
1/4 tsp dried parsley (optional, for garnish)
-
Extra pizza sauce, for dipping
Instructions
-
Step 1
In a large skillet over medium-high heat, brown ground beef for 7-10 minutes, breaking it into crumbles. Drain excess fat if needed. Add diced onion to the skillet; cook 4-5 minutes until softened. Stir in minced garlic and cook 1 minute until fragrant. Stir in diced pepperoni; cook 2-3 minutes. Add oregano, basil, and optional red pepper flakes; stir well. Pour in pizza sauce, stir, and simmer on low for 5-7 minutes until thickened. Season with salt and pepper to taste. Transfer filling to a bowl and cool completely (refrigerate 20-30 minutes) before assembly. -
Step 2
Preheat oven to 400°F (200°C). Line a baking sheet with parchment paper. Unroll pizza crust onto a lightly floured surface and gently stretch/roll into a 10×15-inch rectangle. Cut into 24 equal squares. Take one dough square, stretch slightly, and place 1 generous teaspoon of cooled filling in the center. Top filling with about 1/2 tablespoon shredded mozzarella and a pinch of Parmesan cheese. Bring opposite corners of dough over the filling, pinch firmly to seal. Gather all edges and pinch tightly to form a sealed ball. Roll lightly to shape. Place each bomb seam-side down on the prepared baking sheet, leaving space between them. -
Step 3
In a small bowl, melt 2 tablespoons of butter. Stir in 1/2 teaspoon garlic powder and optional 1/4 teaspoon dried parsley. Brush the tops of the assembled pizza bombs generously with the garlic butter mixture. Bake for 12-18 minutes, or until golden brown and puffed. Remove from oven and let cool on the baking sheet for 5-10 minutes before serving. -
Step 4
Serve warm with extra pizza sauce or marinara for dipping. Garnish with fresh basil or dried parsley if desired. Store leftovers in an airtight container in the refrigerator for up to 3 days. Reheat in an oven at 350°F (175°C) for 8-12 minutes for best results, or microwave briefly.
Important Information
Nutrition Facts (Per Serving)
It is important to consider this information as approximate and not to use it as definitive health advice.
Allergy Information
Please check ingredients for potential allergens and consult a health professional if in doubt.


Leave a Comment