

Boston Cream Pie Fudge. Just uttering those words brings to mind a delightful fusion of two beloved dessert classics, promising an extraordinary treat for your taste buds. Imagine, for a moment, the elegant layers of a traditional Boston Cream Pie – the tender cake, the luscious vanilla custard, and that glossy chocolate glaze – now transformed into a melt-in-your-mouth, velvety square of fudge. This ingenious creation pays homage to the original Boston Cream Pie, often hailed as the official state dessert of Massachusetts and famously originated at Boston’s Omni Parker House Hotel in the mid-19th century. We’ve taken that rich heritage and blended it with the simple, satisfying joy of classic American fudge.
What truly makes this Boston Cream Pie Fudge so utterly irresistible?
It’s the perfect harmony of flavors and textures: the smooth, creamy vanilla base mimicking the custard, crowned with a decadent chocolate layer that captures the essence of that iconic glaze. It’s incredibly convenient to make, requiring no baking, making it an ideal candidate for gifting, party platters, or simply satisfying that sudden craving for something truly special. Get ready to experience dessert perfection in every bite, without the fuss of a full pie!

Ingredients:
- For the Vanilla Cream Fudge Base:
- 1 ½ cups granulated sugar
- ¾ cup (1 ½ sticks) unsalted butter
- ⅔ cup evaporated milk (not condensed milk)
- 1 (7-ounce) jar marshmallow creme (or fluff)
- 1 teaspoon pure vanilla extract
- 12 ounces good quality white chocolate chips or finely chopped white chocolate bar
- For the Velvety Pastry Cream Filling:
- 2 cups whole milk
- ½ cup granulated sugar, divided
- ¼ cup cornstarch
- 4 large egg yolks
- 2 tablespoons unsalted butter, softened
- 1 ½ teaspoons pure vanilla extract
- Pinch of salt
- For the Decadent Chocolate Ganache Topping:
- 1 cup (6 ounces) semi-sweet chocolate chips or finely chopped semi-sweet chocolate bar
- ½ cup heavy cream
- 1 tablespoon unsalted butter, softened (optional, for extra sheen and richness)
- ½ teaspoon pure vanilla extract (optional)
- Equipment & Essentials:
- 9×13 inch baking pan
- Parchment paper
- Large heavy-bottomed saucepan
- Whisk
- Rubber spatula
- Medium saucepan
- Heatproof bowl
- Fine-mesh sieve
- Electric mixer (handheld or stand mixer with whisk attachment, optional but helpful)
Phase 1: Preparing the Velvety Pastry Cream Filling
- Prepare Your Pan: First things first, line your 9×13 inch baking pan with parchment paper, leaving an overhang on the longer sides. This will create a sling, making it incredibly easy to lift your finished Boston Cream Pie Fudge out of the pan later. Give the parchment a light spray with cooking oil or butter it just a touch. Set this aside for now.
- Warm the Milk: In a medium saucepan, combine the whole milk and half of the granulated sugar (¼ cup). Place it over medium heat, stirring occasionally, just until it begins to simmer around the edges. You don’t want a rolling boil, just a gentle warming. Once you see those tiny bubbles forming, remove it from the heat.
- Whisk the Yolks and Dry Ingredients: While the milk is warming, in a separate, heatproof medium bowl, whisk together the remaining ¼ cup of granulated sugar, the cornstarch, egg yolks, and a pinch of salt. Whisk vigorously until the mixture is pale yellow and smooth. It should look like a thick, glossy paste. This is crucial for achieving that silky texture.
- Temper the Eggs: This step is incredibly important to prevent your eggs from scrambling. Slowly, in a thin stream, pour about half of the warm milk mixture into the egg yolk mixture while continuously whisking. Keep whisking steadily to bring the temperature of the egg yolks up gradually. Once half is incorporated, pour the tempered egg mixture back into the saucepan with the remaining warm milk.
- Cook the Pastry Cream: Return the saucepan to medium-low heat. Continue to whisk constantly and vigorously. Initially, the mixture will be thin, but after a few minutes, you’ll feel it start to thicken dramatically. Keep whisking, ensuring you reach into the corners of the pan, as it can easily stick and burn. Cook until the cream is very thick, almost like a pudding, and big bubbles start to erupt slowly on the surface. This usually takes about 5-7 minutes after returning to the heat. A common mistake is not cooking it long enough, which results in a runny pastry cream. It should be able to coat the back of a spoon thickly and hold its shape.
- Add Butter and Vanilla: Remove the saucepan from the heat. Immediately stir in the softened butter and vanilla extract until completely melted and smooth. The butter adds richness and a lovely sheen.
- Strain for Silky Smoothness: For the ultimate smooth pastry cream, pour the mixture through a fine-mesh sieve into a clean bowl. This will catch any tiny bits of cooked egg or lumps, ensuring a truly velvety consistency. Don’t skip this step if you want that professional finish for your Boston Cream Pie Fudge!
- Chill Thoroughly: Cover the surface of the pastry cream directly with plastic wrap to prevent a skin from forming. This is essential! Place it in the refrigerator for at least 3-4 hours, or ideally overnight, until it is thoroughly chilled and firm. This chilling time is non-negotiable for the successful layering of your Boston Cream Pie Fudge.
Phase 2: Crafting the Boston Cream Pie Fudge Base (Vanilla Layer)
- Prepare for Fudge Making: Before you even turn on the stove, get everything ready. Measure out all your ingredients for the vanilla fudge base. Have the marshmallow creme, vanilla extract, and white chocolate chips ready to go right next to your stovetop. This process moves quickly once it starts heating.
- Combine and Heat: In a large, heavy-bottomed saucepan, combine the granulated sugar, unsalted butter, and evaporated milk. Place the saucepan over medium heat. Stir constantly with a wooden spoon or heatproof spatula. You want to ensure the sugar dissolves completely and the butter melts.
- Bring to a Rolling Boil: Continue to stir until the mixture comes to a full, rolling boil. This means you should see large bubbles breaking across the entire surface of the liquid, even when you’re stirring. Once it reaches a rolling boil, continue to boil, stirring occasionally, for precisely 5 minutes. Timing is crucial here for proper fudge texture. If you boil too long, the fudge will be crumbly; not long enough, and it will be too soft.
- Remove from Heat and Incorporate: After 5 minutes of boiling, immediately remove the saucepan from the heat. Stir in the entire jar of marshmallow creme. Stir vigorously until the marshmallow creme is completely melted and smoothly incorporated into the hot sugar mixture. It will look wonderfully glossy and thick.
- Add White Chocolate and Vanilla: Now, add the white chocolate chips and the pure vanilla extract. Stir, stir, stir! Keep mixing until all the white chocolate chips are completely melted and the mixture is entirely smooth and uniform. This might take a few minutes of steady stirring. Ensure there are no streaks of unmixed chocolate. This forms the luxurious, creamy vanilla layer of our Boston Cream Pie Fudge.
- Pour the First Layer: Quickly pour this glorious vanilla fudge mixture into your prepared 9×13 inch pan, which you lined earlier. Use your spatula to spread it evenly across the bottom. Don’t worry if it’s not perfectly smooth; we’ll be adding more layers.
- Initial Set: Let the fudge base cool at room temperature for about 15-20 minutes, just until it begins to set slightly on top and is no longer piping hot. You don’t want to add the cold pastry cream directly onto steaming hot fudge, as it could melt.
Phase 3: Assembling the Boston Cream Pie Fudge
- Prepare the Pastry Cream: Retrieve your thoroughly chilled pastry cream from the refrigerator. It will be quite firm. If desired, you can give it a quick whisk by hand or with an electric mixer for about 30 seconds to loosen it up and make it perfectly smooth and spreadable again. This step isn’t strictly necessary if it’s already smooth, but it can help achieve a perfect texture.
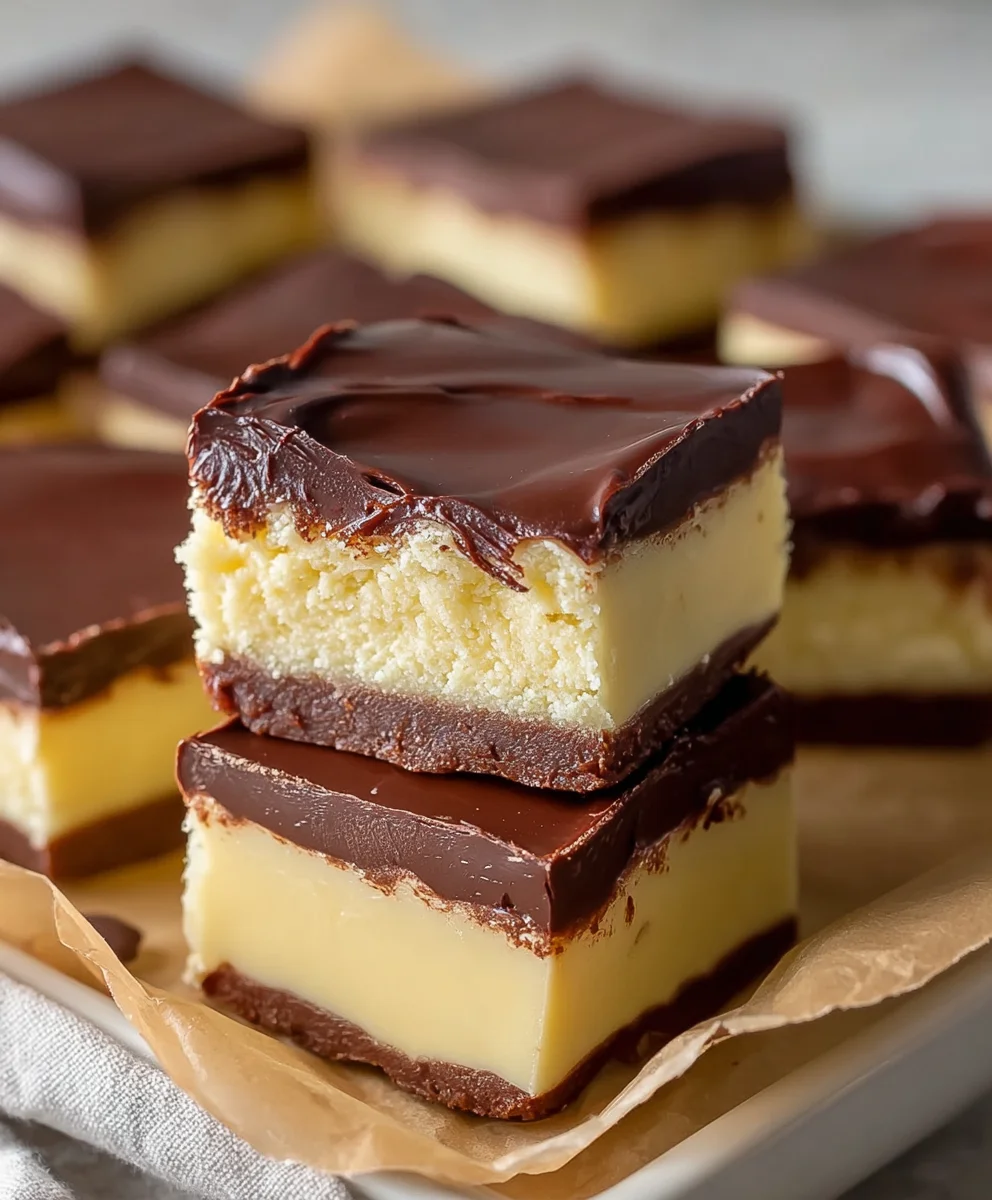
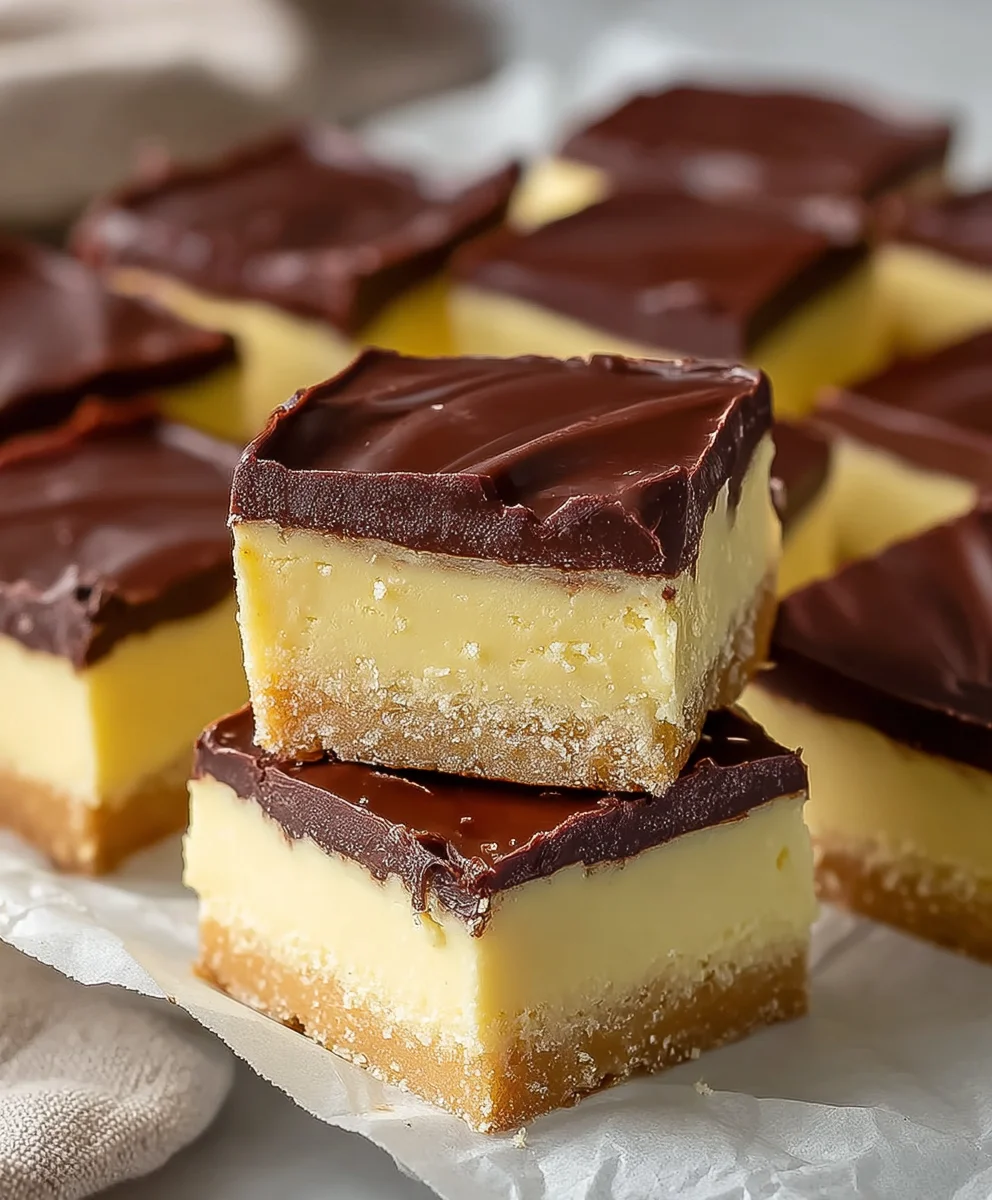
- Layer the Pastry Cream: Carefully spoon the chilled pastry cream over the slightly set vanilla fudge base in the pan. Use an offset spatula or the back of a spoon to gently spread it evenly across the entire surface. Take your time to create a uniform layer. You want a clear distinction between your vanilla fudge and your luscious pastry cream layer. This visual contrast is a hallmark of Boston Cream Pie Fudge.
- Chill for Setting: Once the pastry cream is smoothly layered, place the pan back into the refrigerator. This time, allow it to chill for at least 1-2 hours, or until the pastry cream layer is firm to the touch. This firming up is crucial before we add the warm ganache to prevent it from melting or running into the cream layer. Patience is a virtue when making layered treats like this!
Phase 4: Creating the Decadent Chocolate Ganache Topping
- Prepare the Chocolate: Place your semi-sweet chocolate chips (or finely chopped chocolate) into a heatproof bowl. If using a chocolate bar, ensure it’s chopped into small, uniform pieces for even melting.
- Heat the Heavy Cream: In a small saucepan, heat the heavy cream over medium heat. Watch it carefully and remove it from the heat just as it begins to simmer around the edges – you’ll see tiny bubbles forming. Do not let it boil vigorously.
- Pour and Rest: Pour the hot cream directly over the chocolate chips in the bowl. Do not stir immediately! Let it sit undisturbed for about 5 minutes. This allows the heat from the cream to begin melting the chocolate without scorching it.
- Whisk to Smoothness: After 5 minutes, gently whisk the mixture starting from the center and working your way outwards. Continue whisking until the ganache is completely smooth, glossy, and beautifully uniform. If you’re using the optional butter and vanilla, stir them in now until fully incorporated. The butter adds a wonderful shine and richness, truly elevating the topping for your Boston Cream Pie Fudge.
- Cool Slightly: Allow the ganache to cool at room temperature for about 10-15 minutes, stirring occasionally. You want it to be warm and pourable, but not hot. If it’s too hot, it could melt your pastry cream layer; if it’s too cool, it might be too thick to spread easily. It should be just slightly thicker than pouring cream.
Phase 5: Finishing and Chilling Your Boston Cream Pie Fudge
- Apply the Ganache: Retrieve your chilled pan with the layered fudge from the refrigerator. Pour the slightly cooled chocolate ganache evenly over the pastry cream layer. Use an offset spatula or the back of a spoon to gently spread it to the edges, creating a smooth, enticing, dark chocolate top.
- Final Chill: Place the pan back into the refrigerator for a final chill. This last stage is important for setting the ganache and allowing all the layers of your Boston Cream Pie Fudge to firm up completely. Chill for at least 2-4 hours, or ideally overnight, for the cleanest cuts and best texture.
- Cutting Your Fudge: Once fully chilled and firm, use the parchment paper overhang to carefully lift the entire slab of Boston Cream Pie Fudge out of the pan and onto a cutting board. For clean cuts, use a sharp, large knife that has been warmed under hot water and wiped dry between each cut. This will prevent the ganache from cracking and sticking. Cut the fudge into 1-inch squares or your desired size. Wipe your knife clean between cuts for the absolute best results.
- Serve and Store: Serve your spectacular Boston Cream Pie Fudge squares. Store any leftovers in an airtight container in the refrigerator for up to a week. While delicious at room temperature, it holds its shape and texture best when kept cool, especially given the pastry cream layer. This delightful treat is sure to impress anyone who tries it!
Conclusion:
So, there you have it! We’ve journeyed through the creation of what I truly believe is one of the most exciting and utterly delicious treats you’ll ever make. This isn’t just another dessert; it’s an experience, a moment of pure culinary delight that marries beloved flavors with incredible simplicity. What makes this particular recipe an absolute standout, a definite must-try for anyone with a sweet tooth or a penchant for impressive-yet-easy treats? Well, it’s the ingenious way it encapsulates all the iconic, comforting flavors of a classic Boston Cream Pie – the tender, vanilla-infused cake, the velvety smooth custard filling, and that luscious, shiny chocolate glaze – and transforms them into a bite-sized, incredibly simple, and utterly addictive fudge. Imagine getting all that complex, multi-layered deliciousness without the fuss of baking a cake from scratch, preparing a delicate pastry cream, or tempering chocolate.
The sheer convenience combined with the incredible flavor payoff is what truly elevates this. You are essentially achieving the sophisticated taste profile of a traditional pastry in a no-bake, melt-in-your-mouth form. Who wouldn’t want to capture that? This Boston Cream Pie Fudge truly delivers on its promise of big flavor with minimal effort, making it an indispensable addition to your dessert repertoire, especially for those moments when you crave something extraordinary but are short on time or just don’t want to get into a full-blown baking project. I’ve found it to be a consistent crowd-pleaser, sparking conversations and eliciting gasps of delight every time I serve it. It’s rich, creamy, perfectly balanced, and surprisingly easy to achieve such a sophisticated taste profile. The distinct layers of vanilla fudge base, the creamy custard-like center, and the firm chocolate topping create a symphony of textures and tastes that truly mimics the pie it’s inspired by. It’s a testament to how ingenious dessert transformations can be, offering a novel way to enjoy a classic without sacrificing any of its charm or deliciousness.
Now, when it comes to enjoying your freshly made fudge, the possibilities are delightfully endless, making this recipe even more versatile. Of course, a simple square, perhaps enjoyed with a steaming cup of your favorite coffee or a tall glass of cold milk, is a treat in itself. But let’s get creative! I absolutely love crumbling a piece over a scoop of vanilla bean ice cream for an instant upgrade to any sundae – the texture contrast alone is divine! You could also chop it finely and fold it into a batch of homemade cookie dough before baking for an extra burst of flavor and surprise in every bite, or even incorporate it into a dessert dip for a party spread. For variations, consider experimenting with the chocolate topping. A sprinkle of flaky sea salt immediately after glazing can enhance the chocolate notes and add a sophisticated edge, or a dusting of finely grated orange zest could introduce a refreshing citrus twist that beautifully complements the sweetness. If you’re feeling particularly adventurous, a tiny splash of rum or bourbon extract in the fudge base could add another layer of warmth and complexity. For those who prefer a less intense chocolate experience, a milk chocolate glaze works beautifully, too. Don’t be afraid to make it your own!
So, what are you waiting for? I genuinely hope you feel inspired to give this sensational recipe a try. It’s more than just a dessert; it’s a conversation starter, a mood lifter, and a testament to how simple ingredients, combined with a little creativity, can create something truly magical and memorable. Don’t be shy – dive in, have fun with the process, and most importantly, savor every single bite. And when you do, please, please share your experience with me! I absolutely adore hearing about your culinary adventures and seeing your wonderful creations. Did you add a unique twist? Did your family or friends rave about it? Drop a comment, tell your friends, or even send a picture – seeing your successes brings a huge smile to my face and helps me learn and grow. Your feedback is invaluable!
I promise, this Boston Cream Pie Fudge is a game-changer for your dessert repertoire.
You won’t regret taking the leap into this wonderfully indulgent world. Happy fudging!
No-Bake Boston Cream Pie Fudge
A quick and decadent no-bake fudge combining the classic flavors of Boston Cream Pie: creamy vanilla fudge, luscious pastry cream, and a rich chocolate ganache topping. Perfect for gifting or parties.
Ingredients
-
1 ½ cups granulated sugar
-
¾ cup (1 ½ sticks) unsalted butter
-
⅔ cup evaporated milk (not condensed milk)
-
1 (7-ounce) jar marshmallow creme
-
1 teaspoon pure vanilla extract
-
12 ounces white chocolate chips
-
2 cups whole milk
-
½ cup granulated sugar, divided
-
¼ cup cornstarch
-
4 large egg yolks
-
2 tablespoons softened unsalted butter
-
1 ½ teaspoons pure vanilla extract
-
Pinch of salt
-
1 cup (6 ounces) semi-sweet chocolate chips
-
½ cup heavy cream
-
1 tablespoon softened unsalted butter (optional)
-
½ teaspoon pure vanilla extract (optional)
Instructions
-
Step 1
Line a 9×13 inch baking pan with parchment paper, leaving an overhang; lightly grease the parchment. Set aside. -
Step 2
For the Pastry Cream: In a medium saucepan, warm 2 cups whole milk and ¼ cup sugar until simmering. Remove from heat. -
Step 3
In a separate heatproof bowl, whisk the remaining ¼ cup sugar, cornstarch, egg yolks, and a pinch of salt until pale and smooth. -
Step 4
Slowly whisk about half of the warm milk mixture into the egg yolk mixture to temper. Pour the tempered egg mixture back into the saucepan with the remaining warm milk. -
Step 5
Return the saucepan to medium-low heat, whisking constantly, until the cream is very thick and slowly bubbling (about 5-7 minutes). -
Step 6
Remove from heat. Immediately stir in 2 tablespoons softened unsalted butter and 1 ½ teaspoons pure vanilla extract until smooth. -
Step 7
Pour the pastry cream through a fine-mesh sieve into a clean bowl for ultimate smoothness. Cover the surface directly with plastic wrap to prevent a skin from forming. Chill in the refrigerator for at least 3-4 hours, or ideally overnight, until thoroughly firm. -
Step 8
For the Vanilla Fudge Base: Have all ingredients ready. In a large, heavy-bottomed saucepan, combine 1 ½ cups granulated sugar, ¾ cup unsalted butter, and ⅔ cup evaporated milk. Heat over medium, stirring until sugar dissolves and butter melts. -
Step 9
Bring mixture to a full rolling boil. Continue to boil, stirring occasionally, for precisely 5 minutes. -
Step 10
Immediately remove from heat. Stir in 1 (7-ounce) jar marshmallow creme until completely melted and smoothly incorporated. -
Step 11
Add 12 ounces white chocolate chips and 1 teaspoon pure vanilla extract. Stir vigorously until all white chocolate is melted and the mixture is entirely smooth and uniform. -
Step 12
Quickly pour the vanilla fudge mixture into your prepared 9×13 inch pan and spread evenly. Let it cool at room temperature for 15-20 minutes, until it begins to set slightly. -
Step 13
To Assemble: Retrieve the thoroughly chilled pastry cream. Whisk briefly to loosen if desired. Carefully spoon and spread the pastry cream evenly over the slightly set vanilla fudge base. -
Step 14
Chill the layered pan in the refrigerator for at least 1-2 hours, or until the pastry cream layer is firm to the touch. -
Step 15
For the Chocolate Ganache Topping: Place 1 cup semi-sweet chocolate chips in a heatproof bowl. In a small saucepan, heat ½ cup heavy cream over medium heat until it just begins to simmer. -
Step 16
Pour the hot cream over the chocolate chips. Let sit undisturbed for 5 minutes. Gently whisk from the center outwards until the ganache is completely smooth and glossy. Stir in optional 1 tablespoon softened unsalted butter and ½ teaspoon pure vanilla extract, if using. -
Step 17
Allow ganache to cool at room temperature for 10-15 minutes, stirring occasionally, until warm and pourable but not hot. -
Step 18
Finishing: Retrieve the chilled layered fudge. Pour the slightly cooled ganache evenly over the pastry cream layer, spreading gently to the edges for a smooth top. -
Step 19
Place the pan back into the refrigerator for a final chill of at least 2-4 hours, or ideally overnight, until all layers are completely firm. -
Step 20
Once fully chilled, use the parchment paper overhang to lift the entire slab onto a cutting board. For clean cuts, use a sharp knife warmed under hot water and wiped dry between each cut. Cut into 1-inch squares. -
Step 21
Serve and store any leftovers in an airtight container in the refrigerator for up to a week.
Important Information
Nutrition Facts (Per Serving)
It is important to consider this information as approximate and not to use it as definitive health advice.
Allergy Information
Please check ingredients for potential allergens and consult a health professional if in doubt.


Leave a Comment