

Martha Washington Candy, a confection that whispers tales of bygone eras and delivers pure, unadulterated delight with every single bite. Prepare to embark on a sweet journey back in time with this exquisitely simple yet profoundly satisfying no-bake treat. While the direct lineage to the First Lady’s own recipe might be debated among culinary historians, the enduring charm and name of this candy certainly evoke the elegance and warmth of early American hospitality. It’s a dessert that has gracefully adorned holiday tables and family gatherings for generations, carrying with it a cherished legacy of homemade goodness.
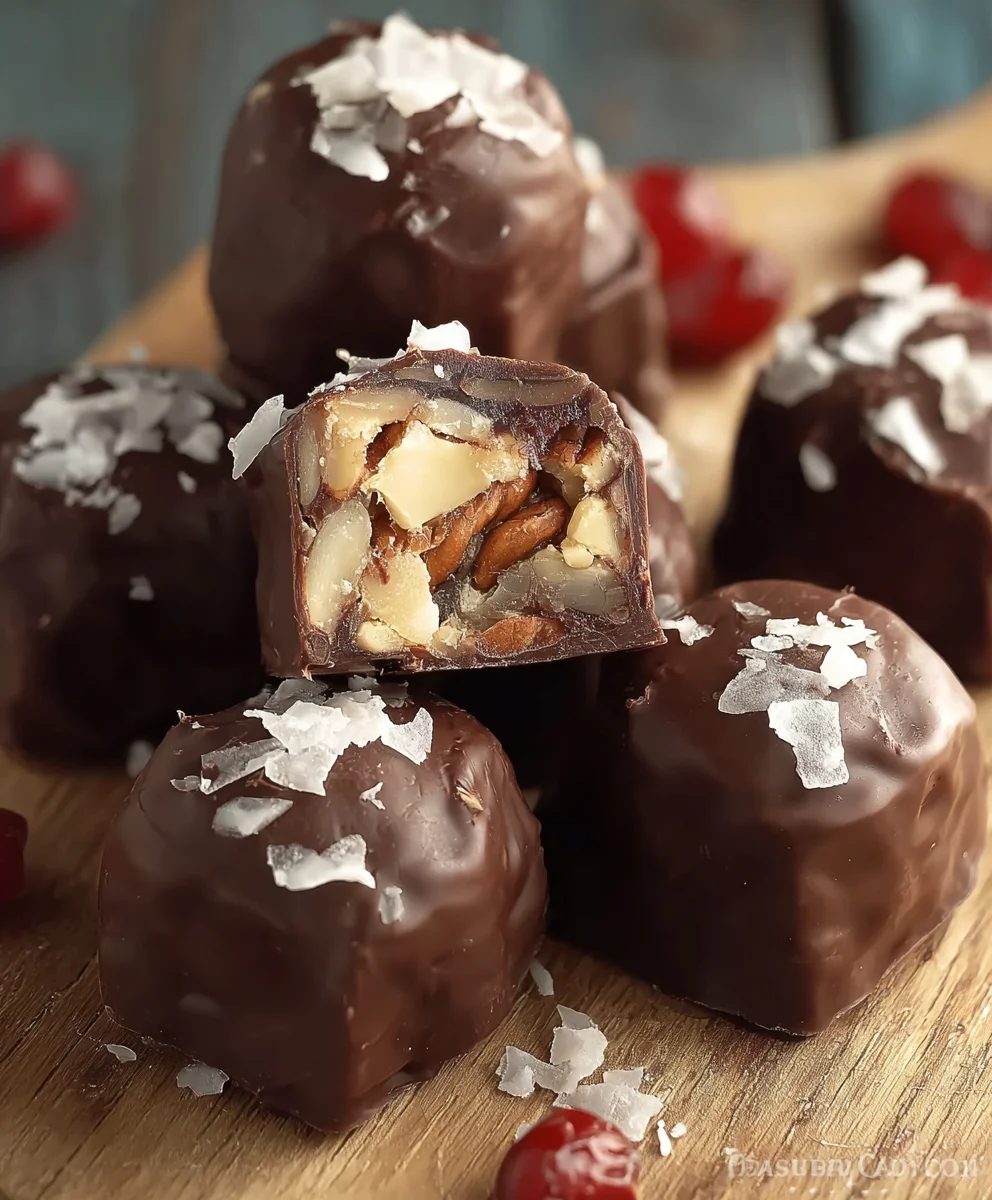
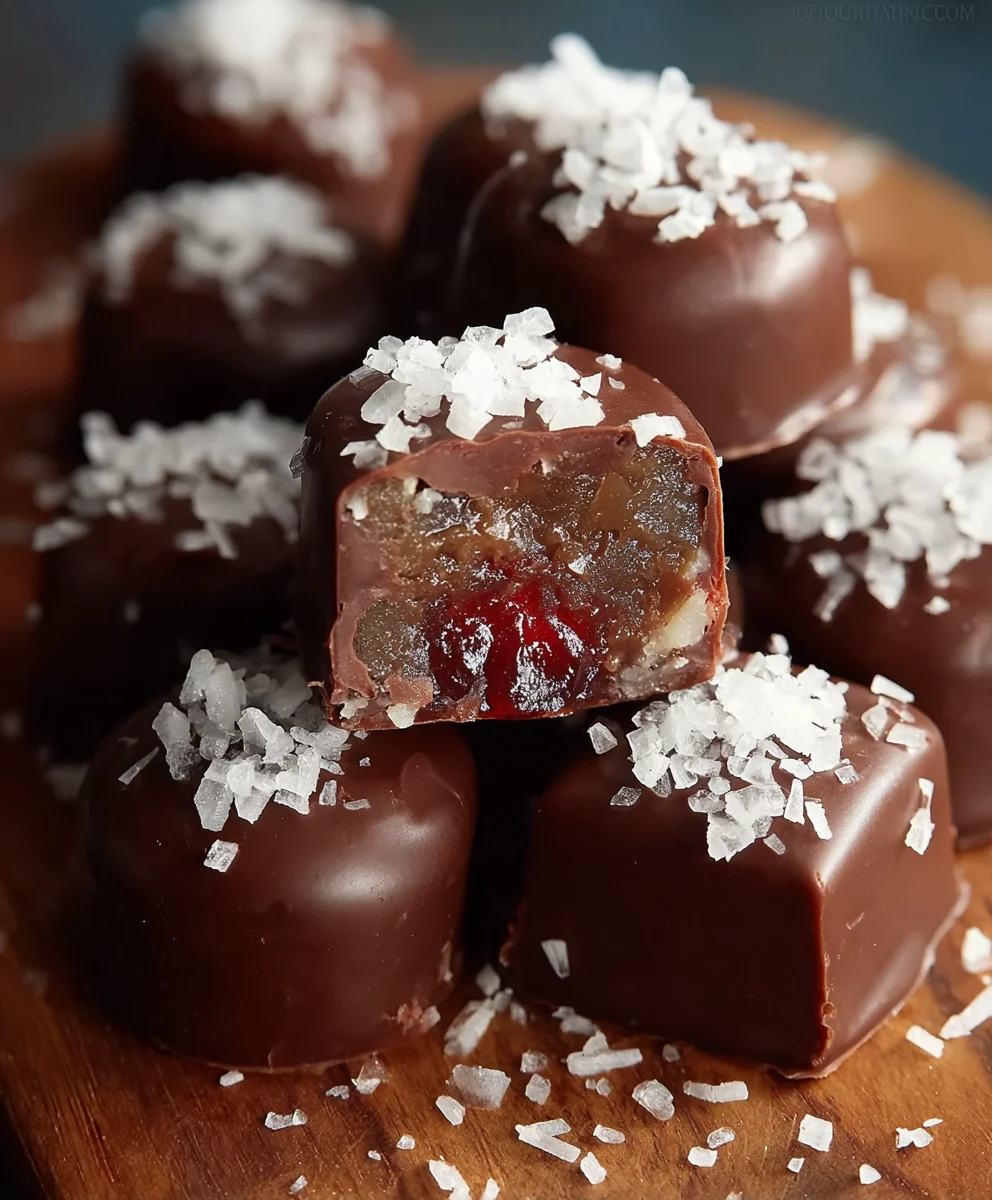
What makes this particular sweet so enduringly beloved and irresistibly popular? I believe it’s the magical combination of its incredibly creamy, melt-in-your-mouth center, often rich with finely shredded coconut and sometimes a hint of maraschino cherry, all enrobed in a crisp, decadent layer of chocolate. The beauty of preparing Martha Washington Candy lies in its delightful simplicity; it requires absolutely no baking, making it an ideal project for even the busiest of days, or a wonderful, fuss-free activity to share with loved ones. The blend of textures – a smooth, sweet interior contrasting with the satisfying snap of the chocolate coating – creates a truly unforgettable experience that has captured hearts for decades. It’s more than just candy; it’s a taste of history, a labor of love, and a testament to the joy of simple, delicious pleasures.

Ingredients:
- 1 cup (2 sticks) unsalted butter, softened: Make sure it’s truly softened, not melted. This is crucial for achieving that incredibly smooth, creamy base for our Martha Washington Candy. If it’s too cold, it won’t cream properly, and if it’s too warm or oily, the texture will be off. I usually leave mine out on the counter for at least an hour, sometimes two, depending on the ambient temperature in my kitchen, to ensure it reaches that perfect pliable consistency.
- 2 lbs (approx. 8 cups) powdered sugar: Also known as confectioners’ sugar. This gives the candy its signature sweetness and fine texture. Sifting it beforehand can prevent lumps, though I often just break up any large clumps with a fork before adding it to the butter mixture. The sheer volume of powdered sugar is what gives these candies their dense, fudgy texture, so don’t be alarmed by the amount!
- 1 (14-ounce) can sweetened condensed milk: This is the binder and adds a wonderful rich creaminess and depth of flavor that sets Martha Washington Candy apart. Do not confuse this with evaporated milk; they are very different! Sweetened condensed milk is thick and sugary, providing essential moisture and a sweet, caramelized undertone to the filling.
- 1 teaspoon pure vanilla extract: I always recommend pure vanilla extract for the best flavor. It really brightens up all the other ingredients and gives that classic candy shop aroma. A good quality vanilla can make a noticeable difference in the final taste profile of your candies.
- 4 cups shredded coconut: I typically use sweetened shredded coconut for this recipe, as it adds to the candy’s overall sweetness and chewiness. You can use fine or medium shred, depending on your preference for texture. The fine shred tends to blend in more seamlessly, while the medium shred offers a bit more distinct coconut texture and presence in each bite. Make sure it’s fresh for the best flavor!
- 4 cups finely chopped pecans: The pecans are a quintessential part of Martha Washington Candy. I prefer to chop them quite finely, almost to a coarse meal, so they are evenly distributed and don’t create large, unruly lumps in the candy. You can buy them pre-chopped, or chop them yourself using a food processor (pulse carefully to avoid pecan butter!) or a sharp knife. Toasting them lightly in a dry skillet beforehand can enhance their nutty flavor, but it’s optional and not traditionally done for this particular candy.
- 24 ounces melting chocolate or chocolate chips: For dipping. You have a few choices here, and the right choice can make a big difference in the ease of dipping and the final finish:
- Almond Bark or Candy Melts: These are specifically designed for melting and dipping. They provide a smooth, glossy finish that sets quickly without needing to be tempered. They are very forgiving and easy to work with, making them an excellent choice for beginners.
- High-Quality Chocolate Chips (semi-sweet or milk chocolate): If using chocolate chips, I highly recommend adding 1-2 tablespoons of vegetable shortening or coconut oil (not butter) per 12 ounces of chocolate. This helps thin out the chocolate and makes it smoother and more fluid for dipping, ensuring a nice, even coating. Without it, regular chocolate chips can be too thick and brittle once set, and they may not provide a perfectly smooth shell.
- Baking Chocolate Bars: Good quality baking chocolate can also be used. Again, a little shortening or oil can aid in dip-ability and create a more professional-looking coat. Opt for a brand you enjoy eating on its own, as the chocolate flavor will be prominent.
The quantity specified here is usually enough to fully coat all the candies, but it’s always better to have a little extra on hand than to run out mid-dipping!
Instructions:
Preparing the Candy Filling:
- Cream the Butter: In a very large mixing bowl, or the bowl of a stand mixer fitted with the paddle attachment, beat the softened butter on medium speed until it is light and fluffy. This usually takes about 2-3 minutes. You want to make sure it’s completely smooth and has a pale yellow color, indicating that air has been incorporated. This initial step is absolutely key to creating a truly smooth and homogenous candy base, ensuring no lumps of butter remain. Scrape down the sides of the bowl occasionally to ensure everything is evenly incorporated.
- Add Powdered Sugar: Gradually add the powdered sugar, one cup at a time, to the creamed butter. It’s best to start on low speed to avoid a “sugar snowstorm” in your kitchen, then increase to medium once the sugar begins to incorporate. Mix thoroughly after each addition until no streaks of sugar remain. The mixture will become very thick and crumbly at first, resembling coarse sand, but as you continue to add sugar and mix, it will start to come together. Make sure to scrape down the bowl frequently to get all the sugar off the bottom and sides.
- Incorporate Sweetened Condensed Milk and Vanilla: Once all the powdered sugar has been added, pour in the entire can of sweetened condensed milk and the vanilla extract. Mix on low speed until just combined, then increase to medium and beat until the mixture is smooth, creamy, and well-blended. This step transforms the thick, sugary butter into a wonderfully rich, pliable candy dough. It should be consistent in texture with no lumps and should look like a soft, yet firm, dough.
- Fold in Coconut and Pecans: Reduce the mixer speed to low, or remove the bowl from the mixer and use a sturdy spoon or rubber spatula. Add the shredded coconut and the finely chopped pecans to the mixture. Gently fold them in until they are evenly distributed throughout the candy base. Take your time here to ensure every bit of the filling has a good amount of coconut and pecans; this makes for a more flavorful and textural candy. You might find it easier to switch to a very sturdy spatula or even your clean hands to fully incorporate these ingredients, as the mixture will be quite stiff and dense.
- Chill the Filling: This is a critical step for ease of shaping and cannot be skipped. Cover the bowl with plastic wrap and refrigerate the candy filling for at least 2-3 hours, or preferably overnight. The longer it chills, the firmer and easier it will be to handle. If it’s not chilled enough, it will be sticky, soft, and difficult to roll into neat shapes, making the dipping process much messier and frustrating. I often let mine chill overnight to ensure it’s perfectly firm and cohesive.
Shaping the Candies:
- Prepare Your Workspace: Line a large baking sheet (or several, depending on the size and quantity of candy) with parchment paper or wax paper. This will be where you place your shaped, undipped candies. It also helps with easy cleanup and prevents the candies from sticking to the tray once they’re coated in chocolate.
- Shape the Candies: Remove the chilled candy filling from the refrigerator. Using a small cookie scoop (about 1 tablespoon in size) or simply your hands, scoop out uniform portions of the filling. Roll each portion into a smooth ball, or press it into a small square or rectangle. I personally love making them into small, uniform balls, roughly 1-inch in diameter, as this is the classic presentation for Martha Washington Candy. The key here is consistency in size and shape; this ensures they will all set evenly once dipped in chocolate and look professionally made. If the mixture starts to get too warm and sticky as you work, pop it back into the refrigerator for 15-20 minutes. You can also lightly dust your hands with a tiny bit of powdered sugar if they become too sticky to prevent the candy from adhering.
- Arrange on Baking Sheet: Place the shaped candies onto the prepared baking sheet, leaving a little space between each one to prevent them from sticking together.
- Re-chill Shaped Candies: Once all the filling has been shaped, return the baking sheets with the candies to the refrigerator for another 30-60 minutes. This second chilling period ensures they are very firm and cold before dipping, which helps the chocolate set faster, prevents the candy from softening too much during the dipping process, and ensures a cleaner, more controlled dip. A cold core means a quicker, cleaner dip and a more appealing finished product.
Melting and Dipping the Chocolate:
- Prepare the Melting Chocolate: While the candies are having their final chill, it’s time to prepare your chocolate.
- Double Boiler Method (My Preferred Method for Control): Place your melting chocolate or chocolate chips (with shortening/oil if using chips) in a heat-safe bowl set over a saucepan of simmering water. Make sure the bottom of the bowl does not touch the water. Stir frequently with a dry rubber spatula until the chocolate is completely melted and smooth. Keep the water at a gentle simmer, not a rolling boil, to prevent the chocolate from overheating or seizing. This method offers the most control over the chocolate’s temperature.
- Microwave Method: Place chocolate (and shortening/oil if using chips) in a microwave-safe bowl. Heat in 30-second intervals, stirring thoroughly after each interval, until the chocolate is mostly melted. Then, stir vigorously until the remaining chunks melt from the residual heat. Be extremely careful not to overheat the chocolate, as it can seize and become thick and unusable. Lower power settings (50%) can help prevent this.
- Candy Melting Pot: If you have a dedicated candy melting pot, follow its instructions for best results. These are fantastic for keeping chocolate at an ideal, consistent dipping temperature for extended periods.
The melted chocolate should be smooth, glossy, and fluid enough for dipping. If it’s too thick, add a tiny bit more shortening/oil (1/2 teaspoon at a time) and stir until desired consistency is reached.
- Set Up Your Dipping Station: Have your chilled, shaped candies ready and within easy reach. Have a clean, new sheet of parchment or wax paper ready on a separate baking sheet for the dipped candies. I also like to have a candy dipping fork (specifically designed for this task) or a regular dinner fork and a toothpick nearby. A small, deep bowl for the chocolate is often better than a wide, shallow one, as it ensures the candy can be fully submerged with less chocolate.
- Dip the Candies:
- Take one chilled candy and carefully drop it into the melted chocolate. Ensure it’s fully submerged.
- Using your candy dipping fork (or a regular fork), gently lift the candy out of the chocolate. Tap the fork against the edge of the bowl a few times to allow any excess chocolate to drip off. This step is important for a nice, even coating and to avoid chocolate “feet” or puddles on your finished candies. A clean, thin coat is much more appealing.
- Carefully slide the dipped candy off the fork onto the clean parchment-lined baking sheet. If using a regular fork, a toothpick can help nudge the candy off smoothly without marring the chocolate.
- Continue dipping the rest of the candies, working efficiently but carefully. If the chocolate starts to thicken as you work, gently reheat it using your chosen method until it’s fluid again.
Work in small batches if necessary, especially if your kitchen is warm. Keeping the undipped candies in the refrigerator until you’re ready to dip them helps maintain their firmness and prevents them from softening too much before they meet the chocolate.
- Optional Decorations: If you wish to add any sprinkles or a contrasting chocolate drizzle, do so immediately after dipping each candy, while the chocolate is still wet. For a drizzle, let the dipped candies set for about 10-15 minutes, then melt a contrasting chocolate (e.g., white chocolate) and drizzle it over the partially set chocolate with a fork or a small piping bag.
Finishing and Storage:
- Allow to Set: Once all the candies are dipped, allow them to set completely. You can do this at room temperature in a cool place (this usually takes 1-2 hours, depending on your chocolate choice and ambient temperature), or place the baking sheets back into the refrigerator for about 15-30 minutes for a quicker set. The chocolate should be firm, glossy, and completely dry to the touch before handling or storing.
- Storage: Once fully set, carefully transfer your Martha Washington Candies to an airtight container. They can be stored at room temperature for up to 2 weeks in a cool, dry place, or in the refrigerator for up to 3-4 weeks. If storing in layers, place parchment paper or wax paper between each layer to prevent sticking and preserve their pristine appearance. I find they taste best when allowed to sit for a day or two after dipping, allowing the flavors to meld beautifully and the texture to fully develop. If refrigerated, let them come to room temperature for about 15-20 minutes before serving for the best texture and flavor experience.
- Serving Suggestions: These delightful candies are perfect for holiday trays, cookie exchanges, homemade gifts, or simply as a special treat to share with loved ones. Their rich, creamy, nutty, and wonderfully coconutty flavor, combined with a crisp chocolate shell, makes them utterly irresistible. They are truly a nostalgic classic that brings joy with every bite and are sure to be a beloved addition to any dessert spread. Enjoy!
Conclusion:
And there you have it! We’ve journeyed through the steps of crafting what I truly believe is one of the most delightful and surprisingly simple confections you can make in your own kitchen. This isn’t just another sweet treat; it’s an experience, a little bite of history, and a testament to the fact that some of the best things are often the most straightforward to prepare. I can’t emphasize enough why this particular recipe is an absolute must-try for anyone who appreciates a rich, satisfying dessert. The unique combination of tender, moist coconut, crunchy pecans, all enrobed in a luscious chocolate shell, creates a symphony of textures and flavors that is utterly irresistible. It’s a candy that manages to be both nostalgic and utterly sophisticated at the same time, striking that perfect balance between homely comfort and gourmet indulgence. The ease with which these come together belies their impressive appearance and incredible taste, making them a fantastic choice for both novice bakers and seasoned confectioners looking for something genuinely special.
Once you’ve successfully whipped up a batch of these delectable treats, you’ll find they are incredibly versatile. For serving, consider arranging them elegantly on a small dessert platter after a dinner party; their distinct shape and chocolate coating make for a beautiful presentation that will surely spark conversation. They pair wonderfully with a robust cup of coffee, a delicate tea, or even a glass of your favorite dessert wine. Beyond personal enjoyment, these candies make for truly thoughtful and impressive gifts. Imagine packaging a small box of homemade delights for a hostess, a friend, or a neighbor during the holidays, or simply as a token of appreciation. They travel well and hold their charm, making them perfect for sharing joy, one sweet bite at a time.
Now, let’s talk about the exciting world of variations you can explore once you’ve mastered the basic recipe. While the classic combination is divine, don’t hesitate to experiment! For the nut component, if pecans aren’t your preferred choice or if you want to try something new, walnuts or even toasted almonds can offer a delightful alternative texture and flavor profile. Simply ensure they are finely chopped to integrate smoothly into the mixture. You could also introduce a tiny dash of almond extract into the coconut mixture for an added layer of aroma and taste, or perhaps a hint of rum extract for a more grown-up twist. For those who love citrus, a touch of finely grated orange zest or lemon zest could brighten the entire flavor profile, adding a zesty counterpoint to the sweetness. These small changes can really make the recipe your own and cater to specific tastes.
When it comes to the chocolate coating, the possibilities are equally inviting. While dark chocolate offers a beautiful bittersweet contrast, feel free to experiment with milk chocolate for a sweeter, creamier finish, or even white chocolate for a different aesthetic and flavor. You could also try flavoring your chocolate with a few drops of peppermint extract for a festive holiday treat, or a tiny pinch of cayenne pepper for a subtle, warming kick. Before the chocolate sets, consider sprinkling the tops with flaky sea salt for that popular sweet-and-salty combination, or some additional finely chopped nuts for extra crunch and visual appeal. Tiny, colorful sprinkles or a dusting of cocoa powder can also add a delightful decorative touch, especially if you’re making them for a special occasion. For a more adventurous variation, you could even try dipping half the candy in one type of chocolate and the other half in another, creating a striking two-tone effect that is both beautiful and delicious.
So, I implore you, dear reader, to clear an afternoon, gather your ingredients, and give this recipe a try. The satisfaction you’ll feel from creating such a delectable treat, from scratch, is truly immeasurable. I promise you won’t regret the effort. These aren’t just any candies; this particular take on Martha Washington Candy carries with it a legacy of deliciousness, and I know you’re going to fall in love with them just as I have. Once you’ve created your batch, I would absolutely love to hear about your experience! Did you stick to the classic recipe, or did you venture into some exciting variations? What nuts did you choose? What kind of chocolate called to you? Please, share your stories, your photos, and any creative twists you came up with. Your culinary adventures inspire me and our community of fellow food lovers. Happy baking, and get ready to enjoy a truly unforgettable confection!
Martha Washington Candy: A Sweet Historical Treat
Martha Washington Candy, a confection that whispers tales of bygone eras and delivers pure, unadulterated delight with every single bite. Prepare to embark on a sweet journey back in time with this exquisitely simple yet profoundly satisfying no-bake treat. While the direct lineage to the First Lady’s own recipe might be debated among culinary historians, the enduring charm and name of this candy certainly evoke the elegance and warmth of early American hospitality. It’s a dessert that has gracefully adorned holiday tables and family gatherings for generations, carrying with it a cherished legacy of homemade goodness.
What makes this particular sweet so enduringly beloved and irresistibly popular? I believe it’s the magical combination of its incredibly creamy, melt-in-your-mouth center, often rich with finely shredded coconut and sometimes a hint of maraschino cherry, all enrobed in a crisp, decadent layer of chocolate. The beauty of preparing Martha Washington Candy lies in its delightful simplicity; it requires absolutely no baking, making it an ideal project for even the busiest of days, or a wonderful, fuss-free activity to share with loved ones. The blend of textures – a smooth, sweet interior contrasting with the satisfying snap of the chocolate coating – creates a truly unforgettable experience that has captured hearts for decades. It’s more than just candy; it’s a taste of history, a labor of love, and a testament to the joy of simple, delicious pleasures.
Ingredients
-
1 cup (2 sticks) unsalted butter, softened
-
2 lbs powdered sugar
-
1 (14-ounce) can sweetened condensed milk
-
1 tsp vanilla extract
-
4 cups shredded coconut (sweetened preferred)
-
4 cups finely chopped pecans
-
24 oz melting chocolate (or chocolate chips + 1-2 tbsp vegetable shortening/coconut oil)
Instructions
-
Step 1
In a large bowl, cream softened butter until light and fluffy (2-3 min). Gradually add powdered sugar, mixing until well incorporated. Add sweetened condensed milk and vanilla extract; beat until smooth and creamy. Fold in shredded coconut and finely chopped pecans until evenly distributed. Cover and refrigerate for at least 2-3 hours, or preferably overnight, until firm. -
Step 2
Line a baking sheet with parchment paper. Scoop or roll chilled filling into uniform 1-inch balls (or squares/rectangles). Place on the prepared baking sheet. Refrigerate shaped candies for another 30-60 minutes to ensure they are very firm and cold before dipping. -
Step 3
Melt chocolate (and shortening/oil if using chips) using a double boiler or microwave until smooth and fluid. Set up a dipping station. Drop each chilled candy into melted chocolate, fully submerge, then lift with a fork, tapping to remove excess. Place dipped candy onto a clean parchment-lined baking sheet. Optionally, add sprinkles or a contrasting chocolate drizzle immediately. -
Step 4
Allow dipped candies to set completely at room temperature (1-2 hours) or in the refrigerator (15-30 min) until firm and dry. Once set, store Martha Washington Candies in an airtight container at room temperature for up to 2 weeks, or in the refrigerator for 3-4 weeks. Layer with parchment paper to prevent sticking. For best flavor and texture, let refrigerated candies come to room temperature before serving.
Important Information
Nutrition Facts (Per Serving)
It is important to consider this information as approximate and not to use it as definitive health advice.
Allergy Information
Please check ingredients for potential allergens and consult a health professional if in doubt.

Leave a Comment