

Fried Ravioli – a delightful culinary surprise that elevates simple pasta into an irresistible, crispy sensation! I remember the first time I bit into one of these golden-brown treasures; the satisfying crunch gave way to a warm, pillowy pocket of savory cheese, and I was instantly hooked. This beloved appetizer, often associated with the vibrant food scene of St. Louis, Missouri, holds a special place in the hearts of many. Legend has it that this innovative dish may have been born from a happy accident, transforming leftover ravioli into a star-studded snack.
What makes Fried Ravioli so universally adored?
It’s truly a magnificent combination of textures and flavors. The contrast between the perfectly crisp, seasoned exterior and the tender, cheesy filling is simply divine. Whether you’re seeking a sophisticated appetizer for a gathering, a fun snack for game night, or just a comforting treat, the ease of preparing this dish, especially with readily available ingredients, makes it a go-to choice. Get ready to discover the magic of making your own delicious Fried Ravioli, a dish guaranteed to become a new favorite in your culinary repertoire.

Ingredients:
- 1 (20 to 25-ounce) package frozen or fresh cheese ravioli: While frozen works wonderfully and is very convenient, if you can get your hands on fresh ravioli from a local Italian deli, the results will be even more sublime. Just make sure to adjust your thawing time accordingly.
- 1 cup all-purpose flour: This will be our first dredging layer, providing a dry surface for the egg wash to adhere to.
- 2 large eggs: The crucial binder that helps the breadcrumbs stick to our delicious ravioli.
- 2 tablespoons milk or water: Added to the eggs to create a smoother, more spreadable wash.
- 2 cups Panko breadcrumbs: I absolutely swear by Panko for this recipe. Its larger, flakier texture gives an unparalleled crispiness that regular breadcrumbs simply can’t match. It’s the secret to that irresistible crunch!
- ½ cup freshly grated Parmesan cheese: Incorporating Parmesan into the breading adds a wonderful savory, umami depth that elevates the flavor profile significantly. Don’t skip this, trust me!
- 1 tablespoon Italian seasoning: A classic blend of herbs like oregano, basil, thyme, and rosemary that infuses our Fried Ravioli with authentic Italian flavor.
- 1 teaspoon garlic powder: For that essential aromatic kick. Garlic powder is fantastic here because it distributes evenly throughout the breading.
- ½ teaspoon onion powder (optional): If you want to deepen the savory notes even further, a little onion powder works wonders.
- ½ teaspoon salt: Crucial for seasoning the breading mixture.
- ¼ teaspoon black pepper: Freshly ground black pepper adds a subtle warmth and zing.
- 4-6 cups neutral oil for frying: Such as vegetable, canola, or peanut oil. You’ll need enough to submerge the ravioli completely or at least halfway. Peanut oil is my personal favorite for frying because of its high smoke point and neutral flavor.
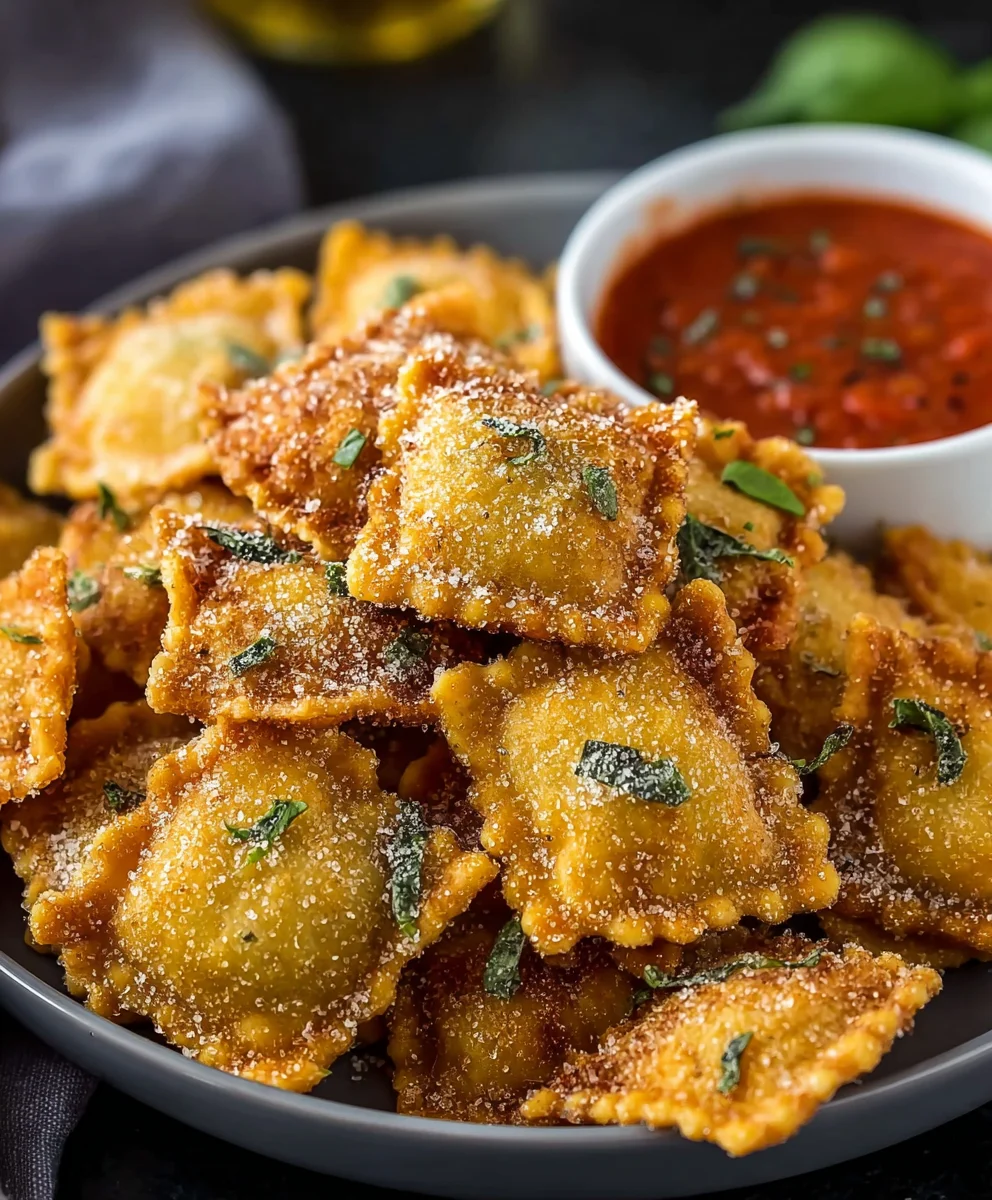
- 1 (24-ounce) jar marinara sauce: For serving as a dipping sauce. Homemade is always a treat, but a good quality store-bought marinara works perfectly well here. Warm it gently before serving.
- Fresh parsley or basil, chopped: For garnishing, adding a touch of freshness and color to your finished dish.
Preparation: Setting Up Your Breading Station for Perfect Fried Ravioli
- Thaw the Ravioli (if frozen): If you’re using frozen ravioli, it’s absolutely essential to thaw them completely before you begin the breading process. I usually spread them out in a single layer on a baking sheet lined with parchment paper and let them sit at room temperature for about 30-45 minutes. You want them pliable but still firm enough to handle without tearing. If they’re too cold, the breading won’t adhere properly; if they’re too warm and sticky, they can become a gooey mess. Fresh ravioli can be used directly, just make sure they aren’t stuck together.
-
Prepare Your Breading Station Bowls: This is a crucial step for an organized and efficient breading process. You’ll need three shallow bowls, wide enough to comfortably fit a single ravioli.
- Bowl 1: The Flour Dredge. Pour the 1 cup of all-purpose flour into the first shallow bowl. I like to add a pinch of salt and pepper to the flour itself for an extra layer of seasoning. Give it a quick whisk to combine.
- Bowl 2: The Egg Wash. In the second shallow bowl, crack your 2 large eggs. Add the 2 tablespoons of milk or water. Using a fork, vigorously whisk the eggs and liquid together until they are completely combined and no streaks of yolk or white remain. This creates a smooth, consistent wash that will help our breadcrumbs stick.
- Bowl 3: The Flavorful Breadcrumbs. This is where the magic happens! In the third and largest shallow bowl, combine the 2 cups of Panko breadcrumbs, ½ cup of freshly grated Parmesan cheese, 1 tablespoon of Italian seasoning, 1 teaspoon of garlic powder, ½ teaspoon of onion powder (if using), ½ teaspoon of salt, and ¼ teaspoon of black pepper. Use your fingers or a spoon to thoroughly mix all these ingredients together. You want the Parmesan and seasonings to be evenly distributed throughout the Panko so every bite of your Fried Ravioli is bursting with flavor.
The Breading Process: Achieving the Perfect Crispy Exterior for Your Fried Ravioli
-
Coat Each Ravioli Individually: Now, let’s get those ravioli perfectly coated! I find it easiest to work with one hand for the wet ingredients and the other for the dry to minimize mess, but do whatever feels comfortable for you.
- First Dredge (Flour): Take a single thawed ravioli and gently place it into the flour bowl. Turn it over a few times, ensuring it’s completely coated with flour. Lightly tap off any excess flour; you want a thin, even layer, not a thick cakey one. This flour layer helps to absorb any surface moisture and provides a perfect base for the egg wash.
- Egg Wash Dip: Immediately transfer the floured ravioli into the egg wash bowl. Submerge it completely, making sure both sides are generously coated. Lift it out and let any excess egg wash drip back into the bowl for a couple of seconds. We want enough to create a sticky surface, but not so much that it’s dripping wet.
- The Grand Finale (Breadcrumbs): Finally, transfer the egg-washed ravioli into the breadcrumb mixture. Gently press the ravioli into the breadcrumbs, then flip it over and press again, ensuring it’s completely encased in the flavorful Panko mixture. Use your fingers to pat the breadcrumbs firmly onto all sides of the ravioli. The firmer you press, the better the coating will adhere, which is key for a crispy exterior that stays intact during frying.
- Arrange on a Baking Sheet: As you bread each ravioli, place them in a single layer on a clean baking sheet. Make sure they aren’t touching each other to prevent sticking. I like to line my baking sheet with parchment paper for easy cleanup and to prevent sticking. Continue this process until all your ravioli are beautifully breaded.
- Chill for Optimal Adhesion (Optional, but Recommended): For the absolute best results and to ensure the breading stays put, I highly recommend chilling the breaded ravioli for at least 30 minutes in the refrigerator. An hour is even better. This firming-up period allows the breading to really set and adhere to the ravioli, preventing it from flaking off in the hot oil. You can even cover and refrigerate them for several hours, or freeze them at this stage for later!
Frying Your Ravioli to Golden Perfection
-
Heat the Frying Oil: Choose a sturdy, heavy-bottomed pot or Dutch oven for frying. My personal preference is a deep cast-iron pot because it retains heat so well. Pour in your neutral oil, making sure you have at least 2-3 inches of depth. You want enough oil so that the ravioli can float and fry evenly. Place the pot over medium-high heat.
This is where a thermometer becomes your best friend! You want the oil to reach a temperature of 350°F (175°C). If you don’t have a thermometer, you can test the oil by dropping a tiny pinch of breadcrumbs into it. If they sizzle and float to the top immediately, the oil is ready. If they just sit there, it’s not hot enough; if they burn instantly, it’s too hot. Maintaining the correct oil temperature is paramount for perfectly crispy and non-greasy Fried Ravioli. Too cool, and they’ll soak up oil and become soggy; too hot, and the outside will burn before the inside is properly heated.
- Begin Frying in Batches: Once your oil is at the ideal temperature, it’s time to fry! Gently lower a few breaded ravioli into the hot oil using a slotted spoon or tongs. Do not overcrowd the pan! This is a common mistake that causes the oil temperature to drop significantly, leading to greasy, poorly cooked ravioli. I usually fry 5-7 ravioli at a time, depending on the size of my pot, ensuring they have plenty of room to cook evenly.
- Fry Until Golden and Crispy: Fry the ravioli for about 1 ½ to 2 ½ minutes per side, or until they are a beautiful, deep golden brown and wonderfully crispy. The exact time will vary based on your oil temperature and the size of your ravioli. Keep a close eye on them, as they can cook quickly. Use tongs or a slotted spoon to gently flip them over to ensure even browning on all sides. You’ll see them puff up slightly, and the breading will look incredibly appealing.
- Drain Excess Oil: As each batch finishes frying, carefully remove the Fried Ravioli from the oil using a slotted spoon or spider skimmer. Immediately transfer them to a plate or wire rack that has been lined with paper towels. The paper towels will absorb any excess oil, ensuring your ravioli stay wonderfully crispy and aren’t greasy. I like to sprinkle them with a tiny pinch of salt immediately after they come out of the oil; the salt adheres best when they’re hot and helps enhance all those delicious flavors.
- Repeat and Maintain Oil Temperature: Continue frying the remaining ravioli in batches, always allowing the oil to come back up to temperature between batches. It’s often helpful to adjust the heat slightly as you go to maintain that consistent 350°F (175°C).
Serving Your Delicious Fried Ravioli
- Warm the Marinara Sauce: While your ravioli are frying or draining, gently warm your marinara sauce in a small saucepan over low heat. You want it warm enough to be comforting, but not simmering furiously. A good marinara is the perfect counterpoint to the rich, crispy Fried Ravioli.
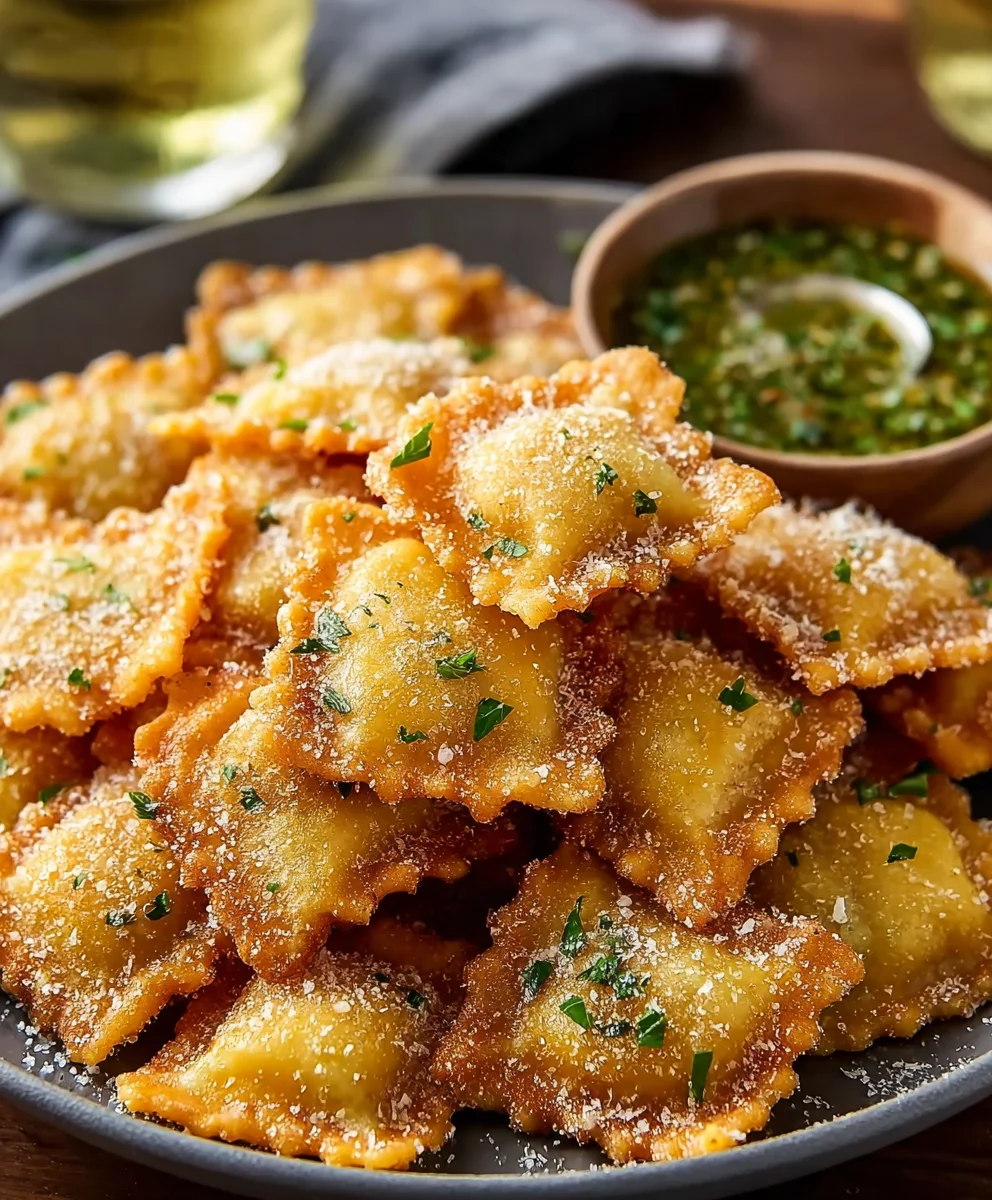
- Garnish and Serve Immediately: Arrange your beautiful golden Fried Ravioli on a serving platter. For a touch of freshness and a pop of color, generously sprinkle them with freshly chopped parsley or basil. Serve them immediately while they are hot and at their crispiest, alongside the warm marinara sauce for dipping. I sometimes like to add an extra dusting of freshly grated Parmesan cheese right before serving. There’s truly nothing better than biting into a warm, crispy Fried Ravioli, followed by the savory burst of cheese and a dip into bright, tangy marinara!
Chef’s Tips and Tricks for the Best Fried Ravioli
- The Importance of Oil Temperature: I cannot stress this enough – maintaining the correct oil temperature is the single most important factor for perfect Fried Ravioli. If the oil is too cold, the breading will absorb too much oil, resulting in a soggy, greasy product. If the oil is too hot, the breading will burn before the ravioli inside is properly heated through, leaving you with a raw-tasting center and a bitter crust. Invest in a good deep-fry thermometer; it makes all the difference! Aim for a consistent 350°F (175°C).
- Don’t Overcrowd the Pan: Frying in small batches is essential. Overcrowding lowers the oil temperature dramatically and causes the ravioli to steam rather than fry. This leads to a less crispy, often greasy, end product. Be patient, it’s worth the extra few minutes!
- Experiment with Ravioli Fillings: While cheese ravioli is the classic choice for Fried Ravioli, don’t be afraid to experiment! Spinach and ricotta ravioli, mushroom ravioli, or even meat-filled ravioli can be absolutely delightful when fried. Just ensure the filling is well-cooked or appropriate for quick heating.
- Make Ahead and Freeze Option: Fried Ravioli is a fantastic make-ahead appetizer! After breading the ravioli in step 5, instead of just chilling them, you can freeze them. Place the breaded ravioli on a parchment-lined baking sheet in a single layer and freeze until solid (about 2-3 hours). Once frozen, transfer them to a freezer-safe bag or airtight container. They will keep well for up to 1-2 months. When you’re ready to fry, simply cook them directly from frozen, adding a minute or two to the frying time to ensure they heat through properly. This is perfect for impromptu gatherings!
-
Air Fryer or Oven Alternatives: While deep-frying provides the ultimate crispiness, you can achieve a decent result with an air fryer or oven if you prefer a lighter option.
- Air Fryer Method: Preheat your air fryer to 375°F (190°C). Lightly spray the breaded ravioli with cooking spray. Place them in a single layer in the air fryer basket, ensuring they don’t overlap. Air fry for 6-10 minutes, flipping halfway through, until golden brown and crispy.
- Oven Method: Preheat your oven to 400°F (200°C). Arrange the breaded ravioli on a parchment-lined baking sheet in a single layer. Lightly spray them with cooking spray. Bake for 15-20 minutes, flipping halfway through, until golden brown and crispy. Keep in mind, these methods won’t be quite as rich or deeply crunchy as deep-fried, but they’re still delicious!
-
Dipping Sauce Variations: Marinara is a traditional and excellent choice, but don’t limit yourself! Consider serving your Fried Ravioli with other delicious dipping options:
- Creamy Pesto Sauce: A blend of pesto and a touch of cream.
- Arrabbiata Sauce: For those who love a bit of a spicy kick.
- Garlic Aioli: A rich, garlicky mayonnaise-based dip.
- Ranch Dressing: A surprisingly popular and tasty pairing for crispy fried foods.
- Vodka Sauce: A creamy, tomato-based sauce with a hint of vodka.
Offering a couple of different dipping sauces can elevate the experience for your guests and allow everyone to customize their bite.
- Double Breading for Extra Crunch: If you’re a true fan of maximum crispiness, consider a double-breading technique. After the first breadcrumb coating (step 3c), dip the ravioli back into the egg wash, then back into the breadcrumbs for a second coating. This creates an even thicker, crunchier crust, though it will absorb slightly more oil. Make sure to press firmly each time to ensure the layers adhere well.
Conclusion:
And there you have it – my absolute favorite way to transform a humble pantry staple into an extraordinary culinary delight. This isn’t just another recipe; it’s an invitation to experience pure, unadulterated comfort food with an exciting, crispy twist. What makes this particular preparation an undeniable must-try, you ask? Well, it’s the magical alchemy that turns soft, plump ravioli into golden, crunchy parcels of joy, each bite delivering a satisfying shatter that gives way to the warm, savory filling within. Imagine the surprise on your guests’ faces, or the delighted grins of your family, as they encounter this unexpected texture and flavor profile. It’s an effortlessly elegant appetizer, a super fun snack, or even a light meal when paired with the right accompaniments. It’s quick to prepare, incredibly versatile, and consistently earns rave reviews. You’ll find yourself wondering why you ever settled for boiled ravioli when this delightful alternative exists. Trust me, once you’ve experienced the crispy perfection, the rich flavors, and the sheer simplicity of whipping up a batch of these beauties, you’ll understand exactly why this recipe has become a true staple in my kitchen and why I am so thrilled to share it with you.
But the fun doesn’t stop with just the basic recipe! While these crispy morsels are utterly divine on their own, especially when served piping hot, they truly shine when paired with the perfect dipping sauce. A classic, vibrant marinara sauce is always a winner – its tangy sweetness cuts through the richness beautifully. However, don’t hesitate to get creative! I love serving them with a creamy roasted red pepper sauce for an extra layer of smoky flavor, or a zesty pesto aioli for a herbaceous kick. For those who enjoy a bit of heat, a spicy arrabiata or even a simple chili oil can elevate the experience. Imagine a luscious vodka sauce for an indulgent touch, or a cool, herby ranch dressing for a more casual vibe. And why stick to just one sauce? Offer a trio of dipping options at your next gathering and let everyone choose their adventure! You can also experiment with different types of ravioli. While classic cheese ravioli is a fantastic starting point, consider trying spinach and ricotta, mushroom, or even a savory meat-filled option for varied flavors and textures. For an extra special touch, sprinkle some freshly grated Parmesan or Pecorino Romano cheese over them the moment they come out of the pan, allowing it to melt into a thin, savory crust. A scattering of fresh basil or parsley can add a lovely pop of color and freshness. This dish is truly a blank canvas for your culinary imagination, adaptable to any palate or occasion.
Your Next Kitchen Adventure Awaits!
I genuinely hope that reading through this has sparked your enthusiasm and given you the confidence to dive into making this exceptional dish. There’s a unique satisfaction that comes from transforming simple ingredients into something truly spectacular, and this recipe for Fried Ravioli certainly delivers on that promise. It’s more than just cooking; it’s about creating memorable moments, sharing delicious food with loved ones, and perhaps even discovering a new signature dish for your repertoire. So, go ahead – gather your ingredients, set aside some time, and embark on this incredibly rewarding culinary journey. I promise you won’t be disappointed. The aroma filling your kitchen as these golden pockets crisp up, and the delightful crunch of that first bite, will be well worth the effort. Once you’ve tasted the perfect balance of crispy exterior and tender, flavorful interior, you’ll understand exactly why this preparation is so beloved. I’d absolutely love to hear about your experience! Did you discover a new favorite dipping sauce? Did you experiment with a unique ravioli filling? Whatever your adventures in the kitchen, please come back and share your stories, tips, and photos in the comments below. Your creativity and feedback not only inspire me but also enrich our entire community of food lovers. Happy frying, and I eagerly anticipate hearing all about your delicious creations!
Fried Ravioli
Crispy, cheesy fried ravioli is an irresistible appetizer, perfect for any occasion, often served with marinara sauce.
Ingredients
-
1 (20-25 ounce) package cheese ravioli (thawed if frozen)
-
1 cup all-purpose flour
-
2 large eggs
-
2 tablespoons milk or water
-
2 cups Panko breadcrumbs
-
½ cup grated Parmesan cheese
-
1 tablespoon Italian seasoning
-
1 teaspoon garlic powder
-
½ teaspoon onion powder (optional)
-
½ teaspoon salt
-
¼ teaspoon black pepper
-
4-6 cups neutral oil for frying
-
1 (24-ounce) jar marinara sauce
-
Fresh parsley or basil, chopped (for garnish)
Instructions
-
Step 1
Thaw frozen ravioli on a baking sheet for 30-45 minutes until pliable. Fresh ravioli can be used directly. -
Step 2
Arrange three shallow bowls: 1) Flour (with a pinch of salt/pepper). 2) Whisked eggs with milk/water. 3) Panko, Parmesan, Italian seasoning, garlic powder, onion powder (if using), salt, and pepper mixed thoroughly. -
Step 3
Dredge each ravioli in flour, tap off excess. Dip in egg wash. Coat thoroughly in breadcrumb mixture, pressing firmly to adhere. -
Step 4
Place breaded ravioli in a single layer on a parchment-lined baking sheet. Chill in the refrigerator for 30-60 minutes to set the coating, or freeze for later use. -
Step 5
Heat 2-3 inches of neutral oil in a heavy-bottomed pot or Dutch oven to 350°F (175°C). Use a thermometer to maintain consistent temperature. -
Step 6
Carefully lower ravioli into the hot oil in small batches to avoid overcrowding. Fry for 1.5-2.5 minutes per side, until golden brown and crispy, flipping once. -
Step 7
Remove fried ravioli with a slotted spoon to a paper towel-lined plate or wire rack. Lightly sprinkle with salt immediately. -
Step 8
Continue frying remaining ravioli, ensuring oil temperature remains consistent between batches. Gently warm marinara sauce in a small saucepan. -
Step 9
Serve Fried Ravioli warm, garnished with chopped parsley or basil, alongside warm marinara sauce for dipping.
Important Information
Nutrition Facts (Per Serving)
It is important to consider this information as approximate and not to use it as definitive health advice.
Allergy Information
Please check ingredients for potential allergens and consult a health professional if in doubt.

Leave a Comment