

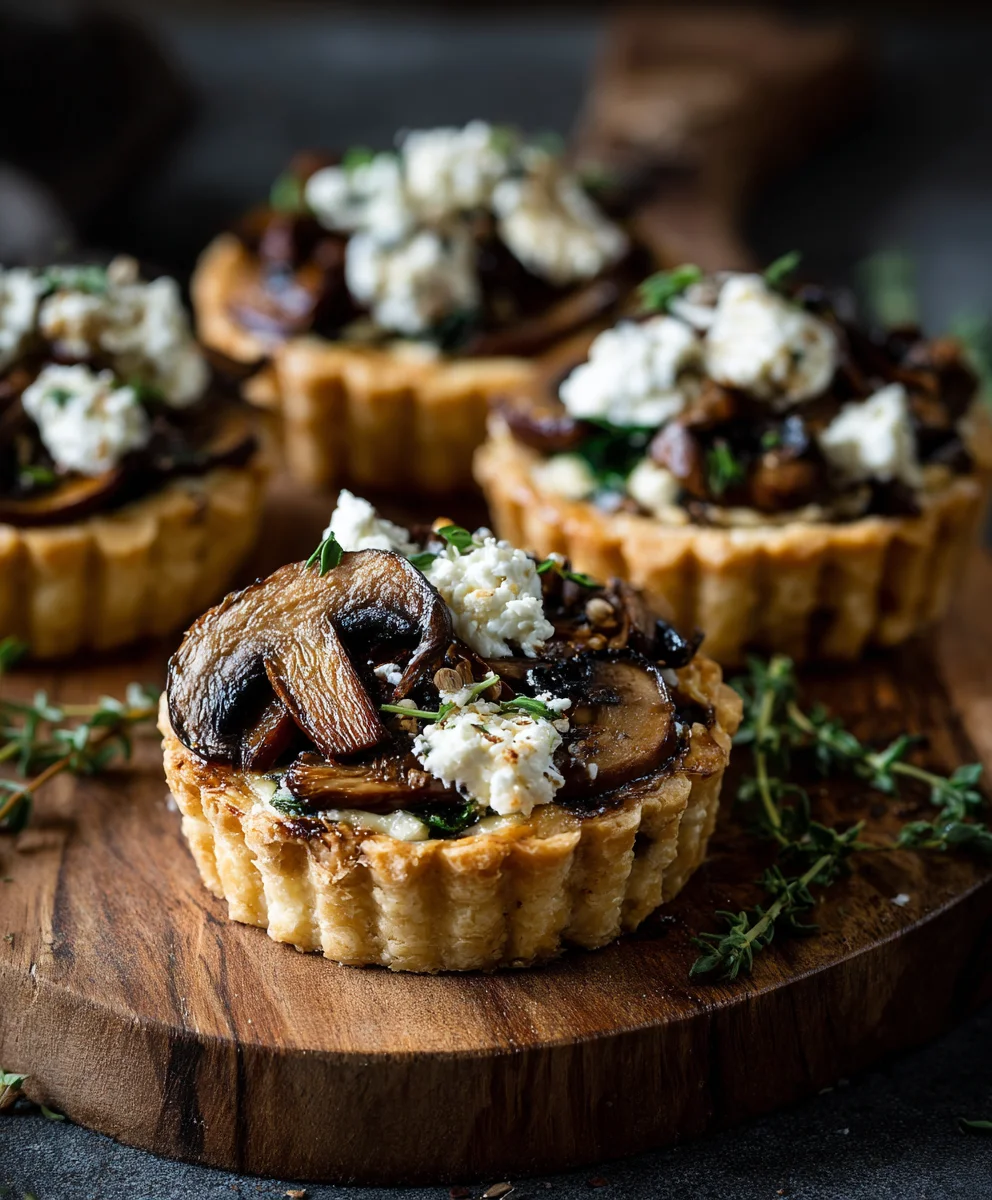
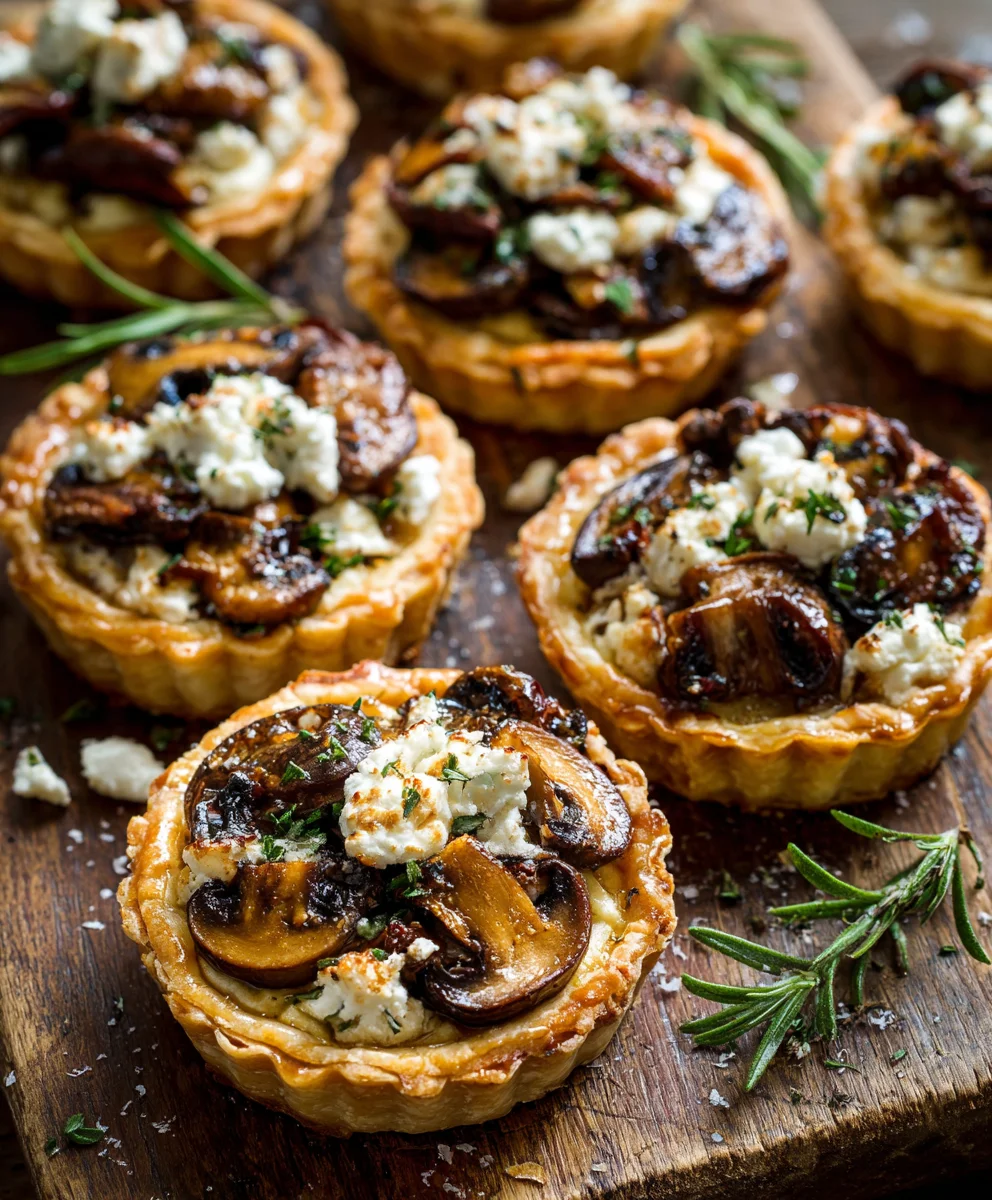
Mushroom Goat Cheese Tarts are more than just a dish; they are a culinary experience waiting to unfold, a symphony of earthy flavors and delicate textures that promises to enchant your palate. Imagine biting into a golden, flaky crust, perfectly cradling a rich, savory filling of sautéed wild mushrooms, all beautifully balanced by the tangy, creamy indulgence of fresh goat cheese. This exquisite combination offers a sophisticated yet approachable delight, making it an ideal choice for any occasion, from an elegant appetizer to a light, satisfying lunch.
While the concept of tarts boasts a rich lineage stretching back to medieval Europe, evolving from humble open-faced pies, this particular marriage of ingredients speaks to a timeless appreciation for robust, natural flavors. The pairing of earthy mushrooms and piquant goat cheese has long been celebrated in European cuisine, renowned for its ability to transform simple ingredients into something truly memorable. I find that people are utterly charmed by these tarts not only for their incredible depth of flavor – the umami of the mushrooms dancing with the sharp creaminess of the goat cheese – but also for their delightful texture and elegant presentation. Creating these Mushroom Goat Cheese Tarts allows you to bring a touch of gourmet sophistication into your own kitchen with surprising ease, promising a delicious reward that everyone will adore.

Ingredients:
- For the Puff Pastry Base:
- 1 box (14.1 ounces or approximately 399g) all-butter puff pastry, thawed according to package directions. Using an all-butter variety truly makes a difference in flavor and flakiness, elevating your Mushroom Goat Cheese Tarts. While making your own puff pastry is a rewarding culinary adventure, store-bought is perfectly acceptable and wonderfully convenient for this recipe, allowing you to focus on the delicious filling. Ensure it’s fully thawed but still cold for optimal handling and rise.
- 1 large egg, beaten with 1 tablespoon of water (for egg wash). This simple mixture is essential for giving our tarts a beautiful, golden-brown sheen and helping to create a lightly sealed edge, contributing to the professional look and taste of your Mushroom Goat Cheese Tarts.
- All-purpose flour, for dusting your work surface. Just a light dusting is all we need to prevent the delicate puff pastry from sticking to your counter or rolling pin, ensuring smooth handling.
- For the Mushroom Filling:
- 2 tablespoons olive oil, plus extra for brushing. A good quality extra virgin olive oil will not only help prevent sticking but also impart a subtle, fruity note that complements the earthiness of the mushrooms in our Mushroom Goat Cheese Tarts.
- 1 tablespoon unsalted butter. Butter adds a wonderful richness and aids in achieving that perfect golden-brown caramelization on the mushrooms, deepening their flavor profile.
- 1 pound (approximately 450g) mixed mushrooms (such as cremini, shiitake, oyster, or even some wild foraged varieties if you’re lucky), cleaned and thinly sliced. A thoughtful mix of mushrooms provides a wonderful depth of flavor and textural complexity. It’s crucial to wipe them clean with a damp cloth rather than washing them under water, as mushrooms absorb moisture readily and become soggy when cooked, hindering proper browning.
- 1 large shallot, finely minced. Shallots offer a milder, sweeter, and more delicate onion flavor compared to regular onions, ensuring they enhance rather than overpower the star mushrooms in these Mushroom Goat Cheese Tarts.
- 2 cloves garlic, minced. Freshly minced garlic is always best for a pungent, aromatic kick that beautifully marries with the savory mushrooms.
- 1/2 teaspoon fresh thyme leaves, finely chopped, plus extra for garnish. Thyme and mushrooms are a classic culinary pairing; their earthy, slightly peppery notes complement each other perfectly, bringing out the best in the filling.
- 1/4 teaspoon sea salt, or to taste. Salt is fundamental for enhancing and drawing out all the nuanced flavors in our mushroom filling, making them truly shine.
- 1/8 teaspoon freshly ground black pepper, or to taste. A touch of freshly ground black pepper adds a subtle warmth and a gentle aromatic finish to the savory filling.
- 2 tablespoons dry white wine (like Sauvignon Blanc or Pinot Grigio), optional, but highly recommended for deglazing the pan and introducing a sophisticated layer of acidity and complexity to the filling for your Mushroom Goat Cheese Tarts.
- For the Goat Cheese Layer:
- 5 ounces (approximately 140g) fresh goat cheese (chèvre), softened slightly at room temperature. Choose a good quality, creamy goat cheese for the best texture and that signature tangy flavor that defines these Mushroom Goat Cheese Tarts. Softening it ensures a smooth, spreadable consistency.
- 2 tablespoons heavy cream. This addition helps to make the goat cheese wonderfully spreadable and adds an extra touch of luxurious richness to the creamy layer.
- 1 tablespoon fresh chives, finely chopped, plus extra for garnish. Chives contribute a mild, fresh oniony flavor and lovely bright green flecks, adding both visual appeal and a burst of freshness.
- Pinch of sea salt and freshly ground black pepper. Just a tiny seasoning to perk up the tangy goat cheese mixture, ensuring every component of the tart is perfectly flavored.
Equipment You’ll Need:
- Large baking sheet(s)
- Parchment paper
- Rolling pin
- Sharp knife or pizza cutter
- Pastry brush
- Large skillet or sauté pan
- Small mixing bowl
- Spatula or spoon
- Wire cooling rack
Phase 1: Preparing Your Pastry Foundation for the Mushroom Goat Cheese Tarts
- Thaw the Puff Pastry Properly: If your puff pastry is frozen, make sure to thaw it according to the package instructions. This usually means leaving it in the refrigerator overnight or on the counter for about 30-40 minutes. It’s crucial that it’s still cold but pliable enough to unfold without cracking. If the pastry gets too warm, the delicate layers of butter within can melt and merge, resulting in a less flaky, rather dense tart. A perfectly thawed and chilled pastry is the absolute first step to achieving beautiful, high-rising, golden Mushroom Goat Cheese Tarts. Take your time with this step, as it genuinely impacts the final texture.
- Preheat Your Oven: While your pastry finishes thawing and chilling, preheat your oven to a robust 400°F (200°C). This relatively high heat is incredibly important for puff pastry, as it causes the moisture in the butter layers to rapidly turn to steam, which in turn helps create that characteristic dramatic rise and incredibly flaky texture. Line one or two large baking sheets with parchment paper. This not only prevents sticking but also makes for significantly easier cleanup later on, and ensures your tarts slide off effortlessly.
- Prepare Your Work Surface: Lightly dust a clean, dry work surface with all-purpose flour. Carefully unfold your puff pastry sheet. If you’re using a block that requires rolling, roll it out into an even rectangle, aiming for approximately 1/8-inch thickness. If it’s already a pre-rolled sheet, gently unfold it. It’s best to work quickly but deliberately here to keep the pastry as cool as possible. The cooler the pastry, the better the rise.
- Shape the Pastry for Individual Tarts: Using a very sharp knife or a pizza cutter, carefully cut the puff pastry sheet into 6-8 equal rectangles or squares, depending on your desired tart size. For a standard 14.1-ounce sheet, aiming for 6 rectangles (by first cutting the sheet in half lengthwise, then cutting each half into three equal pieces) works exceptionally well. You could also use a round cookie cutter for circular tarts, but rectangular shapes are often simpler and more efficient when working with a standard puff pastry sheet. Ensure your cuts are clean for the best rise.
- Create a Border for Your Mushroom Goat Cheese Tarts: For each individual pastry piece, gently score a border about 1/2 inch from the edge using the tip of your knife. Be extremely careful not to cut all the way through the pastry; you’re merely creating a shallow, visual line. This scored border is a clever trick: it helps the outer edges puff up more dramatically and consistently during baking, creating a natural, elevated crust that will beautifully frame and hold our delicious filling. This step is key for that classic tart appearance.
- Prepare the Egg Wash: In a small bowl, whisk together the large egg with 1 tablespoon of cold water until they are thoroughly combined and smooth. This egg wash is our culinary secret weapon for imparting a gorgeous, deep golden-brown color and a subtle sheen to the crust of your Mushroom Goat Cheese Tarts. It adds a professional touch that truly makes them irresistible.
- Brush and Chill: Carefully transfer your pastry rectangles to the prepared baking sheets, ensuring you leave ample space between each piece to allow for expansion during baking. Using your pastry brush, lightly and evenly brush the entire surface of each pastry piece, including the scored border, with the prepared egg wash. This will contribute to a lovely, uniform golden color. At this crucial point, I highly recommend popping the baking sheets into the refrigerator for an additional 10-15 minutes. This quick chill helps the butter within the pastry firm up once more, which significantly promotes a superior rise and an even flakier texture when it encounters the hot oven. It’s a small, often overlooked step that makes a monumental difference in the final flakiness and structure of your Mushroom Goat Cheese Tarts.
Phase 2: Crafting the Savory Mushroom Filling
- Sauté the Mushrooms: Heat the 2 tablespoons of olive oil and the 1 tablespoon of unsalted butter in a large skillet or sauté pan over medium-high heat. Once the butter is melted and shimmering, add your thinly sliced mixed mushrooms. This is a critical step: do not overcrowd the pan. If you have too many mushrooms packed into the pan, they will release their moisture and steam rather than brown, resulting in a pale, watery filling instead of a deeply flavorful one. If necessary, work in two batches to ensure proper browning. Allow the mushrooms to cook undisturbed for a few minutes until they begin to release their moisture and develop a beautiful, rich golden-brown color. Stir them occasionally to ensure even cooking. This browning is absolutely essential for cultivating a deep, complex, and rich umami flavor that will be the backbone of your Mushroom Goat Cheese Tarts.
- Add Aromatics: Once the mushrooms are wonderfully browned and have significantly reduced in volume, add the finely minced shallot to the pan. Sauté for 2-3 minutes, stirring frequently, until the shallot softens and becomes beautifully translucent. Then, add the minced garlic and the finely chopped fresh thyme. Continue to cook for just another minute, stirring constantly, until the garlic becomes fragrant and aromatic. Be vigilant here: be very careful not to burn the garlic, as burnt garlic can quickly turn bitter and ruin the delicate flavor profile of your filling.
- Deglaze (Optional but Highly Recommended): If you’ve opted to use it, pour in the 2 tablespoons of dry white wine into the hot pan. Immediately use your spatula to vigorously scrape the bottom of the pan, releasing any browned bits (known as “fond”). This fond contains a tremendous concentration of caramelized sugars and proteins, packing an incredible amount of flavor that will dramatically enhance your mushroom filling. Let the wine simmer and reduce until almost completely evaporated, which should only take about 1-2 minutes. This step not only adds a wonderful complexity and brightness but also a subtle acidity to the filling, truly making your Mushroom Goat Cheese Tarts sing with layered flavors.
- Season the Filling: Remove the pan from the heat. Stir in the 1/4 teaspoon of sea salt and the 1/8 teaspoon of freshly ground black pepper. Give the mixture a taste and adjust the seasoning as needed to your preference. Remember that the goat cheese component will also contribute some saltiness, so be mindful not to over-season at this stage. The goal is to allow the earthy, savory mushroom flavors to shine through beautifully, perfectly balanced by the seasonings. Set the mushroom mixture aside to cool slightly. A slightly cooled filling is much easier to work with during assembly and, crucially, won’t make your delicate puff pastry soggy before it even hits the oven.
Phase 3: Preparing the Creamy Goat Cheese Layer and Assembling Your Elegant Mushroom Goat Cheese Tarts
- Prepare the Goat Cheese Spread: In a small mixing bowl, combine the softened fresh goat cheese with the heavy cream and the finely chopped chives. Using a fork or a small spatula, mix and mash the ingredients together until the mixture is beautifully smooth and creamy. Season with a small pinch of sea salt and freshly ground black pepper. Taste and adjust the seasoning if necessary to ensure it’s perfectly balanced. The goal here is to achieve a wonderfully spreadable consistency that still proudly maintains its characteristic tangy integrity. This creamy, seasoned layer is truly the vibrant heart of our Mushroom Goat Cheese Tarts, providing a delightful contrast to the savory mushrooms.
- Retrieve the Chilled Pastry: Carefully take your chilled puff pastry rectangles from the refrigerator. You’ll notice the chilling process has helped the butter within the pastry firm up once more, which is exactly what we want. This firmness ensures a better, more pronounced rise when the pastry hits the heat of the oven.
- Spread the Goat Cheese: Spoon an even amount of the meticulously prepared goat cheese mixture onto the center of each pastry rectangle. Gently spread it out, ensuring it remains neatly contained within the scored border you created earlier. It is absolutely essential to leave that 1/2-inch border completely clear of any filling. This untouched border is crucial; it allows the pastry to puff up beautifully and dramatically during baking, creating a perfect, golden, airy frame around the delectable filling of your Mushroom Goat Cheese Tarts.
- Top with Mushrooms: Carefully spoon the slightly cooled mushroom filling evenly over the goat cheese layer on each tart. Distribute the mushrooms generously, ensuring each tart receives a hearty helping. Again, make a conscious effort to keep the filling neatly contained within the goat cheese layer and well away from the scored edges. A clean edge guarantees a superior puff and a professional appearance.
- A Final Touch of Egg Wash (Optional but Highly Recommended): If desired, and to truly elevate the visual appeal, you can very lightly brush the exposed pastry border with a tiny bit more of the egg wash. This meticulous touch will ensure an even more consistently golden and wonderfully glossy finish on the risen edges of your Mushroom Goat Cheese Tarts, adding to their overall allure.
Phase 4: Baking Your Golden Mushroom Goat Cheese Tarts to Perfection
- Bake the Tarts: Carefully transfer the baking sheets, laden with your beautifully assembled Mushroom Goat Cheese Tarts, into the preheated 400°F (200°C) oven. Place them on the middle rack for optimal heat distribution.
- Monitor Baking Time: Bake for 20-25 minutes, or until the puff pastry is gorgeously golden brown, magnificently puffed up around the edges, and the filling is visibly hot and bubbly. The exact baking time can subtly vary depending on the calibration of your specific oven, so it’s wise to keep a watchful eye on them, especially after the 18-minute mark. It is absolutely vital to ensure the pastry is fully cooked through on the bottom as well, not just attractively browned on top. If you observe the edges browning a little too rapidly, you can loosely tent the tarts with a sheet of aluminum foil for the final few minutes of baking, but generally, with the correct temperature, this isn’t necessary. The initial high heat is designed to encourage a rapid, spectacular rise, imparting your Mushroom Goat Cheese Tarts with their signature light, airy, and incredibly flaky texture.
- Rotate for Even Baking: If you find yourself baking two sheets of tarts at once, or if you are aware that your oven has particular hot spots, it is a good practice to rotate the baking sheets halfway through the baking time. This simple action helps to ensure beautifully even browning and a consistent golden hue across all of your magnificent Mushroom Goat Cheese Tarts.
Phase 5: Serving and Enjoying Your Mushroom Goat Cheese Tarts
- Cool Slightly: Once your Mushroom Goat Cheese Tarts emerge from the oven, baked to golden perfection, carefully remove the baking sheets. Using a sturdy spatula, gently transfer the hot tarts to a wire cooling rack. Allow them to cool for a brief 5-10 minutes. This essential cooling period allows the pastry to set completely and firm up, making the tarts significantly easier to handle. More importantly, it prevents the delicious, hot filling from spilling out prematurely when you take that eagerly anticipated first bite.
- Garnish and Serve: Just before serving, take a moment to sprinkle your Mushroom Goat Cheese Tarts with a few extra fresh thyme leaves and/or finely chopped chives. This simple garnish adds a vibrant pop of color, a delightful fresh herbaceous aroma, and an additional layer of fresh herb flavor that truly elevates the dish. These tarts are an absolute delight and are best served warm or at comfortable room temperature. They make a fantastic, sophisticated appetizer for a dinner party, a delightful and substantial brunch item, or a light and satisfying lunch when paired alongside a simple, crisp green salad.
- Storage Instructions: Should you, against all odds, find yourself with any leftover Mushroom Goat Cheese Tarts (which, let’s be honest, is a rare occurrence given their deliciousness!), store them in an airtight container in the refrigerator for up to 2-3 days. To reheat them, I highly recommend doing so gently in a toaster oven or a conventional oven preheated to 300°F (150°C) for about 10-15 minutes, or until they are warmed through and the pastry has crisped up beautifully once more. Microwaving is generally not recommended for puff pastry, as it will inevitably make the wonderfully flaky crust soggy and less appealing.
-
Variations and Tips:
- Add a Touch of Heat: For those who appreciate a little kick, consider sprinkling a pinch of red pepper flakes into the mushroom filling as it sautés. It adds a subtle warmth without overpowering the other flavors.
- Experiment with Cheeses: While the luscious goat cheese is undoubtedly key to these “Mushroom Goat Cheese Tarts,” you could certainly explore adding or mixing in other cheeses. A small amount of finely grated Gruyère or Parmesan cheese mixed with the goat cheese could introduce an intriguing nutty depth, further enhancing the savory profile.
- Additional Vegetable Incorporations: Feel free to get creative with other vegetable additions to the mushroom mixture. Sautéed spinach (ensure you squeeze out all excess moisture!), caramelized onions for a sweet counterpoint, or finely chopped sun-dried tomatoes (packed in oil, drained well) could be lovely and flavorful additions. Always remember to manage moisture content carefully to prevent a soggy tart.
- Mini Tarts for Appetizers: For elegant, bite-sized appetizers, simply cut your puff pastry into smaller squares, perhaps 2×2 inches. Adjust the baking time accordingly; they will likely be ready in 15-20 minutes, so keep a close watch.
- Make Ahead Strategies: The mushroom filling can be conveniently made a day in advance and stored in an airtight container in the refrigerator. Similarly, the goat cheese mixture can also be prepared ahead of time. For the absolute best results, always assemble and bake the tarts just before you plan to serve them, ensuring the freshest and flakiest outcome.
Conclusion:
Well, my friends, we’ve reached the grand finale of our culinary journey with these exceptional tarts, and I truly hope you’re as excited as I am about them! What we’ve explored today isn’t just a recipe; it’s an invitation to elevate your everyday meals or impress guests with minimal fuss. I genuinely believe that this particular recipe for Mushroom Goat Cheese Tarts is a definitive must-try for anyone who appreciates the finer things in life, but without the complicated steps. It’s a harmonious blend of earthy mushrooms, tangy goat cheese, and a delightfully flaky crust that comes together to create an experience far greater than the sum of its parts. This isn’t just food; it’s comfort, elegance, and pure deliciousness wrapped into one perfect bite.
Why You Absolutely MUST Try These Tarts!
If you’re still on the fence, let me gently nudge you over with a few more reasons why these tarts deserve a prime spot in your cooking repertoire. First, the flavor profile is simply unmatched. The deep umami of the sautéed mushrooms, perhaps a mix of cremini and shiitake for added complexity, marries perfectly with the bright, slightly acidic, and creamy notes of fresh goat cheese. Then there’s the texture – oh, the texture! A golden, crisp, and buttery crust gives way to a tender, savory filling that’s both rich and surprisingly light. It’s a dish that feels sophisticated and indulgent, yet it’s incredibly approachable to make, even for novice bakers. It truly bridges the gap between gourmet dining and home cooking, proving that you don’t need a professional kitchen to create something truly spectacular. Moreover, these tarts hold their own whether served warm from the oven or enjoyed at room temperature, making them incredibly versatile for various occasions.
Perfect Pairings & Creative Variations
Now, let’s talk about how you can best enjoy these beauties and how you can make them uniquely your own. For a simple yet elegant appetizer, I love serving individual mini tarts alongside a crisp glass of Sauvignon Blanc or a light-bodied Pinot Noir; the wine’s acidity beautifully cuts through the richness of the cheese. If you’re planning a light lunch or a sophisticated brunch, a larger tart sliced into wedges pairs wonderfully with a fresh, peppery arugula salad dressed with a simple lemon vinaigrette. The peppery bite of the arugula and the bright citrus notes provide a fantastic counterpoint to the tart’s savory depth. For a more substantial dinner, consider serving them alongside a vibrant green bean almondine or roasted asparagus. The possibilities are truly endless!
But don’t stop there; let your culinary imagination soar with variations! While I adore the classic combination, you could easily introduce some finely diced, caramelized onions for an added layer of sweetness and depth. A sprinkle of fresh thyme or rosemary folded into the mushroom mixture before baking would also impart a beautiful aromatic quality. Feeling adventurous? Try incorporating a handful of blanched spinach or sun-dried tomatoes into the filling for extra color and flavor. You could even experiment with different types of mushrooms – wild varieties like chanterelles or oyster mushrooms would bring their unique characteristics to the forefront. And for those who prefer a slightly different cheese, while the goat cheese is iconic here, a blend of feta and cream cheese could offer a similar tangy creaminess, or a delicate Brie could introduce a different kind of melt-in-your-mouth richness. For those who want to play with the crust, a whole-wheat pastry dough could offer a nuttier flavor, or store-bought puff pastry makes for an even quicker preparation. Imagine serving these to delighted guests who have no idea how simple they were to prepare!
Your Turn to Create and Share!
So, there you have it. My heartfelt plea for you to give this recipe a try. I truly believe it will become a cherished addition to your recipe collection, a reliable go-to for those moments when you want something impressive, delicious, and not overly complicated. This is more than just a dish; it’s a little slice of culinary joy waiting to be created in your own kitchen. Don’t hesitate, grab your ingredients, and prepare to be amazed by the deliciousness you can create. Once you’ve baked and savored your very own Mushroom Goat Cheese Tarts, I would absolutely love to hear about your experience! Did you stick to the original recipe, or did you put your own creative spin on it? What were your favorite serving suggestions? Please come back and share your thoughts, tips, and triumphs in the comments below. Your feedback and creativity inspire me, and I can’t wait to see what wonderful variations you come up with. Happy baking, my friends!
Savory Mushroom & Goat Cheese Tarts
Mushroom Goat Cheese Tarts are a culinary experience, featuring a golden, flaky crust cradling a rich filling of sautéed wild mushrooms, balanced by tangy goat cheese. An elegant yet easy dish perfect for appetizers or a light lunch.
Ingredients
-
1 box (14.1 oz / 399g) all-butter puff pastry, thawed
-
1 large egg, beaten with 1 tbsp water (for egg wash)
-
All-purpose flour, for dusting
-
2 tbsp olive oil, plus extra
-
1 tbsp unsalted butter
-
1 lb (450g) mixed mushrooms, cleaned & thinly sliced
-
1 large shallot, minced
-
2 cloves garlic, minced
-
1/2 tsp fresh thyme, chopped, plus extra for garnish
-
1/4 tsp sea salt, or to taste
-
1/8 tsp fresh black pepper, or to taste
-
2 tbsp vegetable broth (or white grape juice + splash of vinegar), optional
-
5 oz (140g) fresh goat cheese, softened
-
2 tbsp heavy cream
-
1 tbsp fresh chives, chopped, plus extra for garnish
-
Pinch of sea salt & fresh black pepper
Instructions
-
Step 1
Thaw puff pastry according to package directions; it should be cold but pliable. Preheat oven to 400°F (200°C) and line baking sheets with parchment paper. -
Step 2
Lightly flour a work surface. Unfold or roll out puff pastry to 1/8-inch thickness. Cut into 6-8 equal rectangles or squares. -
Step 3
For each piece, gently score a 1/2-inch border around the edge, being careful not to cut all the way through. -
Step 4
Whisk 1 large egg with 1 tbsp water for egg wash. Transfer pastry pieces to baking sheets, brush all surfaces with egg wash. Chill for 10-15 minutes. -
Step 5
Heat olive oil and butter in a large skillet over medium-high heat. Add sliced mushrooms; do not overcrowd. Sauté until golden brown and moisture is released, working in batches if necessary. -
Step 6
Add minced shallot, cook 2-3 minutes until soft. Add minced garlic and chopped thyme, cook 1 minute until fragrant. -
Step 7
(Optional) Pour in vegetable broth, scraping up any browned bits from the pan. Simmer until almost evaporated (1-2 minutes). -
Step 8
Remove from heat. Stir in salt and pepper. Taste and adjust seasoning. Set aside to cool slightly. -
Step 9
In a small bowl, combine softened goat cheese, heavy cream, chopped chives, and a pinch of salt and pepper. Mix until smooth and creamy. -
Step 10
Retrieve chilled pastry. Spread goat cheese mixture evenly onto the center of each pastry rectangle, keeping it within the scored border. -
Step 11
Spoon cooled mushroom filling over the goat cheese layer, again staying within the border. -
Step 12
(Optional) Lightly brush the exposed pastry border with a tiny bit more egg wash for extra sheen. -
Step 13
Bake tarts in preheated 400°F (200°C) oven for 20-25 minutes, or until pastry is golden brown and puffed, and filling is bubbly. Rotate baking sheets halfway through if baking multiple. -
Step 14
Carefully transfer baked tarts to a wire rack; cool for 5-10 minutes. -
Step 15
Garnish with extra fresh thyme and/or chives. Serve warm or at room temperature. -
Step 16
Store leftovers in an airtight container in the refrigerator for 2-3 days. Reheat in a 300°F (150°C) oven for 10-15 minutes.
Important Information
Nutrition Facts (Per Serving)
It is important to consider this information as approximate and not to use it as definitive health advice.
Allergy Information
Please check ingredients for potential allergens and consult a health professional if in doubt.

Leave a Comment