

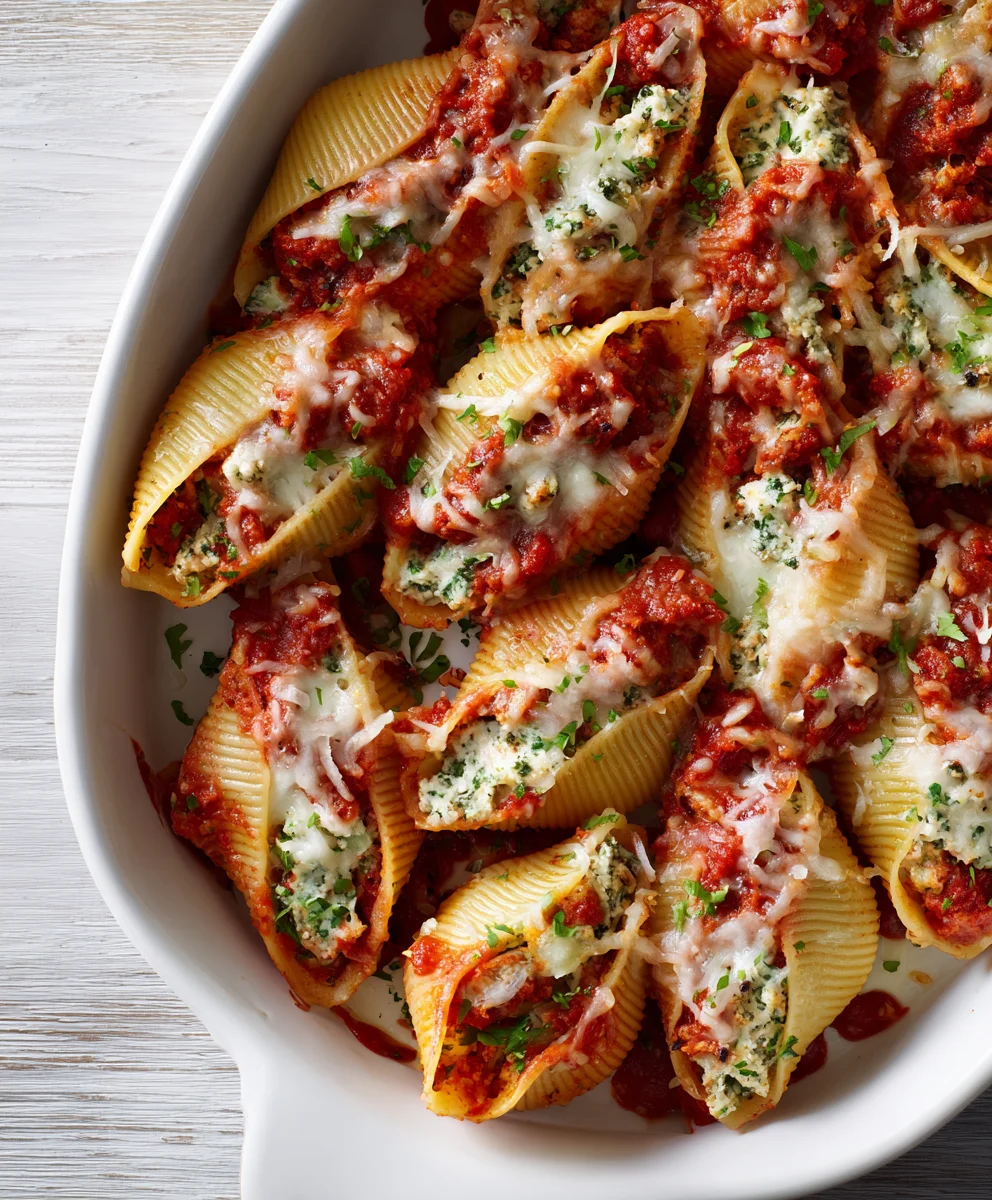
Cheesy Stuffed Shells Easy – that phrase alone promises a culinary experience that is both deeply satisfying and wonderfully accessible. Imagine tender jumbo pasta shells, each one a perfect vessel for a rich, creamy blend of ricotta, mozzarella, and Parmesan cheeses, all baked to golden perfection in a vibrant marinara sauce. This beloved classic isn’t just a meal; it’s a warm embrace, a comforting staple that brings joy to any table, effortlessly combining rustic Italian charm with everyday convenience.
For generations, stuffed shells have been a cherished centerpiece in Italian-American homes, often associated with festive gatherings and heartwarming family dinners. There’s a profound reason why this dish resonates with so many: it’s the ultimate comfort food. The exquisite balance of al dente pasta, the melty, gooey cheese filling, and the tangy tomato sauce creates a symphony of flavors and textures that is truly irresistible. What makes our approach so special is how we simplify the process, ensuring that bringing this delectable meal to your table is an absolute breeze. Making Cheesy Stuffed Shells Easy doesn’t just refer to the name; it’s our promise that you can achieve incredible flavor without the fuss, transforming a potential culinary challenge into a joyful and rewarding cooking experience.

Ingredients:
- 24-30 jumbo pasta shells (approximately 12 ounces)
- 2 tablespoons olive oil
- 1 medium yellow onion, finely chopped
- 4 cloves garlic, minced
- 15 ounces (approximately 1 ¾ cups) whole milk ricotta cheese
- 8 ounces fresh mozzarella cheese, shredded or diced into small cubes
- ½ cup grated Parmesan cheese, plus extra for topping
- 1 large egg, lightly beaten
- ½ cup fresh parsley, finely chopped, plus extra for garnish
- 2 tablespoons fresh basil, finely chopped (or 1 teaspoon dried basil)
- 1 teaspoon dried oregano
- ½ teaspoon red pepper flakes (optional, for a little kick)
- Salt and freshly ground black pepper to taste
- 2 jars (24-26 ounces each) good quality marinara sauce (your favorite brand is perfect for these Cheesy Stuffed Shells Easy)
Preparing the Jumbo Shells
Let’s get started with the foundation of our delightful dish: the jumbo pasta shells. This step is crucial for achieving that perfect texture that holds all our delicious cheesy filling without breaking.
-
Boil Water and Season Generously:
First things first, grab a large pot, the biggest one you have, and fill it with plenty of water. We want the shells to have ample space to swim and cook evenly. Place it over high heat and bring it to a rolling boil. Once it’s bubbling furiously, add a generous amount of salt – I usually go for about 1-2 tablespoons. Think of it like seasoning the ocean; this isn’t just for flavor, it helps prevent the pasta from sticking together and infuses taste into the shells themselves. Don’t skip this important step!
-
Cook the Shells to Al Dente Perfection:
Carefully add the jumbo pasta shells to the boiling salted water. Stir them gently right after adding them to prevent them from sticking to the bottom of the pot or to each other. Cook the shells according to the package directions, but aim for just beyond al dente. This means they should be tender enough to handle and stuff, but still have a slight firmness, or “bite,” to them. You absolutely do not want mushy shells, as they’ll fall apart when you try to fill them later. Cooking them slightly underdone is better than overdone, as they will continue to cook in the oven later. For most brands, this is typically about 8-10 minutes. Keep an eye on them!
-
Drain and Cool Properly:
Once your shells have reached that sweet spot of al dente tenderness, carefully drain them in a colander. Here’s a little trick I’ve found incredibly helpful: immediately rinse them under cold water. This stops the cooking process dead in its tracks and, perhaps even more importantly, prevents them from sticking together. Gently separate any shells that might be clinging to each other. Lay them out in a single layer on a baking sheet lined with parchment paper or a clean kitchen towel. This allows them to cool completely and dry slightly, making them much easier to handle when it comes time for stuffing. You’ll thank yourself for taking this extra moment later on when you’re assembling your Cheesy Stuffed Shells Easy!
Crafting the Irresistible Cheesy Filling
Now for the heart of our dish, the rich and savory cheesy filling! This is where all the magic happens and we really lean into the “Cheesy Stuffed Shells Easy” promise. The combination of different cheeses, fresh herbs, and aromatic vegetables creates a symphony of flavors that will have everyone asking for more.
-
Sauté the Aromatics for Depth of Flavor:
In a large skillet or frying pan, heat 2 tablespoons of olive oil over medium heat. Once the oil shimmers, add the finely chopped yellow onion. Sauté the onion for about 5-7 minutes, stirring occasionally, until it becomes soft, translucent, and slightly golden. We’re looking for sweetness here, not browning. Once the onion is softened, add the minced garlic. Cook for another 1-2 minutes, stirring constantly, until the garlic is fragrant. Be careful not to burn the garlic, as it can turn bitter very quickly. Remove the skillet from the heat and set it aside to cool slightly. This aromatic base is key to a truly flavorful filling.
-
Combine the Star Cheeses:
In a large mixing bowl, combine the whole milk ricotta cheese, shredded fresh mozzarella, and ½ cup of grated Parmesan cheese. Using good quality cheese makes a noticeable difference in the final taste and texture of your Cheesy Stuffed Shells Easy. The ricotta provides that creamy, smooth foundation, the mozzarella offers a delightful meltiness, and the Parmesan adds a sharp, salty depth of flavor.
-
Introduce the Binder and Fresh Herbs:
Add the lightly beaten large egg to the cheese mixture. The egg acts as a binder, helping the filling hold its shape beautifully as it bakes. Next, stir in the finely chopped fresh parsley, chopped fresh basil (or dried basil if fresh isn’t available), and dried oregano. If you’re feeling a little adventurous and like a touch of heat, now is the time to add the ½ teaspoon of red pepper flakes. Fresh herbs truly elevate this dish, bringing a vibrant freshness that dried herbs can’t quite replicate, so I highly recommend using them if you can.
-
Incorporate Sautéed Aromatics and Season:
Once the sautéed onion and garlic have cooled down a bit – you don’t want to cook the egg with hot vegetables – add them to the cheese and herb mixture in the bowl. Mix everything together thoroughly with a sturdy spoon or a rubber spatula until all the ingredients are well combined. Now for seasoning: season generously with salt and freshly ground black pepper. Remember that the cheeses contribute saltiness, so taste a small amount of the mixture (before adding the egg if you’re concerned about raw egg) and adjust the seasoning as needed. Don’t be shy with the pepper! This creates a perfectly balanced and utterly delicious filling that is truly the star of our Cheesy Stuffed Shells Easy.
Assembling Your Cheesy Stuffed Shells
This is where our prepared shells and scrumptious filling come together! Assembling your Cheesy Stuffed Shells Easy is a straightforward process, but a little care here ensures a beautiful and evenly baked dish.
-
Prepare Your Baking Dish:
Preheat your oven to 375°F (190°C). While the oven heats up, grab a 9×13-inch baking dish (or two smaller ones if you prefer). Pour about 1.5 to 2 cups of your marinara sauce into the bottom of the dish, spreading it evenly to create a bed for your stuffed shells. This layer of sauce not only adds flavor but also helps to prevent the pasta from sticking and keeps it moist during baking. A good quality marinara sauce is key here, as it forms a significant part of the dish’s flavor profile.
-
Stuffing the Shells with Precision:
Now for the fun part! Take one cooled jumbo pasta shell at a time. Gently open it up with your fingers. Using a small spoon, carefully fill each shell with a generous amount of the cheesy filling. I usually aim for about 2-3 tablespoons per shell, making sure they’re plump but not overstuffed to the point of bursting. If you want to make this process even easier and less messy, you can transfer the filling to a large piping bag (or a large Ziploc bag with a corner snipped off) and pipe the filling into each shell. This method is incredibly efficient and results in beautifully consistent shells. Take your time with this step to ensure each shell is adequately filled for maximum cheesy goodness.
-
Arrange in the Baking Dish:
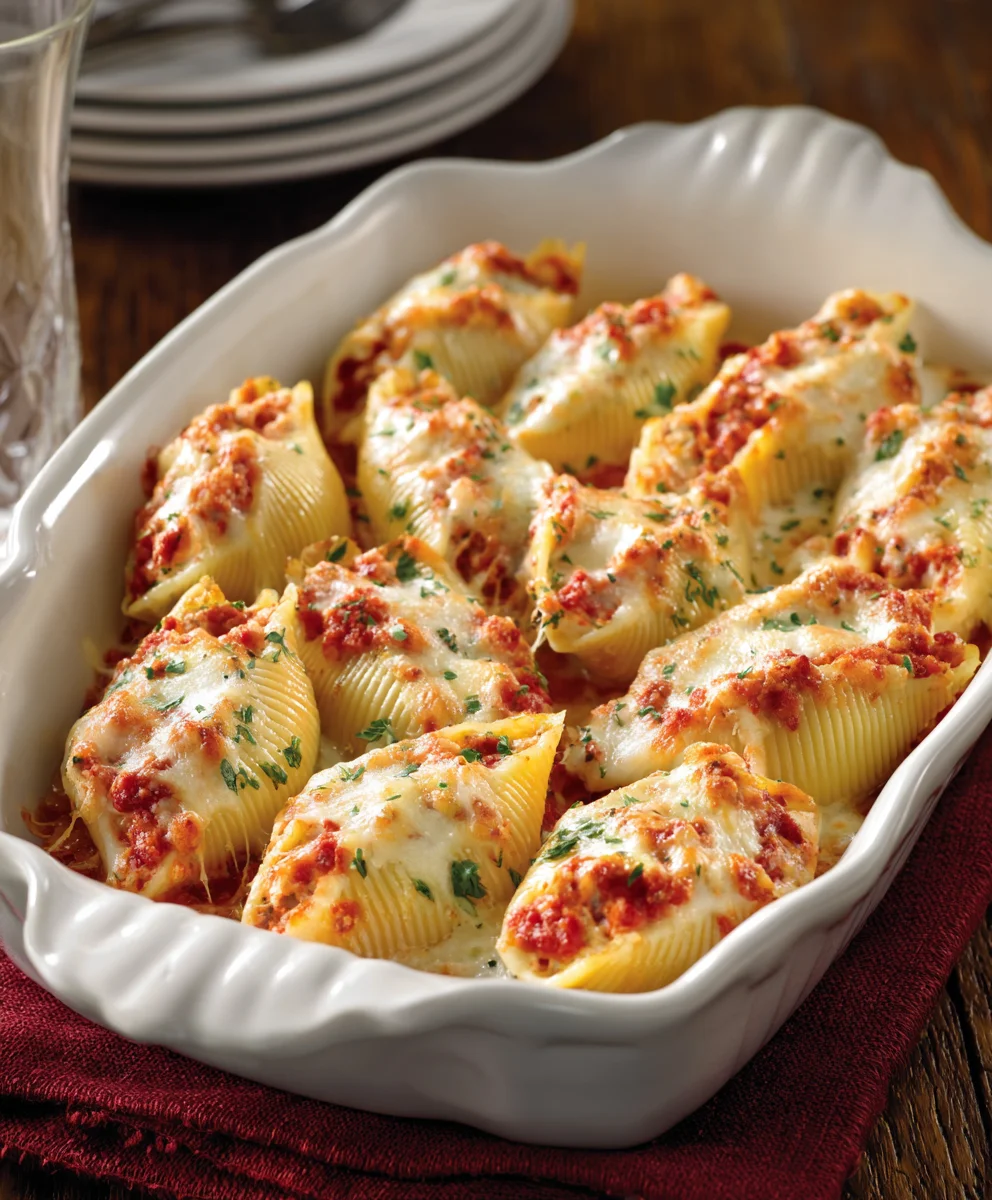
As you fill each shell, arrange it seam-side up in the prepared baking dish. You want them to be snug but not overly crowded. They should fit nicely in a single layer. If you have any extra shells or filling, you can always use a second, smaller baking dish. Arranging them neatly ensures even cooking and presentation, making your Cheesy Stuffed Shells Easy look as good as they taste.
-
Sauce and Cheese Topping:
Once all the shells are nestled in the dish, pour the remaining marinara sauce evenly over the top of the stuffed shells. Make sure to cover them well; this keeps them moist and adds another layer of flavor. Then, sprinkle generously with extra grated Parmesan cheese and, if you like, a little more shredded mozzarella. This top layer of cheese will melt into a golden, bubbly crust that is absolutely irresistible. For a vibrant touch, I sometimes sprinkle a little more fresh parsley on top at this stage, or wait until after baking for garnish.
-
Prepare for Baking:
Cover the baking dish tightly with aluminum foil. This step is important because it traps steam, helping the shells cook through without drying out and allowing the flavors to meld beautifully. Make sure the foil doesn’t touch the cheese too much; you can spray the underside of the foil with cooking spray if you’re worried about sticking. Your Cheesy Stuffed Shells Easy are now ready for their oven transformation!
Baking to Golden Perfection
The final phase! Baking is where all our hard work comes to fruition, transforming our meticulously assembled dish into bubbling, golden perfection. Getting the timing right ensures that the pasta is tender, the filling is hot, and the cheese is beautifully melted and slightly browned.
-
Initial Covered Bake:
Place the covered baking dish into your preheated 375°F (190°C) oven. Bake for 25-30 minutes. During this initial covered bake, the heat penetrates through the dish, allowing the pasta to fully tenderize, the cheeses in the filling to melt and meld, and all the flavors to deepen. The foil creates a steaming environment that prevents the shells from drying out and ensures the cheesy filling heats thoroughly. You’ll start to smell the delightful aromas filling your kitchen during this stage – a sure sign that something delicious is happening!
-
Uncovered Bake for Golden Finish:
After 25-30 minutes, carefully remove the foil from the baking dish. Be mindful of the steam that will escape! At this point, the shells should be tender, and the sauce should be bubbly. Return the uncovered dish to the oven and continue baking for another 15-20 minutes, or until the sauce is deeply bubbly around the edges, and the cheese on top is melted, golden brown, and slightly caramelized in spots. This uncovered bake is crucial for developing that beautiful golden crust that truly makes these Cheesy Stuffed Shells Easy irresistible. Keep an eye on it to ensure it doesn’t get too dark.
-
Resting Period is Key:
Once baked to perfection, remove the baking dish from the oven. I know it’s tempting to dive right in, but trust me on this: allow the Cheesy Stuffed Shells Easy to rest for 10-15 minutes before serving. This resting period is not just for cooling; it allows the sauces and cheeses to set slightly, preventing a soupy mess when you serve and ensuring each shell holds its perfect shape. The flavors also have a chance to settle and intensify. Think of it like letting a steak rest – it makes all the difference!
Serving Suggestions and Variations
Your delicious Cheesy Stuffed Shells Easy are now ready to be enjoyed! Here are some ideas for serving, along with a few creative twists to make this dish your own.
-
Garnish and Serve:
After the resting period, sprinkle your beautifully baked shells with a little more fresh parsley or fresh basil for a pop of color and an extra layer of freshness. Serve them warm straight from the dish. I love to serve these with a crisp green salad tossed in a light vinaigrette – the acidity cuts through the richness of the cheese beautifully. A side of warm, crusty garlic bread is also a fantastic addition for soaking up any extra sauce. It’s a complete, comforting meal that’s perfect for a family dinner or entertaining guests.
-
Make-Ahead Magic:
One of the best things about these Cheesy Stuffed Shells Easy is how well they can be prepared in advance! You can assemble the entire dish, including topping with sauce and cheese, up to 24 hours before baking. Cover the dish tightly with plastic wrap or aluminum foil and refrigerate. When you’re ready to bake, remove it from the fridge about 30 minutes before baking to allow it to come closer to room temperature, then bake as directed, possibly adding an extra 10-15 minutes to the covered baking time since it’s starting from cold. This makes them an ideal choice for busy weeknights or when hosting a dinner party.
-
Freezing for Future Feasts:
These stuffed shells freeze wonderfully, making them a fantastic freezer meal. You can either freeze them baked or unbaked.
- To freeze unbaked: Assemble the shells in an oven-safe, freezer-safe dish. Cover tightly with a layer of plastic wrap, then a layer of aluminum foil. Label with the date. Freeze for up to 2-3 months. When ready to bake, thaw overnight in the refrigerator, then bake as directed. If baking from frozen, it will take significantly longer (expect 1.5-2 hours covered, then uncover and finish baking).
- To freeze baked: Allow the baked dish to cool completely. Divide into individual portions or leave whole. Cover tightly with plastic wrap and foil. Freeze for up to 2-3 months. Thaw in the refrigerator and reheat gently in the oven or microwave until heated through.
Having a batch of these “Cheesy Stuffed Shells Easy” in the freezer is a true lifesaver!
-
Delightful Variations to Explore:
While the cheesy version is incredibly satisfying, don’t hesitate to personalize your stuffed shells:
- Spinach & Mushroom: Sauté a cup of fresh spinach (squeeze out excess water) and finely diced mushrooms with your onion and garlic, then add to the cheese mixture. This adds an earthy flavor and more vegetables.
- Hearty Meat Sauce: For a meatier dish, brown ½ pound of ground beef, Italian sausage, or a combination, draining any fat. Mix it into your marinara sauce before layering in the baking dish, or even add a small amount to the cheesy filling. Just remember to adjust your seasonings.
- Spicy Kick: Increase the red pepper flakes in the filling, or add a pinch to your marinara sauce for a more pronounced heat.
- Different Cheeses: Experiment with other Italian cheeses like provolone, fontina, or even a smoked mozzarella for a unique flavor profile.
These variations keep the “Easy” aspect while offering new culinary adventures with your Cheesy Stuffed Shells Easy! Enjoy creating and savoring every bite.
Conclusion:
Well, my friends, we’ve reached the end of our culinary journey for today, and I truly hope you’re feeling inspired to get into your kitchen and create something truly special. What we’ve discussed is not just another recipe; it’s a gateway to an incredibly satisfying and remarkably simple meal that consistently delivers on flavor and comfort. I’ve poured my heart into guiding you through every step, ensuring that even if you’re a novice in the kitchen, you’ll feel confident tackling this dish. This isn’t merely about filling your stomach; it’s about crafting moments, whether it’s a cozy family dinner or a relaxed gathering with friends. The beauty of this particular dish lies in its impressive presentation coupled with its surprisingly straightforward preparation. It’s the kind of meal that elicits “oohs” and “aahs” from your dinner guests, yet you’ll know the secret to its ease. That’s the magic we’re chasing here, isn’t it? The ability to produce restaurant-quality comfort food right from your own home, without the stress or the fuss.
Why This Recipe Is an Absolute Must-Try:
Let me reiterate why this particular recipe for Cheesy Stuffed Shells Easy is destined to become a staple in your cooking repertoire. First and foremost, the flavor profile is simply irresistible. Imagine perfectly al dente pasta shells, generously overflowing with a creamy, rich mixture of various cheeses, all nestled in a savory tomato sauce that has been simmered to perfection. Each bite is a harmonious blend of textures and tastes – the tender pasta, the gooey, melt-in-your-mouth cheese, and the vibrant acidity of the sauce cutting through the richness. It’s pure comfort food at its finest, a warm embrace in a bowl that can soothe any soul after a long day. Beyond the incredible taste, it’s also incredibly versatile, adaptable to different palates and dietary preferences, making it an excellent choice for any occasion. Furthermore, the make-ahead potential is a game-changer for busy weeknights or for those who love to meal prep. You can assemble it in advance, refrigerate it, and then simply pop it into the oven when you’re ready to eat, minimizing last-minute stress. It truly embodies that ideal balance of delectable taste, ease of preparation, and impressive presentation.
Serving Suggestions to Elevate Your Meal:
While these stuffed shells are hearty enough to be a complete meal on their own, pairing them with a few complementary sides can truly elevate your dining experience. I always recommend starting with a fresh, crisp green salad. Think mixed greens with a light vinaigrette – perhaps a lemon-herb dressing or a balsamic glaze – to provide a refreshing counterpoint to the rich pasta. The brightness of the salad cuts through the creaminess of the cheese and sauce, creating a perfectly balanced meal. Another absolute essential is a basket of warm, crusty bread, especially garlic bread or cheesy breadsticks. There’s nothing quite like using a piece of bread to sop up every last bit of that delicious sauce from your plate; it’s a little culinary ritual that adds so much enjoyment. For those who enjoy a beverage pairing, a medium-bodied red wine, such as a Chianti or a Merlot, would beautifully complement the tomato and cheese flavors. If you prefer non-alcoholic options, sparkling cider or even just a simple glass of iced tea can be a lovely accompaniment. Don’t underestimate the power of these small additions to transform a great meal into an extraordinary one.
Get Creative! Exciting Variations to Try:
One of the aspects I love most about this recipe is its incredible flexibility. Once you’ve mastered the basic version, the possibilities for customization are endless, allowing you to truly make it your own. Want to add some protein? Brown some Italian sausage, ground beef, or shredded cooked chicken and mix it into the cheese filling before stuffing the shells. For a vegetarian twist with added texture and nutrition, sauté some finely chopped spinach (make sure to squeeze out all excess water!), mushrooms, or bell peppers and fold them into the ricotta mixture. If you’re a fan of a little heat, a pinch of red pepper flakes in the sauce or even mixed into the filling can provide a delightful kick. Experiment with different cheese combinations too! While ricotta, mozzarella, and Parmesan are classics, don’t shy away from adding a touch of provolone, asiago, or even a smoked Gouda for a unique flavor profile. For a richer sauce, consider adding a splash of heavy cream or even some pureed roasted red peppers. You could even swap out the tomato sauce for a creamy alfredo or a robust meat sauce for a completely different experience. These variations ensure that this recipe never gets boring and can be adapted to whatever ingredients you have on hand or whatever mood strikes your culinary fancy.
Your Turn: Try It and Share!
Now that you have all the tools, tips, and encouragement, it’s truly your turn to bring this incredible dish to life in your own kitchen. I genuinely believe that cooking should be an enjoyable and rewarding experience, and this recipe perfectly embodies that philosophy. Don’t be intimidated; follow the steps, trust the process, and most importantly, have fun with it! The aroma alone as it bakes will be enough to get your taste buds tingling with anticipation. Once you’ve pulled that golden, bubbly casserole from the oven, and taken that first glorious bite, I’m confident you’ll understand why I’m so passionate about sharing this with you. But my excitement doesn’t stop there; I’m incredibly eager to hear about your experience! Did you stick to the classic recipe, or did you get creative with some of the variations? What did your family and friends think? Please, I urge you to come back and leave a comment below. Share your photos on social media and tag me! Your feedback, your tips, and your stories are what truly enrich this culinary community we’re building together. Let’s inspire each other to keep cooking, keep exploring, and keep sharing the joy of delicious homemade food. Happy cooking, everyone!
Quick & Easy Cheesy Stuffed Shells Recipe
Imagine tender jumbo pasta shells, each a perfect vessel for a rich, creamy blend of ricotta, mozzarella, and Parmesan cheeses, all baked to golden perfection in a vibrant marinara sauce. This beloved classic is a comforting staple that brings joy to any table, effortlessly combining rustic Italian charm with everyday convenience.
Ingredients
-
24-30 jumbo pasta shells (12 ounces)
-
2 tablespoons olive oil
-
1 medium yellow onion, chopped
-
4 cloves garlic, minced
-
15 ounces (1 ¾ cups) whole milk ricotta cheese
-
8 ounces fresh mozzarella cheese, shredded
-
½ cup grated Parmesan cheese, plus extra
-
1 large egg, lightly beaten
-
½ cup fresh parsley, chopped, plus extra for garnish
-
2 tablespoons fresh basil, chopped (or 1 teaspoon dried)
-
1 teaspoon dried oregano
-
½ teaspoon red pepper flakes (optional)
-
Salt and fresh black pepper to taste
-
2 jars (24-26 ounces each) marinara sauce
Instructions
-
Step 1
Boil a large pot of generously salted water. -
Step 2
Add shells and cook for 8-10 minutes until just beyond al dente. Stir gently to prevent sticking. -
Step 3
Drain shells and rinse immediately under cold water. Lay them on a baking sheet to cool and dry completely. -
Step 4
Heat 2 tbsp olive oil in a skillet over medium heat. Sauté chopped onion for 5-7 mins until soft. Add minced garlic and cook for 1-2 mins until fragrant. Remove from heat and cool slightly. -
Step 5
In a large bowl, combine ricotta, shredded mozzarella, and ½ cup Parmesan cheese. -
Step 6
Add lightly beaten egg, chopped parsley, chopped basil (or dried), dried oregano, and optional red pepper flakes to the cheese mixture. Mix well. -
Step 7
Stir the cooled sautéed onion and garlic into the cheese mixture. Season generously with salt and fresh black pepper to taste. Mix until well combined. -
Step 8
Preheat oven to 375°F (190°C). Spread 1.5-2 cups marinara sauce evenly in a 9×13-inch baking dish. -
Step 9
Gently open each cooled shell and fill with 2-3 tablespoons of cheesy filling. (Optional: use a piping bag for easier stuffing). -
Step 10
Arrange stuffed shells seam-side up in a single layer in the baking dish. -
Step 11
Pour remaining marinara sauce over shells. Sprinkle generously with extra Parmesan and optional shredded mozzarella. -
Step 12
Cover the baking dish tightly with aluminum foil. -
Step 13
Bake covered for 25-30 minutes in the preheated oven. -
Step 14
Remove foil and bake uncovered for another 15-20 minutes, until bubbly and cheese is golden brown. -
Step 15
Let rest for 10-15 minutes before serving.
Important Information
Nutrition Facts (Per Serving)
It is important to consider this information as approximate and not to use it as definitive health advice.
Allergy Information
Please check ingredients for potential allergens and consult a health professional if in doubt.

Leave a Comment