

Pineapple Christmas Balls Recipe – a delightful twist on classic holiday treats, promising a burst of tropical sunshine even on the chilliest winter days. Every holiday season, we seek out those special recipes that not only taste incredible but also bring a unique charm to our festive table. This year, allow me to introduce you to a truly remarkable no-bake confection that will surely become a new family favorite.
While many traditional Christmas desserts feature rich chocolate or warm spices, this particular recipe offers a refreshingly zesty and sweet alternative. Originating from a desire to blend traditional holiday cheer with the vibrant, exotic flavors of the tropics, these delightful pineapple balls have become a beloved staple in many homes, especially where fresh fruit is abundant during the festive period. They carry a cheerful, celebratory spirit perfect for any gathering.
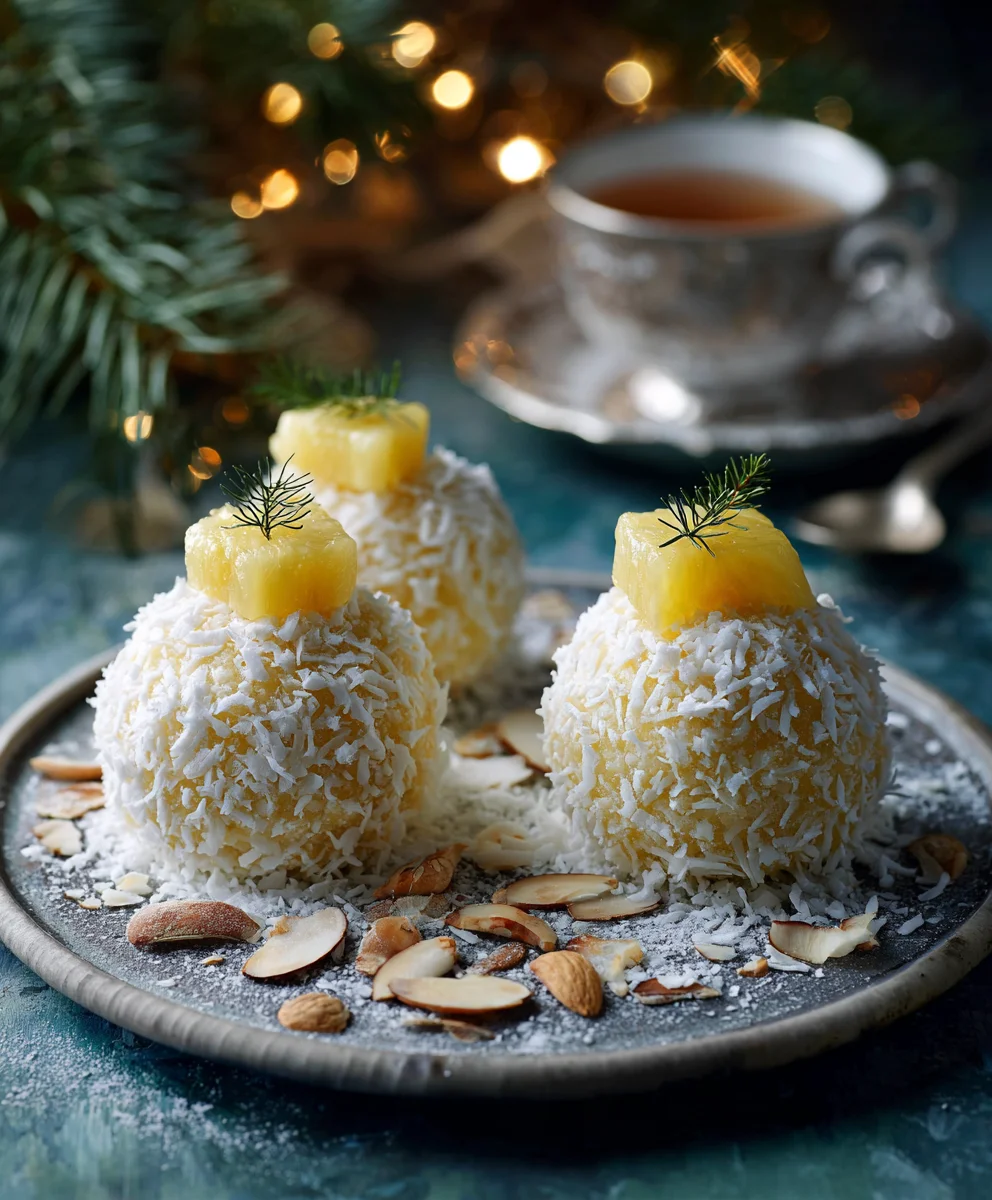
People adore this Pineapple Christmas Balls Recipe for its incredible simplicity, requiring no oven, and its irresistible combination of tangy crushed pineapple, sweet shredded coconut, and a hint of crunchy biscuit. These treats are perfect for involving little helpers in the kitchen, making them a wonderful activity for creating lasting holiday memories. Imagine a chewy, sweet bite that instantly transports you to a warm, sandy beach, even as snow falls outside. They are not just treats; they are little spheres of joy, ideal for potlucks, gift baskets, or simply enjoying with a warm cup of tea.

Ingredients:
- For the Pineapple Filling:
- 2 large (approximately 3-4 lbs total) ripe pineapples, fresh is always best!
- 1 cup granulated sugar (or more/less to taste, depending on pineapple sweetness)
- 2 tablespoons fresh lemon juice (this really brightens up the flavor)
- 1 cinnamon stick (about 3 inches long – for that warm, festive aroma)
- 2 star anise pods (optional, but adds a lovely, subtle spice)
- For the Cookie Dough:
- 2 ½ cups all-purpose flour, sifted (a crucial step for light, airy cookies!)
- 1 cup (2 sticks or 226g) unsalted butter, softened to room temperature (not melted, just soft enough to indent easily)
- ½ cup confectioners’ sugar (also known as icing sugar), sifted (for a smooth, melt-in-your-mouth texture)
- 2 large egg yolks (these add richness and help bind the dough beautifully)
- 1 teaspoon pure vanilla extract (go for good quality here, it makes a difference!)
- ¼ teaspoon salt (to balance the sweetness and enhance flavors)
- For the Egg Wash:
- 1 large egg yolk
- 1 teaspoon milk or water
- Optional Garnish/Coating:
- Extra confectioners’ sugar for dusting
- Shredded coconut, lightly toasted
- Christmas-themed sprinkles
Preparing the Delicious Pineapple Filling for Our Christmas Balls
Making your own pineapple filling is absolutely worth the effort for this Pineapple Christmas Balls Recipe. It’s fresh, vibrant, and incredibly flavorful, a huge step up from store-bought versions. Let’s get started!
- Peel and Prepare the Pineapples: First things first, we need to tackle those beautiful pineapples. Using a sharp knife, carefully slice off the top and bottom of each pineapple. Stand the pineapple upright and, following its curve, slice downwards to remove the prickly skin. Once peeled, you’ll notice little “eyes” remaining; use a small paring knife to carve these out in a V-shape. Finally, quarter each pineapple lengthwise and remove the tough, fibrous core from each quarter. I find a good way to do this is to slice down the length of the core.
- Grate or Finely Chop the Pineapple: Now, for the juicy part! You have a couple of options here. You can either grate the pineapple flesh using the coarse side of a box grater, which yields a finer, jam-like consistency perfect for stuffing. Alternatively, you can finely chop the pineapple into very small pieces. Both methods work well, but grating usually results in a smoother filling. Place all the grated or chopped pineapple into a large, heavy-bottomed pot or a deep skillet.
- Cook Down the Pineapple: Add the granulated sugar, fresh lemon juice, cinnamon stick, and star anise pods to the pot with the pineapple. Give everything a good stir to combine. Place the pot over medium-high heat and bring the mixture to a vigorous boil. Once it’s bubbling merrily, reduce the heat to medium-low. This is where patience becomes your best friend! You’ll need to simmer the pineapple filling, stirring frequently to prevent sticking, for a considerable amount of time – usually between 1 to 1.5 hours. The goal here is to evaporate almost all the liquid until the mixture becomes very thick, sticky, and jam-like. When you drag a spoon across the bottom of the pot, it should leave a clear path for a few seconds before the filling slowly creeps back. It should also have a beautiful golden-brown color.
- Cool and Chill the Filling: Once your pineapple filling has reached the perfect thick consistency, remove the pot from the heat. Carefully pick out and discard the cinnamon stick and star anise pods. Transfer the hot filling to a heatproof bowl or container and allow it to cool completely at room temperature. After it has cooled, cover the bowl and refrigerate the filling for at least 2-3 hours, or even better, overnight. Chilling the filling makes it much firmer and significantly easier to handle and roll into balls for our Pineapple Christmas Balls. This step is crucial for easy assembly!
- Form the Filling Balls: Once the filling is thoroughly chilled and firm, use a small spoon or a ½ teaspoon measuring spoon to scoop out portions of the filling. Roll each portion between your palms to form small, compact balls, roughly ½ to ¾ inch in diameter, or about the size of a small marble. The size of your filling balls should be proportional to the size you intend your cookie balls to be. Place these formed pineapple balls on a plate lined with parchment paper and keep them in the refrigerator until you are ready to stuff the dough. Having these ready beforehand makes the assembly process very smooth.
Preparing the Perfect Dough for Your Pineapple Christmas Balls
A good cookie dough is the foundation of any fantastic Christmas ball. For this Pineapple Christmas Balls Recipe, we want a dough that’s tender, rich, and easy to work with. Let’s get mixing!
- Cream the Butter and Sugar: In a large mixing bowl, either using an electric stand mixer fitted with the paddle attachment or a hand mixer, combine the softened unsalted butter and sifted confectioners’ sugar. Beat them together on medium speed for about 3 to 5 minutes until the mixture is beautifully pale yellow, light, and wonderfully fluffy. Make sure to scrape down the sides of the bowl occasionally with a rubber spatula to ensure everything is thoroughly incorporated and no sugar bits are left behind. Proper creaming incorporates air, making your cookies tender.
- Add Egg Yolks and Vanilla: Reduce the mixer speed to low. Add the two large egg yolks, one at a time, mixing well after each addition until fully incorporated. Follow this with the pure vanilla extract and the salt. Continue mixing on low speed until just combined. Be careful not to overmix at this stage, as too much air can sometimes lead to a tougher cookie.
- Incorporate the Flour: With the mixer still on low speed, gradually add the sifted all-purpose flour, about a third at a time, mixing only until just combined after each addition. The dough will start to come together and may appear crumbly at first, but it will eventually form a soft, pliable ball. The key here is not to overmix the flour! Overmixing develops gluten, which can make your cookies tough and less tender. As soon as you see no streaks of dry flour, stop mixing.
- Chill the Dough: Once the dough has come together, gently gather it into a disk shape. Wrap it tightly in plastic wrap and refrigerate it for at least 30 minutes to 1 hour. Chilling the dough helps firm up the butter, making the dough much easier to handle and preventing it from spreading too much during baking. It also allows the flavors to meld beautifully. If your kitchen is warm, you might even consider chilling it for a bit longer.
Shaping and Baking Your Festive Pineapple Christmas Balls
Now for the fun part – assembling and baking these delightful treats! This stage truly brings our Pineapple Christmas Balls Recipe to life, transforming simple ingredients into a festive masterpiece.
- Preheat Oven and Prepare Baking Sheets: About 15-20 minutes before you’re ready to bake, preheat your oven to 350°F (175°C). Line two large baking sheets with parchment paper. This prevents sticking and makes for easy cleanup. Trust me, you’ll thank yourself later!
- Prepare the Egg Wash: In a small bowl, whisk together the egg yolk with 1 teaspoon of milk or water. This will be used to brush over our Pineapple Christmas Balls before baking, giving them a lovely golden sheen.
-
Assemble the Christmas Balls:
- Take your chilled cookie dough out of the refrigerator. If it’s too firm to work with, let it sit at room temperature for a few minutes until it’s pliable but still cool.
- Scoop out small portions of dough, about 1 tablespoon each. You can use a small cookie scoop for consistency. Flatten each portion of dough into a small disc in the palm of your hand. The disc should be wide enough to comfortably wrap around one of your pre-rolled pineapple filling balls.
- Place one chilled pineapple filling ball in the center of the flattened dough disc.
- Carefully bring the edges of the dough up and around the pineapple filling, pinching and sealing the seams completely to enclose the filling. Gently roll the enclosed dough between your palms to form a smooth, round ball. It’s crucial to ensure there are no cracks or open seams, as the pineapple filling can ooze out during baking. Take your time with each one.
- Place the formed Pineapple Christmas Balls seam-side down on the prepared baking sheets, leaving about 1 to 1.5 inches of space between each one to allow for even baking and slight spreading.
- Egg Wash and Optional Decorating: Once all your Pineapple Christmas Balls are neatly arranged on the baking sheets, gently brush the tops of each ball with the prepared egg wash. This gives them a beautiful golden glow when baked. If you’re feeling extra festive, this is the perfect time to add a sprinkle of shredded coconut or some cheerful Christmas sprinkles on top of the egg wash. The egg wash acts as a glue, holding the garnishes in place.
- Bake to Golden Perfection: Place the baking sheets in the preheated oven. Bake for approximately 15 to 20 minutes, or until the Pineapple Christmas Balls are beautifully golden brown on the bottom and lightly golden on top. The exact baking time may vary slightly depending on your oven and the size of your balls, so keep an eye on them. You want them cooked through but still tender.
- Cool the Cookies: Once baked, carefully remove the baking sheets from the oven. Let the Pineapple Christmas Balls cool on the baking sheets for about 5 minutes before transferring them to a wire rack to cool completely. They will be quite delicate when warm, so handle them with care. Cooling on a wire rack allows air circulation, preventing the bottoms from becoming soggy.
Finishing Touches and Enjoying Your Pineapple Christmas Balls
After all that meticulous work, it’s time for the final flourish and, of course, the best part – tasting your homemade delights! These finishing touches elevate our Pineapple Christmas Balls Recipe from great to absolutely spectacular.
- Optional Dusting for a Snowy Effect: Once the Pineapple Christmas Balls have cooled completely to room temperature, you can dust them generously with extra sifted confectioners’ sugar. This creates a beautiful, snowy winter wonderland effect, making them even more festive and inviting. You can use a small sieve or a specialized dusting wand for an even coating. This adds an extra layer of sweetness and a delicate appearance.
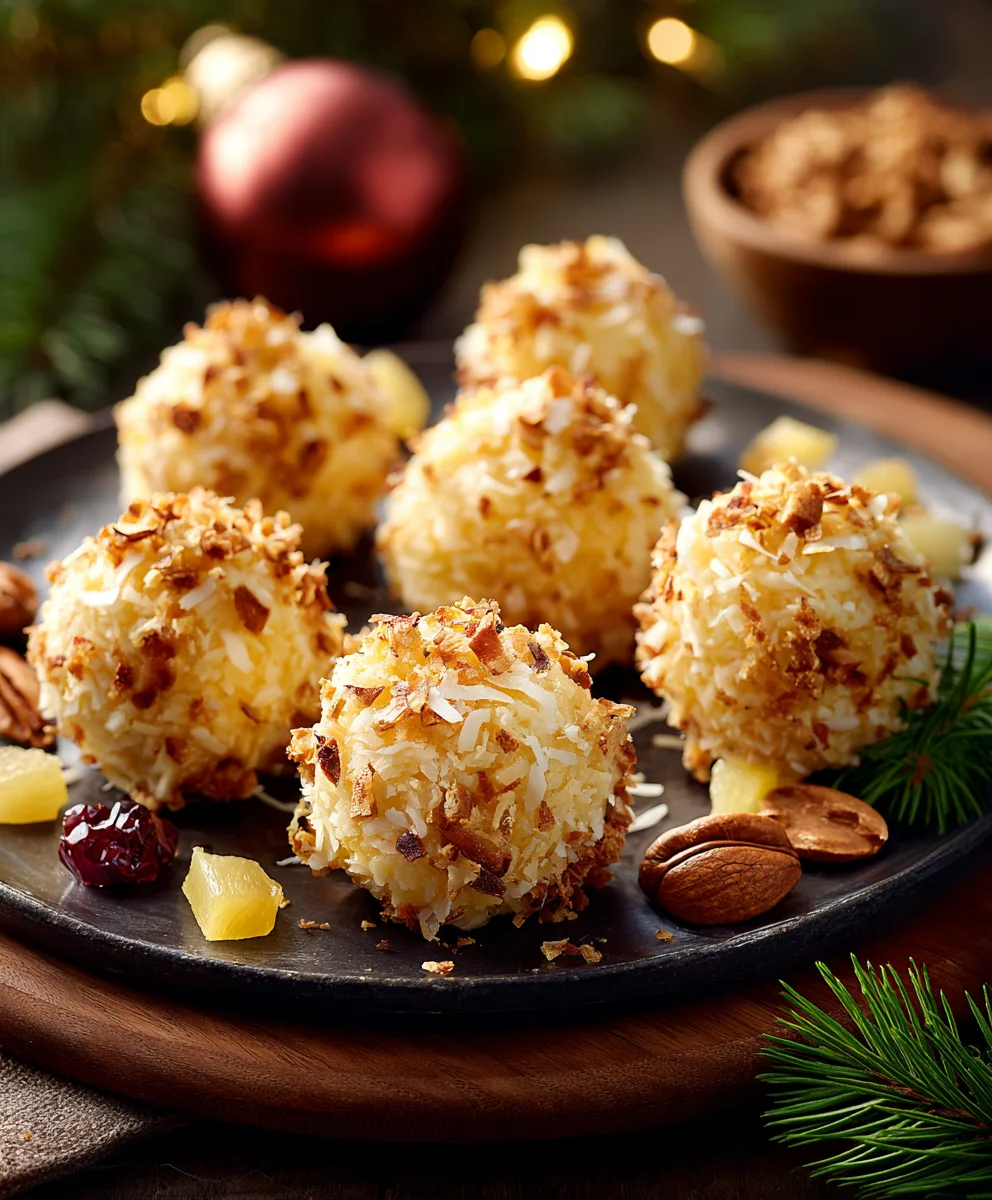
- Consider Other Coatings (If Not Applied Before Baking): If you didn’t add shredded coconut or sprinkles before baking, you can still do so now! You could gently roll the cooled balls in toasted shredded coconut, or if you prefer a bit of extra sweetness, a light dusting of cinnamon sugar would also be delightful. For a simple glaze, you could whisk together some confectioners’ sugar with a tiny bit of milk or lemon juice until it’s a pourable consistency, then drizzle it over the cooled balls.
-
Serving Suggestions and Storage:
- Serve Warm or Cold: These Pineapple Christmas Balls are delicious both at room temperature or slightly warmed. If you choose to warm them, a few seconds in the microwave can bring out the gooey pineapple filling wonderfully, but be careful not to overheat.
- Pairing: They pair wonderfully with a cup of hot tea, coffee, or even a glass of cold milk. They are perfect for holiday gatherings, cookie exchanges, or simply as a special treat for your family.
- Storage: Store the cooled Pineapple Christmas Balls in an airtight container at room temperature for up to 3-4 days. For longer freshness, you can refrigerate them for up to a week. If you plan to make them well in advance, they also freeze beautifully. Place them in a single layer in an airtight freezer-safe container or bag, separated by parchment paper, and they will keep for up to 1-2 months. Thaw them at room temperature before serving.
- Enjoy the Fruits of Your Labor: Take a moment to admire your beautiful homemade Pineapple Christmas Balls. Each one is a testament to your baking skills and a delightful treat that embodies the spirit of the holidays. The burst of tangy, sweet pineapple filling encased in a tender, buttery cookie shell is truly irresistible. Share them with loved ones and enjoy the smiles they bring!
<h2>Conclusion:</h2>
<p>So, there you have it! We’ve journeyed through the simple yet incredibly rewarding process of creating these delightful festive treats. I truly believe that this <strong>Pineapple Christmas Balls Recipe</strong> is more than just a sweet; it’s a burst of unexpected sunshine, a refreshing counterpoint to the traditional heavy flavors often found during the holiday season. The combination of sweet, tangy pineapple with that perfect chewy texture is nothing short of magical, providing a delightful surprise that will have everyone reaching for just one more. I’ve found that their vibrant flavor and beautiful presentation make them an instant hit, leaving a lasting impression on anyone who tries them. They are remarkably easy to prepare, requiring no baking and just a handful of ingredients, making them an ideal project for busy individuals or a fun activity to share with family, especially with little helpers in the kitchen. Imagine the smiles when these little golden nuggets of joy are unveiled; they truly encapsulate the spirit of giving and sharing in every bite.</p>
<h4>Serving Suggestions & Creative Variations</h4>
<p>Now that you’ve mastered this fantastic recipe, let’s talk about how to showcase these beauties or even put your own unique spin on them. <strong>For serving</strong>, I love arranging them on a festive platter alongside other holiday cookies, where their bright color truly pops. They are absolutely divine with a cup of hot coffee or tea, providing a wonderful little pick-me-up during a chilly afternoon. Consider packaging them in small, decorative boxes or cellophane bags tied with a ribbon; they make for thoughtful, homemade gifts that friends, neighbors, and colleagues will absolutely adore. I often prepare a large batch and store them in an airtight container, pulling them out whenever unexpected guests drop by – they never fail to impress!</p>
<p>But don’t stop there; <strong>the possibilities for variation are endless</strong>! If you’re looking to add another layer of flavor and texture, try rolling some of the balls in finely chopped toasted pecans or walnuts for a nutty crunch. For an even more decadent touch, a drizzle of melted dark or white chocolate over the finished balls can transform them into an elegant confection. You could also experiment with different coatings beyond shredded coconut; how about colorful sprinkles for a fun, kid-friendly look, or even a light dusting of powdered sugar for a snowy effect? For those who love a bit of spice, a pinch of ground cardamom or ginger mixed into the pineapple mixture before shaping can introduce a warm, aromatic note that complements the fruit beautifully. And while we focused on pineapple, don’t hesitate to consider other dried fruits in the future – dried mango or apricot could offer equally delicious and exciting twists! Each variation offers a fresh perspective, allowing you to tailor this versatile recipe to your personal taste or the theme of your gathering.</p>
<h4>Your Turn: Embrace the Joy of Baking!</h4>
<p>I genuinely hope you’re feeling inspired to give this <strong>Pineapple Christmas Balls Recipe</strong> a try. It’s a truly delightful experience from start to finish, and the reward of those first few bites is simply unmatched. There’s a special kind of satisfaction that comes from creating something so delicious with your own hands, and I promise you, these little tropical gems will bring a smile to everyone’s face. Don’t be afraid to get creative with your own additions and decorations – that’s where the real magic of home baking lies, making a recipe truly yours.</p>
<p>After you’ve whipped up your batch, I would absolutely love to hear about your experience! <strong>Please share your thoughts</strong> on how they turned out, what variations you tried, or any special moments you created while making or sharing them. Did you roll them in toasted coconut, or did you go for a chocolate drizzle? Did your family fall in love with them as much as mine has? Your feedback and shared joy are what make this baking community so wonderful. Let’s spread the festive cheer, one delicious pineapple ball at a time. <strong>Go ahead, gather your ingredients, and let the holiday magic begin in your kitchen!</strong></p>
Pineapple Christmas Balls: Festive No-Bake Holiday Treat!
A delightful twist on classic holiday treats, these no-bake Pineapple Christmas Balls offer a burst of tropical sunshine. Featuring tangy crushed pineapple, sweet shredded coconut, and crunchy graham crumbs, they are simple to make and perfect for festive gatherings.
Ingredients
-
1 (20 oz) can crushed pineapple, well drained
-
1 (3 oz) package pineapple flavored gelatin mix
-
1 ½ cups graham cracker crumbs
-
1 cup shredded coconut, plus more for coating
-
½ cup (1 stick) unsalted butter, melted
-
½ cup confectioners’ sugar, plus more for coating
Instructions
-
Step 1
In a large bowl, combine the well-drained crushed pineapple, pineapple flavored gelatin mix, graham cracker crumbs, 1 cup shredded coconut, and melted unsalted butter. Mix thoroughly until all ingredients are well combined. -
Step 2
Cover the mixture and refrigerate for at least 1 hour, or until it is firm enough to easily handle and roll. -
Step 3
Prepare two shallow dishes: one with additional shredded coconut and another with extra confectioners’ sugar for coating the balls. -
Step 4
Scoop out approximately 1 tablespoon of the chilled mixture and roll it between your palms to form a smooth, round ball. -
Step 5
Roll each formed ball in either the prepared shredded coconut or confectioners’ sugar until it is evenly and completely coated. -
Step 6
Place the coated Pineapple Christmas Balls on a parchment-lined plate or tray. Chill them again until firm before serving. -
Step 7
Store the cooled Pineapple Christmas Balls in an airtight container in the refrigerator for up to a week. For longer storage, they can be frozen for 1-2 months.
Important Information
Nutrition Facts (Per Serving)
It is important to consider this information as approximate and not to use it as definitive health advice.
Allergy Information
Please check ingredients for potential allergens and consult a health professional if in doubt.

Leave a Comment