

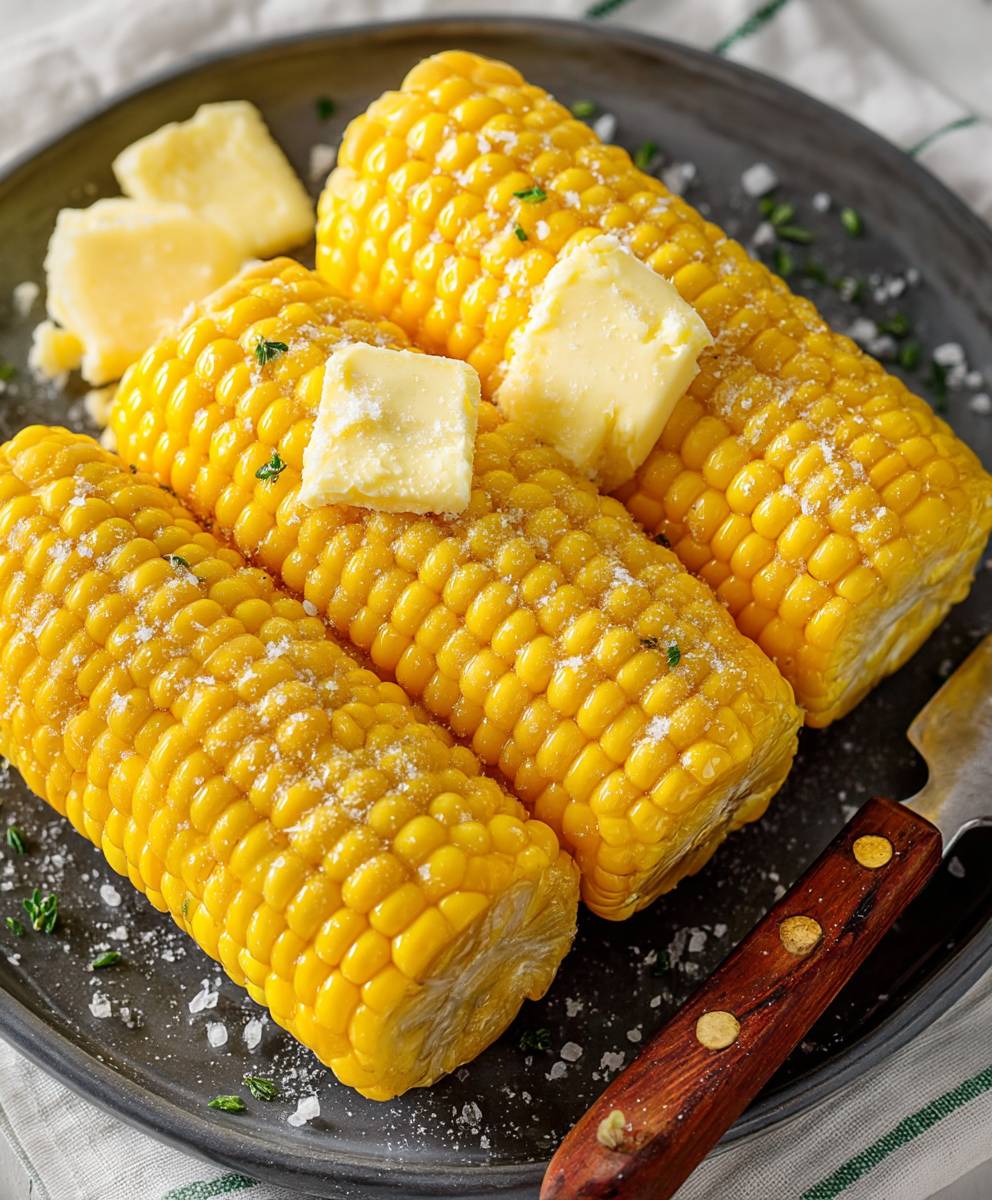
Boil Corn on the Cob for the sweetest, most satisfying summer side dish imaginable! Forget complicated recipes and fancy ingredients. We’re going back to basics with a method that guarantees perfectly cooked, juicy corn every single time. Have you ever bitten into a cob of corn and been instantly transported back to childhood barbecues and county fairs? That’s the magic of this simple pleasure.
Corn on the cob has a rich history, deeply intertwined with the cultures of indigenous peoples of the Americas. For centuries, corn has been a staple food, providing sustenance and playing a vital role in traditions and celebrations. While our method of simply boiling it might seem straightforward, it’s a testament to the inherent deliciousness of this humble grain.
People adore boil corn on the cob because it’s quick, easy, and utterly delicious. The natural sweetness of the corn is enhanced by the gentle cooking process, resulting in kernels that burst with flavor. Plus, there’s something undeniably satisfying about slathering a perfectly cooked cob with butter and enjoying every single bite. Whether you’re grilling, picnicking, or simply looking for a tasty side to complement your meal, learning how to boil corn on the cob is a skill every home cook should master. So, let’s get started!

Ingredients:
- 4 ears of fresh corn on the cob, husks and silk removed
- Water (enough to cover the corn in a large pot)
- 1 tablespoon salt (optional, for seasoning the water)
- 2 tablespoons butter, unsalted (optional, for serving)
- Salt and pepper to taste (optional, for serving)
- Fresh herbs like parsley or chives, chopped (optional, for garnish)
Preparing the Corn:
- Shucking the Corn: The first and most important step is to properly shuck the corn. This means removing the outer green husks and the silky threads underneath. Start by peeling back the husks from the top of the ear. Once you have a good grip, pull the husks down towards the base of the corn. You might need to peel off a few layers at a time.
- Removing the Silk: After the husks are removed, you’ll see the corn silk those fine, thread-like strands. These can be a bit stubborn to remove. The best way to get rid of them is to use your fingers to gently pull them off. You can also use a clean vegetable brush to help dislodge any stubborn silk. Don’t worry about getting every single strand; a few remaining won’t hurt anything.
- Trimming the Ends (Optional): If the ends of the corn are a bit ragged or discolored, you can trim them off with a sharp knife. This is purely for aesthetic purposes and doesn’t affect the taste or cooking process. Just make sure to cut off only the very end, about half an inch or so.
- Washing the Corn: Give the shucked corn a quick rinse under cold running water to remove any remaining debris or silk. This also helps to hydrate the kernels slightly, which can improve their texture when cooked.
Boiling the Corn:
- Choosing the Right Pot: Select a large pot that is big enough to hold all four ears of corn comfortably. You want the corn to be fully submerged in water during the boiling process. If you don’t have a pot large enough, you might need to cut the ears of corn in half.
- Filling the Pot with Water: Fill the pot with enough cold water to completely cover the corn. It’s better to start with cold water, as this allows the corn to heat up gradually and cook more evenly.
- Adding Salt (Optional): This is a matter of personal preference. Some people like to add salt to the boiling water, believing that it enhances the flavor of the corn. If you choose to add salt, use about 1 tablespoon per pot of water. Keep in mind that adding salt can also slightly toughen the corn, so if you prefer a more tender texture, you might want to skip this step.
- Bringing the Water to a Boil: Place the pot on the stovetop over high heat and bring the water to a rolling boil. A rolling boil is characterized by large, vigorous bubbles that are constantly moving.
- Adding the Corn: Once the water is boiling, carefully add the shucked corn to the pot. Make sure the corn is fully submerged in the water. If necessary, you can use a spoon or tongs to gently push the corn down.
- Cooking Time: After adding the corn, the water will likely stop boiling for a moment. Wait for the water to return to a boil, then reduce the heat slightly to maintain a gentle boil. Cook the corn for 5-7 minutes. The exact cooking time will depend on the freshness and size of the corn. You’ll know the corn is done when the kernels are bright yellow and slightly tender when pierced with a fork. Overcooking the corn can make it tough and mushy, so be careful not to cook it for too long.
- Checking for Doneness: To check if the corn is done, carefully remove one ear from the pot using tongs. Use a fork or knife to pierce a kernel. If the kernel is tender and releases a milky liquid when pierced, the corn is ready. If it’s still hard or starchy, continue cooking for another minute or two and check again.
Serving the Corn:
- Removing the Corn from the Pot: Once the corn is cooked, carefully remove it from the pot using tongs. Be careful, as the corn will be very hot. Place the cooked corn on a serving platter or individual plates.
- Adding Butter (Optional): While the corn is still hot, spread it with butter. The butter will melt quickly and coat the kernels, adding richness and flavor. You can use salted or unsalted butter, depending on your preference.
- Seasoning with Salt and Pepper (Optional): Sprinkle the corn with salt and pepper to taste. This is another matter of personal preference. Some people prefer a lot of salt and pepper, while others prefer just a little.
- Garnishing (Optional): For a more elegant presentation, you can garnish the corn with fresh herbs like parsley or chives. Simply chop the herbs finely and sprinkle them over the corn.
- Serving Immediately: Serve the corn immediately while it’s still hot and fresh. Boiled corn on the cob is best enjoyed right away.
Tips and Variations:
- Choosing Fresh Corn: The key to delicious boiled corn is to start with fresh, high-quality corn. Look for ears of corn that have bright green husks and plump, juicy kernels. Avoid corn that has dry or discolored husks, or kernels that are shriveled or dented.
- Soaking the Corn (Optional): Some people like to soak the corn in cold water for about 30 minutes before boiling it. This is said to help hydrate the kernels and improve their texture. However, this step is not necessary, especially if you are using fresh corn.
- Adding Sugar to the Water (Optional): Another variation is to add a tablespoon or two of sugar to the boiling water. This is said to enhance the sweetness of the corn. However, this is also a matter of personal preference and is not necessary.
- Grilling the Corn After Boiling (Optional): For a smoky flavor, you can grill the corn briefly after boiling it. Simply grill the corn over medium heat for a few minutes per side, until it’s lightly charred.
- Serving with Different Toppings: Get creative with your toppings! In addition to butter, salt, and pepper, you can try serving the corn with other toppings like chili powder, lime juice, grated Parmesan cheese, or even a drizzle of honey.
- Storing Leftover Corn: If you have any leftover boiled corn, you can store it in the refrigerator for up to 3 days. To reheat the corn, you can boil it again for a few minutes, or microwave it for a minute or two.
Troubleshooting:
- Corn is Too Tough: If your corn is tough, it’s likely that you overcooked it. Next time, try cooking it for a shorter amount of time.
- Corn is Too Mushy: If your corn is mushy, it’s likely that you overcooked it. Next time, try cooking it for a shorter amount of time.
- Corn is Not Sweet Enough: If your corn is not sweet enough, it’s likely that it’s not fresh. Try to buy the freshest corn possible. You can also try adding a tablespoon or two of sugar to the boiling water.
- Corn is Bland: If your corn is bland, try adding more salt and pepper. You can also try serving it with different toppings like chili powder, lime juice, or grated Parmesan cheese.
Nutritional Information (Approximate, per ear):
- Calories: 123
- Protein: 4.7 grams
- Fat: 1.8 grams
- Carbohydrates: 27 grams
- Fiber: 2 grams
- Sugar: 6.3 grams
Enjoy your perfectly boiled corn on the cob! It’s a simple yet satisfying dish that’s perfect for summer barbecues, picnics, or any time you’re craving a taste of fresh, seasonal produce.
Conclusion:
And there you have it! Boiling corn on the cob might seem simple, but mastering the technique unlocks a world of sweet, juicy deliciousness. I truly believe this is a must-try recipe, not just because it’s incredibly easy, but because the results are consistently perfect. Forget tough, bland corn this method guarantees tender kernels bursting with natural sweetness every single time. It’s the kind of simple pleasure that makes summer evenings so special.
But the beauty of boiled corn on the cob lies in its versatility. While I personally love it slathered in butter and a sprinkle of salt, the possibilities are endless! For a zesty twist, try brushing it with a lime-cilantro butter. Or, if you’re feeling adventurous, grill the boiled corn for a few minutes to add a smoky char. Think about rolling it in crumbled cotija cheese and chili powder for an Elote-inspired treat. You can even cut the kernels off the cob and add them to salads, salsas, or soups for a burst of fresh flavor.
Serving Suggestions:
* Classic: Butter, salt, and pepper.
* Mexican Street Corn (Elote): Mayonnaise, cotija cheese, chili powder, lime juice.
* Garlic Herb: Garlic butter, fresh herbs (parsley, chives, thyme).
* Spicy: Chili flakes, sriracha mayo.
* Sweet: Honey butter, cinnamon sugar.
Variations:
* Boil with a pinch of sugar for extra sweetness.
* Add a bay leaf to the boiling water for a subtle savory note.
* Soak the corn in cold water for 30 minutes before boiling for enhanced moisture.
* Grill the boiled corn for a smoky flavor.
* Cut the kernels off the cob and use them in other recipes.
I’ve made this recipe countless times, and it’s always a crowd-pleaser. It’s the perfect side dish for barbecues, picnics, or even a simple weeknight dinner. Plus, it’s a great way to get kids involved in the kitchen they’ll love shucking the corn and adding their favorite toppings.
So, what are you waiting for? Grab some fresh corn on the cob and give this recipe a try! I’m confident you’ll be amazed at how easy it is to achieve perfectly cooked corn every time. And the best part? It’s a blank canvas for your culinary creativity. Don’t be afraid to experiment with different toppings and flavor combinations to find your perfect corn on the cob creation.
I’m so excited for you to experience the joy of perfectly boiled corn on the cob. Once you try this method, I promise you’ll never cook corn any other way. It’s simple, reliable, and utterly delicious.
And most importantly, I’d love to hear about your experience! Did you try any of the variations? What were your favorite toppings? Share your photos and comments below I can’t wait to see what you create! Happy cooking, and enjoy your sweet, juicy, perfectly boiled corn on the cob!
Boil Corn on the Cob: The Ultimate Guide to Perfect Results
Simple and delicious summer side dish: perfectly boiled corn on the cob.
Ingredients
- 4 ears of fresh corn on the cob, husks and silk removed
- Water (enough to cover the corn in a large pot)
- 1 tablespoon salt (optional, for seasoning the water)
- 2 tablespoons butter, unsalted (optional, for serving)
- Salt and pepper to taste (optional, for serving)
- Fresh herbs like parsley or chives, chopped (optional, for garnish)
Instructions
- Shuck the Corn: Remove the outer green husks and silky threads from the corn.
- Remove the Silk: Gently pull off the silk strands with your fingers or a vegetable brush.
- Trim the Ends (Optional): Trim any ragged or discolored ends with a sharp knife.
- Wash the Corn: Rinse the shucked corn under cold running water.
- Choose the Right Pot: Select a large pot that can hold all the corn comfortably.
- Fill the Pot with Water: Fill the pot with enough cold water to completely cover the corn.
- Add Salt (Optional): Add 1 tablespoon of salt to the water for seasoning.
- Bring the Water to a Boil: Place the pot on the stovetop over high heat and bring the water to a rolling boil.
- Add the Corn: Carefully add the shucked corn to the boiling water.
- Cooking Time: Once the water returns to a boil, reduce the heat slightly to maintain a gentle boil. Cook the corn for 5-7 minutes, until the kernels are bright yellow and slightly tender.
- Check for Doneness: Pierce a kernel with a fork or knife. If it’s tender and releases a milky liquid, the corn is ready.
- Remove the Corn from the Pot: Carefully remove the cooked corn from the pot using tongs and place it on a serving platter or individual plates.
- Add Butter (Optional): Spread the corn with butter while it’s still hot.
- Season with Salt and Pepper (Optional): Sprinkle the corn with salt and pepper to taste.
- Garnish (Optional): Garnish with fresh herbs like parsley or chives.
- Serve Immediately: Serve the corn immediately while it’s still hot and fresh.
Notes
- Choose fresh corn with bright green husks and plump, juicy kernels.
- Soaking the corn in cold water for 30 minutes before boiling is optional.
- Adding a tablespoon or two of sugar to the boiling water is optional.
- For a smoky flavor, grill the corn briefly after boiling.
- Get creative with toppings like chili powder, lime juice, or grated Parmesan cheese.
- Store leftover corn in the refrigerator for up to 3 days. Reheat by boiling or microwaving.
- If the corn is too tough or mushy, adjust the cooking time accordingly.
- If the corn is not sweet enough, buy fresher corn or add sugar to the boiling water.
- If the corn is bland, add more salt and pepper or try different toppings.

Leave a Comment