

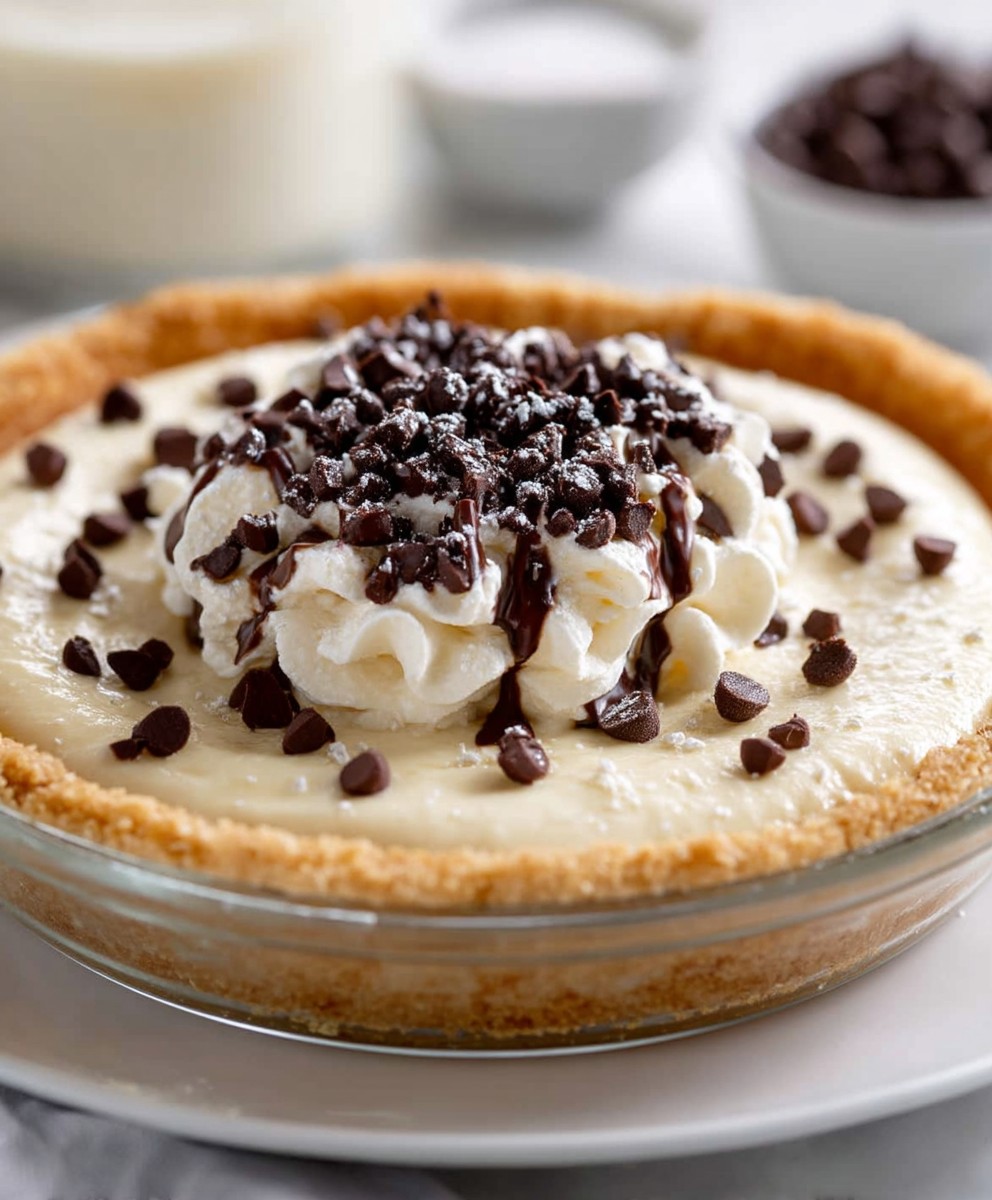
No Bake Cannoli Pie: Imagine sinking your fork into a creamy, dreamy dessert that captures all the classic flavors of a traditional cannoli, but without ever turning on your oven! This isn’t just a pie; it’s a shortcut to pure Italian indulgence, perfect for those hot summer days or when you simply crave a sweet treat without the fuss.
Cannoli, originating from Sicily, have a rich history dating back to ancient times, possibly even Roman festivals. These crispy, tube-shaped pastries filled with sweet ricotta cheese have become a beloved symbol of Italian-American culture. But let’s be honest, sometimes we want that cannoli experience without the effort of frying shells and meticulously piping filling. That’s where this No Bake Cannoli Pie comes in!
People adore cannoli for their delightful contrast of textures the crisp shell against the smooth, creamy filling. The subtle sweetness of the ricotta, often enhanced with chocolate chips, candied fruit, or pistachios, creates a symphony of flavors that’s simply irresistible. This no-bake version captures all those elements in an easy-to-assemble pie, making it a guaranteed crowd-pleaser. It’s the perfect dessert for potlucks, parties, or even just a special treat for yourself. So, ditch the oven and get ready to experience cannoli bliss in pie form!

Ingredients:
- For the Crust:
- 2 cups chocolate wafer crumbs (about 30-35 wafers)
- 6 tablespoons unsalted butter, melted
- 2 tablespoons granulated sugar
- For the Cannoli Filling:
- 32 ounces (4 cups) whole milk ricotta cheese, drained overnight
- 1 ½ cups powdered sugar, sifted
- 1 teaspoon vanilla extract
- ½ teaspoon almond extract
- ¼ teaspoon ground cinnamon
- Pinch of salt
- ½ cup mini chocolate chips
- ½ cup candied orange peel, finely chopped (optional)
- For Garnish (Optional):
- Powdered sugar, for dusting
- Mini chocolate chips
- Candied orange peel, finely chopped
- Chopped pistachios
Preparing the Crust
Okay, let’s get started with the crust! This is the foundation of our delicious no-bake cannoli pie, and it’s super easy to make.
- Crush the Chocolate Wafers: First, you’ll need to crush your chocolate wafers into fine crumbs. You can do this in a food processor, pulsing until you get a consistent crumb texture. If you don’t have a food processor, no worries! Just place the wafers in a large zip-top bag, seal it tightly, and use a rolling pin to crush them into crumbs. Make sure there are no large chunks left.
- Combine the Crumbs, Butter, and Sugar: In a medium bowl, combine the chocolate wafer crumbs, melted butter, and granulated sugar. Mix everything together really well until the crumbs are evenly moistened. The mixture should resemble wet sand. This is what will hold our crust together.
- Press the Crust into the Pie Plate: Now, transfer the crumb mixture into a 9-inch pie plate. Use the bottom of a measuring cup or your fingers to firmly press the crumbs evenly across the bottom and up the sides of the pie plate. Make sure the crust is compact and uniform in thickness. This will give you a nice, sturdy base for the filling.
- Chill the Crust: Once the crust is pressed into the pie plate, cover it with plastic wrap and place it in the refrigerator to chill for at least 30 minutes. This will help the crust set and become firm. You can even chill it for longer, up to a few hours, if you have the time. The colder the crust, the better it will hold its shape when you add the filling.
Preparing the Cannoli Filling
Now for the best part the creamy, dreamy cannoli filling! This is where the magic happens, and it’s surprisingly simple to create that classic cannoli flavor.
- Drain the Ricotta Cheese: This is a crucial step! Ricotta cheese contains a lot of moisture, and if you don’t drain it properly, your filling will be too watery. The best way to drain ricotta is to line a colander with cheesecloth (or a clean kitchen towel). Place the ricotta in the lined colander, set it over a bowl, and let it drain in the refrigerator for at least 8 hours, or preferably overnight. This will remove excess liquid and give you a thick, creamy ricotta.
- Combine the Ricotta and Powdered Sugar: In a large bowl, combine the drained ricotta cheese and sifted powdered sugar. Sifting the powdered sugar is important to prevent any lumps in your filling. Use an electric mixer (either a stand mixer or a hand mixer) to beat the ricotta and powdered sugar together until smooth and creamy. Start on low speed to prevent the powdered sugar from flying everywhere, then gradually increase the speed to medium.
- Add the Extracts and Cinnamon: Once the ricotta and powdered sugar are well combined, add the vanilla extract, almond extract, cinnamon, and salt. Mix everything together until well incorporated. The almond extract is what really gives it that authentic cannoli flavor, so don’t skip it!
- Fold in the Chocolate Chips and Candied Orange Peel: Gently fold in the mini chocolate chips and candied orange peel (if using). Be careful not to overmix, as this can deflate the filling. You want to distribute the chocolate chips and candied orange peel evenly throughout the filling.
Assembling the No-Bake Cannoli Pie
Alright, we’re in the home stretch! Now it’s time to put everything together and create our beautiful no-bake cannoli pie.
- Fill the Crust: Remove the chilled chocolate wafer crust from the refrigerator. Pour the cannoli filling into the crust, spreading it evenly with a spatula. Make sure the filling reaches all the way to the edges of the crust.
- Chill the Pie: Cover the pie with plastic wrap and refrigerate for at least 4 hours, or preferably overnight. This will allow the filling to set completely and the flavors to meld together. The longer you chill it, the better it will taste!
- Garnish (Optional): Before serving, you can garnish the pie with a dusting of powdered sugar, mini chocolate chips, chopped candied orange peel, and/or chopped pistachios. Get creative and make it look beautiful!
- Serve and Enjoy: Slice the pie into wedges and serve chilled. Enjoy the creamy, decadent flavors of cannoli in a super easy, no-bake pie!
Tips for Success
- Don’t Skip Draining the Ricotta: I can’t stress this enough! Draining the ricotta is essential for a thick, creamy filling.
- Use High-Quality Ricotta: The better the ricotta, the better the filling will taste. Look for whole milk ricotta for the richest flavor.
- Sift the Powdered Sugar: This will prevent lumps in your filling and give it a smooth, creamy texture.
- Chill Thoroughly: Chilling the pie for at least 4 hours (or overnight) is crucial for the filling to set properly.
- Get Creative with Garnishes: Have fun with the garnishes! You can use anything from powdered sugar and chocolate chips to candied orange peel and pistachios.
- Make Ahead: This pie is perfect for making ahead of time. You can prepare the crust and filling a day or two in advance and assemble the pie just before serving.
Variations
- Add Liqueur: For an extra touch of flavor, you can add a tablespoon or two of your favorite liqueur to the filling. Amaretto or Marsala wine would be delicious!
- Use Different Chocolate: Instead of mini chocolate chips, you can use chopped dark chocolate, milk chocolate, or even white chocolate.
- Add Nuts: In addition to (or instead of) pistachios, you can add other chopped nuts like almonds, walnuts, or pecans.
- Make Individual Pies: Instead of a large pie, you can make individual mini pies using small tart pans or ramekins.
- Different Crust: While the chocolate wafer crust is classic, you could experiment with a graham cracker crust or even a shortbread crust.
I hope you enjoy this No-Bake Cannoli Pie as much as I do! It’s the perfect dessert for any occasion, and it’s so easy to make. Let me know in the comments if you try it and how it turns out!
Conclusion:
So there you have it! This No Bake Cannoli Pie is truly a dessert game-changer. It captures all the creamy, crunchy, and subtly sweet flavors of a classic cannoli, but without any of the fuss of frying shells or dealing with finicky pastry. Honestly, if you’re looking for a show-stopping dessert that’s surprisingly easy to make, this is it. It’s the perfect centerpiece for your next gathering, a delightful treat for a special occasion, or even just a satisfying indulgence on a weeknight.
Why is this a must-try? Well, beyond the sheer simplicity, it’s the flavor profile that really shines. The ricotta filling is incredibly smooth and rich, perfectly balanced by the sweetness of the powdered sugar and the subtle tang of the citrus zest. The chocolate chips add a delightful burst of chocolatey goodness, and the crushed waffle cones provide that essential cannoli crunch that we all crave. It’s a symphony of textures and tastes that will have everyone coming back for seconds (and maybe even thirds!).
But the best part? It’s incredibly versatile! Feel free to get creative with your toppings and variations. For a more decadent experience, drizzle some melted dark chocolate over the top before serving. Or, if you’re a fan of nuts, sprinkle on some chopped pistachios or almonds for added crunch and flavor. You could even incorporate different extracts into the filling, like almond or vanilla, to customize the flavor to your liking.
Here are a few more serving suggestions to elevate your No Bake Cannoli Pie experience:
* Individual Mini Pies: Instead of making one large pie, press the waffle cone mixture into individual ramekins or small tart pans for adorable mini pies. This is perfect for parties or portion control!
* Cannoli Pie Parfaits: Layer the crushed waffle cones, ricotta filling, and chocolate chips in parfait glasses for a fun and elegant presentation.
* Fruit Infusion: Add a layer of fresh berries, like strawberries or raspberries, between the crust and the filling for a burst of fruity freshness.
* Coffee Kick: Mix a tablespoon of strong brewed coffee into the ricotta filling for a subtle coffee flavor that complements the chocolate chips beautifully.
* Boozy Boost: A splash of Marsala wine or rum in the filling will add a sophisticated touch.
I truly believe that this recipe is a winner, and I can’t wait for you to try it! It’s a guaranteed crowd-pleaser, and it’s so easy to make that you’ll find yourself whipping it up again and again.
So, what are you waiting for? Grab your ingredients, head to the kitchen, and get ready to create a dessert masterpiece. I promise you won’t be disappointed.
And most importantly, I’d love to hear about your experience! Once you’ve made this No Bake Cannoli Pie, please share your photos and comments. Let me know what variations you tried, what your family and friends thought, and any tips or tricks you discovered along the way. Your feedback is invaluable, and it helps me to continue creating and sharing delicious recipes that you’ll love. Happy baking (or rather, no-baking!) and enjoy!
No Bake Cannoli Pie: The Easiest Dessert Recipe Ever
Easy no-bake cannoli pie with a chocolate wafer crust and a creamy ricotta filling. Perfect for a quick and delicious dessert!
Ingredients
- 2 cups chocolate wafer crumbs (about 30-35 wafers)
- 6 tablespoons unsalted butter, melted
- 2 tablespoons granulated sugar
- 32 ounces (4 cups) whole milk ricotta cheese, drained overnight
- 1 ½ cups powdered sugar, sifted
- 1 teaspoon vanilla extract
- ½ teaspoon almond extract
- ¼ teaspoon ground cinnamon
- Pinch of salt
- ½ cup mini chocolate chips
- ½ cup candied orange peel, finely chopped (optional)
- Powdered sugar, for dusting
- Mini chocolate chips
- Candied orange peel, finely chopped
- Chopped pistachios
Instructions
- Crush chocolate wafers into fine crumbs using a food processor or rolling pin.
- In a medium bowl, combine chocolate wafer crumbs, melted butter, and granulated sugar. Mix well until evenly moistened.
- Press the crumb mixture firmly into a 9-inch pie plate, covering the bottom and sides.
- Chill the crust in the refrigerator for at least 30 minutes.
- Drain ricotta cheese overnight in a cheesecloth-lined colander.
- In a large bowl, combine drained ricotta cheese and sifted powdered sugar. Beat with an electric mixer until smooth and creamy.
- Add vanilla extract, almond extract, cinnamon, and salt. Mix until well incorporated.
- Gently fold in mini chocolate chips and candied orange peel (if using).
- Remove the chilled crust from the refrigerator.
- Pour the cannoli filling into the crust, spreading it evenly.
- Chill the pie in the refrigerator for at least 4 hours, or preferably overnight.
- Garnish with powdered sugar, mini chocolate chips, candied orange peel, and/or chopped pistachios before serving.
- Slice and serve chilled.
Notes
- Draining the ricotta cheese is essential for a thick filling.
- Use high-quality, whole milk ricotta for the best flavor.
- Sift the powdered sugar to prevent lumps.
- Chill the pie thoroughly for the filling to set.
- Get creative with garnishes.
- The pie can be made ahead of time.
- Variations: Add liqueur (Amaretto or Marsala wine), use different chocolate, add nuts, make individual pies, or use a different crust.


Leave a Comment