

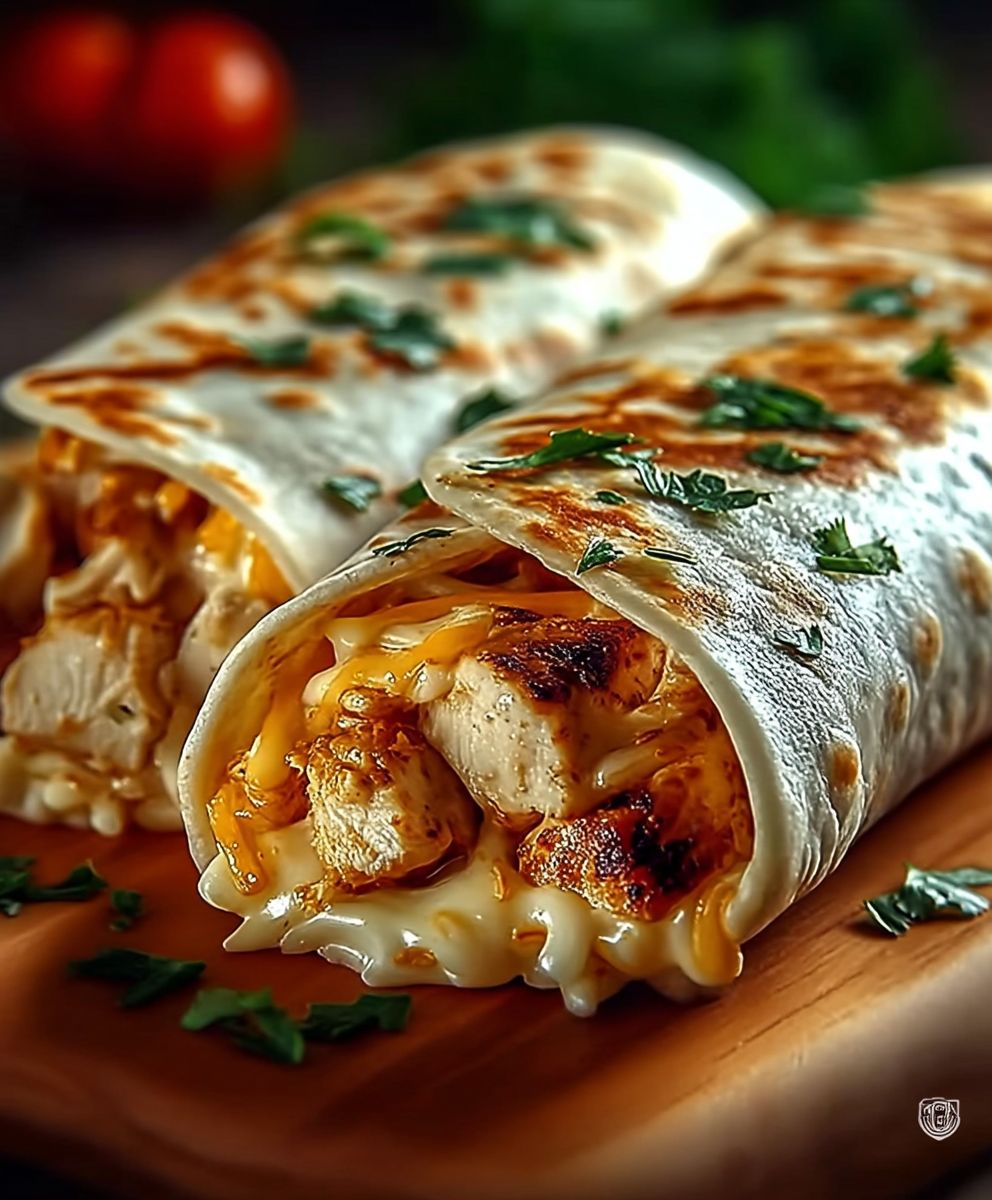
Cheesy Chicken Wraps: Prepare to be amazed by this incredibly simple yet utterly satisfying recipe! Imagine biting into a warm, toasted tortilla filled with tender, juicy chicken and an explosion of melted, gooey cheese. It’s comfort food at its finest, and trust me, once you try it, you’ll be hooked.
While the exact origins of the chicken wrap are somewhat debated, the concept of wrapping savory fillings in flatbreads has been around for centuries, spanning various cultures. From Mexican burritos to Middle Eastern shawarmas, the idea of portable, delicious meals wrapped in bread is a global phenomenon. Our Cheesy Chicken Wraps take inspiration from these traditions, offering a quick and easy way to enjoy a flavorful and satisfying meal.
What makes these wraps so irresistible? It’s the perfect combination of textures and flavors. The soft tortilla, the savory chicken, and the creamy, melted cheese create a symphony of deliciousness in every bite. Plus, they are incredibly versatile! You can customize them with your favorite toppings and sauces, making them perfect for a quick lunch, a simple dinner, or even a crowd-pleasing appetizer. The best part? They are ready in minutes, making them ideal for busy weeknights when you crave something comforting and delicious without spending hours in the kitchen. So, let’s get wrapping!

Ingredients:
- 1.5 lbs boneless, skinless chicken breasts
- 1 tbsp olive oil
- 1 tsp garlic powder
- 1 tsp onion powder
- 1/2 tsp smoked paprika
- 1/4 tsp black pepper
- 1/2 tsp salt, or to taste
- 1 large onion, thinly sliced
- 2 bell peppers (any color), thinly sliced
- 8 large flour tortillas (10-12 inch)
- 2 cups shredded cheddar cheese
- 1 cup shredded Monterey Jack cheese
- 1/2 cup sour cream
- 1/4 cup chopped fresh cilantro (optional)
- 1 avocado, sliced (optional, for serving)
- Salsa, for serving (optional)
Preparing the Chicken and Vegetables:
- First, we need to get our chicken ready. Pat the chicken breasts dry with paper towels. This helps them brown nicely when we cook them.
- Now, let’s season the chicken. In a small bowl, combine the garlic powder, onion powder, smoked paprika, black pepper, and salt. Mix it all together.
- Sprinkle the seasoning mixture evenly over both sides of the chicken breasts. Make sure each piece is well coated for maximum flavor.
- Heat the olive oil in a large skillet over medium-high heat. You want the skillet to be nice and hot before adding the chicken.
- Carefully place the seasoned chicken breasts in the hot skillet. Don’t overcrowd the pan; you might need to cook them in batches.
- Cook the chicken for about 5-7 minutes per side, or until it’s cooked through and the internal temperature reaches 165°F (74°C). Use a meat thermometer to be sure!
- Once the chicken is cooked, remove it from the skillet and let it rest for a few minutes. This helps the juices redistribute, making the chicken more tender.
- While the chicken is resting, let’s cook the vegetables. In the same skillet (no need to clean it!), add the sliced onion and bell peppers.
- Cook the onions and peppers over medium heat, stirring occasionally, until they are softened and slightly caramelized, about 8-10 minutes. This brings out their natural sweetness.
- Once the chicken has rested, shred it using two forks. It should shred easily if it’s cooked properly.
- Add the shredded chicken to the skillet with the cooked onions and peppers. Stir everything together to combine.
- Cook for another 2-3 minutes, allowing the chicken to absorb the flavors of the vegetables.
- Remove the skillet from the heat and set it aside.
Assembling the Cheesy Chicken Wraps:
- Now comes the fun part: assembling the wraps! Lay out one flour tortilla on a clean surface.
- Sprinkle a generous amount of shredded cheddar cheese and Monterey Jack cheese in the center of the tortilla, leaving about an inch of space around the edges.
- Spoon about 1/2 cup of the chicken and vegetable mixture over the cheese. Don’t overfill the tortilla, or it will be difficult to wrap.
- Top with a dollop of sour cream and a sprinkle of fresh cilantro, if using.
- To fold the wrap, first fold in the sides of the tortilla towards the center, covering the filling.
- Then, fold the bottom of the tortilla up and over the filling, tucking it in tightly.
- Roll the wrap forward, keeping it snug, until you reach the end of the tortilla.
- Repeat steps 1-7 with the remaining tortillas and filling.
Cooking the Wraps:
- Heat a large skillet or griddle over medium heat. You can lightly grease the skillet with cooking spray or a little bit of olive oil if you like.
- Place the assembled wraps in the hot skillet, seam-side down. This helps seal the wraps and prevent them from unraveling.
- Cook the wraps for about 3-4 minutes per side, or until they are golden brown and crispy.
- Gently press down on the wraps with a spatula while they are cooking to ensure even browning.
- Once the wraps are golden brown and the cheese is melted, remove them from the skillet and place them on a cutting board.
- Let the wraps cool for a minute or two before slicing them in half diagonally. This makes them easier to handle and eat.
Serving Suggestions:
- Serve the cheesy chicken wraps immediately while they are still warm and crispy.
- You can serve them with a side of salsa, guacamole, or sour cream for dipping.
- Sliced avocado also makes a great addition to these wraps.
- For a complete meal, serve the wraps with a side salad or some Mexican rice.
- These wraps are also great for meal prepping. You can assemble them ahead of time and store them in the refrigerator until you’re ready to cook them.
- To reheat the wraps, you can bake them in the oven at 350°F (175°C) for about 10-15 minutes, or until they are heated through. You can also reheat them in a skillet or in the microwave.
Tips and Tricks:
- Don’t overfill the tortillas: This is key to preventing the wraps from tearing or being difficult to roll.
- Use good quality cheese: The better the cheese, the better the flavor of the wraps.
- Get creative with the fillings: You can add other vegetables, such as corn, black beans, or diced tomatoes, to the chicken mixture.
- Add some spice: If you like a little heat, add a pinch of cayenne pepper or some chopped jalapeños to the chicken mixture.
- Make it vegetarian: Substitute the chicken with black beans or tofu for a vegetarian option.
- Experiment with different cheeses: Try using pepper jack cheese for a spicy kick, or provolone cheese for a milder flavor.
- Use whole wheat tortillas: For a healthier option, use whole wheat tortillas instead of white flour tortillas.
- Make it ahead of time: You can assemble the wraps ahead of time and store them in the refrigerator until you’re ready to cook them. This is a great option for busy weeknights.
- Freeze for later: Cooked and cooled wraps can be individually wrapped in plastic wrap and foil, then frozen for up to 2 months. Thaw completely before reheating.
Variations:
- Spicy Cheesy Chicken Wraps: Add diced jalapeños or a dash of hot sauce to the chicken mixture.
- BBQ Chicken Wraps: Use BBQ sauce instead of the spice blend to season the chicken.
- Buffalo Chicken Wraps: Toss the shredded chicken in buffalo wing sauce before adding it to the wraps.
- Southwest Chicken Wraps: Add black beans, corn, and diced tomatoes to the chicken mixture, and use a southwest-style seasoning blend.
- Chicken Caesar Wraps: Use grilled chicken and Caesar dressing, along with romaine lettuce and Parmesan cheese.
Nutritional Information (approximate, per wrap):
- Calories: 450-550
- Protein: 30-40g
- Fat: 20-30g
- Carbohydrates: 40-50g
Enjoy your delicious and easy-to-make Cheesy Chicken Wraps!
Conclusion:
This Cheesy Chicken Wraps recipe isn’t just another meal; it’s a flavor explosion waiting to happen, and I truly believe you need to experience it! From the juicy, perfectly seasoned chicken to the gooey, melted cheese and the satisfying crunch of the tortilla, every bite is a little piece of heaven. It’s quick, it’s easy, and it’s guaranteed to be a crowd-pleaser, making it a weeknight dinner champion or the star of your next casual get-together.
But what truly sets these wraps apart is their versatility. Feeling adventurous? Try adding a dollop of your favorite hot sauce for a spicy kick, or incorporate some finely diced jalapeños into the chicken mixture. For a Southwestern twist, black beans, corn, and a sprinkle of chili powder will transform these wraps into a fiesta in your mouth. If you’re looking for a lighter option, swap out the full-fat cheese for a reduced-fat variety and load up on fresh veggies like shredded lettuce, diced tomatoes, and sliced avocado. You could even use whole wheat tortillas for added fiber.
Serving Suggestions:
These Cheesy Chicken Wraps are fantastic on their own, but they also pair beautifully with a variety of sides. A simple side salad with a light vinaigrette provides a refreshing contrast to the richness of the wraps. Alternatively, some crispy sweet potato fries or a bowl of creamy tomato soup would make for a truly comforting and satisfying meal. For a potluck or party, consider cutting the wraps into smaller pinwheels for easy snacking. And don’t forget the dipping sauces! Ranch dressing, sour cream, guacamole, or even a tangy honey mustard are all excellent choices.
Variations to Explore:
Don’t be afraid to get creative and experiment with different ingredients to customize these wraps to your liking. Instead of chicken, you could use shredded turkey, pulled pork, or even seasoned ground beef. Vegetarian? No problem! Simply substitute the chicken with grilled halloumi cheese or seasoned black beans and corn. The possibilities are endless! Think about adding some sauteed bell peppers and onions for extra flavor and texture. Or, for a Mediterranean-inspired wrap, incorporate some feta cheese, olives, and sun-dried tomatoes.
I’ve poured my heart into perfecting this recipe, and I’m confident that you’ll love it as much as I do. It’s more than just a recipe; it’s an invitation to create delicious memories with your loved ones. So, gather your ingredients, put on some music, and get ready to embark on a culinary adventure.
Your Turn to Shine!
I truly encourage you to give this Cheesy Chicken Wraps recipe a try. I’m so excited for you to experience the deliciousness firsthand. And most importantly, I want to hear about your experience! Did you make any modifications? What were your favorite toppings? What did your family think? Share your photos and stories in the comments below. Let’s create a community of wrap enthusiasts and inspire each other with our culinary creations. Happy cooking, and I can’t wait to see what you come up with! Remember, the best part about cooking is sharing the joy with others, so don’t hesitate to spread the love and pass this recipe along to your friends and family. Enjoy!
Cheesy Chicken Wraps: The Ultimate Guide to Delicious & Easy Recipes
Delicious and easy cheesy chicken wraps filled with seasoned chicken, sautéed peppers and onions, and plenty of melted cheese. Perfect for a quick weeknight meal!
Ingredients
- 1.5 lbs boneless, skinless chicken breasts
- 1 tbsp olive oil
- 1 tsp garlic powder
- 1 tsp onion powder
- 1/2 tsp smoked paprika
- 1/4 tsp black pepper
- 1/2 tsp salt, or to taste
- 1 large onion, thinly sliced
- 2 bell peppers (any color), thinly sliced
- 8 large flour tortillas (10-12 inch)
- 2 cups shredded cheddar cheese
- 1 cup shredded Monterey Jack cheese
- 1/2 cup sour cream
- 1/4 cup chopped fresh cilantro (optional)
- 1 avocado, sliced (optional, for serving)
- Salsa, for serving (optional)
Instructions
- Prepare the Chicken: Pat chicken breasts dry with paper towels.
- Season the Chicken: In a small bowl, combine garlic powder, onion powder, smoked paprika, black pepper, and salt. Sprinkle evenly over chicken breasts.
- Cook the Chicken: Heat olive oil in a large skillet over medium-high heat. Cook chicken for 5-7 minutes per side, or until internal temperature reaches 165°F (74°C). Remove and let rest.
- Cook the Vegetables: In the same skillet, add sliced onion and bell peppers. Cook over medium heat, stirring occasionally, until softened and slightly caramelized, about 8-10 minutes.
- Shred the Chicken: Shred the rested chicken using two forks.
- Combine Chicken and Vegetables: Add shredded chicken to the skillet with the cooked onions and peppers. Stir to combine and cook for another 2-3 minutes. Remove from heat.
- Assemble the Wraps: Lay out one flour tortilla. Sprinkle cheddar and Monterey Jack cheese in the center, leaving space around the edges.
- Add Filling: Spoon about 1/2 cup of the chicken and vegetable mixture over the cheese. Top with sour cream and cilantro (if using).
- Fold the Wrap: Fold in the sides of the tortilla towards the center. Fold the bottom up and over the filling, tucking it in tightly. Roll forward, keeping it snug.
- Repeat: Repeat steps 7-9 with the remaining tortillas and filling.
- Cook the Wraps: Heat a large skillet or griddle over medium heat. Lightly grease if desired.
- Sear the Wraps: Place assembled wraps in the hot skillet, seam-side down. Cook for about 3-4 minutes per side, or until golden brown and crispy. Gently press down with a spatula for even browning.
- Serve: Remove from skillet, let cool for a minute or two, and slice in half diagonally. Serve immediately with salsa, guacamole, or sliced avocado.
Notes
- Don’t overfill the tortillas to prevent tearing.
- Use good quality cheese for the best flavor.
- Get creative with fillings add corn, black beans, or diced tomatoes.
- Add a pinch of cayenne pepper or chopped jalapeños for spice.
- Substitute chicken with black beans or tofu for a vegetarian option.
- Experiment with different cheeses like pepper jack or provolone.
- Use whole wheat tortillas for a healthier option.
- Assemble wraps ahead of time and store in the refrigerator.
- Cooked and cooled wraps can be frozen for up to 2 months. Thaw completely before reheating.
- To reheat the wraps, you can bake them in the oven at 350°F (175°C) for about 10-15 minutes, or until they are heated through. You can also reheat them in a skillet or in the microwave.

Leave a Comment