

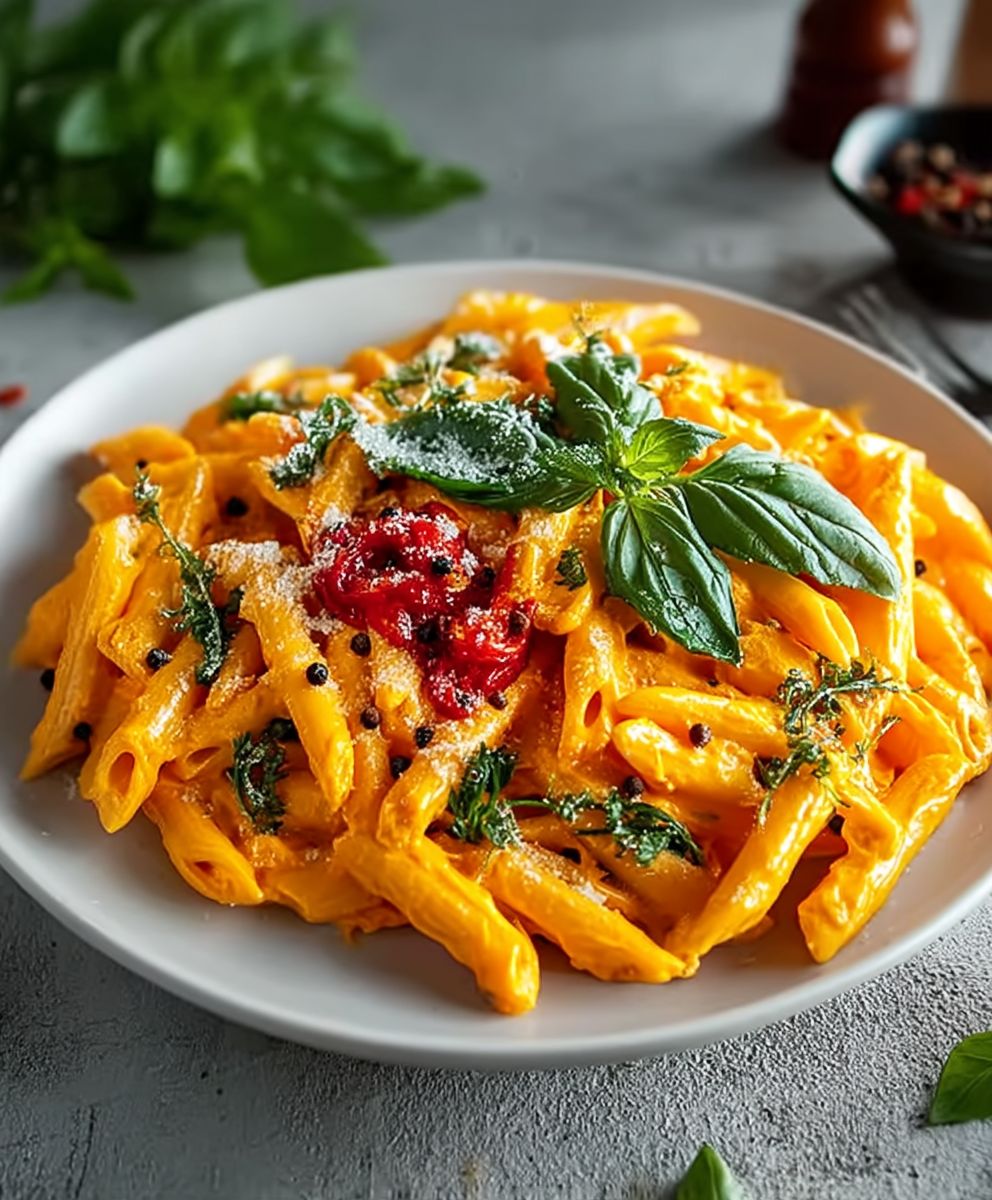
Red Pepper Pasta: Prepare to be captivated by a dish that’s as vibrant in color as it is in flavor! Imagine twirling strands of perfectly cooked pasta, each coated in a luscious, smoky-sweet sauce that dances on your palate. This isn’t just another pasta dish; it’s an experience, a culinary journey that will leave you craving more.
While the exact origins of red pepper pasta are debated, its roots can be traced back to the sun-drenched regions of Southern Italy, where red peppers thrive. For generations, Italian cooks have harnessed the natural sweetness of roasted red peppers to create sauces that are both simple and sublime. Its a testament to the beauty of using fresh, seasonal ingredients to create something truly special.
What makes this dish so universally loved? It’s the perfect balance of flavors the sweetness of the roasted peppers, the subtle tang of garlic, and the creamy richness that envelops every strand of pasta. Beyond the taste, it’s incredibly versatile and convenient. Whether you’re looking for a quick weeknight meal or an impressive dish to serve guests, red pepper pasta fits the bill perfectly. It’s a comforting, satisfying, and utterly delicious way to enjoy the simple pleasures of life.

Ingredients:
- 1 pound pasta (penne, rigatoni, or your favorite shape)
- 2 large red bell peppers
- 4 cloves garlic, minced
- 1/2 cup olive oil, extra virgin
- 1/4 cup heavy cream (optional, for extra richness)
- 1/4 cup grated Parmesan cheese, plus more for serving
- 2 tablespoons tomato paste
- 1 teaspoon red pepper flakes (adjust to your spice preference)
- 1/2 teaspoon dried oregano
- Salt and freshly ground black pepper to taste
- 1/4 cup reserved pasta water
- Fresh basil leaves, for garnish (optional)
- 1/4 cup toasted pine nuts, for garnish (optional)
Preparing the Red Pepper Sauce:
Alright, let’s get started on the heart of this dish the vibrant red pepper sauce! This is where the magic happens, and trust me, the aroma alone will have your mouth watering.
- Roasting the Red Peppers: First things first, we need to roast those red peppers. This brings out their natural sweetness and gives them that lovely smoky flavor. There are a few ways to do this. My preferred method is directly over a gas stovetop flame. Carefully place each pepper directly on the burner grate over a medium flame. Rotate the pepper every few minutes as the skin blackens and blisters. This usually takes about 10-15 minutes per pepper. Alternatively, you can roast them under the broiler in your oven. Place the peppers on a baking sheet lined with foil and broil them, turning occasionally, until the skins are blackened and blistered. You can also roast them in the oven at 450°F (232°C) for about 40-50 minutes, turning occasionally.
- Steaming the Peppers: Once the peppers are nicely charred, immediately transfer them to a bowl and cover it tightly with plastic wrap. This creates steam, which helps to loosen the skins. Let them steam for about 15-20 minutes. This step is crucial for easy peeling!
- Peeling and Seeding: After steaming, carefully remove the peppers from the bowl. The skins should slip off quite easily. If you find any stubborn bits, you can use a paring knife to gently scrape them away. Once peeled, cut the peppers in half, remove the seeds and membranes, and discard them.
- Sautéing the Garlic: Now, let’s move on to the garlic. In a large skillet or Dutch oven, heat the olive oil over medium heat. Add the minced garlic and sauté for about 1-2 minutes, or until fragrant. Be careful not to burn the garlic, as it will become bitter. We want it to be golden and aromatic.
- Adding the Red Peppers and Tomato Paste: Add the roasted red peppers to the skillet with the garlic. Also, stir in the tomato paste. The tomato paste adds depth and richness to the sauce. Cook for another 2-3 minutes, stirring occasionally, to allow the flavors to meld together.
- Simmering the Sauce: Reduce the heat to low, cover the skillet, and let the sauce simmer for about 15-20 minutes. This allows the flavors to fully develop and the peppers to soften even further. Stir occasionally to prevent sticking.
- Blending the Sauce: This is where we transform the chunky mixture into a smooth and creamy sauce. Carefully transfer the red pepper mixture to a blender or food processor. Be cautious when blending hot liquids, as they can splatter. You might want to vent the blender lid slightly to allow steam to escape. Blend until the sauce is completely smooth. If the sauce is too thick, you can add a tablespoon or two of water to thin it out.
Cooking the Pasta:
While the sauce is simmering and blending, let’s get the pasta cooking. This is a straightforward process, but there are a few key tips to ensure perfectly cooked pasta.
- Boiling the Water: Fill a large pot with salted water. The water should be generously salted about 1-2 tablespoons of salt per gallon of water. This seasons the pasta from the inside out. Bring the water to a rolling boil over high heat.
- Cooking the Pasta: Add the pasta to the boiling water and cook according to the package directions. Usually, this is about 8-10 minutes for al dente pasta. Al dente means “to the tooth” in Italian, and it refers to pasta that is firm to the bite.
- Reserving Pasta Water: Before draining the pasta, reserve about 1/2 cup of the pasta water. This starchy water is liquid gold! It helps to emulsify the sauce and create a creamy, luscious texture.
- Draining the Pasta: Drain the pasta in a colander. Do not rinse the pasta unless you are making a cold pasta salad. Rinsing removes the starch, which we want to help the sauce cling to the pasta.
Bringing it All Together:
Now for the grand finale combining the sauce and pasta to create our delicious Red Pepper Pasta! This is the easiest part, and the reward is well worth the effort.
- Combining Sauce and Pasta: Pour the blended red pepper sauce back into the skillet. Add the cooked pasta to the skillet and toss to coat. Make sure every strand of pasta is coated in that beautiful red sauce.
- Adding the Finishing Touches: Stir in the red pepper flakes, dried oregano, and Parmesan cheese. The red pepper flakes add a touch of heat, while the oregano provides a subtle herbal note. The Parmesan cheese adds a salty, savory flavor and helps to thicken the sauce.
- Adjusting Consistency: If the sauce is too thick, add a little of the reserved pasta water, one tablespoon at a time, until it reaches your desired consistency. The pasta water will help to create a creamy, emulsified sauce.
- Adding Cream (Optional): If you’re feeling indulgent, stir in the heavy cream for an extra layer of richness. This is entirely optional, but it does elevate the dish to another level.
- Seasoning to Taste: Season with salt and freshly ground black pepper to taste. Be sure to taste the pasta and adjust the seasoning as needed.
- Serving: Serve immediately, garnished with fresh basil leaves and toasted pine nuts, if desired. A sprinkle of extra Parmesan cheese is always a welcome addition.
Tips and Variations:
This recipe is a great starting point, but feel free to experiment and make it your own! Here are a few ideas to get you started:
- Add Protein: Grilled chicken, shrimp, or sausage would be delicious additions to this pasta dish. Simply cook the protein separately and add it to the skillet along with the pasta.
- Add Vegetables: Feel free to add other vegetables to the sauce, such as zucchini, eggplant, or spinach. Sauté the vegetables along with the garlic before adding the red peppers.
- Make it Vegan: To make this recipe vegan, simply omit the Parmesan cheese and heavy cream. You can use nutritional yeast in place of the Parmesan cheese for a cheesy flavor.
- Spice it Up: If you like your pasta extra spicy, add more red pepper flakes or a pinch of cayenne pepper to the sauce.
- Use Different Pasta Shapes: While penne and rigatoni are classic choices for this dish, you can use any pasta shape you like. Farfalle (bow tie pasta), fusilli (spiral pasta), or even spaghetti would work well.
- Make it Ahead: The red pepper sauce can be made ahead of time and stored in the refrigerator for up to 3 days. Simply reheat the sauce before adding the pasta.
Enjoy your homemade Red Pepper Pasta!
Conclusion:
So, there you have it! This Red Pepper Pasta recipe is truly a game-changer, and I genuinely believe it’s a must-try for anyone looking to add a vibrant and flavorful dish to their repertoire. The creamy, smoky sauce, the perfectly cooked pasta, and the overall simplicity of the recipe make it a winner in my book. It’s quick enough for a weeknight meal but impressive enough to serve to guests. What more could you ask for?
But the best part? It’s incredibly versatile! Feel free to get creative and adapt it to your own tastes. For a spicier kick, add a pinch of red pepper flakes to the sauce while it’s simmering. If you’re a cheese lover (and who isn’t?), a sprinkle of grated Parmesan or Pecorino Romano on top just before serving elevates the dish to another level. You could even stir in a dollop of mascarpone cheese for an extra creamy and decadent experience.
Looking for some serving suggestions? This Red Pepper Pasta pairs beautifully with a simple green salad dressed with a light vinaigrette. The freshness of the salad cuts through the richness of the pasta perfectly. Grilled chicken or shrimp also make excellent additions, transforming it into a more substantial meal. For a vegetarian option, consider adding roasted vegetables like zucchini, eggplant, or mushrooms. They’ll complement the roasted red pepper flavor beautifully.
And don’t be afraid to experiment with different types of pasta! While I personally love it with penne or rigatoni, it works equally well with spaghetti, linguine, or even farfalle. The key is to choose a pasta shape that can hold the sauce well. For a gluten-free option, use your favorite gluten-free pasta. The sauce is so flavorful that you won’t even miss the gluten!
I’ve made this Red Pepper Pasta countless times, and it’s always a hit. It’s become a staple in my kitchen, and I have a feeling it will become one in yours too. It’s one of those recipes that you can easily customize to your liking, making it a truly personal and satisfying dish.
I’m so excited for you to try this recipe! I truly believe you’ll love it as much as I do. It’s a simple, flavorful, and versatile dish that’s perfect for any occasion.
So, what are you waiting for? Head to the kitchen, gather your ingredients, and get cooking! I promise you won’t be disappointed. And most importantly, have fun with it! Cooking should be an enjoyable experience, so relax, put on some music, and let your creativity flow.
Once you’ve made this delicious Red Pepper Pasta, I’d absolutely love to hear about your experience! Did you make any variations? What did you serve it with? What did your family and friends think? Share your photos and stories in the comments below. I can’t wait to see what you create! Your feedback is invaluable, and it helps me to continue creating recipes that you’ll love. Happy cooking!
Red Pepper Pasta: A Delicious and Easy Recipe
Creamy Red Pepper Pasta with roasted peppers, garlic, Parmesan, and a hint of spice. A simple, flavorful weeknight dish.
Ingredients
- 1 pound pasta (penne, rigatoni, or your favorite shape)
- 2 large red bell peppers
- 4 cloves garlic, minced
- 1/2 cup olive oil, extra virgin
- 1/4 cup heavy cream (optional, for extra richness)
- 1/4 cup grated Parmesan cheese, plus more for serving
- 2 tablespoons tomato paste
- 1 teaspoon red pepper flakes (adjust to your spice preference)
- 1/2 teaspoon dried oregano
- Salt and freshly ground black pepper to taste
- 1/4 cup reserved pasta water
- Fresh basil leaves, for garnish (optional)
- 1/4 cup toasted pine nuts, for garnish (optional)
Instructions
- Roast the Red Peppers: Roast red peppers using your preferred method (gas stovetop, broiler, or oven) until the skins are blackened and blistered.
- Steam the Peppers: Transfer roasted peppers to a bowl, cover tightly with plastic wrap, and let steam for 15-20 minutes.
- Peel and Seed: Remove peppers from the bowl, peel off the skins, cut in half, and remove seeds and membranes.
- Sauté the Garlic: In a large skillet or Dutch oven, heat olive oil over medium heat. Add minced garlic and sauté for 1-2 minutes until fragrant, being careful not to burn.
- Add Red Peppers and Tomato Paste: Add roasted red peppers and tomato paste to the skillet. Cook for 2-3 minutes, stirring occasionally.
- Simmer the Sauce: Reduce heat to low, cover the skillet, and simmer for 15-20 minutes, stirring occasionally.
- Blend the Sauce: Carefully transfer the red pepper mixture to a blender or food processor. Blend until smooth. Thin with water if needed.
- Boil the Water: Fill a large pot with generously salted water and bring to a rolling boil.
- Cook the Pasta: Add pasta to the boiling water and cook according to package directions (usually 8-10 minutes for al dente).
- Reserve Pasta Water: Before draining, reserve about 1/2 cup of pasta water.
- Drain the Pasta: Drain the pasta in a colander (do not rinse).
- Combine Sauce and Pasta: Pour the blended red pepper sauce back into the skillet. Add the cooked pasta and toss to coat.
- Add Finishing Touches: Stir in red pepper flakes, dried oregano, and Parmesan cheese.
- Adjust Consistency: If the sauce is too thick, add reserved pasta water, one tablespoon at a time, until desired consistency is reached.
- Add Cream (Optional): Stir in heavy cream for extra richness, if desired.
- Season to Taste: Season with salt and freshly ground black pepper to taste.
- Serve: Serve immediately, garnished with fresh basil leaves and toasted pine nuts, if desired. Sprinkle with extra Parmesan cheese.
Notes
- Roasting Peppers: Roasting the peppers is key to the flavor. Don’t skip this step!
- Pasta Water: The reserved pasta water is essential for creating a creamy sauce.
- Spice Level: Adjust the amount of red pepper flakes to your preference.
- Variations: Add protein (grilled chicken, shrimp, sausage), vegetables (zucchini, eggplant, spinach), or make it vegan by omitting Parmesan and cream.
- Make Ahead: The red pepper sauce can be made ahead of time and stored in the refrigerator for up to 3 days.
Leave a Comment