

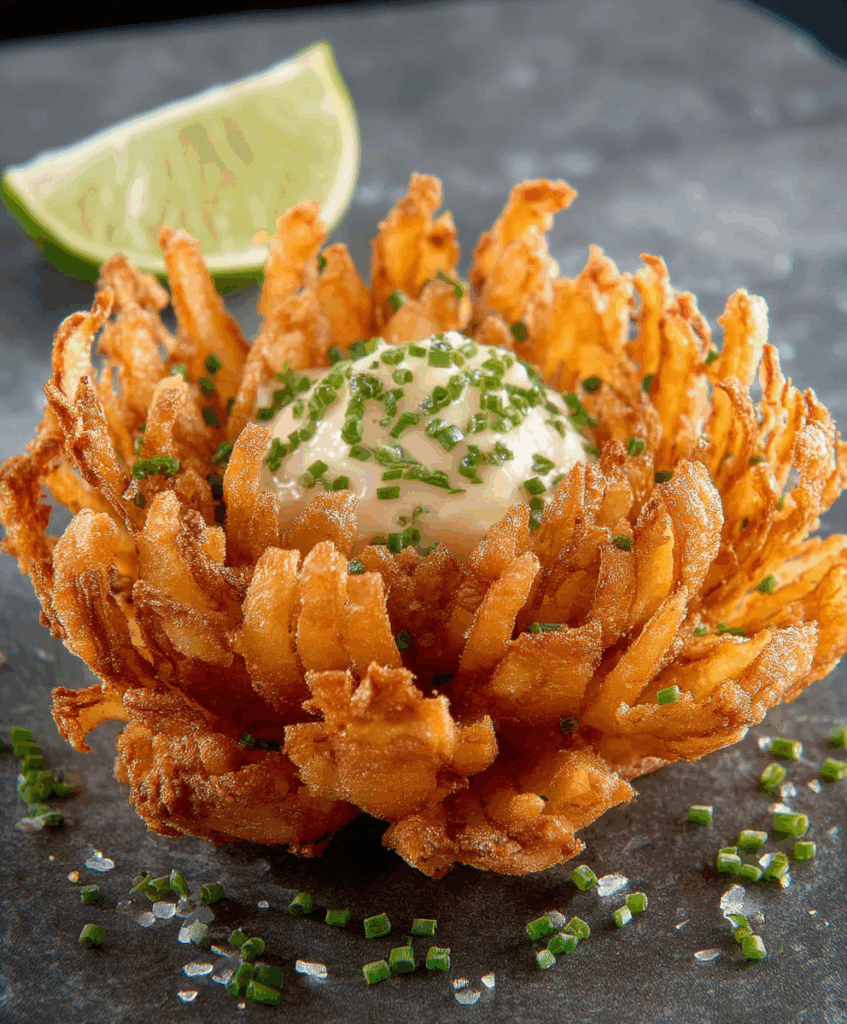
Crispy Blooming Onion: Prepare to be amazed! Imagine a single, colossal onion, transformed into a stunning, edible flower, its golden-brown petals radiating outwards, begging to be devoured. This isn’t just an appetizer; it’s a culinary spectacle that’s guaranteed to steal the show at any gathering.
While the exact origins of the blooming onion are shrouded in a bit of mystery, its modern iteration is widely credited to Outback Steakhouse in the 1980s. It quickly became their signature dish, captivating diners with its unique presentation and irresistible flavor. The sheer novelty of the dish, combined with its satisfying crunch and savory seasoning, propelled it to iconic status.
What makes the crispy blooming onion so universally loved? It’s a symphony of textures and tastes. The outer petals achieve a delightful crispiness, giving way to tender, sweet onion within. The accompanying dipping sauce, often a creamy horseradish or spicy mayo, adds another layer of flavor that perfectly complements the onion’s natural sweetness. Beyond the taste, it’s undeniably fun to eat! Sharing a blooming onion is a communal experience, making it the perfect centerpiece for celebrations and casual get-togethers alike. So, are you ready to create this show-stopping appetizer in your own kitchen? Let’s get started!

Ingredients:
- 1 large Vidalia onion (or other sweet onion), about 3-4 inches in diameter
- 1 ½ cups all-purpose flour
- 2 tablespoons cornstarch
- 2 teaspoons paprika
- 1 teaspoon garlic powder
- 1 teaspoon onion powder
- 1 teaspoon dried oregano
- 1 teaspoon dried thyme
- ½ teaspoon cayenne pepper (optional, for a little heat)
- 1 teaspoon salt
- ½ teaspoon black pepper
- 1 ½ cups buttermilk
- 1 large egg
- Vegetable oil, for frying (about 6-8 cups)
Dipping Sauce (Optional):
- ½ cup mayonnaise
- ¼ cup ketchup
- 2 tablespoons horseradish sauce
- 1 tablespoon Worcestershire sauce
- ½ teaspoon garlic powder
- ¼ teaspoon paprika
- Pinch of cayenne pepper (optional)
Preparing the Onion:
- Chill the onion: Place the onion in the freezer for about 30 minutes before you start. This helps it hold its shape better when you cut it. Don’t freeze it solid, just chill it!
- Trim the ends: Remove the top (stem end) of the onion, about ½ inch down, and the root end, being careful not to cut into the layers. You want a flat surface on both ends.
- Peel the onion: Carefully peel off the outer layers of the onion, leaving only the firm, white layers.
- Cut the onion: Place the onion root-side up on a cutting board. Using a sharp knife, make cuts from about ½ inch from the root end down to the cutting board. Make the cuts about ½ inch apart, all the way around the onion. Try to keep the cuts even for a uniform bloom.
- Make the second set of cuts: Now, carefully flip the onion over so it’s stem-side up. Repeat the cutting process, making cuts between the first set of cuts. Again, stop about ½ inch from the root end. This will create the “petals” of your blooming onion.
- Gently separate the petals: Carefully turn the onion root-side up again. Gently use your fingers to separate the petals, working from the outside in. Be careful not to break them off. You want to create a nice, open “bloom.”
- Soak the onion: Place the cut onion in a large bowl of ice water for about 30 minutes. This will help the petals open further and also remove some of the onion’s sharpness.
- Drain and dry: After soaking, carefully remove the onion from the ice water and pat it dry with paper towels. Make sure to get as much water out as possible, especially between the petals.
Preparing the Breading:
- Combine dry ingredients: In a large bowl, whisk together the flour, cornstarch, paprika, garlic powder, onion powder, oregano, thyme, cayenne pepper (if using), salt, and pepper. Make sure everything is well combined.
- Prepare the wet batter: In a separate bowl, whisk together the buttermilk and egg until smooth.
Breading the Onion:
- First coat of flour: Place the dried onion on a baking sheet. Sprinkle the dry flour mixture all over the onion, making sure to get it in between all the petals. Use your fingers to gently separate the petals and ensure they are coated. Shake off any excess flour.
- Dip in wet batter: Carefully lift the onion and dip it into the buttermilk mixture, making sure all the petals are coated. Let any excess batter drip off.
- Second coat of flour: Return the onion to the bowl of dry flour mixture and again, sprinkle the flour all over, ensuring every petal is thoroughly coated. Press the flour gently into the petals to help it adhere. Shake off any excess flour. This double coating is key to a crispy onion!
- Rest the onion: Place the breaded onion back on the baking sheet and let it rest for about 15-20 minutes. This helps the breading adhere better and prevents it from falling off during frying.
Frying the Onion:
- Heat the oil: Pour the vegetable oil into a large, deep pot or Dutch oven. Heat the oil over medium-high heat to 350°F (175°C). Use a deep-fry thermometer to monitor the temperature. It’s crucial to maintain the correct temperature for even cooking and crispy results.
- Carefully lower the onion: Once the oil is hot, carefully lower the breaded onion into the oil, root-side down. Use a large slotted spoon or spider to gently lower it in. Be careful not to overcrowd the pot; you may need to fry it in batches if your pot isn’t large enough.
- Fry until golden brown: Fry the onion for about 5-7 minutes, or until it’s golden brown and crispy. Use the slotted spoon to gently turn the onion occasionally to ensure even cooking.
- Remove and drain: Once the onion is golden brown, carefully remove it from the oil with the slotted spoon and place it on a wire rack lined with paper towels to drain off any excess oil.
Making the Dipping Sauce (Optional):
- Combine ingredients: In a small bowl, whisk together the mayonnaise, ketchup, horseradish sauce, Worcestershire sauce, garlic powder, paprika, and cayenne pepper (if using).
- Taste and adjust: Taste the sauce and adjust the seasonings as needed. You can add more horseradish for a spicier kick or more ketchup for a sweeter flavor.
- Chill (optional): For best flavor, chill the dipping sauce in the refrigerator for at least 30 minutes before serving. This allows the flavors to meld together.
Serving:
- Transfer to a serving plate: Carefully transfer the crispy blooming onion to a serving plate.
- Serve immediately: Serve the blooming onion immediately while it’s hot and crispy.
- Serve with dipping sauce: Serve with the dipping sauce on the side for dipping. You can also place the dipping sauce in the center of the onion for a dramatic presentation.
- Enjoy! This blooming onion is best enjoyed fresh and hot. It’s a crowd-pleasing appetizer that’s sure to impress!
Tips for Success:
- Don’t skip the chilling step: Chilling the onion before cutting is crucial for preventing it from falling apart.
- Use a sharp knife: A sharp knife will make it easier to cut the onion cleanly and evenly.
- Don’t overcook the onion: Overcooking will make the onion mushy. Fry it until it’s golden brown and crispy.
- Maintain the oil temperature: Maintaining the correct oil temperature is essential for even cooking and crispy results.
- Drain the onion well: Draining the onion on a wire rack lined with paper towels will help remove excess oil and keep it crispy.
- Get creative with the dipping sauce: Feel free to experiment with different dipping sauces. Ranch dressing, blue cheese dressing, or even a spicy sriracha mayo would be delicious.
- Make it ahead of time: You can prepare the onion up to the breading stage a few hours in advance. Just keep it refrigerated until you’re ready to fry it.
Troubleshooting:
- Onion falling apart: This could be due to not chilling the onion enough, using a dull knife, or cutting too close to the root end.
- Breading falling off: This could be due to not drying the onion thoroughly after soaking, not using a double coating of flour, or not letting the breaded onion rest before frying.
- Onion not cooking evenly: This could be due to not maintaining the correct oil temperature or overcrowding the pot.
- Onion too greasy: This could be due to not draining the onion well enough after frying or frying at too low of a temperature.
Conclusion:
And there you have it! A Crispy Blooming Onion that’s guaranteed to be the star of your next gathering. I truly believe this recipe is a must-try for anyone who loves a good appetizer. It’s impressive, delicious, and surprisingly easy to make once you get the hang of the cutting technique. Forget ordering it at a restaurant; you can now create this crowd-pleaser right in your own kitchen!
Why is this recipe a must-try? Well, beyond the sheer visual appeal of that perfectly bloomed onion, the taste is simply irresistible. The crispy, golden-brown petals offer a satisfying crunch, while the sweet onion inside remains tender and flavorful. Dipped in that creamy, tangy sauce, it’s a symphony of textures and tastes that will leave you wanting more. Plus, making it yourself means you can control the ingredients and ensure it’s exactly to your liking. No more overly greasy or under-seasoned blooming onions!
But the fun doesn’t stop there! Feel free to experiment with different serving suggestions and variations to make this recipe your own. For a spicier kick, add a pinch of cayenne pepper to the flour mixture or a dash of hot sauce to the dipping sauce. You could also try using different types of onions, such as Vidalia for a sweeter flavor or red onions for a more pungent bite.
Looking for some serving suggestions? This Crispy Blooming Onion is fantastic as an appetizer for parties, game nights, or even just a fun weekend treat. Serve it with a variety of dipping sauces, such as ranch dressing, blue cheese dressing, or even a sweet chili sauce. You can also cut the bloomed onion into smaller pieces and use it as a topping for burgers, salads, or nachos. The possibilities are endless!
Consider these variations to elevate your blooming onion game:
* Spice it up: Add a tablespoon of your favorite Cajun seasoning to the flour mixture for a zesty kick.
* Go cheesy: Sprinkle shredded Parmesan cheese over the onion during the last few minutes of baking for a cheesy, savory twist.
* Make it mini: Use smaller onions to create individual blooming onion appetizers.
* Air Fryer Option: For a healthier version, try air frying the blooming onion. Simply spray it with cooking oil and air fry at 375°F (190°C) for about 15-20 minutes, or until golden brown and crispy.
I’m so excited for you to try this recipe! I know you’ll love the process of creating this show-stopping appetizer, and even more, you’ll love the taste. Don’t be intimidated by the cutting technique; with a little practice, you’ll be blooming onions like a pro in no time.
So, what are you waiting for? Gather your ingredients, sharpen your knife, and get ready to create a Crispy Blooming Onion that will impress your friends and family. And most importantly, have fun with it! Cooking should be an enjoyable experience, so don’t be afraid to experiment and make it your own.
Once you’ve tried this recipe, I’d love to hear about your experience! Share your photos and comments on social media using [Your Hashtag Here] or leave a review on my website. I’m always eager to see your creations and hear your feedback. Happy cooking! I can’t wait to see your blooming onion masterpieces! Let me know if you have any questions, and I’ll be happy to help. Enjoy!
Crispy Blooming Onion: The Ultimate Guide to Making it Perfectly
A show-stopping appetizer! This crispy, golden-brown blooming onion is deep-fried to perfection and served with a flavorful dipping sauce.
Ingredients
- 1 large Vidalia onion (or other sweet onion), about 3-4 inches in diameter
- 1 ½ cups all-purpose flour
- 2 tablespoons cornstarch
- 2 teaspoons paprika
- 1 teaspoon garlic powder
- 1 teaspoon onion powder
- 1 teaspoon dried oregano
- 1 teaspoon dried thyme
- ½ teaspoon cayenne pepper (optional, for a little heat)
- 1 teaspoon salt
- ½ teaspoon black pepper
- 1 ½ cups buttermilk
- 1 large egg
- Vegetable oil, for frying (about 6-8 cups)
- ½ cup mayonnaise
- ¼ cup ketchup
- 2 tablespoons horseradish sauce
- 1 tablespoon Worcestershire sauce
- ½ teaspoon garlic powder
- ¼ teaspoon paprika
- Pinch of cayenne pepper (optional)
Instructions
- Place the onion in the freezer for about 30 minutes before you start. This helps it hold its shape better when you cut it. Don’t freeze it solid, just chill it!
- Remove the top (stem end) of the onion, about ½ inch down, and the root end, being careful not to cut into the layers. You want a flat surface on both ends.
- Carefully peel off the outer layers of the onion, leaving only the firm, white layers.
- Place the onion root-side up on a cutting board. Using a sharp knife, make cuts from about ½ inch from the root end down to the cutting board. Make the cuts about ½ inch apart, all the way around the onion. Try to keep the cuts even for a uniform bloom.
- Now, carefully flip the onion over so it’s stem-side up. Repeat the cutting process, making cuts between the first set of cuts. Again, stop about ½ inch from the root end. This will create the “petals” of your blooming onion.
- Carefully turn the onion root-side up again. Gently use your fingers to separate the petals, working from the outside in. Be careful not to break them off. You want to create a nice, open “bloom.”
- Place the cut onion in a large bowl of ice water for about 30 minutes. This will help the petals open further and also remove some of the onion’s sharpness.
- After soaking, carefully remove the onion from the ice water and pat it dry with paper towels. Make sure to get as much water out as possible, especially between the petals.
- In a large bowl, whisk together the flour, cornstarch, paprika, garlic powder, onion powder, oregano, thyme, cayenne pepper (if using), salt, and pepper. Make sure everything is well combined.
- In a separate bowl, whisk together the buttermilk and egg until smooth.
- Place the dried onion on a baking sheet. Sprinkle the dry flour mixture all over the onion, making sure to get it in between all the petals. Use your fingers to gently separate the petals and ensure they are coated. Shake off any excess flour.
- Carefully lift the onion and dip it into the buttermilk mixture, making sure all the petals are coated. Let any excess batter drip off.
- Return the onion to the bowl of dry flour mixture and again, sprinkle the flour all over, ensuring every petal is thoroughly coated. Press the flour gently into the petals to help it adhere. Shake off any excess flour. This double coating is key to a crispy onion!
- Place the breaded onion back on the baking sheet and let it rest for about 15-20 minutes. This helps the breading adhere better and prevents it from falling off during frying.
- Pour the vegetable oil into a large, deep pot or Dutch oven. Heat the oil over medium-high heat to 350°F (175°C). Use a deep-fry thermometer to monitor the temperature. It’s crucial to maintain the correct temperature for even cooking and crispy results.
- Once the oil is hot, carefully lower the breaded onion into the oil, root-side down. Use a large slotted spoon or spider to gently lower it in. Be careful not to overcrowd the pot; you may need to fry it in batches if your pot isn’t large enough.
- Fry the onion for about 5-7 minutes, or until it’s golden brown and crispy. Use the slotted spoon to gently turn the onion occasionally to ensure even cooking.
- Once the onion is golden brown, carefully remove it from the oil with the slotted spoon and place it on a wire rack lined with paper towels to drain off any excess oil.
- In a small bowl, whisk together the mayonnaise, ketchup, horseradish sauce, Worcestershire sauce, garlic powder, paprika, and cayenne pepper (if using).
- Taste the sauce and adjust the seasonings as needed. You can add more horseradish for a spicier kick or more ketchup for a sweeter flavor.
- For best flavor, chill the dipping sauce in the refrigerator for at least 30 minutes before serving. This allows the flavors to meld together.
- Carefully transfer the crispy blooming onion to a serving plate.
- Serve the blooming onion immediately while it’s hot and crispy.
- Serve with the dipping sauce on the side for dipping. You can also place the dipping sauce in the center of the onion for a dramatic presentation.
- Enjoy! This blooming onion is best enjoyed fresh and hot. It’s a crowd-pleasing appetizer that’s sure to impress!
Notes
- Don’t skip the chilling step: Chilling the onion before cutting is crucial for preventing it from falling apart.
- Use a sharp knife: A sharp knife will make it easier to cut the onion cleanly and evenly.
- Don’t overcook the onion: Overcooking will make the onion mushy. Fry it until it’s golden brown and crispy.
- Maintain the oil temperature: Maintaining the correct oil temperature is essential for even cooking and crispy results.
- Drain the onion well: Draining the onion on a wire rack lined with paper towels will help remove excess oil and keep it crispy.
- Get creative with the dipping sauce: Feel free to experiment with different dipping sauces. Ranch dressing, blue cheese dressing, or even a spicy sriracha mayo would be delicious.
- Make it ahead of time: You can prepare the onion up to the breading stage a few hours in advance. Just keep it refrigerated until you’re ready to fry it.
- Onion falling apart: This could be due to not chilling the onion enough, using a dull knife, or cutting too close to the root end.
- Breading falling off: This could be due to not drying the onion thoroughly after soaking, not using a double coating of flour, or not letting the breaded onion rest before frying.
- Onion not cooking evenly: This could be due to not maintaining the correct oil temperature or overcrowding the pot.
- Onion too greasy: This could be due to not draining the onion well enough after frying or frying at too low of a temperature.


Leave a Comment