

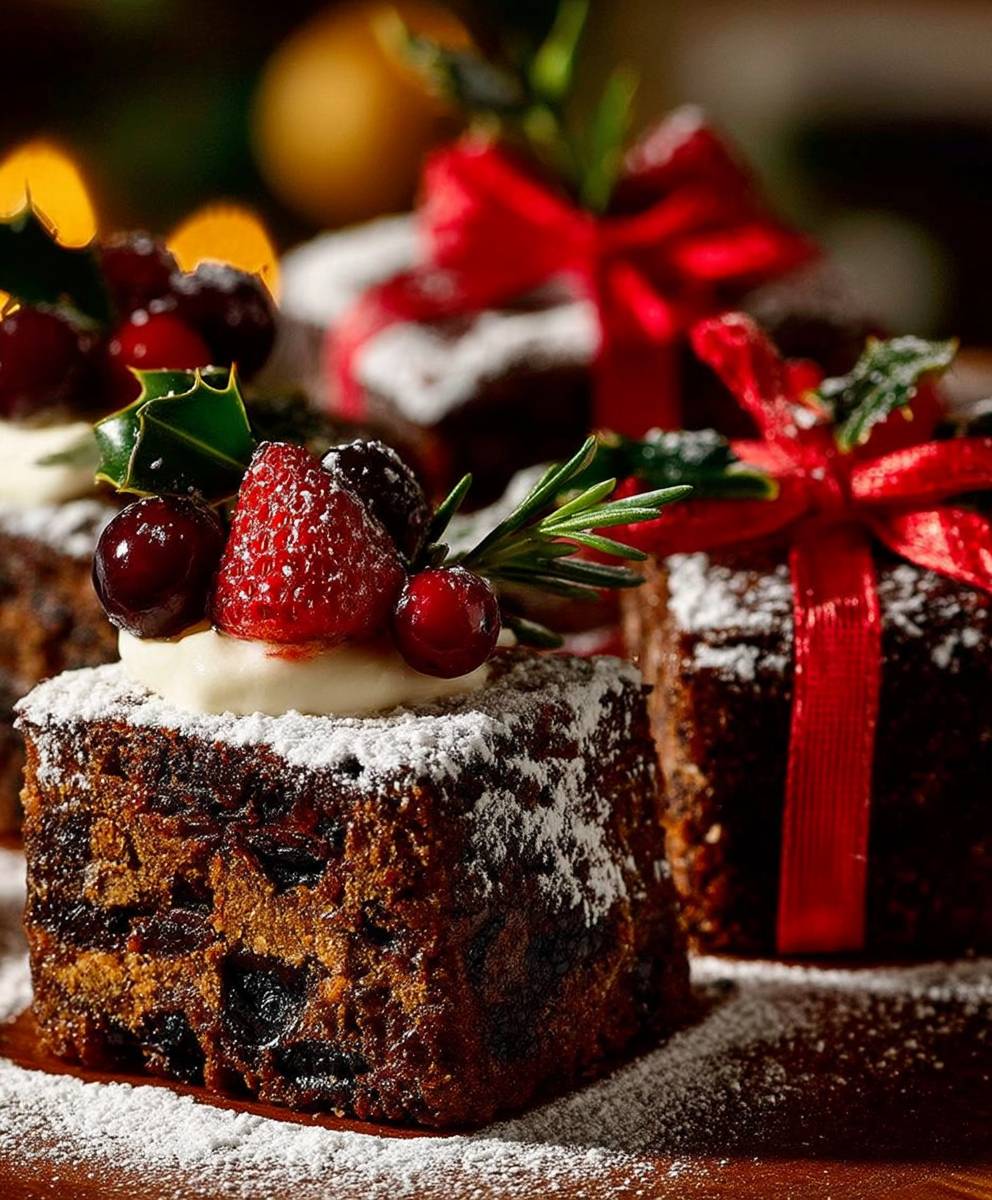
Mini Christmas Cakes: Prepare to be enchanted by these delightful, bite-sized treats that encapsulate the magic of the holiday season! Imagine sinking your teeth into a moist, fruit-studded cake, infused with warming spices and a hint of brandy, all perfectly portioned for individual indulgence. These aren’t just cakes; they’re edible ornaments, miniature masterpieces that bring joy to every gathering.
The tradition of Christmas cake dates back centuries, evolving from plum porridge to the rich, decadent cakes we know and love today. Fruitcakes, in particular, were a symbol of prosperity and good fortune, often shared amongst friends and family during the festive season. Our Mini Christmas Cakes pay homage to this rich history, offering a modern twist on a beloved classic.
What makes these mini cakes so irresistible? It’s the perfect combination of flavors and textures. The sweetness of the dried fruits, the warmth of the spices, and the subtle boozy notes create a symphony of taste that dances on your palate. Plus, their convenient size makes them ideal for gifting, serving at parties, or simply enjoying as a personal treat. They are incredibly easy to make and are always a crowd-pleaser. So, gather your ingredients, preheat your oven, and let’s embark on a baking adventure to create these unforgettable Mini Christmas Cakes!

Ingredients:
- For the Cake:
- 225g (8oz) softened butter, plus extra for greasing
- 225g (8oz) light brown soft sugar
- 4 large eggs, lightly beaten
- 225g (8oz) self-raising flour
- 1 tsp mixed spice
- 100g (3 ½ oz) ground almonds
- 450g (1lb) mixed dried fruit (raisins, sultanas, currants, candied peel)
- 50g (2oz) glace cherries, quartered
- 50g (2oz) chopped mixed nuts
- 2 tbsp brandy or rum (optional, but highly recommended!)
- For the Marzipan Layer:
- 500g (1lb 2oz) marzipan
- Apricot jam, warmed and sieved
- For the Icing:
- 500g (1lb 2oz) royal icing sugar, plus extra for dusting
- 3-4 tbsp water, or as needed
- Food coloring (optional, for decorating)
- Edible glitter, sprinkles, or other decorations (optional)
Preparing the Cake Batter
- Cream the Butter and Sugar: First, preheat your oven to 160°C (320°F/Gas Mark 3). Grease your mini cake tins (or muffin tins if you don’t have mini cake tins) really well. I like to use a pastry brush to get into all the nooks and crannies. You can also line the base of each tin with a small circle of baking parchment for extra insurance against sticking. In a large bowl, cream together the softened butter and light brown sugar until the mixture is light and fluffy. This is a crucial step, so don’t rush it! Use an electric mixer if you have one, it will make your life much easier. You want the mixture to be pale and almost doubled in volume.
- Add the Eggs Gradually: Gradually add the beaten eggs to the butter and sugar mixture, a little at a time, beating well after each addition. If the mixture starts to curdle (it sometimes happens!), add a spoonful of flour to help bring it back together. Don’t worry too much if it curdles slightly, it will all come together in the end.
- Sift in the Flour and Spice: Sift the self-raising flour and mixed spice into the bowl. This helps to prevent lumps and ensures that the spice is evenly distributed throughout the batter. Gently fold the flour and spice into the wet ingredients using a large metal spoon or spatula. Be careful not to overmix, as this can result in a tough cake.
- Add the Ground Almonds: Add the ground almonds to the mixture and gently fold them in until just combined. The ground almonds add a lovely moistness and nutty flavor to the cakes.
- Incorporate the Dried Fruit and Nuts: Now for the fun part! Add the mixed dried fruit, glace cherries, and chopped mixed nuts to the bowl. Gently fold everything together until the fruit and nuts are evenly distributed throughout the batter. Make sure there are no pockets of plain batter.
- Add the Brandy or Rum (Optional): If you’re using brandy or rum, now’s the time to add it. Drizzle the brandy or rum over the batter and gently fold it in. The alcohol will add a lovely depth of flavor and help to keep the cakes moist. If you’re not a fan of alcohol, you can skip this step or substitute it with a tablespoon of orange juice or apple juice.
Baking the Mini Cakes
- Fill the Cake Tins: Spoon the cake batter into the prepared mini cake tins, filling each tin about two-thirds full. This will allow the cakes to rise without overflowing. Use two spoons to help you distribute the batter evenly.
- Bake in the Oven: Place the cake tins in the preheated oven and bake for 25-30 minutes, or until the cakes are golden brown and a skewer inserted into the center comes out clean. The baking time will depend on the size of your mini cake tins, so keep an eye on them.
- Cool the Cakes: Once the cakes are baked, remove them from the oven and let them cool in the tins for a few minutes before turning them out onto a wire rack to cool completely. This will prevent them from sticking to the tins and breaking.
Marzipan Layering
- Prepare the Apricot Jam: Warm the apricot jam in a small saucepan or in the microwave until it’s runny. Then, sieve it to remove any lumps or pieces of fruit. This will give you a smooth, glossy glaze.
- Brush the Cakes with Apricot Jam: Once the cakes are completely cool, brush the tops and sides of each cake with the warmed apricot jam. This will help the marzipan to stick to the cakes.
- Roll Out the Marzipan: Lightly dust a clean work surface with icing sugar. Roll out the marzipan to a thickness of about 5mm (¼ inch).
- Cut Out Marzipan Circles: Use a cookie cutter or a knife to cut out circles of marzipan that are slightly larger than the tops of the cakes.
- Apply the Marzipan: Carefully place a marzipan circle on top of each cake, pressing it down gently to adhere to the apricot jam. Smooth the edges of the marzipan with your fingers or a palette knife.
- Optional: Marzipan Sides: If you want to cover the sides of the cakes with marzipan as well, roll out more marzipan and cut it into strips. Attach the strips to the sides of the cakes using a little apricot jam as glue.
Royal Icing and Decoration
- Prepare the Royal Icing: In a large bowl, gradually add water to the royal icing sugar, mixing with a spoon until you have a smooth, thick icing. The consistency should be such that it holds its shape but is still easy to spread. Add the water a little at a time, as you don’t want to make the icing too runny.
- Ice the Cakes: Using a palette knife or a spoon, spread the royal icing evenly over the marzipan layer of each cake. You can create a smooth, flat surface or create peaks and swirls for a more textured look.
- Add Decorations (Optional): While the icing is still wet, you can add edible glitter, sprinkles, or other decorations. You can also use food coloring to tint the royal icing before applying it to the cakes. Get creative and have fun with it!
- Let the Icing Set: Allow the royal icing to set completely before serving or storing the cakes. This may take several hours, or even overnight. The icing should be hard and dry to the touch.
Tips and Variations
- Soaking the Fruit: For an even richer flavor, soak the dried fruit in brandy or rum for several days or even weeks before making the cakes. This will plump up the fruit and infuse it with flavor.
- Nut-Free Option: If you have a nut allergy, you can omit the ground almonds and chopped nuts from the recipe. You may need to add a little extra flour to compensate for the missing ground almonds.
- Flavor Variations: Experiment with different spices, such as cinnamon, nutmeg, or cloves. You can also add citrus zest or a teaspoon of vanilla extract to the batter.
- Storage: These mini Christmas cakes can be stored in an airtight container at room temperature for up to a week. They can also be frozen for up to three months.
- Make Ahead: You can make the cakes several weeks in advance and store them in an airtight container until you’re ready to decorate them. This is a great way to spread out the work during the busy holiday season.
- Different Shapes: While this recipe focuses on mini cakes, you can easily adapt it to make a larger cake. Just adjust the baking time accordingly. You can also use different shaped cookie cutters to create festive marzipan decorations.
Enjoy your delicious Mini Christmas Cakes!
Conclusion:
And there you have it! These Mini Christmas Cakes are truly a must-try this holiday season. They’re not just adorable; they’re bursting with festive flavors that will warm you from the inside out. The rich, moist cake, studded with dried fruits and spices, combined with the sweet, creamy frosting, creates a symphony of textures and tastes that is simply irresistible. Trust me, once you take a bite, you’ll understand why I’m so enthusiastic about them!
But why are these little cakes so special? Well, beyond the deliciousness, they’re incredibly versatile. They’re perfect for gifting to friends, family, and neighbors imagine the joy on their faces when they receive a beautifully decorated mini cake! They also make a stunning addition to any Christmas dessert table, adding a touch of elegance and charm. And let’s not forget, they’re the ideal size for a single serving, so you can indulge without feeling guilty.
Serving Suggestions and Variations:
Now, let’s talk about how you can enjoy these delightful treats. While they’re absolutely perfect as is, there are plenty of ways to customize them to your liking.
* Boozy Boost: For a more adult-friendly version, consider soaking the dried fruits in rum or brandy for a few hours (or even overnight!) before adding them to the batter. This will add a wonderful depth of flavor and a subtle kick.
* Frosting Fun: Feel free to experiment with different types of frosting. While I love the classic buttercream, cream cheese frosting or even a simple glaze would also be delicious. You could even tint the frosting with festive colors like red or green for an extra touch of holiday cheer.
* Nutty Delight: Add chopped nuts, such as walnuts, pecans, or almonds, to the batter for added texture and flavor.
* Citrus Zest: A little bit of orange or lemon zest can brighten up the flavor of the cake and add a refreshing twist.
* Serving Style: Serve these mini cakes with a dollop of whipped cream, a scoop of vanilla ice cream, or a drizzle of warm caramel sauce. They’re also fantastic with a cup of hot coffee or tea.
These Mini Christmas Cakes are more than just a recipe; they’re an experience. They’re a chance to create something beautiful and delicious that you can share with the people you love. They’re a way to bring a little bit of extra joy and magic to the holiday season.
So, what are you waiting for? Gather your ingredients, preheat your oven, and get ready to bake some holiday magic! I promise you won’t regret it. And when you do, please, please, please share your creations with me! I’d love to see your photos and hear about your experiences. Tag me on social media or leave a comment below. I can’t wait to see what you come up with! Happy baking, and happy holidays! I hope you enjoy making these Mini Christmas Cakes as much as I do. They are a guaranteed crowd-pleaser and a wonderful way to spread some holiday cheer. Don’t be afraid to get creative and make them your own. After all, the best recipes are the ones that are made with love and a little bit of personal flair.
Mini Christmas Cakes: Delicious Recipes & Decorating Ideas
Festive mini Christmas cakes with dried fruit, nuts, marzipan, and royal icing. Great for gifting or a sweet treat!
Ingredients
- 225g (8oz) softened butter, plus extra for greasing
- 225g (8oz) light brown soft sugar
- 4 large eggs, lightly beaten
- 225g (8oz) self-raising flour
- 1 tsp mixed spice
- 100g (3 ½ oz) ground almonds
- 450g (1lb) mixed dried fruit (raisins, sultanas, currants, candied peel)
- 50g (2oz) glace cherries, quartered
- 50g (2oz) chopped mixed nuts
- 2 tbsp brandy or rum (optional)
- 500g (1lb 2oz) marzipan
- Apricot jam, warmed and sieved
- 500g (1lb 2oz) royal icing sugar, plus extra for dusting
- 3-4 tbsp water, or as needed
- Food coloring (optional)
- Edible glitter, sprinkles, or other decorations (optional)
Instructions
- Cream the Butter and Sugar: Preheat oven to 320°F (160°C). Grease mini cake tins well. Cream butter and sugar until light and fluffy.
- Add the Eggs Gradually: Gradually add beaten eggs, beating well after each addition. Add a spoonful of flour if the mixture curdles.
- Sift in the Flour and Spice: Sift flour and mixed spice into the bowl. Gently fold into the wet ingredients.
- Add the Ground Almonds: Add ground almonds and gently fold in.
- Incorporate the Dried Fruit and Nuts: Add dried fruit, glace cherries, and nuts. Gently fold until evenly distributed.
- Add the Brandy or Rum (Optional): Drizzle brandy or rum over the batter and gently fold in.
- Fill the Cake Tins: Spoon batter into prepared tins, filling each about two-thirds full.
- Bake in the Oven: Bake for 25-30 minutes, or until golden brown and a skewer inserted into the center comes out clean.
- Cool the Cakes: Cool in tins for a few minutes, then turn out onto a wire rack to cool completely.
- Prepare the Apricot Jam: Warm apricot jam and sieve it.
- Brush the Cakes with Apricot Jam: Brush tops and sides of cakes with warmed jam.
- Roll Out the Marzipan: Dust a surface with icing sugar. Roll out marzipan to about 1/4 inch (5mm) thickness.
- Cut Out Marzipan Circles: Cut out marzipan circles slightly larger than the tops of the cakes.
- Apply the Marzipan: Place a marzipan circle on top of each cake, pressing gently. Smooth the edges.
- Optional: Marzipan Sides: Roll out more marzipan and cut into strips. Attach to the sides of the cakes using apricot jam.
- Prepare the Royal Icing: Gradually add water to royal icing sugar until smooth and thick.
- Ice the Cakes: Spread royal icing evenly over the marzipan layer.
- Add Decorations (Optional): Add edible glitter, sprinkles, or other decorations while the icing is wet.
- Let the Icing Set: Allow the royal icing to set completely before serving.
Notes
- Soaking the fruit in brandy or rum beforehand enhances the flavor.
- For a nut-free option, omit ground almonds and nuts, adding a little extra flour.
- Experiment with different spices or citrus zest for flavor variations.
- Store in an airtight container at room temperature for up to a week, or freeze for up to three months.
- Cakes can be made in advance and decorated later.
- Adapt the recipe for a larger cake by adjusting the baking time.

Leave a Comment