

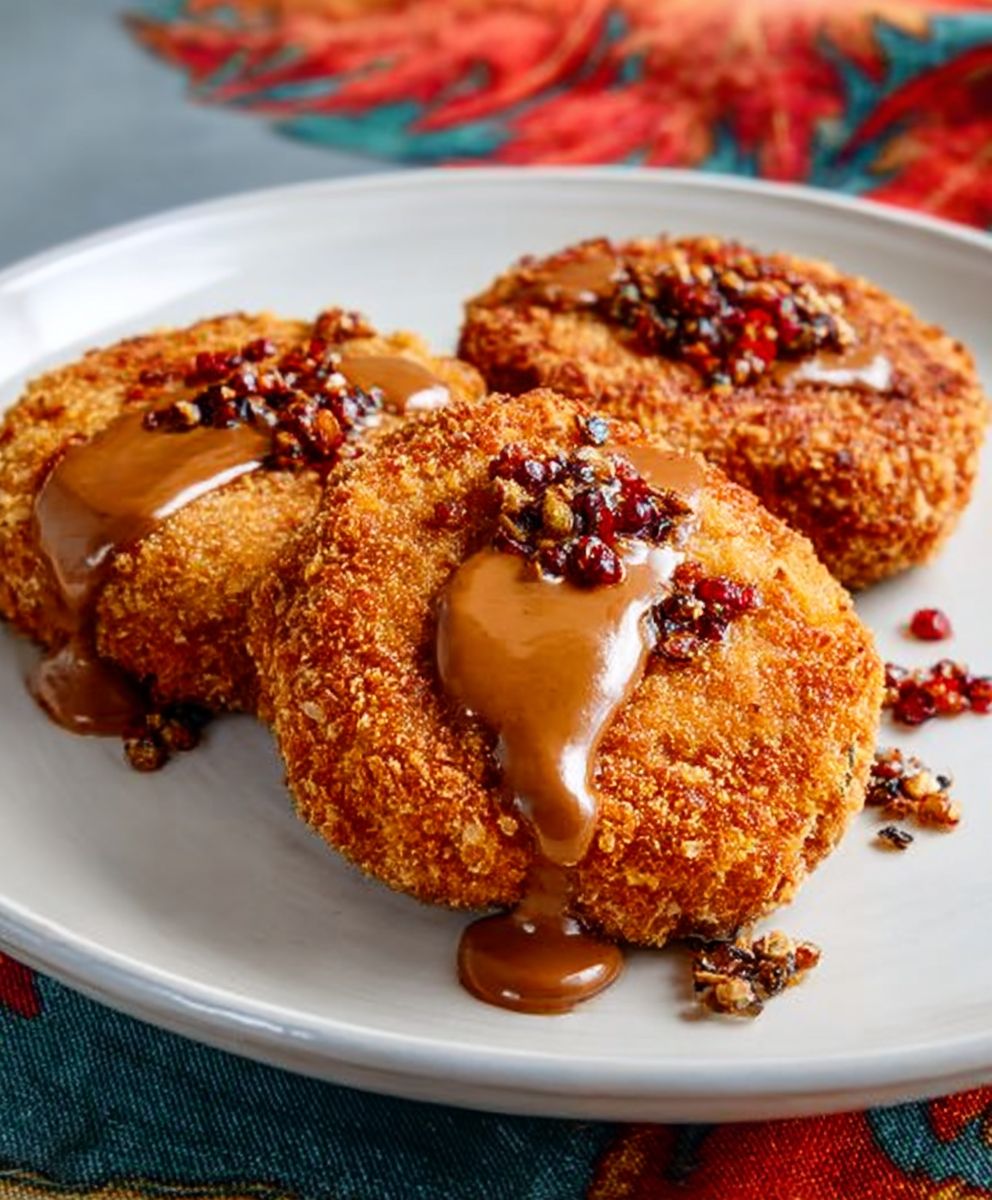
Holiday Croquette: the quintessential festive appetizer that’s guaranteed to disappear faster than you can say “Happy Holidays!” I don’t know about you, but for me, the holidays aren’t complete without a platter piled high with these golden-brown, crispy delights. There’s something truly magical about biting into a perfectly crafted croquette, especially when surrounded by loved ones during the most wonderful time of the year.
While the exact origins of the croquette are debated, many believe they trace back to French haute cuisine. Legend has it that they were invented out of necessity, a clever way to use up leftover meats and vegetables. Over time, they evolved from a thrifty kitchen staple into a sophisticated delicacy enjoyed worldwide. In many cultures, croquettes are a symbol of resourcefulness and culinary creativity, transforming humble ingredients into something truly special.
So, what makes the Holiday Croquette so irresistible? It’s the perfect combination of textures and flavors. The crispy, crunchy exterior gives way to a creamy, savory filling that’s simply divine. Plus, they’re incredibly versatile! You can customize the filling with your favorite holiday leftovers think roasted turkey, stuffing, cranberry sauce, or even sweet potatoes. They’re also incredibly convenient to make ahead of time, freeing you up to enjoy the festivities. Trust me, once you try this recipe, you’ll understand why everyone raves about these little bites of holiday heaven!

Ingredients:
- 1 lb Yukon Gold potatoes, peeled and cubed
- 1/2 cup heavy cream
- 1/4 cup unsalted butter
- 1/4 teaspoon ground nutmeg
- Salt and freshly ground black pepper to taste
- 1/2 cup finely diced cooked ham (holiday ham leftovers are perfect!)
- 1/4 cup finely chopped fresh parsley
- 1/4 cup finely chopped chives
- 1/2 cup all-purpose flour
- 2 large eggs, beaten
- 1 1/2 cups panko breadcrumbs
- Vegetable oil, for frying
- Optional: Cranberry sauce, for serving
Preparing the Potato Base:
Alright, let’s get started with the heart of our croquettes the creamy, dreamy potato base. This is where the magic begins, and trust me, it’s easier than you think!
- Boil the Potatoes: First things first, place those peeled and cubed Yukon Gold potatoes into a large pot. Cover them generously with cold water we want them to cook evenly. Add a pinch of salt to the water; this helps season the potatoes from the inside out. Bring the water to a boil over high heat, then reduce the heat to medium and let them simmer until they’re fork-tender. This usually takes about 15-20 minutes. You should be able to easily pierce them with a fork without any resistance.
- Drain and Dry: Once the potatoes are cooked, carefully drain them in a colander. Now, here’s a little secret for extra fluffy mashed potatoes: return the drained potatoes to the empty pot and place it back on the stovetop over low heat for a minute or two. This helps to evaporate any excess moisture, resulting in a smoother, less watery mash. Just be sure to watch them closely so they don’t burn!
- Mash the Potatoes: Now for the fun part! Using a potato ricer or a potato masher, mash the potatoes until they are smooth and lump-free. A ricer will give you the absolute smoothest texture, but a masher works just fine too. If you’re using a masher, just make sure to be thorough and get rid of any stubborn lumps.
- Enrich the Mash: Add the heavy cream, unsalted butter, and ground nutmeg to the mashed potatoes. Stir everything together until the butter is melted and the mixture is creamy and well combined. The nutmeg adds a warm, subtle spice that complements the potatoes beautifully.
- Season to Perfection: Now, season the mashed potato mixture with salt and freshly ground black pepper to taste. Don’t be shy with the seasoning it’s important to get the flavor just right. Give it a good taste and adjust the seasoning as needed. Remember, you can always add more, but you can’t take it away!
Adding the Holiday Flavors:
This is where we transform our basic mashed potatoes into festive holiday croquettes! The ham, parsley, and chives add a burst of flavor and color that will make these croquettes a hit at any gathering.
- Incorporate the Ham: Gently fold in the finely diced cooked ham into the mashed potato mixture. Make sure the ham is evenly distributed throughout the potatoes. The ham adds a savory, salty element that perfectly complements the creamy potatoes.
- Add Fresh Herbs: Stir in the finely chopped fresh parsley and chives. These herbs add a bright, fresh flavor and a pop of color to the croquettes. If you don’t have fresh herbs on hand, you can use dried herbs, but be sure to use about half the amount, as dried herbs are more concentrated in flavor.
- Chill the Mixture: This is a crucial step! Cover the potato mixture with plastic wrap, pressing the wrap directly onto the surface of the potatoes to prevent a skin from forming. Refrigerate the mixture for at least 2 hours, or preferably overnight. This allows the mixture to firm up, making it much easier to shape into croquettes. Trust me, you don’t want to skip this step!
Forming and Breading the Croquettes:
Now comes the hands-on part! Shaping and breading the croquettes can be a bit messy, but it’s also quite therapeutic. Get ready to get your hands dirty!
- Prepare the Breading Station: Set up a breading station with three shallow dishes. In the first dish, place the all-purpose flour. In the second dish, place the beaten eggs. And in the third dish, place the panko breadcrumbs. Make sure the breadcrumbs are spread out evenly in the dish.
- Shape the Croquettes: Remove the chilled potato mixture from the refrigerator. Using a spoon or a small ice cream scoop, scoop out about 2 tablespoons of the mixture. Gently roll the mixture between your palms to form a cylindrical or oval shape. You can make them any size or shape you like, but try to keep them consistent in size so they cook evenly.
- Breading the Croquettes: One at a time, carefully roll each croquette in the flour, making sure it’s completely coated. Then, dip it into the beaten eggs, again ensuring it’s fully coated. Finally, roll it in the panko breadcrumbs, pressing gently to help the breadcrumbs adhere. The panko breadcrumbs will give the croquettes a wonderfully crispy texture when fried.
- Repeat: Repeat the shaping and breading process with the remaining potato mixture until all the croquettes are formed and breaded.
- Chill Again (Optional): For even better results, place the breaded croquettes on a baking sheet lined with parchment paper and refrigerate them for another 30 minutes. This helps the breading to set and prevents the croquettes from falling apart during frying.
Frying the Croquettes:
The final step frying! This is where the croquettes transform into golden-brown, crispy delights. Be careful when working with hot oil, and always have a fire extinguisher nearby just in case.
- Heat the Oil: Pour about 2-3 inches of vegetable oil into a large, heavy-bottomed pot or Dutch oven. Heat the oil over medium-high heat until it reaches a temperature of 350°F (175°C). You can use a deep-fry thermometer to monitor the temperature. If you don’t have a thermometer, you can test the oil by dropping a small piece of bread into it. If the bread turns golden brown in about 30 seconds, the oil is ready.
- Fry the Croquettes: Carefully place a few croquettes into the hot oil, being careful not to overcrowd the pot. Overcrowding will lower the oil temperature and result in soggy croquettes. Fry the croquettes for about 2-3 minutes per side, or until they are golden brown and crispy.
- Drain and Serve: Using a slotted spoon or a spider, carefully remove the fried croquettes from the oil and place them on a wire rack lined with paper towels to drain off any excess oil.
- Serve Immediately: Serve the holiday croquettes immediately while they are still hot and crispy. They are delicious on their own, or you can serve them with a dollop of cranberry sauce for a festive touch. Enjoy!
Tips for Perfect Croquettes:
- Don’t Overwork the Potatoes: Overworking the potatoes can result in a gluey texture. Be gentle when mashing and mixing the ingredients.
- Chill, Chill, Chill: Chilling the potato mixture is essential for easy shaping and preventing the croquettes from falling apart during frying.
- Maintain Oil Temperature: Keeping the oil temperature consistent is crucial for achieving golden-brown, crispy croquettes. Use a thermometer to monitor the temperature and adjust the heat as needed.
- Don’t Overcrowd the Pot: Frying too many croquettes at once will lower the oil temperature and result in soggy croquettes. Fry them in batches.
- Get Creative with Fillings: Feel free to experiment with different fillings! You can add cheese, vegetables, or other types of meat to customize the croquettes to your liking.
Variations:
- Cheese Croquettes: Add 1/2 cup of shredded cheddar cheese or Gruyere cheese to the potato mixture for a cheesy twist.
- Vegetarian Croquettes: Omit the ham and add 1/2 cup of finely diced roasted vegetables, such as carrots, parsnips, or Brussels sprouts.
- Spicy Croquettes: Add a pinch of cayenne pepper or a dash of hot sauce to the potato mixture for a spicy kick.
Storage and Reheating:
Leftover croquettes can be stored in the refrigerator for up to 3 days. To reheat, bake them in a preheated oven at 350
Conclusion:
This Holiday Croquette recipe isn’t just another dish; it’s a guaranteed crowd-pleaser that will have everyone reaching for seconds (and maybe thirds!). The combination of savory flavors, the satisfying crunch of the breadcrumb coating, and the creamy, comforting interior makes it an irresistible treat, perfect for any festive gathering or even a cozy night in. Trust me, once you taste these, you’ll understand why I’m so enthusiastic about them.
But what truly elevates these croquettes to must-try status is their versatility. They’re not just limited to being served as appetizers. Imagine them as a delightful side dish alongside roasted turkey or ham during your holiday feast. Or, for a more casual meal, try serving them with a vibrant cranberry sauce or a tangy Dijon mustard for dipping.
And the variations? Oh, the possibilities are endless! Feel free to experiment with different cheeses a sharp cheddar or a creamy Gruyere would add a wonderful depth of flavor. You could also incorporate finely chopped vegetables like mushrooms or spinach for an extra nutritional boost and a touch of earthiness. If you’re feeling adventurous, consider adding a hint of spice with a pinch of cayenne pepper or a dash of hot sauce.
For a truly decadent experience, try serving these Holiday Croquettes with a truffle aioli. The earthy aroma of the truffle will complement the savory flavors of the croquettes beautifully, creating a sophisticated and unforgettable culinary experience. Alternatively, for a lighter option, a simple lemon-herb aioli would provide a refreshing contrast.
Don’t be intimidated by the process; while it may seem a bit involved at first glance, each step is straightforward and manageable. I’ve broken it down into easy-to-follow instructions, and I’m confident that even novice cooks can achieve delicious results. The key is to take your time, follow the recipe carefully, and most importantly, have fun!
I truly believe that this recipe will become a cherished tradition in your home, just as it has in mine. It’s a dish that brings people together, sparks conversation, and creates lasting memories. The warmth and comfort of these croquettes are simply unmatched, making them the perfect addition to any celebration.
So, what are you waiting for? Gather your ingredients, put on your apron, and get ready to create some culinary magic. I’m absolutely certain that you and your loved ones will adore these Holiday Croquettes.
I’m so excited for you to try this recipe and experience the joy of sharing these delicious croquettes with your friends and family. And please, don’t be shy! I’d love to hear about your experience. Share your photos, your variations, and your feedback in the comments below. Let me know what you thought, what you changed, and how you made this recipe your own. I can’t wait to see what you create! Happy cooking!
Holiday Croquette: The Ultimate Festive Recipe Guide
Crispy, golden-brown potato croquettes transform leftover holiday ham into a creamy, savory appetizer or side dish.
Ingredients
- 1 lb Yukon Gold potatoes, peeled and cubed
- 1/2 cup heavy cream
- 1/4 cup unsalted butter
- 1/4 teaspoon ground nutmeg
- Salt to taste
- Freshly ground black pepper to taste
- 1/2 cup finely diced cooked ham (holiday ham leftovers are perfect!)
- 1/4 cup finely chopped fresh parsley
- 1/4 cup finely chopped chives
- 1/2 cup all-purpose flour
- 2 large eggs, beaten
- 1 1/2 cups panko breadcrumbs
- Vegetable oil, for frying
- Optional: Cranberry sauce, for serving
Instructions
- Boil the Potatoes: Place the peeled and cubed Yukon Gold potatoes into a large pot. Cover with cold water and add a pinch of salt. Bring to a boil, then reduce heat and simmer until fork-tender (15-20 minutes).
- Drain and Dry: Drain the potatoes in a colander. Return them to the empty pot and place over low heat for 1-2 minutes to evaporate excess moisture.
- Mash the Potatoes: Mash the potatoes until smooth and lump-free using a potato ricer or masher.
- Enrich the Mash: Add the heavy cream, unsalted butter, and ground nutmeg to the mashed potatoes. Stir until the butter is melted and the mixture is creamy.
- Season to Perfection: Season the mashed potato mixture with salt and freshly ground black pepper to taste.
- Incorporate the Ham: Gently fold in the finely diced cooked ham into the mashed potato mixture.
- Add Fresh Herbs: Stir in the finely chopped fresh parsley and chives.
- Chill the Mixture: Cover the potato mixture with plastic wrap, pressing it onto the surface. Refrigerate for at least 2 hours, or preferably overnight.
- Prepare the Breading Station: Set up three shallow dishes. In the first dish, place the all-purpose flour. In the second dish, place the beaten eggs. And in the third dish, place the panko breadcrumbs.
- Shape the Croquettes: Remove the chilled potato mixture from the refrigerator. Using a spoon or a small ice cream scoop, scoop out about 2 tablespoons of the mixture. Gently roll the mixture between your palms to form a cylindrical or oval shape.
- Breading the Croquettes: One at a time, carefully roll each croquette in the flour, making sure it’s completely coated. Then, dip it into the beaten eggs, again ensuring it’s fully coated. Finally, roll it in the panko breadcrumbs, pressing gently to help the breadcrumbs adhere.
- Repeat: Repeat the shaping and breading process with the remaining potato mixture until all the croquettes are formed and breaded.
- Chill Again (Optional): For even better results, place the breaded croquettes on a baking sheet lined with parchment paper and refrigerate them for another 30 minutes. This helps the breading to set and prevents the croquettes from falling apart during frying.
- Heat the Oil: Pour about 2-3 inches of vegetable oil into a large, heavy-bottomed pot or Dutch oven. Heat the oil over medium-high heat until it reaches a temperature of 350°F (175°C).
- Fry the Croquettes: Carefully place a few croquettes into the hot oil, being careful not to overcrowd the pot. Fry the croquettes for about 2-3 minutes per side, or until they are golden brown and crispy.
- Drain and Serve: Using a slotted spoon or a spider, carefully remove the fried croquettes from the oil and place them on a wire rack lined with paper towels to drain off any excess oil.
- Serve Immediately: Serve the holiday croquettes immediately while they are still hot and crispy. They are delicious on their own, or you can serve them with a dollop of cranberry sauce for a festive touch. Enjoy!
Notes
- Don’t overwork the potatoes, as this can result in a gluey texture.
- Chilling the potato mixture is essential for easy shaping and preventing the croquettes from falling apart during frying.
- Maintain the oil temperature at 350°F (175°C) for even cooking.
- Don’t overcrowd the pot when frying.
- Get creative with fillings! Add cheese, vegetables, or other types of meat.
- Leftover croquettes can be stored in the refrigerator for up to 3 days. To reheat, bake them in a preheated oven at 350


Leave a Comment