

Malted milk pie: just the name conjures up images of simpler times, doesn’t it? Imagine sinking your fork into a slice of creamy, dreamy goodness, a flavor reminiscent of childhood trips to the soda fountain. This isn’t just dessert; it’s a nostalgic journey back to the golden age of malt shops and sweet, comforting treats.
While the exact origins of malted milk pie are a bit hazy, its roots are firmly planted in the early 20th century, coinciding with the rise in popularity of malted milk powder. This ingredient, initially created as a nutritional supplement, quickly found its way into candies, milkshakes, and, of course, pies! It became a staple in American households, offering a unique, subtly sweet, and slightly tangy flavor profile that was instantly addictive.
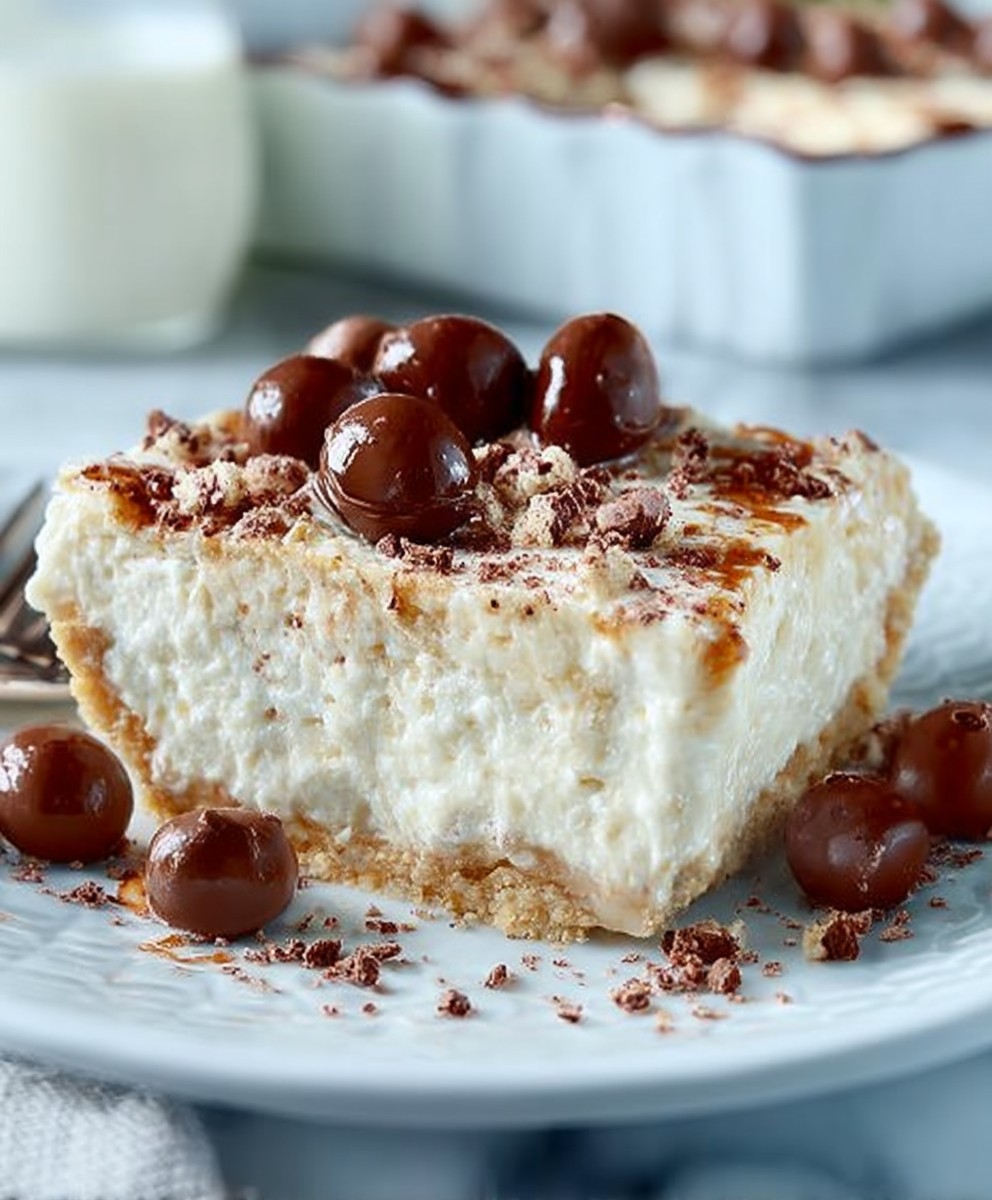
What makes this pie so beloved? It’s the perfect balance of textures a smooth, velvety filling nestled in a flaky, buttery crust. The malted milk powder lends a distinctive flavor that’s both comforting and sophisticated. It’s not overly sweet, making it a delightful treat that you can enjoy without feeling overwhelmed. Plus, it’s surprisingly easy to make, making it a perfect choice for both experienced bakers and those just starting their culinary adventures. So, are you ready to experience a slice of history? Let’s get baking!

Ingredients:
- For the Crust:
- 1 ½ cups all-purpose flour
- ½ teaspoon salt
- ½ cup (1 stick) cold unsalted butter, cut into cubes
- ¼ cup cold vegetable shortening, cut into cubes
- 5-7 tablespoons ice water
- For the Filling:
- 1 ½ cups whole milk
- ½ cup heavy cream
- 6 large egg yolks
- ¾ cup granulated sugar
- ¼ cup cornstarch
- ¼ teaspoon salt
- ½ cup malted milk powder (such as Carnation)
- 2 tablespoons unsalted butter
- 1 teaspoon vanilla extract
- Optional Toppings:
- Whipped cream
- Shaved chocolate
- Extra malted milk powder for dusting
Preparing the Crust:
- Combine Dry Ingredients: In a large bowl, whisk together the flour and salt. This ensures the salt is evenly distributed throughout the crust, which is crucial for flavor.
- Cut in the Fat: Add the cold butter and shortening to the flour mixture. Using a pastry blender or your fingertips (work quickly to keep the fat cold!), cut the fat into the flour until the mixture resembles coarse crumbs. You should still see small pieces of butter and shortening these are what create flaky layers.
- Add Ice Water: Gradually add the ice water, one tablespoon at a time, mixing gently after each addition. Be careful not to overmix. You want just enough water to bring the dough together. The dough should be slightly shaggy but not sticky.
- Form the Dough: Turn the dough out onto a lightly floured surface. Gently gather it into a disc. If the dough is too dry and crumbly, add a tiny bit more ice water, but be very careful not to add too much.
- Chill the Dough: Wrap the dough tightly in plastic wrap and refrigerate for at least 30 minutes, or up to 2 hours. This allows the gluten to relax, which will prevent the crust from shrinking during baking.
- Roll Out the Dough: On a lightly floured surface, roll out the dough into a 12-inch circle. Make sure to keep the dough moving and add more flour as needed to prevent sticking.
- Transfer to Pie Plate: Carefully transfer the dough to a 9-inch pie plate. Gently press the dough into the bottom and up the sides of the plate.
- Trim and Crimp the Edges: Trim any excess dough from the edges of the pie plate. Crimp the edges using your fingers or a fork to create a decorative border. This also helps to seal the edges and prevent them from shrinking.
- Pre-Bake the Crust (Blind Bake): Preheat your oven to 375°F (190°C). Line the pie crust with parchment paper and fill it with pie weights or dried beans. This will prevent the crust from puffing up during baking.
- Bake: Bake for 15-20 minutes, or until the edges are lightly golden brown. Remove the parchment paper and pie weights.
- Continue Baking (If Necessary): If the bottom of the crust looks pale, return it to the oven for another 5-10 minutes, or until it is golden brown. Watch it carefully to prevent burning.
- Cool Completely: Let the crust cool completely before filling.
Preparing the Malted Milk Filling:
- Heat Milk and Cream: In a medium saucepan, combine the milk and heavy cream. Heat over medium heat until it just begins to simmer. Do not boil.
- Whisk Egg Yolks and Sugar: In a separate bowl, whisk together the egg yolks, sugar, cornstarch, and salt until pale and smooth. This is an important step to ensure a smooth and creamy filling.
- Temper the Egg Yolks: Slowly drizzle about ½ cup of the hot milk mixture into the egg yolk mixture, whisking constantly to prevent the eggs from scrambling. This process is called tempering and it gradually raises the temperature of the egg yolks so they don’t cook too quickly when added to the hot milk.
- Combine Mixtures: Pour the tempered egg yolk mixture into the saucepan with the remaining milk mixture.
- Cook the Filling: Cook over medium heat, whisking constantly, until the mixture thickens and comes to a simmer. Continue to cook for 1-2 minutes, whisking constantly, to ensure the cornstarch is fully cooked. The filling should be thick enough to coat the back of a spoon.
- Remove from Heat: Remove the saucepan from the heat.
- Stir in Malted Milk Powder: Whisk in the malted milk powder until it is completely dissolved. Make sure there are no lumps.
- Add Butter and Vanilla: Stir in the butter and vanilla extract until the butter is melted and the mixture is smooth.
- Strain the Filling (Optional): For an extra smooth filling, strain the mixture through a fine-mesh sieve into a bowl. This will remove any lumps or cooked egg particles.
Assembling the Pie:
- Pour Filling into Crust: Pour the warm malted milk filling into the cooled pie crust.
- Smooth the Surface: Use a spatula to smooth the surface of the filling.
- Chill the Pie: Cover the pie with plastic wrap, pressing it gently onto the surface of the filling to prevent a skin from forming. Refrigerate for at least 4 hours, or preferably overnight, to allow the filling to set completely.
Serving the Pie:
- Remove from Refrigerator: Remove the pie from the refrigerator about 15-20 minutes before serving to allow it to soften slightly.
- Slice and Serve: Slice the pie into wedges and serve.
- Add Toppings (Optional): Top with whipped cream, shaved chocolate, or a dusting of extra malted milk powder, if desired.
Tips for Success:
- Keep Ingredients Cold: Using cold butter and ice water when making the crust is essential for creating a flaky texture.
- Don’t Overmix the Dough: Overmixing the dough will develop the gluten, resulting in a tough crust.
- Blind Bake the Crust: Blind baking the crust prevents it from becoming soggy when filled with the custard.
- Temper the Egg Yolks Carefully: Tempering the egg yolks slowly prevents them from scrambling when added to the hot milk mixture.
- Whisk Constantly: Whisking the filling constantly while cooking prevents it from sticking to the bottom of the saucepan and ensures a smooth texture.
- Chill Thoroughly: Chilling the pie completely allows the filling to set properly and develop its flavor.
Variations:
- Chocolate Malted Milk Pie: Add 2-3 tablespoons of unsweetened cocoa powder to the filling along with the malted milk powder for a chocolatey twist.
- Peanut Butter Malted Milk Pie: Swirl a few tablespoons of peanut butter into the filling after it has been cooked.
- Salted Caramel Malted Milk Pie: Drizzle salted caramel sauce over the top of the pie before serving.
Enjoy your delicious homemade Malted Milk Pie!
Conclusion:
This isn’t just another pie recipe; it’s a trip down memory lane with a sophisticated twist. The creamy, dreamy texture combined with that unmistakable malted milk flavor makes this malted milk pie an absolute showstopper. Trust me, the first bite will have you hooked! It’s the perfect balance of sweet and nostalgic, guaranteed to impress your family and friends.
But why is this pie a must-try? Beyond the incredible taste, it’s surprisingly simple to make. No fussy techniques or hard-to-find ingredients are required. You likely have most of what you need in your pantry already! And the result? A pie that tastes like it came straight from a high-end bakery. It’s the kind of dessert that elevates any occasion, from a casual weeknight dinner to a special holiday gathering.
Now, let’s talk serving suggestions. While this pie is divine on its own, a few simple additions can take it to the next level. A dollop of freshly whipped cream is always a welcome companion, adding a light and airy contrast to the rich filling. For a more decadent experience, try serving it with a scoop of vanilla bean ice cream. The cold ice cream melting into the warm pie is pure bliss.
Looking for variations? I’ve got you covered! For a chocolatey twist, add a tablespoon or two of cocoa powder to the filling. This will deepen the flavor and create a delightful malted chocolate pie. If you’re a fan of nuts, sprinkle some chopped pecans or walnuts on top before baking for added texture and flavor. And for a truly unique presentation, consider using individual tart pans instead of a full-sized pie crust. These mini malted milk pies are perfect for parties and gatherings.
Don’t be intimidated by the word “pie.” This recipe is incredibly forgiving. Even if you’re not a seasoned baker, you can absolutely nail this. The key is to follow the instructions carefully and don’t overbake the pie. You want the filling to be set but still slightly jiggly in the center.
I’m so excited for you to try this recipe! I truly believe it will become a new family favorite. It’s the perfect comfort food, a delightful treat, and a guaranteed crowd-pleaser all rolled into one delicious pie.
So, what are you waiting for? Preheat your oven, gather your ingredients, and get ready to bake the best malted milk pie you’ve ever tasted.
And most importantly, I want to hear about your experience! Did you try any of the variations? Did you serve it with whipped cream or ice cream? What did your family and friends think? Share your photos and stories in the comments below. I can’t wait to see your creations and hear all about your baking adventures. Happy baking!
Malted Milk Pie: The Ultimate Guide to Baking Perfection
Flaky homemade crust filled with a creamy, rich malted milk custard. A classic pie perfect for any occasion.
Ingredients
- 1 ½ cups all-purpose flour
- ½ teaspoon salt
- ½ cup (1 stick) cold unsalted butter, cut into cubes
- ¼ cup cold vegetable shortening, cut into cubes
- 5-7 tablespoons ice water
- 1 ½ cups whole milk
- ½ cup heavy cream
- 6 large egg yolks
- ¾ cup granulated sugar
- ¼ cup cornstarch
- ¼ teaspoon salt
- ½ cup malted milk powder (such as Carnation)
- 2 tablespoons unsalted butter
- 1 teaspoon vanilla extract
- Whipped cream
- Shaved chocolate
- Extra malted milk powder for dusting
Instructions
- Combine Dry Ingredients: In a large bowl, whisk together the flour and salt.
- Cut in the Fat: Add the cold butter and shortening to the flour mixture. Using a pastry blender or your fingertips (work quickly to keep the fat cold!), cut the fat into the flour until the mixture resembles coarse crumbs.
- Add Ice Water: Gradually add the ice water, one tablespoon at a time, mixing gently after each addition. Be careful not to overmix. You want just enough water to bring the dough together. The dough should be slightly shaggy but not sticky.
- Form the Dough: Turn the dough out onto a lightly floured surface. Gently gather it into a disc. If the dough is too dry and crumbly, add a tiny bit more ice water, but be very careful not to add too much.
- Chill the Dough: Wrap the dough tightly in plastic wrap and refrigerate for at least 30 minutes, or up to 2 hours.
- Roll Out the Dough: On a lightly floured surface, roll out the dough into a 12-inch circle.
- Transfer to Pie Plate: Carefully transfer the dough to a 9-inch pie plate. Gently press the dough into the bottom and up the sides of the plate.
- Trim and Crimp the Edges: Trim any excess dough from the edges of the pie plate. Crimp the edges using your fingers or a fork to create a decorative border.
- Pre-Bake the Crust (Blind Bake): Preheat your oven to 375°F (190°C). Line the pie crust with parchment paper and fill it with pie weights or dried beans.
- Bake: Bake for 15-20 minutes, or until the edges are lightly golden brown. Remove the parchment paper and pie weights.
- Continue Baking (If Necessary): If the bottom of the crust looks pale, return it to the oven for another 5-10 minutes, or until it is golden brown. Watch it carefully to prevent burning.
- Cool Completely: Let the crust cool completely before filling.
- Heat Milk and Cream: In a medium saucepan, combine the milk and heavy cream. Heat over medium heat until it just begins to simmer. Do not boil.
- Whisk Egg Yolks and Sugar: In a separate bowl, whisk together the egg yolks, sugar, cornstarch, and salt until pale and smooth.
- Temper the Egg Yolks: Slowly drizzle about ½ cup of the hot milk mixture into the egg yolk mixture, whisking constantly to prevent the eggs from scrambling.
- Combine Mixtures: Pour the tempered egg yolk mixture into the saucepan with the remaining milk mixture.
- Cook the Filling: Cook over medium heat, whisking constantly, until the mixture thickens and comes to a simmer. Continue to cook for 1-2 minutes, whisking constantly, to ensure the cornstarch is fully cooked. The filling should be thick enough to coat the back of a spoon.
- Remove from Heat: Remove the saucepan from the heat.
- Stir in Malted Milk Powder: Whisk in the malted milk powder until it is completely dissolved. Make sure there are no lumps.
- Add Butter and Vanilla: Stir in the butter and vanilla extract until the butter is melted and the mixture is smooth.
- Strain the Filling (Optional): For an extra smooth filling, strain the mixture through a fine-mesh sieve into a bowl.
- Pour Filling into Crust: Pour the warm malted milk filling into the cooled pie crust.
- Smooth the Surface: Use a spatula to smooth the surface of the filling.
- Chill the Pie: Cover the pie with plastic wrap, pressing it gently onto the surface of the filling to prevent a skin from forming. Refrigerate for at least 4 hours, or preferably overnight, to allow the filling to set completely.
- Remove from Refrigerator: Remove the pie from the refrigerator about 15-20 minutes before serving to allow it to soften slightly.
- Slice and Serve: Slice the pie into wedges and serve.
- Add Toppings (Optional): Top with whipped cream, shaved chocolate, or a dusting of extra malted milk powder, if desired.
Notes
- Keep Ingredients Cold: Using cold butter and ice water when making the crust is essential for creating a flaky texture.
- Don’t Overmix the Dough: Overmixing the dough will develop the gluten, resulting in a tough crust.
- Blind Bake the Crust: Blind baking the crust prevents it from becoming soggy when filled with the custard.
- Temper the Egg Yolks Carefully: Tempering the egg yolks slowly prevents them from scrambling when added to the hot milk mixture.
- Whisk Constantly: Whisking the filling constantly while cooking prevents it from sticking to the bottom of the saucepan and ensures a smooth texture.
- Chill Thoroughly: Chilling the pie completely allows the filling to set properly and develop its flavor.

Leave a Comment