

Homemade glazed doughnuts are a delightful treat that can transform any ordinary day into a special occasion. There’s something magical about biting into a warm, fluffy doughnut, its sweet glaze melting in your mouth. This recipe not only brings the joy of fresh doughnuts to your kitchen but also connects you to a rich history of this beloved pastry. Originating from various cultures, doughnuts have been enjoyed for centuries, with each region adding its unique twist. People love homemade glazed doughnuts for their irresistible taste and soft, pillowy texture, making them perfect for breakfast or a sweet snack. Plus, the convenience of making them at home means you can indulge in this classic treat whenever the craving strikes!

Ingredients:
- 2 ¼ teaspoons active dry yeast (1 packet)
- ½ cup warm milk (110°F or 43°C)
- ¼ cup granulated sugar
- 1 large egg
- 2 tablespoons unsalted butter, melted
- 1 teaspoon vanilla extract
- 2 cups all-purpose flour, plus more for dusting
- ½ teaspoon salt
- Vegetable oil, for frying
- 1 ½ cups powdered sugar
- 2 tablespoons milk (for glaze)
- 1 teaspoon vanilla extract (for glaze)
Preparing the Dough
1. **Activate the Yeast**: In a small bowl, combine the warm milk and the active dry yeast. Let it sit for about 5-10 minutes until it becomes frothy. This means your yeast is active and ready to go! 2. **Mix Wet Ingredients**: In a large mixing bowl, whisk together the granulated sugar, egg, melted butter, and vanilla extract. Once the yeast mixture is frothy, add it to this bowl and mix until well combined. 3. **Combine Dry Ingredients**: In another bowl, whisk together the all-purpose flour and salt. Gradually add the dry ingredients to the wet mixture, stirring with a wooden spoon or spatula until a dough begins to form. 4. **Knead the Dough**: Transfer the dough onto a floured surface. Knead the dough for about 5-7 minutes until it becomes smooth and elastic. If the dough is too sticky, sprinkle a little more flour as needed. 5. **First Rise**: Place the kneaded dough in a lightly greased bowl, cover it with a clean kitchen towel or plastic wrap, and let it rise in a warm place for about 1-1.5 hours, or until it has doubled in size.Shaping the Doughnuts
6. **Prepare the Work Surface**: Once the dough has risen, punch it down to release the air. Lightly flour your work surface again and roll out the dough to about ½ inch thick. 7. **Cut the Doughnuts**: Using a doughnut cutter or two round cookie cutters (one larger and one smaller), cut out doughnut shapes. Place the cut doughnuts on a floured baking sheet. Make sure to leave some space between each doughnut. 8. **Second Rise**: Cover the cut doughnuts with a kitchen towel and let them rise for another 30-45 minutes until they puff up.Frying the Doughnuts
9. **Heat the Oil**: In a deep pot or a deep fryer, heat about 2-3 inches of vegetable oil to 350°F (175°C). You can test the oil by dropping a small piece of dough into it; if it sizzles and rises to the surface, its ready. 10. **Fry the Doughnuts**: Carefully place a few doughnuts into the hot oil, being cautious not to overcrowd the pot. Fry them for about 1-2 minutes on each side, or until they are golden brown. Use a slotted spoon to flip them and remove them from the oil. 11. **Drain the Doughnuts**: Once fried, transfer the doughnuts to a plate lined with paper towels to drain excess oil. Repeat the frying process with the remaining doughnuts.Making the Glaze
12. **Prepare the Glaze**: In a medium bowl, whisk together the powdered sugar, milk, and vanilla extract until smooth. If the glaze is too thick, add a little more milk until you reach your desired consistency. 13. **Glaze the Doughnuts**: Once the doughnuts have cooled slightly (but are still warm), dip the tops into the glaze. Allow the excess glaze to drip off before placing them on a wire rack to set. 14. **Optional Toppings**: If you want to get creative, you can sprinkle some colorful sprinkles or chopped nuts on top of the glaze before it sets.Enjoying Your Homemade Doughnuts
15. **Serve and Enjoy**: Once the glaze has set, your homemade glazed doughnuts are ready to be enjoyed! Serve them fresh with a cup of coffee or tea, or share them with friends and family for a delightful treat. 16. **Storage**: If you have any leftovers (which is rare!), store them in an airtight container at room temperature for up to 2 days. For longer storage, you can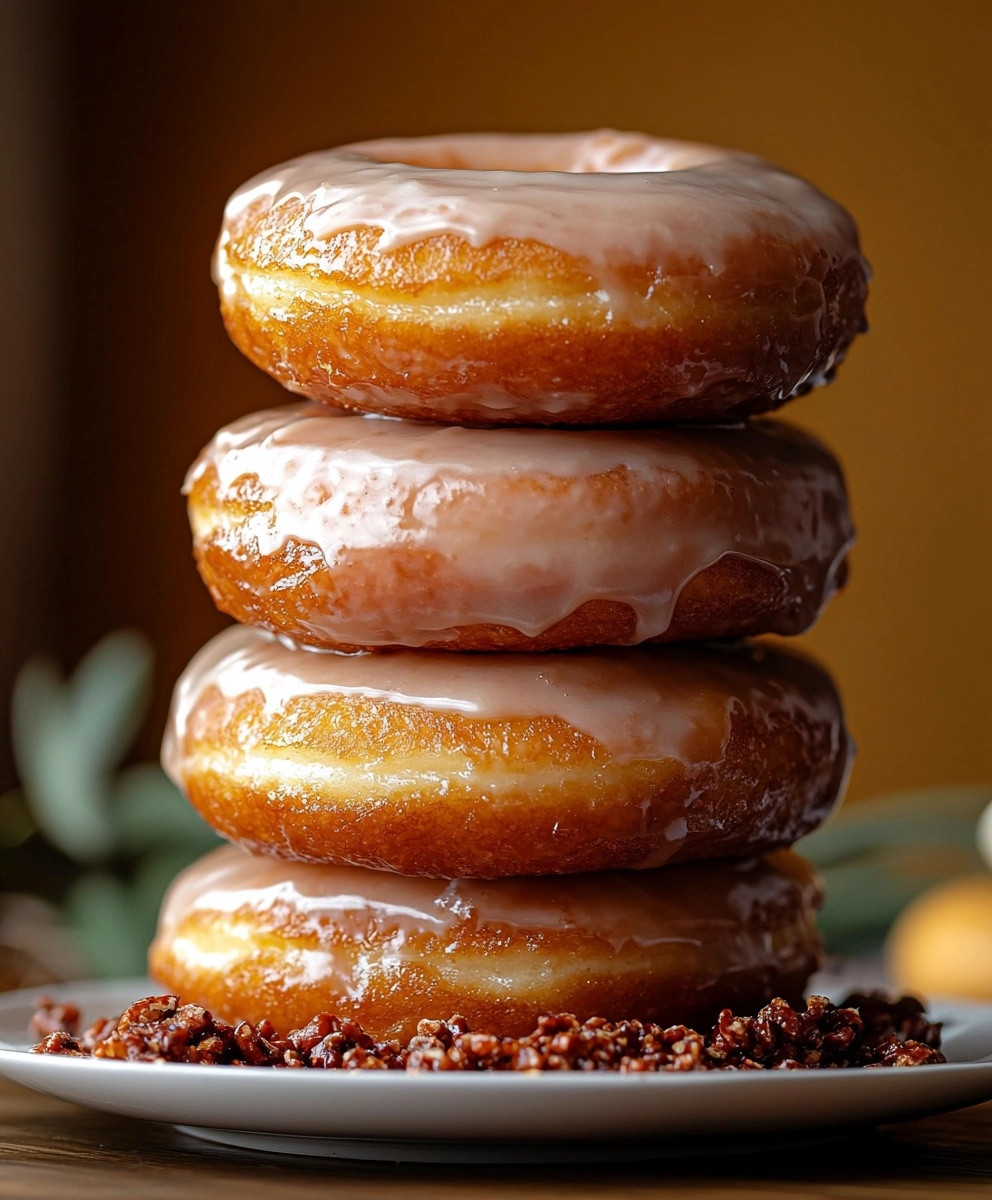
Conclusion:
In conclusion, this homemade glazed doughnuts recipe is an absolute must-try for anyone who loves a sweet treat thats both fluffy and indulgent. The combination of warm, freshly fried doughnuts coated in a glossy glaze is simply irresistible, making them perfect for breakfast, brunch, or even as a delightful dessert. You can easily customize these doughnuts by adding your favorite flavorsthink chocolate glaze, sprinkles, or even a hint of cinnamon for a cozy twist. I encourage you to gather your ingredients and give this recipe a go; I promise you wont regret it! Once youve made your batch of homemade glazed doughnuts, Id love to hear about your experience. Did you try any fun variations? How did they turn out? Sharing your creations not only inspires others but also helps build a community of fellow doughnut lovers. So roll up your sleeves, get that doughnut dough ready, and lets make some magic happen in the kitchen! Happy frying! Print
Homemade Glazed Doughnuts: The Ultimate Recipe for Deliciousness
- Total Time: 150 minutes
- Yield: 12 doughnuts 1x
Description
Enjoy the bliss of homemade glazed doughnuts with this easy recipe! These fluffy, sweet treats are perfect for breakfast or a snack, featuring a light texture and rich vanilla glaze. Simple to make and delicious to eat, theyre sure to be a hit with family and friends.
Ingredients
- 2 ¼ teaspoons active dry yeast
- ½ cup warm milk
- ¼ cup granulated sugar
- 1 large egg
- 2 tablespoons unsalted butter, melted
- 1 teaspoon vanilla extract
- 2 cups all-purpose flour, plus more for dusting
- ½ teaspoon salt
- Vegetable oil, for frying
- 1 ½ cups powdered sugar
- 2 tablespoons milk (for glaze)
- 1 teaspoon vanilla extract (for glaze)
Instructions
- In a small bowl, combine the warm milk and the active dry yeast. Let it sit for about 5-10 minutes until it becomes frothy.
- In a large mixing bowl, whisk together the granulated sugar, egg, melted butter, and vanilla extract. Add the frothy yeast mixture and mix until well combined.
- In another bowl, whisk together the all-purpose flour and salt. Gradually add the dry ingredients to the wet mixture, stirring until a dough begins to form.
- Transfer the dough onto a floured surface and knead for about 5-7 minutes until smooth and elastic. Add more flour if the dough is too sticky.
- Place the kneaded dough in a greased bowl, cover with a towel or plastic wrap, and let it rise in a warm place for 1-1.5 hours, or until doubled in size.
- Once risen, punch down the dough to release air. Roll out to about ½ inch thick on a floured surface.
- Use a doughnut cutter or two round cookie cutters to cut out doughnut shapes. Place on a floured baking sheet, leaving space between each.
- Cover the cut doughnuts with a towel and let them rise for another 30-45 minutes until puffed.
- In a deep pot or fryer, heat 2-3 inches of vegetable oil to 350°F (175°C). Test with a small piece of dough; it should sizzle and rise.
- Carefully place a few doughnuts in the hot oil, frying for 1-2 minutes on each side until golden brown. Use a slotted spoon to flip and remove.
- Transfer fried doughnuts to a plate lined with paper towels to drain excess oil. Repeat with remaining doughnuts.
- In a medium bowl, whisk together powdered sugar, milk, and vanilla extract until smooth. Adjust consistency with more milk if needed.
- Dip the tops of warm doughnuts into the glaze, allowing excess to drip off. Place on a wire rack to set.
- Add sprinkles or chopped nuts on top of the glaze before it sets for extra flair.
- Once the glaze has set, serve your homemade glazed doughnuts fresh with coffee or tea, or share with friends and family.
- Store any leftovers in an airtight container at room temperature for up to 2 days. For longer storage, freeze them.
Notes
- Ensure the milk is warm but not hot to avoid killing the yeast.
- You can customize the glaze with different flavors or colors for special occasions.
- Prep Time: 20 minutes
- Cook Time: 15 minutes

Leave a Comment