

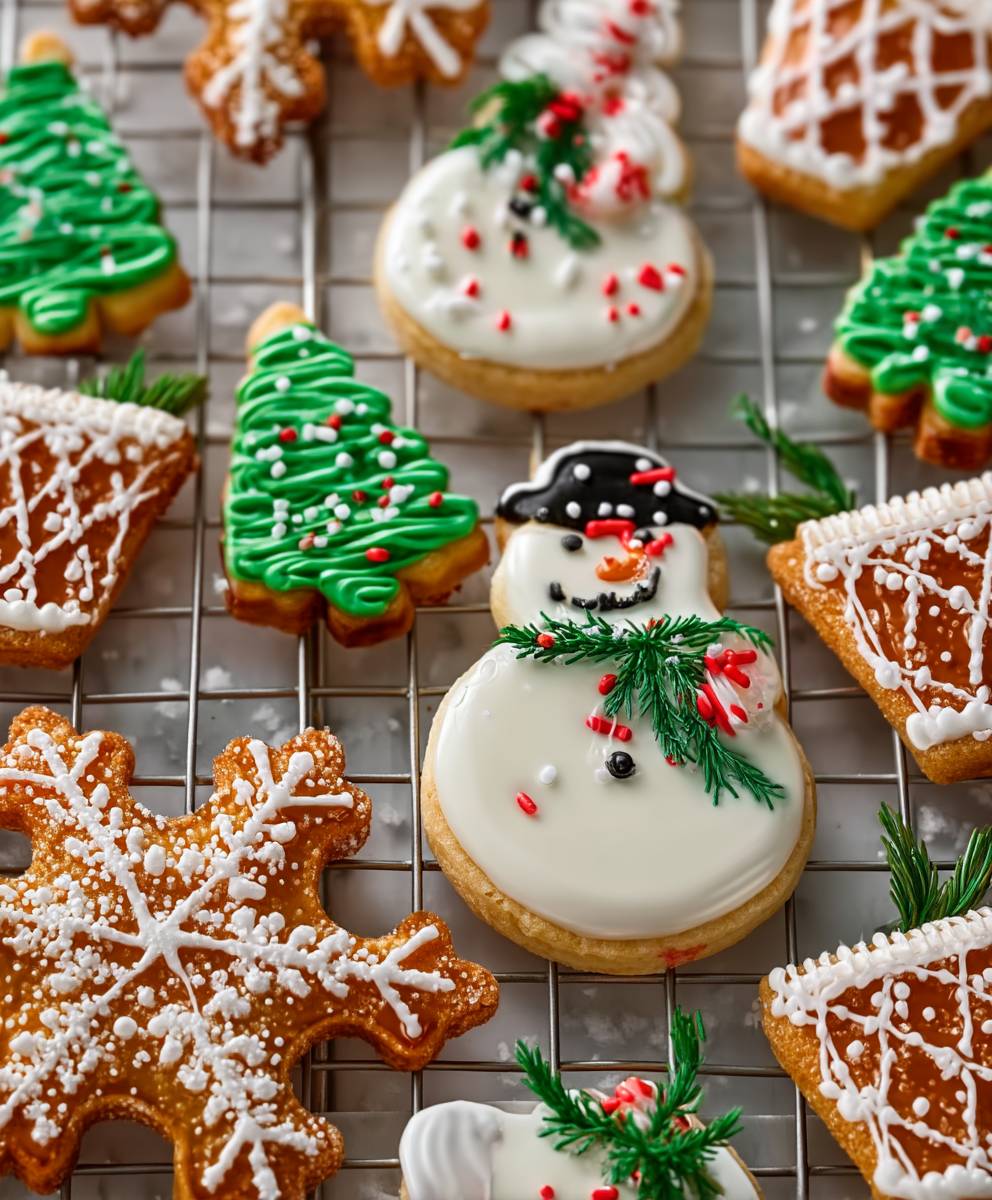
Royal Icing: the secret weapon in every baker’s arsenal! Have you ever gazed in awe at intricately decorated cookies, the kind that seem almost too beautiful to eat? The magic behind those edible masterpieces lies in the flawless finish of perfectly piped royal icing. It’s the edible glue that holds gingerbread houses together, the delicate detail that transforms a simple cookie into a work of art, and the smooth, glossy finish that elevates any baked good.
While its exact origins are debated, a form of royal icing has been gracing cakes and cookies since at least the 17th century. It gained prominence in royal courts, hence the name, where elaborate sugar sculptures and decorations were a symbol of wealth and artistry. Today, you don’t need to be royalty to enjoy the benefits of this versatile icing!
What makes royal icing so beloved? It’s the unique combination of its smooth, paint-like consistency when wet and its rock-hard, durable finish when dry. This allows for incredible detail work, from delicate floral patterns to intricate lettering. Plus, it’s incredibly versatile! You can adjust the consistency to create everything from flood icing for a smooth base to stiff icing for detailed piping. Whether you’re a seasoned baker or just starting out, mastering royal icing will open up a whole new world of decorating possibilities. Get ready to transform your treats into edible works of art!

Ingredients:
- 4 cups (approximately 1 pound) powdered sugar, sifted
- 3 tablespoons meringue powder
- 5-7 tablespoons warm water
- 1 teaspoon vanilla extract (optional, for flavor)
- Gel food coloring (optional, for desired colors)
Preparing the Royal Icing:
Okay, let’s get started! Making royal icing can seem a little intimidating, but trust me, it’s totally doable. The key is to be precise with your measurements and patient with the mixing process. We’re aiming for a smooth, glossy icing that’s perfect for decorating cookies, cakes, and more. So, grab your ingredients, and let’s dive in!
- Sift the Powdered Sugar: This is a crucial step! Sifting the powdered sugar removes any lumps, ensuring a smooth and even consistency in your icing. Nobody wants gritty icing, right? So, grab your sifter and give that powdered sugar a good shake. You’ll be surprised how much of a difference it makes.
- Combine Dry Ingredients: In a large, clean mixing bowl (I prefer using a stand mixer, but a hand mixer works too!), combine the sifted powdered sugar and meringue powder. Whisk them together thoroughly. This ensures the meringue powder is evenly distributed, which is essential for proper icing structure and stability. Think of it as laying the foundation for a beautiful, long-lasting design.
- Add Warm Water: Now, slowly add the warm water, one tablespoon at a time, to the dry ingredients. Start with 5 tablespoons and mix on low speed. The key here is to add the water gradually. You can always add more, but you can’t take it away! Keep mixing until the ingredients start to come together.
- Mix on Medium Speed: Once the water is incorporated, increase the mixer speed to medium and beat for about 5-7 minutes. The icing should become thick, glossy, and form stiff peaks when you lift the whisk or beater. This is where the meringue powder really works its magic, creating that stable structure we need. Keep an eye on the consistency; it should be similar to a thick toothpaste.
- Check the Consistency: To test the consistency, dip a spoon into the icing and lift it out. The icing should form a stiff peak that holds its shape. If the peak droops or the icing is too thin, continue mixing for another minute or two. If it’s too thick, add a tiny bit more warm water (a teaspoon at a time) until you reach the desired consistency. Remember, patience is key!
- Add Vanilla Extract (Optional): If you’re using vanilla extract, add it now and mix until well combined. The vanilla adds a lovely flavor that complements the sweetness of the icing. You can also experiment with other extracts like almond, lemon, or even peppermint, depending on your preference.
Coloring the Royal Icing:
Alright, now for the fun part adding color! This is where you can really get creative and personalize your royal icing. I prefer using gel food coloring because it’s highly concentrated and won’t change the consistency of the icing as much as liquid food coloring. But feel free to use whatever you have on hand. Just remember to start with a small amount of color and gradually add more until you achieve the desired shade.
- Divide the Icing: If you’re using multiple colors, divide the royal icing into separate bowls. I like to use small bowls or ramekins for this. The number of bowls will depend on how many different colors you want to create.
- Add Gel Food Coloring: Using a toothpick or small spoon, add a tiny amount of gel food coloring to each bowl of icing. Remember, a little goes a long way! Start with just a drop or two and mix well.
- Mix Thoroughly: Use a clean spoon or spatula to mix the food coloring into the icing until it’s evenly distributed. Make sure there are no streaks or swirls of color.
- Adjust the Color: If the color is too light, add another drop of food coloring and mix again. Continue adding color until you reach the desired shade. Remember to mix well after each addition to ensure even color distribution.
- Create Different Shades: You can also create different shades of the same color by adding varying amounts of food coloring. For example, you can create a light pink, a medium pink, and a dark pink using the same pink food coloring.
- Store Colored Icing: Once you’ve colored your icing, it’s important to store it properly to prevent it from drying out. Cover each bowl tightly with plastic wrap, pressing the plastic wrap directly onto the surface of the icing. This will help to prevent a crust from forming.
Adjusting Icing Consistency:
Royal icing is all about consistency! You’ll need different consistencies for different decorating techniques. For outlining cookies, you’ll want a thicker consistency that holds its shape. For flooding (filling in the outlined areas), you’ll want a thinner consistency that spreads easily. Here’s how to adjust the consistency of your royal icing:
Outlining Consistency:
This consistency is often referred to as “piping consistency.” It should be thick enough to hold its shape when piped, but not so thick that it’s difficult to squeeze out of the piping bag. To achieve outlining consistency, the icing should form a stiff peak that doesn’t droop when you lift the spoon or beater. If your icing is already at this consistency, you’re good to go! If it’s too thin, add a small amount of sifted powdered sugar (a tablespoon at a time) and mix until you reach the desired consistency.
Flooding Consistency:
This consistency is often referred to as “15-second icing” because when you drop a spoonful of icing back into the bowl, it should take about 15 seconds for the surface to become smooth again. To achieve flooding consistency, add a small amount of warm water (a teaspoon at a time) to the outlining consistency icing and mix until it thins out. Test the consistency by dropping a spoonful of icing back into the bowl and counting how long it takes for the surface to smooth out. If it takes longer than 15 seconds, add a little more water. If it takes less than 15 seconds, add a little more powdered sugar.
Tips for Adjusting Consistency:
- Add Water Gradually: When thinning the icing, add water very gradually, a teaspoon at a time. It’s easier to add more water than to try to thicken the icing again.
- Add Powdered Sugar Gradually: When thickening the icing, add sifted powdered sugar gradually, a tablespoon at a time. Again, it’s easier to add more powdered sugar than to try to thin the icing again.
- Mix Well After Each Addition: After adding water or powdered sugar, mix the icing thoroughly to ensure it’s evenly distributed.
- Test the Consistency: Always test the consistency after each adjustment to make sure you’re on the right track.
Storing Royal Icing:
Proper storage is essential to prevent your royal icing from drying out and becoming unusable. Here’s how to store royal icing:
- Transfer to an Airtight Container: Transfer the royal icing to an airtight container. This will help to prevent it from drying out.
- Cover with Plastic Wrap: Press a piece of plastic wrap directly onto the surface of the icing. This will create a barrier between the icing and the air, preventing a crust from forming.
- Seal the Container: Seal the airtight container tightly.
- Store at Room Temperature: Store the royal icing at room temperature. Do not refrigerate it, as this can cause it to separate.
- Use Within a Week: Royal icing is best used within a week of making it. After a week, it may start to dry out or separate.
- Re-Mix Before Using: Before using stored royal icing, re-mix it thoroughly to ensure it’s smooth and consistent. You may need to add a small amount of water to thin it out if it has thickened during storage.
Troubleshooting Royal Icing:
Sometimes, things don’t go exactly as planned. Here are some common problems you might encounter when making royal icing and how to fix them:
Icing is Too Thick:
If your icing is too thick, it will be difficult to pipe and spread. To fix this, add a small amount of warm water (a teaspoon at a time) and mix until you reach the desired consistency. Remember to mix well after each addition and test the consistency frequently.
Icing is Too Thin:
If your icing is too thin, it won’t hold its shape when piped and will spread too quickly. To fix this, add a small amount of sifted powdered sugar (a tablespoon at a time
Conclusion:
So, there you have it! This royal icing recipe isn’t just another icing recipe; it’s your secret weapon for creating truly stunning and professional-looking baked goods. I know, I know, royal icing can seem intimidating, but trust me, once you get the hang of it, you’ll be hooked. The smooth, glossy finish and the incredible versatility it offers make it absolutely worth the effort.
Why is this a must-try? Because it’s more than just decoration; it’s edible art! Imagine transforming simple sugar cookies into personalized masterpieces, adding intricate details to gingerbread houses that will wow everyone, or even creating delicate piped flowers for cakes that look like they belong in a magazine. This royal icing recipe gives you the power to do all of that and more. It’s the key to unlocking your inner baking artist and taking your creations to the next level. Plus, the taste is subtly sweet and complements a wide range of baked goods without being overpowering.
But the best part? It’s incredibly adaptable. Feel free to experiment with different extracts to add unique flavors. A touch of almond extract can elevate your cookies to a whole new level of sophistication, or a hint of lemon extract can add a bright, citrusy zing. You can also play around with the consistency to achieve different effects. For outlining, you’ll want a thicker consistency that holds its shape. For flooding, you’ll need a thinner consistency that spreads easily and evenly. Don’t be afraid to experiment and find what works best for you.
Serving Suggestions and Variations:
* Classic Sugar Cookies: This is the most obvious choice, but for good reason! Use this royal icing to create intricate designs on your favorite sugar cookie recipe.
* Gingerbread Houses: Royal icing is the glue that holds gingerbread houses together, both literally and figuratively. Its strong hold and beautiful finish make it the perfect choice for creating festive holiday decorations.
* Cake Decorations: Pipe delicate flowers, intricate borders, or personalized messages onto cakes for a truly special touch.
* Petit Fours: Use royal icing to create a smooth, glossy coating for petit fours, adding a touch of elegance to these bite-sized treats.
* Cookie Bouquets: Create stunning cookie bouquets by attaching decorated cookies to skewers and arranging them in a vase.
* Marbled Effect: Create a marbled effect by swirling different colors of royal icing together on your cookies.
* Watercolor Effect: Achieve a watercolor effect by diluting royal icing with a small amount of water and painting it onto your cookies.
* Stenciled Designs: Use stencils to create intricate designs on your cookies with royal icing.
I truly believe that this recipe will become a staple in your baking repertoire. It’s reliable, easy to follow, and delivers consistently beautiful results. So, go ahead, give it a try! I’m confident that you’ll be amazed at what you can create.
And most importantly, I want to hear about your experience! Did you try this recipe? What did you create? What variations did you try? Share your photos and stories in the comments below. I can’t wait to see what you come up with! Happy baking, and remember, with a little practice and this fantastic royal icing recipe, you’ll be creating edible masterpieces in no time! Don’t forget to tag me in your creations on social media I’d love to see them! Let’s spread the joy of beautiful and delicious baking together!
Royal Icing: The Ultimate Guide to Recipes, Tips, and Techniques
Easy homemade royal icing for decorating cookies, cakes, and more! Achieve smooth, glossy results with this simple recipe.
Ingredients
- 4 cups (approximately 1 pound) powdered sugar, sifted
- 3 tablespoons meringue powder
- 5-7 tablespoons warm water
- 1 teaspoon vanilla extract (optional, for flavor)
- Gel food coloring (optional, for desired colors)
Instructions
- Sift the Powdered Sugar: Sift the powdered sugar to remove any lumps.
- Combine Dry Ingredients: In a large bowl, combine the sifted powdered sugar and meringue powder. Whisk together thoroughly.
- Add Warm Water: Slowly add the warm water, one tablespoon at a time, to the dry ingredients. Start with 5 tablespoons and mix on low speed until combined.
- Mix on Medium Speed: Increase the mixer speed to medium and beat for about 5-7 minutes. The icing should become thick, glossy, and form stiff peaks.
- Check the Consistency: Dip a spoon into the icing and lift it out. The icing should form a stiff peak that holds its shape. Adjust with more water or powdered sugar as needed.
- Add Vanilla Extract (Optional): If using, add vanilla extract and mix until well combined.
- Coloring the Royal Icing: Divide the royal icing into separate bowls. Add a tiny amount of gel food coloring to each bowl of icing. Mix thoroughly. Adjust the color until you reach the desired shade.
- Adjusting Icing Consistency: For outlining cookies, you’ll want a thicker consistency that holds its shape. For flooding (filling in the outlined areas), you’ll want a thinner consistency that spreads easily.
- Outlining Consistency: This consistency is often referred to as “piping consistency.” It should be thick enough to hold its shape when piped, but not so thick that it’s difficult to squeeze out of the piping bag. To achieve outlining consistency, the icing should form a stiff peak that doesn’t droop when you lift the spoon or beater. If your icing is already at this consistency, you’re good to go! If it’s too thin, add a small amount of sifted powdered sugar (a tablespoon at a time) and mix until you reach the desired consistency.
- Flooding Consistency: This consistency is often referred to as “15-second icing” because when you drop a spoonful of icing back into the bowl, it should take about 15 seconds for the surface to become smooth again. To achieve flooding consistency, add a small amount of warm water (a teaspoon at a time) to the outlining consistency icing and mix until it thins out. Test the consistency by dropping a spoonful of icing back into the bowl and counting how long it takes for the surface to smooth out. If it takes longer than 15 seconds, add a little more water. If it takes less than 15 seconds, add a little more powdered sugar.
- Storing Royal Icing: Transfer the royal icing to an airtight container. Press a piece of plastic wrap directly onto the surface of the icing. Seal the airtight container tightly. Store the royal icing at room temperature. Do not refrigerate it, as this can cause it to separate. Use Within a Week. Re-Mix Before Using.
Notes
- Sifting the powdered sugar is crucial for a smooth icing.
- Add water gradually to avoid making the icing too thin.
- Gel food coloring is recommended for vibrant colors without altering the consistency.
- Adjust the consistency of the icing based on your decorating needs (outlining vs. flooding).
- Store properly to prevent drying out.
- If your icing is too thick, it will be difficult to pipe and spread. To fix this, add a small amount of warm water (a teaspoon at a time) and mix until you reach the desired consistency. Remember to mix well after each addition and test the consistency frequently.
- If your icing is too thin, it won’t hold its shape when piped and will spread too quickly. To fix this, add a small amount of sifted powdered sugar (a tablespoon at a time

Leave a Comment