

Mimosa Cake: Just the name evokes sunshine, celebration, and pure joy! Imagine a dessert so light, airy, and vibrantly yellow that it mirrors the effervescence of its namesake cocktail. This isn’t just a cake; it’s a statement, a centerpiece, and a guaranteed crowd-pleaser for any occasion.
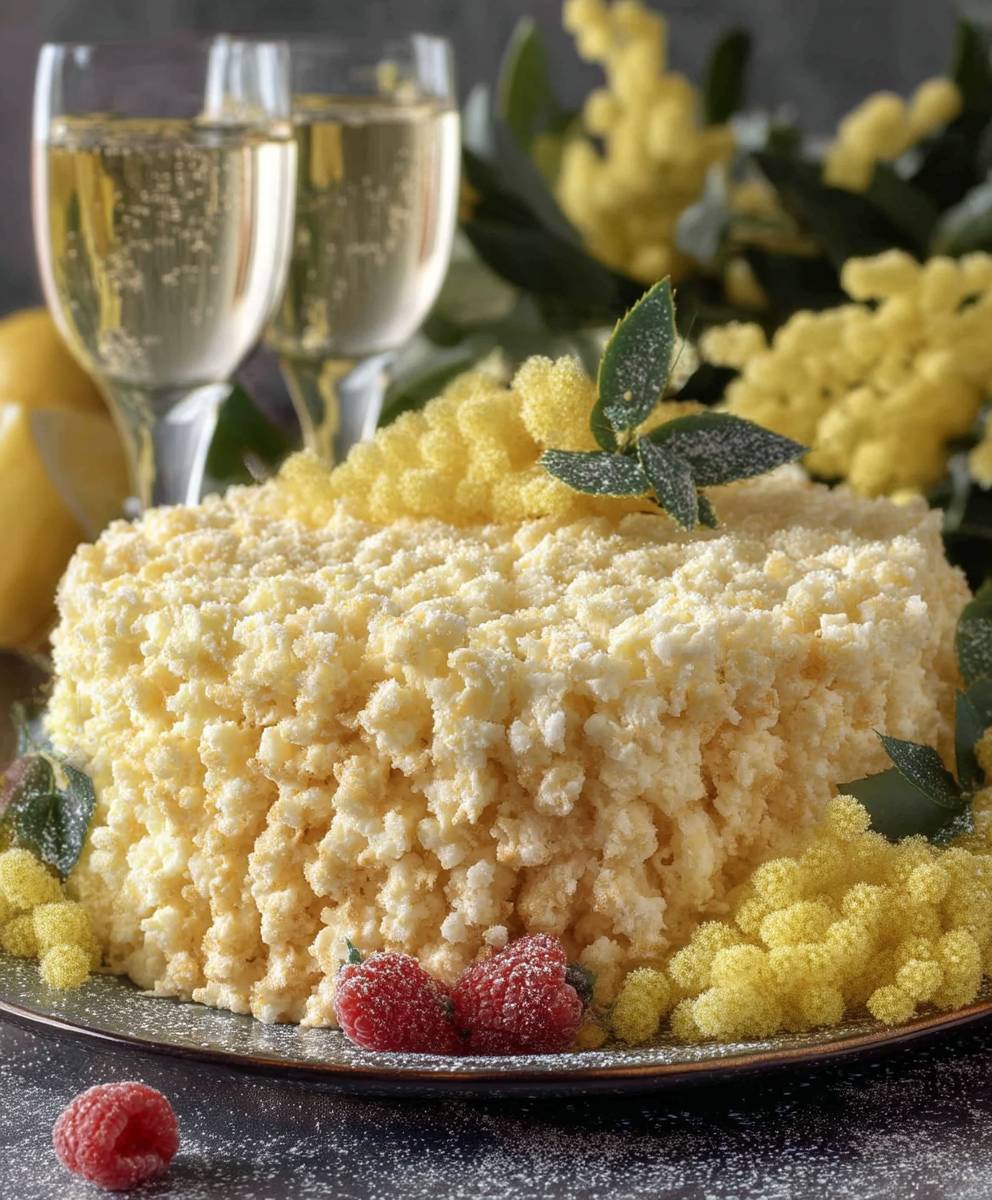
The Mimosa Cake, or Torta Mimosa as it’s known in Italy, is a relatively modern creation, born in the 1950s in the region of Friuli Venezia Giulia. It was created by a pastry chef named Adelmo Renzi in honor of International Women’s Day, and the cake’s appearance is meant to resemble the mimosa flower, a symbol of the holiday in Italy. The delicate, fluffy cubes of sponge cake adorning its surface perfectly capture the flower’s soft, golden texture.
What makes this Mimosa Cake so irresistible? It’s a symphony of textures and flavors. The sponge cake is incredibly light and moist, often soaked in a citrusy syrup that adds a delightful tang. The filling, typically a combination of pastry cream and whipped cream, provides a luscious, creamy counterpoint. But the real magic lies in those mimosa “petals” each bite is a burst of airy sweetness that melts in your mouth. It’s elegant enough for a special occasion, yet simple enough to enjoy any time you crave a little bit of sunshine on your plate. So, let’s get baking and create this stunning and delicious Mimosa Cake together!

Ingredients:
- For the Sponge Cake:
- 225g (1 3/4 cups + 2 tablespoons) all-purpose flour
- 225g (1 cup + 1/8 cup) granulated sugar
- 6 large eggs, separated
- 60ml (1/4 cup) warm water
- 1 teaspoon vanilla extract
- 1/4 teaspoon salt
- 1 teaspoon baking powder
- For the Pastry Cream:
- 500ml (2 cups) whole milk
- 120g (1/2 cup + 1 tablespoon) granulated sugar
- 4 large egg yolks
- 40g (1/3 cup) cornstarch
- 1 teaspoon vanilla extract
- 25g (2 tablespoons) unsalted butter
- Pinch of salt
- For the Whipped Cream:
- 500ml (2 cups) heavy cream, cold
- 50g (1/4 cup) powdered sugar
- 1 teaspoon vanilla extract
- For the Syrup:
- 100ml (1/2 cup less 1 tablespoon) water
- 50g (1/4 cup) granulated sugar
- 2 tablespoons orange liqueur (such as Grand Marnier or Cointreau), optional
Preparing the Sponge Cake:
- Preheat and Prepare: I always start by preheating my oven to 175°C (350°F). While it’s heating up, grease and flour a 23cm (9-inch) round cake pan. This will prevent the cake from sticking and make it easier to remove later.
- Whisk Egg Yolks and Sugar: In a large bowl, whisk together the egg yolks and granulated sugar until the mixture is pale yellow and fluffy. This usually takes about 3-5 minutes with an electric mixer. The mixture should ribbon when you lift the whisk.
- Add Water and Vanilla: Gradually add the warm water to the egg yolk mixture, whisking continuously. Then, stir in the vanilla extract.
- Sift Dry Ingredients: In a separate bowl, sift together the all-purpose flour, salt, and baking powder. Sifting ensures that there are no lumps and that the dry ingredients are evenly distributed.
- Combine Wet and Dry Ingredients: Gradually add the dry ingredients to the wet ingredients, mixing on low speed until just combined. Be careful not to overmix, as this can result in a tough cake.
- Whisk Egg Whites: In a clean, grease-free bowl, whisk the egg whites until stiff peaks form. You can use an electric mixer or a whisk. The peaks should hold their shape when you lift the whisk.
- Fold Egg Whites into Batter: Gently fold the egg whites into the batter in two additions. Be careful not to deflate the egg whites, as this will make the cake dense. Use a spatula and fold from the bottom up.
- Bake the Cake: Pour the batter into the prepared cake pan and bake for 30-35 minutes, or until a toothpick inserted into the center comes out clean.
- Cool the Cake: Let the cake cool in the pan for 10 minutes before inverting it onto a wire rack to cool completely.
Preparing the Pastry Cream:
- Heat the Milk: In a medium saucepan, heat the milk over medium heat until it is almost boiling. Be careful not to let it boil over.
- Whisk Egg Yolks and Sugar: In a separate bowl, whisk together the egg yolks and granulated sugar until the mixture is pale yellow and fluffy.
- Add Cornstarch: Whisk in the cornstarch until it is fully incorporated. This will help to thicken the pastry cream.
- Temper the Egg Yolks: Gradually pour a small amount of the hot milk into the egg yolk mixture, whisking constantly. This will temper the egg yolks and prevent them from scrambling when you add them to the hot milk.
- Combine Mixtures: Pour the egg yolk mixture into the saucepan with the remaining hot milk.
- Cook the Pastry Cream: Cook over medium heat, whisking constantly, until the pastry cream thickens and comes to a boil. Continue to cook for 1-2 minutes, whisking constantly, to ensure that the cornstarch is fully cooked.
- Remove from Heat: Remove the saucepan from the heat and stir in the vanilla extract, butter, and salt.
- Cool the Pastry Cream: Pour the pastry cream into a clean bowl, cover with plastic wrap (pressing the plastic wrap directly onto the surface of the cream to prevent a skin from forming), and refrigerate for at least 2 hours, or until completely cooled.
Preparing the Whipped Cream:
- Chill Equipment: Make sure your bowl and whisk attachment are well-chilled. This helps the cream whip up faster and hold its shape better. I sometimes put them in the freezer for 15-20 minutes before starting.
- Combine Ingredients: In the chilled bowl, combine the heavy cream, powdered sugar, and vanilla extract.
- Whip the Cream: Whip the cream with an electric mixer on medium speed until stiff peaks form. Be careful not to overwhip, as this can cause the cream to curdle.
- Refrigerate: Cover and refrigerate the whipped cream until ready to use.
Preparing the Syrup:
- Combine Water and Sugar: In a small saucepan, combine the water and granulated sugar.
- Heat and Dissolve: Heat over medium heat, stirring constantly, until the sugar is completely dissolved.
- Simmer: Bring the mixture to a simmer and cook for 1-2 minutes.
- Remove from Heat: Remove the saucepan from the heat and let the syrup cool completely.
- Add Liqueur (Optional): Stir in the orange liqueur, if using.
Assembling the Mimosa Cake:
- Level the Cake: Using a long serrated knife, level the top of the sponge cake. This will ensure that the cake is even and stable.
- Cut the Cake: Cut the cake horizontally into three layers. Be very careful when doing this, as the sponge cake is delicate. I find it helpful to use toothpicks to mark the halfway point around the cake before cutting.
- Prepare the Cake Cubes: Take the top layer of the cake and cut it into small cubes (about 1cm or 1/2 inch). These cubes will be used to decorate the outside of the cake. Set aside.
- Soak the First Layer: Place the bottom layer of the cake on a serving plate or cake stand. Brush the cake layer generously with the syrup. This will keep the cake moist and flavorful.
- Add Pastry Cream: Spread half of the pastry cream evenly over the soaked cake layer.
- Add Whipped Cream: Spread half of the whipped cream evenly over the pastry cream.
- Place the Second Layer: Carefully place the second layer of the cake on top of the whipped cream.
- Soak the Second Layer: Brush the second cake layer generously with the syrup.
- Add Remaining Pastry Cream: Spread the remaining pastry cream evenly over the soaked cake layer.
- Add Remaining Whipped Cream: Spread the remaining whipped cream evenly over the pastry cream.
- Place the Top Layer (Optional): You can place the bottom of the top layer on top of the whipped cream, but it is not necessary.
- Cover the Cake: Cover the entire cake with a thin layer of whipped cream. This will help the cake cubes adhere to the cake.
- Decorate with Cake Cubes: Gently press the cake cubes onto the sides and top of the cake, covering it completely. This is what gives the Mimosa cake its signature look.
- Chill the Cake: Refrigerate the cake for at least 2 hours before serving. This will allow the flavors to meld together and the cake to set. I prefer to chill it overnight for the best results.
- Serve: Slice and serve the Mimosa cake. Enjoy!
Conclusion:
This Mimosa Cake isn’t just a dessert; it’s a celebration on a plate! From the vibrant citrus flavors to the delicate, airy crumb, every bite is a burst of sunshine. I truly believe this recipe is a must-try for anyone looking to impress their guests, brighten a special occasion, or simply treat themselves to something extraordinary. The combination of the moist cake, the tangy orange syrup, and the light, whipped cream frosting creates a symphony of textures and tastes that will leave you wanting more.
Why is this Mimosa Cake a must-try? It’s simple: it’s delicious, visually stunning, and surprisingly easy to make. While it looks like it came straight from a professional bakery, the steps are straightforward and manageable for even beginner bakers. Plus, the bright, citrusy flavors are universally appealing, making it a crowd-pleaser for any gathering. It’s the perfect balance of sweet and tart, light and decadent, making it a truly unforgettable dessert experience.
But the best part? You can easily customize this recipe to suit your preferences!
Serving Suggestions and Variations:
* Brunch Perfection: Serve slices of this Mimosa Cake alongside fresh fruit, yogurt parfaits, and a pot of freshly brewed coffee for the ultimate brunch spread.
* Elegant Dessert: For a more formal occasion, garnish each slice with a sprig of mint and a few fresh berries. A dusting of powdered sugar adds a touch of elegance.
* Citrus Swap: While orange is the classic choice, feel free to experiment with other citrus fruits! Lemon, grapefruit, or even blood orange would all work beautifully in this recipe. Just adjust the amount of sugar to balance the tartness.
* Boozy Boost: For an extra touch of indulgence, add a splash of orange liqueur (like Grand Marnier or Cointreau) to the syrup. This will enhance the citrus flavor and add a subtle warmth.
* Berry Bliss: Fold fresh berries (strawberries, raspberries, blueberries) into the whipped cream frosting for a burst of fresh flavor and color.
* Chocolate Twist: For chocolate lovers, add a tablespoon or two of cocoa powder to the cake batter for a subtle chocolatey undertone. You could even drizzle melted chocolate over the finished cake.
* Individual Servings: Bake the cake in muffin tins for individual servings. This is perfect for parties or for portion control.
I’m so excited for you to try this recipe and experience the joy of creating your own stunning Mimosa Cake. Don’t be intimidated by the layered look it’s much easier than it seems! Remember to take your time, follow the instructions carefully, and most importantly, have fun!
I truly believe that baking should be an enjoyable experience, and this recipe is designed to be just that.
Once you’ve made your own version of this delightful Mimosa Cake, I’d love to hear about your experience! Share your photos and comments on social media using [Your Hashtag] or tag me [Your Social Media Handle]. I can’t wait to see your creations and hear about your variations. Happy baking, and enjoy every delicious bite! Let me know if you have any questions, and I’ll do my best to help. I am confident that this Mimosa Cake will become a family favorite!
Mimosa Cake: The Ultimate Recipe and Baking Guide
A classic Italian Mimosa Cake with light sponge cake layers, creamy pastry cream, and fluffy whipped cream, covered in delicate cake cubes.
Ingredients
- 225g (1 3/4 cups + 2 tablespoons) all-purpose flour
- 225g (1 cup + 1/8 cup) granulated sugar
- 6 large eggs, separated
- 60ml (1/4 cup) warm water
- 1 teaspoon vanilla extract
- 1/4 teaspoon salt
- 1 teaspoon baking powder
- 500ml (2 cups) whole milk
- 120g (1/2 cup + 1 tablespoon) granulated sugar
- 4 large egg yolks
- 40g (1/3 cup) cornstarch
- 1 teaspoon vanilla extract
- 25g (2 tablespoons) unsalted butter
- Pinch of salt
- 500ml (2 cups) heavy cream, cold
- 50g (1/4 cup) powdered sugar
- 1 teaspoon vanilla extract
- 100ml (1/2 cup less 1 tablespoon) water
- 50g (1/4 cup) granulated sugar
- 2 tablespoons orange liqueur (such as Grand Marnier or Cointreau), optional
Instructions
- Preheat oven to 350°F (175°C). Grease and flour a 9-inch (23cm) round cake pan.
- In a large bowl, whisk together the egg yolks and granulated sugar until pale yellow and fluffy (3-5 minutes).
- Gradually add the warm water to the egg yolk mixture, whisking continuously. Then, stir in the vanilla extract.
- In a separate bowl, sift together the all-purpose flour, salt, and baking powder.
- Gradually add the dry ingredients to the wet ingredients, mixing on low speed until just combined. Be careful not to overmix.
- In a clean, grease-free bowl, whisk the egg whites until stiff peaks form.
- Gently fold the egg whites into the batter in two additions. Be careful not to deflate the egg whites.
- Pour the batter into the prepared cake pan and bake for 30-35 minutes, or until a toothpick inserted into the center comes out clean.
- Let the cake cool in the pan for 10 minutes before inverting it onto a wire rack to cool completely.
- In a medium saucepan, heat the milk over medium heat until it is almost boiling. Be careful not to let it boil over.
- In a separate bowl, whisk together the egg yolks and granulated sugar until the mixture is pale yellow and fluffy.
- Whisk in the cornstarch until it is fully incorporated.
- Gradually pour a small amount of the hot milk into the egg yolk mixture, whisking constantly.
- Pour the egg yolk mixture into the saucepan with the remaining hot milk.
- Cook over medium heat, whisking constantly, until the pastry cream thickens and comes to a boil. Continue to cook for 1-2 minutes, whisking constantly, to ensure that the cornstarch is fully cooked.
- Remove the saucepan from the heat and stir in the vanilla extract, butter, and salt.
- Pour the pastry cream into a clean bowl, cover with plastic wrap (pressing the plastic wrap directly onto the surface of the cream to prevent a skin from forming), and refrigerate for at least 2 hours, or until completely cooled.
- Make sure your bowl and whisk attachment are well-chilled.
- In the chilled bowl, combine the heavy cream, powdered sugar, and vanilla extract.
- Whip the cream with an electric mixer on medium speed until stiff peaks form. Be careful not to overwhip.
- Cover and refrigerate the whipped cream until ready to use.
- In a small saucepan, combine the water and granulated sugar.
- Heat over medium heat, stirring constantly, until the sugar is completely dissolved.
- Bring the mixture to a simmer and cook for 1-2 minutes.
- Remove the saucepan from the heat and let the syrup cool completely.
- Stir in the orange liqueur, if using.
- Using a long serrated knife, level the top of the sponge cake.
- Cut the cake horizontally into three layers.
- Take the top layer of the cake and cut it into small cubes (about 1cm or 1/2 inch). Set aside.
- Place the bottom layer of the cake on a serving plate or cake stand. Brush the cake layer generously with the syrup.
- Spread half of the pastry cream evenly over the soaked cake layer.
- Spread half of the whipped cream evenly over the pastry cream.
- Carefully place the second layer of the cake on top of the whipped cream.
- Brush the second cake layer generously with the syrup.
- Spread the remaining pastry cream evenly over the soaked cake layer.
- Spread the remaining whipped cream evenly over the pastry cream.
- You can place the bottom of the top layer on top of the whipped cream, but it is not necessary.
- Cover the entire cake with a thin layer of whipped cream.
- Gently press the cake cubes onto the sides and top of the cake, covering it completely.
- Refrigerate the cake for at least 2 hours before serving.
- Slice and serve the Mimosa cake. Enjoy!
Notes
- Make sure all ingredients are fresh for the best flavor.
- Don’t overmix the sponge cake batter, or it will become tough.
- Chill the pastry cream and whipped cream thoroughly before assembling the cake.
- The orange liqueur in the syrup is optional but adds a lovely flavor.
- Chilling the assembled cake overnight allows the flavors to meld together beautifully.
Leave a Comment