

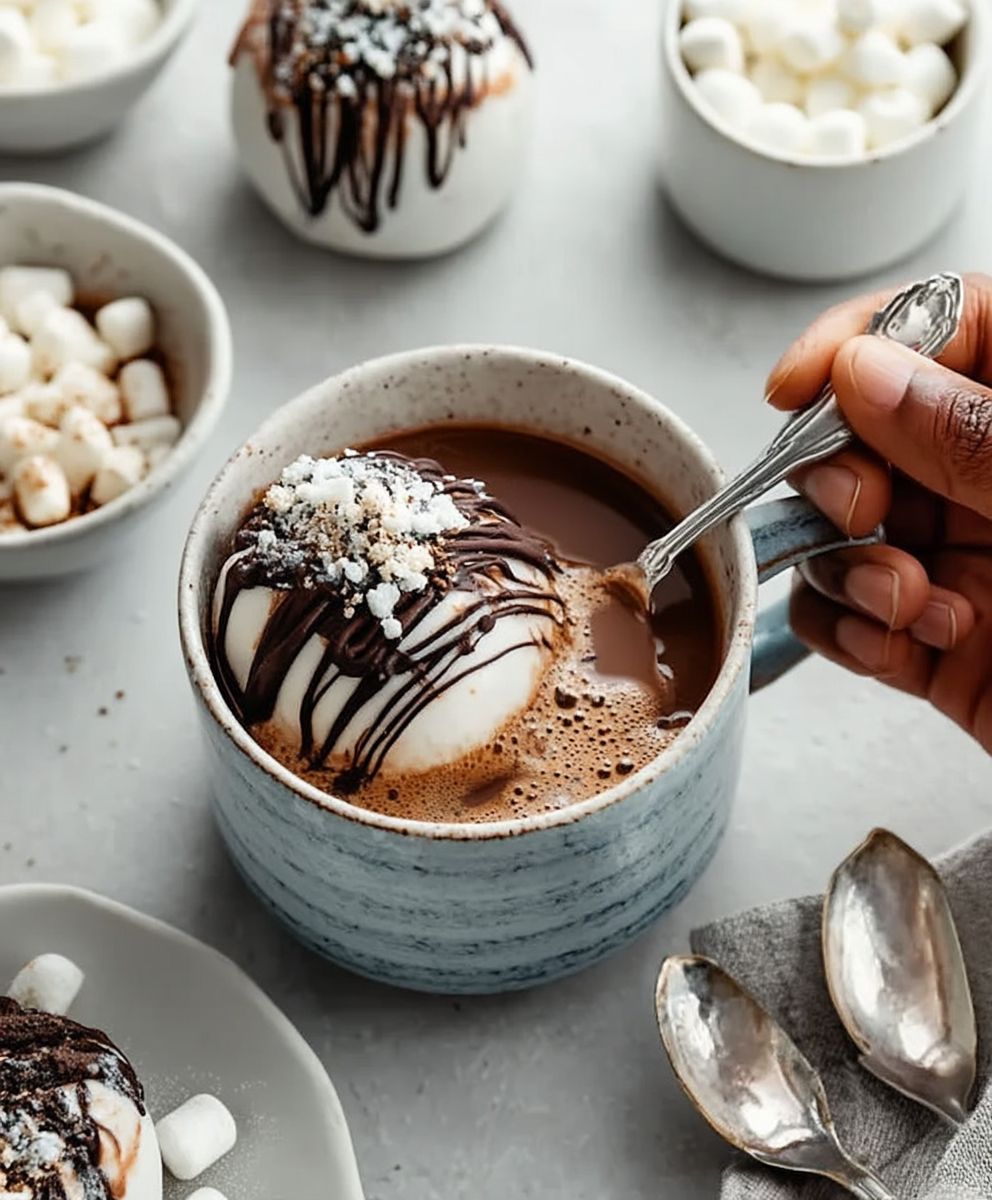
Hot Chocolate Bombs Homemade: Prepare to be amazed! Imagine a decadent sphere of rich, dark chocolate melting away in a mug of warm milk, releasing a flurry of mini marshmallows and a burst of intense chocolate flavor. That’s the magic of homemade hot chocolate bombs, and I’m here to guide you through creating these delightful treats in your own kitchen.
While the exact origins of hot chocolate bombs are a bit hazy, their popularity exploded in recent years, fueled by social media’s love for visually stunning and interactive food experiences. They’re a modern twist on the classic cup of hot cocoa, transforming a simple beverage into a mini-celebration. Think of them as individual servings of pure comfort and joy, perfect for cozy nights in or as delightful gifts for friends and family.
People adore hot chocolate bombs homemade for several reasons. First, they’re incredibly fun to make and even more fun to watch dissolve! The anticipation as the chocolate melts away, revealing the hidden treasures inside, is simply irresistible. Second, they offer a customizable and elevated hot chocolate experience. You can experiment with different types of chocolate, add flavored fillings, and create unique flavor combinations to suit your personal preferences. Finally, they are incredibly delicious! The combination of rich chocolate, creamy milk, and fluffy marshmallows creates a symphony of textures and flavors that’s guaranteed to warm you from the inside out. So, let’s dive in and learn how to make these enchanting treats!

Ingredients:
- For the Chocolate Shells:
- 12 ounces high-quality chocolate (dark, milk, or white, or a combination), finely chopped
- 1 tablespoon vegetable shortening (optional, for smoother melting)
- For the Hot Chocolate Mix:
- 1 cup powdered milk
- ½ cup granulated sugar
- ¼ cup unsweetened cocoa powder
- ¼ teaspoon salt
- ½ teaspoon cornstarch (optional, for a thicker hot chocolate)
- For the Fillings:
- 1 cup mini marshmallows
- ¼ cup chocolate chips (same type as the shell, or different!)
- ¼ cup crushed peppermint candies (optional, for a festive touch)
- ¼ cup caramel bits (optional, for a sweet surprise)
- Sprinkles (optional, for decoration)
- Equipment:
- Silicone sphere molds (2-inch diameter recommended)
- Microwave-safe bowls
- Spoon or spatula
- Baking sheet lined with parchment paper
- Small saucepan or double boiler (optional, for melting chocolate)
- Piping bag or Ziploc bag (optional, for decorating)
Preparing the Chocolate Shells:
Okay, let’s get started with the most important part the chocolate shells! This is where the magic happens, and it’s easier than you might think. The key is to melt the chocolate properly and work quickly.
- Melt the Chocolate:
Place the finely chopped chocolate and vegetable shortening (if using) in a microwave-safe bowl. Microwave in 30-second intervals, stirring well after each interval, until the chocolate is almost completely melted. Be careful not to overheat the chocolate, as it can seize up and become grainy. If you prefer, you can melt the chocolate in a double boiler over simmering water, stirring constantly until smooth.
Important Tip: Even after the chocolate looks mostly melted, keep stirring! The residual heat will melt the remaining pieces, preventing overheating.
- Tempering the Chocolate (Optional but Recommended):
Tempering the chocolate will give your bombs a beautiful shine and a satisfying snap. If you want to skip this step, that’s totally fine, but your shells might be a little softer and less glossy. Here’s a simple method:
- Melt about two-thirds of the chocolate as described above.
- Remove the bowl from the heat (or microwave).
- Add the remaining one-third of the chopped chocolate to the melted chocolate.
- Stir constantly until all the chocolate is melted and the mixture is smooth. This process helps to cool the chocolate down and stabilize the cocoa butter crystals.
- Coat the Molds:
Using a spoon or spatula, generously coat the inside of each silicone sphere mold with the melted chocolate. Make sure to cover the entire surface evenly, paying special attention to the edges. You want a nice, thick layer of chocolate to create a sturdy shell. If the chocolate is too thin, the shells will be fragile and prone to breaking.
Pro Tip: Use the back of a spoon to spread the chocolate up the sides of the mold. This helps to create an even coating.
- Chill the First Layer:
Place the filled molds on a baking sheet lined with parchment paper and transfer them to the refrigerator or freezer for about 5-10 minutes, or until the chocolate is set. The chocolate should be firm to the touch.
- Add a Second Layer (If Needed):
Remove the molds from the refrigerator or freezer. If you notice any thin spots or holes in the chocolate shells, add a second layer of melted chocolate, repeating the coating process. This will ensure that your shells are strong enough to hold the hot chocolate mix and fillings.
- Chill Again:
Return the molds to the refrigerator or freezer for another 5-10 minutes, or until the second layer of chocolate is completely set.
- Remove the Shells from the Molds:
Once the chocolate is firm and set, gently flex the silicone molds to release the chocolate shells. Start by pulling the edges of the mold away from the chocolate, then carefully push the shell out from the bottom. Be patient and gentle to avoid breaking the shells.
Troubleshooting: If the shells are sticking, try placing the molds back in the freezer for a few more minutes. The cold will help the chocolate contract and release more easily.
- Trim the Edges (Optional):
If the edges of the chocolate shells are uneven or have excess chocolate, you can gently trim them with a warm knife or a small offset spatula. This will help the two halves fit together more seamlessly.
Preparing the Hot Chocolate Mix:
While the chocolate shells are chilling, let’s whip up the hot chocolate mix. This is super simple and you can customize it to your liking!
- Combine the Dry Ingredients:
In a medium bowl, whisk together the powdered milk, granulated sugar, unsweetened cocoa powder, salt, and cornstarch (if using). Make sure there are no lumps in the cocoa powder.
Flavor Boost: For a richer flavor, you can add a pinch of cinnamon, nutmeg, or espresso powder to the hot chocolate mix.
- Store the Mix (Optional):
If you’re not ready to assemble the hot chocolate bombs right away, you can store the hot chocolate mix in an airtight container at room temperature for up to several weeks.
Assembling the Hot Chocolate Bombs:
Now for the fun part putting everything together! This is where you can get creative with your fillings and decorations.
- Fill the Shells:
Take half of the chocolate shells and fill them with the hot chocolate mix, mini marshmallows, chocolate chips, crushed peppermint candies, caramel bits, and any other fillings you desire. Don’t overfill the shells, as you need to leave room for the other half to fit on top.
Filling Ideas: Get creative with your fillings! Try adding peanut butter chips, chopped nuts, dried fruit, or even a small piece of fudge.
- Seal the Bombs:
Gently warm the edges of the remaining chocolate shells by placing them on a warm plate or holding them over a heat source for a few seconds. This will slightly melt the chocolate and help them adhere to the filled shells.
Carefully place the warmed shell on top of a filled shell, aligning the edges. Gently press the two halves together to seal the bomb. You can use a small amount of melted chocolate to help seal any gaps.
Sealing Tip: If you’re having trouble sealing the bombs, try using a warm spoon to smooth the edges and melt the chocolate together.
- Decorate (Optional):
Once the bombs are sealed, you can decorate them with melted chocolate, sprinkles, edible glitter, or any other decorations you like. Use a piping bag or Ziploc bag with a small hole cut in the corner to drizzle melted chocolate over the bombs. Immediately sprinkle with your desired decorations before the chocolate sets.
Decoration Ideas: Drizzle with white chocolate and sprinkle with crushed peppermint candies for a festive holiday look. Or, drizzle with caramel and sprinkle with sea salt for a sweet and salty treat.
- Chill Again (Optional):
If you’ve added decorations, place the finished hot chocolate bombs on a baking sheet lined with parchment paper and transfer them to the refrigerator for a few minutes to allow the decorations to set.
Using Your Hot Chocolate Bombs:
Finally, the moment you’ve been waiting for enjoying your homemade hot chocolate bombs!
- Heat the Milk:
Heat 1 cup of milk (dairy or non-dairy) in a mug in the microwave or on the stovetop until it’s hot but not boiling.
- Drop in the Bomb:
Carefully drop one hot chocolate bomb into the hot milk
Conclusion:
So, there you have it! These Hot Chocolate Bombs Homemade are more than just a drink; they’re an experience, a little burst of joy waiting to happen in your favorite mug. I truly believe this recipe is a must-try, and here’s why: it’s incredibly fun to make, surprisingly simple once you get the hang of tempering chocolate (don’t be intimidated!), and the payoff is absolutely delightful. Imagine the look on someone’s face whether it’s a child or a child at heart as they watch that chocolate sphere melt away, releasing a cloud of cocoa and marshmallows. It’s pure magic!
Beyond the sheer entertainment value, these hot chocolate bombs offer a level of customization you just can’t get with store-bought versions. You control the quality of the chocolate, the type of cocoa, and the fillings. Want a richer, darker chocolate experience? Use a higher percentage cacao. Prefer milk chocolate? Go for it! The possibilities are endless. And speaking of possibilities, let’s talk about serving suggestions and variations.
Serving Suggestions & Variations:
- Classic Comfort: Simply drop one bomb into a mug of hot milk (dairy or non-dairy works perfectly!). Stir gently until everything is melted and combined. Top with extra marshmallows, whipped cream, or a sprinkle of chocolate shavings.
- Peppermint Perfection: Add a few crushed peppermint candies to the inside of the bomb along with the cocoa and marshmallows. The peppermint flavor adds a refreshing twist to the classic hot chocolate.
- Mocha Magic: Incorporate a teaspoon of instant coffee or espresso powder into the cocoa mixture for a mocha-flavored bomb. This is perfect for coffee lovers!
- Salted Caramel Delight: Drizzle a little caramel sauce inside the bomb before adding the cocoa and marshmallows. A pinch of sea salt on top of the finished drink elevates the flavor even further.
- Spiced Hot Chocolate: Add a pinch of cinnamon, nutmeg, or even a tiny bit of cayenne pepper to the cocoa mixture for a warm and spicy kick.
- Adult Indulgence: For a grown-up treat, add a splash of your favorite liqueur, such as Baileys Irish Cream or Kahlua, to the hot milk before dropping in the bomb.
- Presentation is Key: Package your homemade hot chocolate bombs in individual cellophane bags tied with ribbon for a beautiful and thoughtful gift. You can even add a small tag with instructions on how to use them.
I’ve tried all of these variations myself, and each one is a winner in its own right. Don’t be afraid to experiment and create your own unique flavor combinations! Think about what you love in a hot chocolate and let that guide your creativity. Maybe you’re a fan of hazelnut, or perhaps you adore the taste of orange and chocolate together. The only limit is your imagination.
But the best part of all this? Sharing these Hot Chocolate Bombs Homemade with the people you care about. Imagine gathering around a cozy fireplace on a cold winter evening, each person enjoying their own personalized hot chocolate creation. It’s moments like these that make life truly special. So, I urge you, give this recipe a try. It might seem a little daunting at first, but I promise you, it’s worth the effort. And once you’ve mastered the art of hot chocolate bomb making, you’ll be hooked!
I’m so excited for you to embark on this delicious adventure. And most importantly, I want to hear about your experience! Did you try any of the variations I suggested? Did you come up with your own creative flavor combinations? What was the reaction of your friends and family when they watched your hot chocolate bomb explode? Please, share your stories and photos in the comments below. I can’t wait to see what you create! Happy bomb-making!
Hot Chocolate Bombs Homemade: The Ultimate Guide to Delicious DIY Treats
Homemade hot chocolate bombs filled with rich hot chocolate mix, marshmallows, and your favorite toppings melt into a decadent cup of hot cocoa.
Ingredients
- 12 ounces high-quality chocolate (dark, milk, or white, or a combination), finely chopped
- 1 tablespoon vegetable shortening (optional, for smoother melting)
- 1 cup powdered milk
- ½ cup granulated sugar
- ¼ cup unsweetened cocoa powder
- ¼ teaspoon salt
- ½ teaspoon cornstarch (optional, for a thicker hot chocolate)
- 1 cup mini marshmallows
- ¼ cup chocolate chips (same type as the shell, or different!)
- ¼ cup crushed peppermint candies (optional, for a festive touch)
- ¼ cup caramel bits (optional, for a sweet surprise)
- Sprinkles (optional, for decoration)
Instructions
- Place the finely chopped chocolate and vegetable shortening (if using) in a microwave-safe bowl. Microwave in 30-second intervals, stirring well after each interval, until the chocolate is almost completely melted. Be careful not to overheat the chocolate. Alternatively, melt in a double boiler over simmering water, stirring constantly until smooth.
- Melt about two-thirds of the chocolate as described above. Remove from heat and add the remaining one-third of chopped chocolate. Stir constantly until all chocolate is melted and smooth.
- Using a spoon or spatula, generously coat the inside of each silicone sphere mold with the melted chocolate. Cover the entire surface evenly, paying special attention to the edges.
- Place the filled molds on a baking sheet lined with parchment paper and transfer them to the refrigerator or freezer for about 5-10 minutes, or until the chocolate is set.
- Remove the molds from the refrigerator or freezer. If you notice any thin spots or holes, add a second layer of melted chocolate, repeating the coating process.
- Return the molds to the refrigerator or freezer for another 5-10 minutes, or until the second layer of chocolate is completely set.
- Gently flex the silicone molds to release the chocolate shells. Start by pulling the edges of the mold away from the chocolate, then carefully push the shell out from the bottom.
- If the edges of the chocolate shells are uneven or have excess chocolate, you can gently trim them with a warm knife or a small offset spatula.
- In a medium bowl, whisk together the powdered milk, granulated sugar, unsweetened cocoa powder, salt, and cornstarch (if using). Make sure there are no lumps in the cocoa powder.
- If you’re not ready to assemble the hot chocolate bombs right away, you can store the hot chocolate mix in an airtight container at room temperature for up to several weeks.
- Take half of the chocolate shells and fill them with the hot chocolate mix, mini marshmallows, chocolate chips, crushed peppermint candies, caramel bits, and any other fillings you desire. Don’t overfill the shells, as you need to leave room for the other half to fit on top.
- Gently warm the edges of the remaining chocolate shells by placing them on a warm plate or holding them over a heat source for a few seconds. Carefully place the warmed shell on top of a filled shell, aligning the edges. Gently press the two halves together to seal the bomb. You can use a small amount of melted chocolate to help seal any gaps.
- Once the bombs are sealed, you can decorate them with melted chocolate, sprinkles, edible glitter, or any other decorations you like. Use a piping bag or Ziploc bag with a small hole cut in the corner to drizzle melted chocolate over the bombs. Immediately sprinkle with your desired decorations before the chocolate sets.
- If you’ve added decorations, place the finished hot chocolate bombs on a baking sheet lined with parchment paper and transfer them to the refrigerator for a few minutes to allow the decorations to set.
- Heat 1 cup of milk (dairy or non-dairy) in a mug in the microwave or on the stovetop until it’s hot but not boiling.
- Carefully drop one hot chocolate bomb into the hot milk.
Notes
- Tempering the chocolate is optional but recommended for a shiny and snappy shell.
- Be careful not to overheat the chocolate when melting.
- Get creative with your fillings and decorations!
- If the shells are sticking to the molds, try placing them back in the freezer for a few more minutes.
- Store the hot chocolate mix in an airtight container at room temperature for up to several weeks.
Leave a Comment