

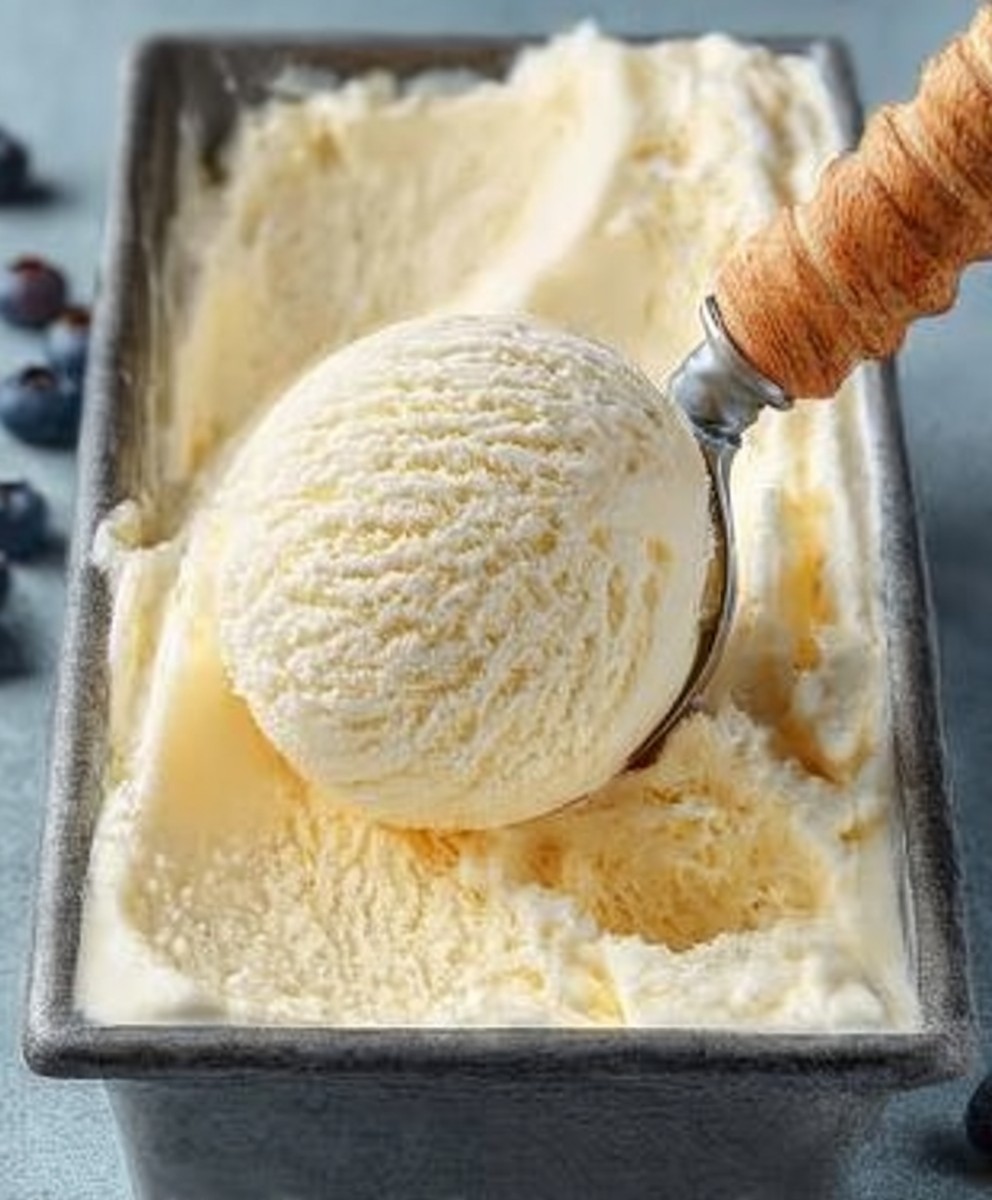
Vanilla Ice Cream: Is there anything more classic, more universally loved, than a scoop of creamy, dreamy vanilla ice cream? I think not! From childhood memories of chasing down the ice cream truck to elegant desserts at fancy restaurants, this frozen treat holds a special place in our hearts (and stomachs!). But forget the store-bought stuff I’m going to show you how incredibly easy it is to make the most decadent, flavorful vanilla ice cream right in your own kitchen.
While its exact origins are debated, ice cream-like desserts have been enjoyed for centuries, with early versions appearing in royal courts across Europe. The introduction of vanilla, with its exotic and alluring aroma, elevated ice cream to a whole new level of sophistication. Today, vanilla remains the most popular ice cream flavor worldwide, and for good reason!
People adore vanilla ice cream for its simple elegance and incredible versatility. Its smooth, velvety texture and delicate sweetness make it the perfect blank canvas for countless toppings and pairings. Whether you enjoy it on its own, swirled into a milkshake, or as the perfect complement to a warm slice of pie, vanilla ice cream is a timeless indulgence that never fails to satisfy. So, grab your ingredients, and let’s get churning!

Ingredients:
- 2 cups heavy cream (at least 36% milkfat)
- 1 cup whole milk
- ¾ cup granulated sugar
- 1 vanilla bean, split lengthwise and seeds scraped (or 2 teaspoons pure vanilla extract)
- Pinch of salt
Preparing the Vanilla Base:
- Infuse the Cream with Vanilla: In a medium saucepan, combine the heavy cream, whole milk, sugar, and salt. If using a vanilla bean, add both the scraped seeds and the pod to the saucepan. This will give us the most intense vanilla flavor. Place the saucepan over medium heat and stir constantly until the sugar is completely dissolved. You don’t want any gritty sugar left at the bottom!
- Heat the Mixture: Continue heating the mixture, stirring occasionally, until it is steaming and just begins to simmer around the edges. Be careful not to let it boil! Boiling can change the texture of the ice cream and we want a smooth, creamy result. If you’re using a thermometer, aim for a temperature of around 170-175°F (77-79°C). This gentle heating helps to dissolve the sugar completely and infuse the cream with the vanilla flavor.
- Steep the Vanilla (Optional, but Recommended): Remove the saucepan from the heat. If you used a vanilla bean, cover the saucepan and let the mixture steep for at least 30 minutes, or even up to an hour, for a more intense vanilla flavor. The longer it steeps, the more vanilla goodness will be extracted. If you’re using vanilla extract, you’ll add it later, so skip this step.
- Strain the Mixture: If you used a vanilla bean, strain the mixture through a fine-mesh sieve into a clean bowl. This will remove the vanilla bean pod and any small particles, ensuring a perfectly smooth ice cream base. Discard the vanilla bean pod (or rinse and dry it for other uses, like flavoring sugar!).
- Add Vanilla Extract (If Using): If you’re using vanilla extract instead of a vanilla bean, stir it into the strained (or unstrained, if you didn’t use a bean) cream mixture now.
- Chill the Base: This is a crucial step! Cover the bowl tightly with plastic wrap, pressing the plastic wrap directly onto the surface of the cream mixture to prevent a skin from forming. Refrigerate the mixture for at least 4 hours, or preferably overnight. The colder the base, the better the ice cream will churn. Chilling allows the fat molecules to solidify, resulting in a smoother, creamier texture.
Churning the Ice Cream:
- Prepare Your Ice Cream Maker: Make sure your ice cream maker bowl is completely frozen according to the manufacturer’s instructions. This usually means freezing it for at least 24 hours. A properly frozen bowl is essential for successful ice cream making. If the bowl isn’t cold enough, the ice cream won’t freeze properly.
- Pour in the Base: Remove the chilled vanilla base from the refrigerator and pour it into the frozen ice cream maker bowl.
- Churn According to Instructions: Turn on the ice cream maker and churn the mixture according to the manufacturer’s instructions. This usually takes about 20-25 minutes, but it can vary depending on your machine. The ice cream is ready when it has thickened to the consistency of soft-serve ice cream. It should be thick and creamy, but still slightly soft.
- Check the Consistency: Keep an eye on the ice cream as it churns. You want it to be thick and creamy, but not too hard. If it churns for too long, it can become grainy. If it’s not churning properly, double-check that your ice cream maker bowl was fully frozen.
Freezing and Serving:
- Transfer to a Freezer-Safe Container: Once the ice cream has reached the soft-serve consistency, carefully transfer it to a freezer-safe container. A loaf pan or a plastic container with a tight-fitting lid works well.
- Press Plastic Wrap (Optional): For extra protection against ice crystals, you can press a piece of plastic wrap directly onto the surface of the ice cream before covering the container with the lid.
- Freeze to Harden: Freeze the ice cream for at least 2-3 hours, or preferably longer, to allow it to harden completely. This will give it a scoopable consistency.
- Scoop and Serve: When you’re ready to serve, remove the ice cream from the freezer and let it sit at room temperature for a few minutes to soften slightly. This will make it easier to scoop.
- Enjoy! Scoop the vanilla ice cream into bowls or cones and enjoy! You can serve it plain or top it with your favorite toppings, such as chocolate sauce, sprinkles, fruit, or nuts.
Tips and Variations:
- Use High-Quality Ingredients: The quality of your ingredients will directly impact the flavor of your ice cream. Use fresh, high-quality heavy cream and whole milk for the best results.
- Don’t Skip the Chilling Step: Chilling the base is essential for a smooth and creamy texture. Don’t be tempted to skip this step!
- Adjust Sweetness to Taste: If you prefer a sweeter ice cream, you can add a little more sugar. Start with a small amount and taste as you go.
- Add Flavorings: Get creative with your flavorings! You can add other extracts, such as almond or peppermint, or stir in chocolate chips, chopped nuts, or fruit purees after churning.
- Make it Vegan: For a vegan version, substitute the heavy cream and whole milk with coconut cream and almond milk.
- Troubleshooting: If your ice cream is icy, it could be due to not chilling the base long enough or not using enough fat. If it’s grainy, it could be due to over-churning.
- Storage: Homemade ice cream is best enjoyed within a week or two. Store it in an airtight container in the freezer to prevent freezer burn.
Detailed Explanation of Key Steps:
Why is chilling the base so important?
Chilling the ice cream base is arguably the most critical step in the entire process. Here’s why: When the base is chilled, the fat molecules in the cream solidify. This solidification is crucial for creating a smooth and creamy texture. When the mixture is churned, these solidified fat molecules trap air, creating the light and airy texture we associate with good ice cream. If the base isn’t cold enough, the fat molecules won’t solidify properly, and the ice cream will be icy and less creamy.
The Role of the Vanilla Bean (or Extract):
Vanilla is the star of this recipe, so it’s important to use a good quality vanilla bean or extract. A vanilla bean will give you the most intense and complex vanilla flavor. The seeds are where most of the flavor is concentrated, but the pod itself also contains flavor compounds. That’s why we steep the pod in the cream mixture. If you’re using vanilla extract, make sure it’s pure vanilla extract, not imitation vanilla flavoring. Pure vanilla extract is made from vanilla beans and has a much richer and more authentic flavor.
Understanding the Churning Process:
The churning process is what transforms the liquid ice cream base into the frozen treat we all love. The ice cream maker works by constantly agitating the mixture while simultaneously freezing it. This agitation prevents large ice crystals from forming, resulting in a smooth and creamy texture. The churning also incorporates air into the mixture, which contributes to the light and airy texture. The amount of time it takes to churn the ice cream will vary depending on your ice cream maker and the temperature of your freezer. You’ll know the ice cream is ready when it has thickened to the consistency of soft-serve ice cream.
Preventing Ice Crystals:
One of the biggest challenges in making homemade ice cream is preventing ice crystals from forming. Ice crystals can make the ice cream grainy and unpleasant to eat. Here are a few tips for preventing ice crystals:
- Chill the base thoroughly: As mentioned earlier, chilling the base is crucial for preventing ice crystals.
- Use a high-fat content: The fat in the cream helps to prevent ice crystals from forming. That’s why it’s important to use heavy cream with a high milkfat content.
- Add a stabilizer (optional): Some recipes call for stabilizers, such as cornstarch or gelatin, to help prevent ice crystals. However, these are not necessary if you follow the other tips.
- Store the ice cream properly: Store the ice cream in an airtight container in the freezer to prevent freezer burn and ice crystal formation.
Serving Suggestions:
<
Conclusion:
And there you have it! This Vanilla Ice Cream recipe isn’t just another dessert; it’s a gateway to creamy, dreamy deliciousness that you can whip up right in your own kitchen. Forget the store-bought stuff loaded with artificial flavors and preservatives. This is the real deal: pure, simple, and utterly satisfying. I truly believe that once you taste the difference, you’ll never go back.
Why is this a must-try? Because it’s incredibly easy, even for beginner ice cream makers. The ingredient list is short and sweet, focusing on quality rather than complexity. And the result? A luxuriously smooth and intensely flavorful vanilla ice cream that will have everyone begging for seconds. Its the perfect blank canvas for all your dessert dreams.
But the fun doesn’t stop there! This recipe is incredibly versatile. Looking for serving suggestions? Oh, I have plenty! A classic scoop on top of a warm brownie is always a winner. Or how about pairing it with a slice of homemade apple pie? The warm spices of the pie combined with the cool, creamy vanilla is a match made in heaven. For a more sophisticated treat, try drizzling it with balsamic glaze and a sprinkle of sea salt. Trust me, the sweet and savory combination is surprisingly addictive.
And if you’re feeling adventurous, let’s talk variations! Want to add a little crunch? Stir in some chopped nuts, like toasted pecans or walnuts, during the last few minutes of churning. Craving something fruity? Fold in fresh berries, like raspberries or blueberries, after the ice cream is finished churning. For a chocolate lover’s dream, swirl in some melted dark chocolate or add chocolate chips. You could even infuse the cream with different flavors, like lavender or cardamom, for a truly unique and unforgettable ice cream experience. Think about adding a splash of bourbon or rum for an adult twist! The possibilities are truly endless.
Serving Suggestions:
- On top of warm brownies or apple pie
- Drizzled with balsamic glaze and sea salt
- Paired with fresh fruit, like berries or peaches
- As part of an ice cream sundae with all your favorite toppings
- Alongside a slice of warm cobbler
Vanilla Ice Cream Variations:
- Add chopped nuts (pecans, walnuts, almonds)
- Fold in fresh berries (raspberries, blueberries, strawberries)
- Swirl in melted chocolate or add chocolate chips
- Infuse the cream with lavender, cardamom, or other spices
- Add a splash of bourbon or rum
- Make it vegan with coconut cream and plant-based milk
I’m so excited for you to try this recipe and discover the joy of homemade Vanilla Ice Cream. It’s a simple pleasure that brings so much happiness. Don’t be intimidated it’s easier than you think! And once you taste the difference between homemade and store-bought, you’ll be hooked.
So, grab your ingredients, dust off your ice cream maker, and get ready to create some magic in your kitchen. I can’t wait to hear about your experience! Please, share your photos and tell me about your favorite variations in the comments below. Did you try a unique flavor combination? Did you serve it with a special dessert? I want to know all about it! Happy ice cream making! Let me know what you think, and if you have any questions, don’t hesitate to ask. I’m here to help you every step of the way. Enjoy!
Vanilla Ice Cream: The Ultimate Guide to Flavors, Recipes, and More
Rich and creamy homemade vanilla ice cream, made with fresh ingredients and infused with real vanilla bean for an unforgettable flavor.
Ingredients
- 2 cups heavy cream (at least 36% milkfat)
- 1 cup whole milk
- ¾ cup granulated sugar
- 1 vanilla bean, split lengthwise and seeds scraped (or 2 teaspoons pure vanilla extract)
- Pinch of salt
Instructions
- In a medium saucepan, combine the heavy cream, whole milk, sugar, and salt. If using a vanilla bean, add both the scraped seeds and the pod to the saucepan. Place the saucepan over medium heat and stir constantly until the sugar is completely dissolved.
- Continue heating the mixture, stirring occasionally, until it is steaming and just begins to simmer around the edges. Be careful not to let it boil! If you’re using a thermometer, aim for a temperature of around 170-175°F (77-79°C).
- Remove the saucepan from the heat. If you used a vanilla bean, cover the saucepan and let the mixture steep for at least 30 minutes, or even up to an hour, for a more intense vanilla flavor. If you’re using vanilla extract, you’ll add it later, so skip this step.
- If you used a vanilla bean, strain the mixture through a fine-mesh sieve into a clean bowl. Discard the vanilla bean pod (or rinse and dry it for other uses, like flavoring sugar!).
- If you’re using vanilla extract instead of a vanilla bean, stir it into the strained (or unstrained, if you didn’t use a bean) cream mixture now.
- Cover the bowl tightly with plastic wrap, pressing the plastic wrap directly onto the surface of the cream mixture to prevent a skin from forming. Refrigerate the mixture for at least 4 hours, or preferably overnight.
- Make sure your ice cream maker bowl is completely frozen according to the manufacturer’s instructions. This usually means freezing it for at least 24 hours.
- Remove the chilled vanilla base from the refrigerator and pour it into the frozen ice cream maker bowl.
- Turn on the ice cream maker and churn the mixture according to the manufacturer’s instructions. This usually takes about 20-25 minutes, but it can vary depending on your machine. The ice cream is ready when it has thickened to the consistency of soft-serve ice cream.
- Keep an eye on the ice cream as it churns. You want it to be thick and creamy, but not too hard. If it churns for too long, it can become grainy. If it’s not churning properly, double-check that your ice cream maker bowl was fully frozen.
- Once the ice cream has reached the soft-serve consistency, carefully transfer it to a freezer-safe container. A loaf pan or a plastic container with a tight-fitting lid works well.
- For extra protection against ice crystals, you can press a piece of plastic wrap directly onto the surface of the ice cream before covering the container with the lid.
- Freeze the ice cream for at least 2-3 hours, or preferably longer, to allow it to harden completely. This will give it a scoopable consistency.
- When you’re ready to serve, remove the ice cream from the freezer and let it sit at room temperature for a few minutes to soften slightly. This will make it easier to scoop.
- Enjoy! Scoop the vanilla ice cream into bowls or cones and enjoy! You can serve it plain or top it with your favorite toppings, such as chocolate sauce, sprinkles, fruit, or nuts.
Notes
- Use high-quality ingredients for the best flavor.
- Don’t skip the chilling step; it’s essential for a smooth and creamy texture.
- Adjust sweetness to taste.
- Get creative with flavorings by adding extracts, chocolate chips, nuts, or fruit purees after churning.
- For a vegan version, substitute heavy cream and whole milk with coconut cream and almond milk.
- Homemade ice cream is best enjoyed within a week or two. Store it in an airtight container in the freezer to prevent freezer burn.
- Chilling the ice cream base is arguably the most critical step in the entire process. When the base is chilled, the fat molecules in the cream solidify. This solidification is crucial for creating a smooth and creamy texture.
- Vanilla is the star of this recipe, so it’s important to use a good quality vanilla bean or extract. A vanilla bean will give you the most intense and complex vanilla flavor.
- The churning process is what transforms the liquid ice cream base into the frozen treat we all love. The ice cream maker works by constantly agitating the mixture while simultaneously freezing it. This agitation prevents large ice crystals from forming, resulting in a smooth and creamy texture.
- One of the biggest challenges in making homemade ice cream is preventing ice crystals from forming. Ice crystals can make the ice cream grainy and unpleasant to eat.

Leave a Comment